Tripo-ComfyUI Plugin 終極指南:從安裝到完整使用
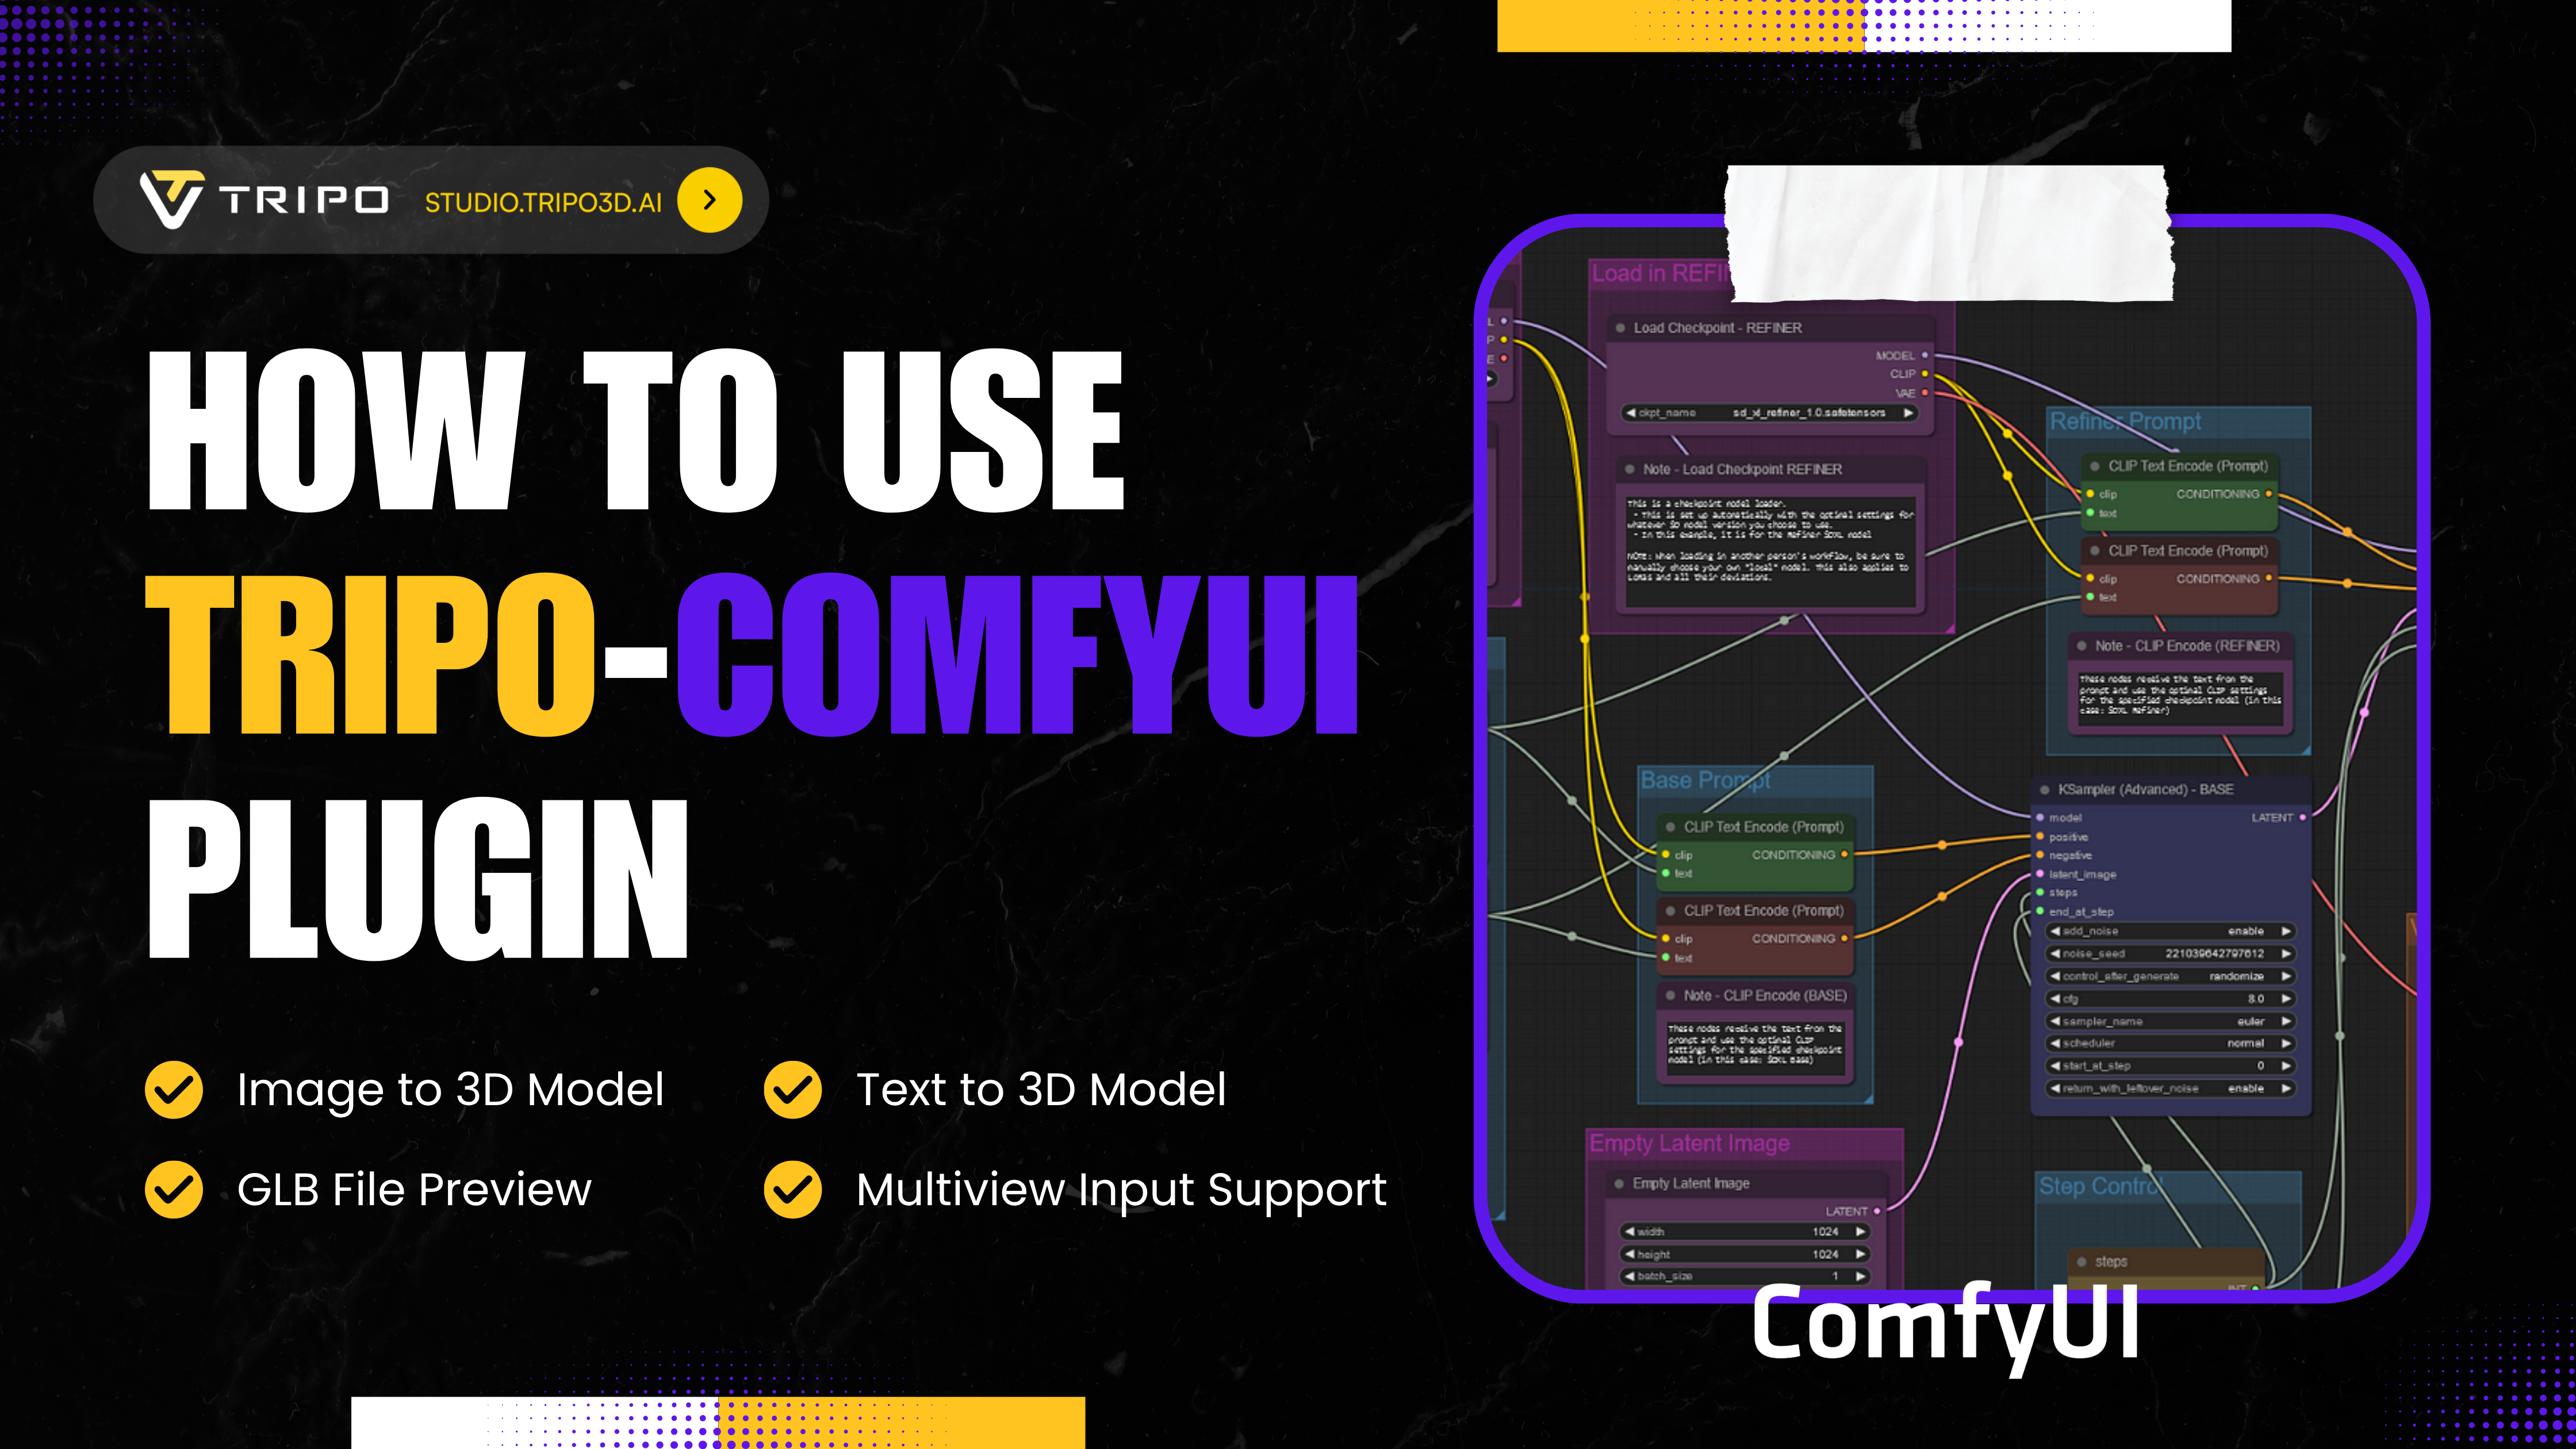
你準備好革新你的 3D modeling workflow 了嗎?Tripo-ComfyUI plugin 將強大的 AI 3D model 生成能力直接帶入多功能的 ComfyUI 環境,打造一個端到端的製作工作室,改變你建立 3D assets 的方式。
在這份完整指南中,我們將探索從基本設定到進階 workflows 的所有內容,幫助你以前所未有的速度與彈性生成專業品質的 3D models。
3D 創作的新時代
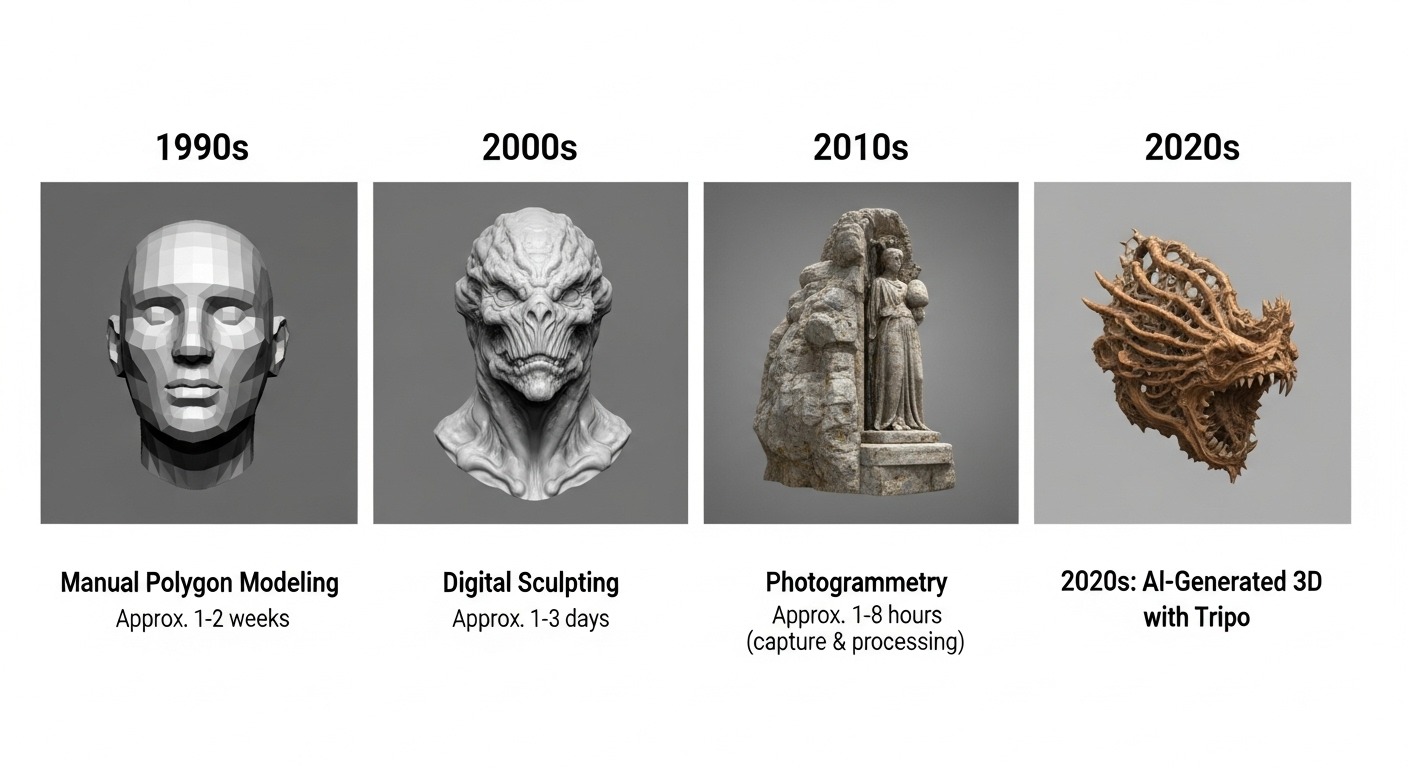
3D 內容創作的世界正經歷劇烈轉變,而 AI 3D model generators 正站在這場革命的最前線。過去需要多年專業訓練的工具,如今正變得人人都能使用。Tripo AI 已成為此領域的領導者,提供強大平台,可透過簡單的文字 prompts 或 images 生成高品質 3D models。
當這項突破性技術整合到 ComfyUI 靈活的 node-based 環境中時,真正特別的事情就發生了。Tripo-ComfyUI plugin 在你最喜愛的 workflow 工具中,直接建立一個完整的端到端 3D 製作工作室。這個強大的組合讓你能從概念到完成 asset,全程不必離開你的創作流程。
你可以用 Tripo-ComfyUI Plugin 做什麼
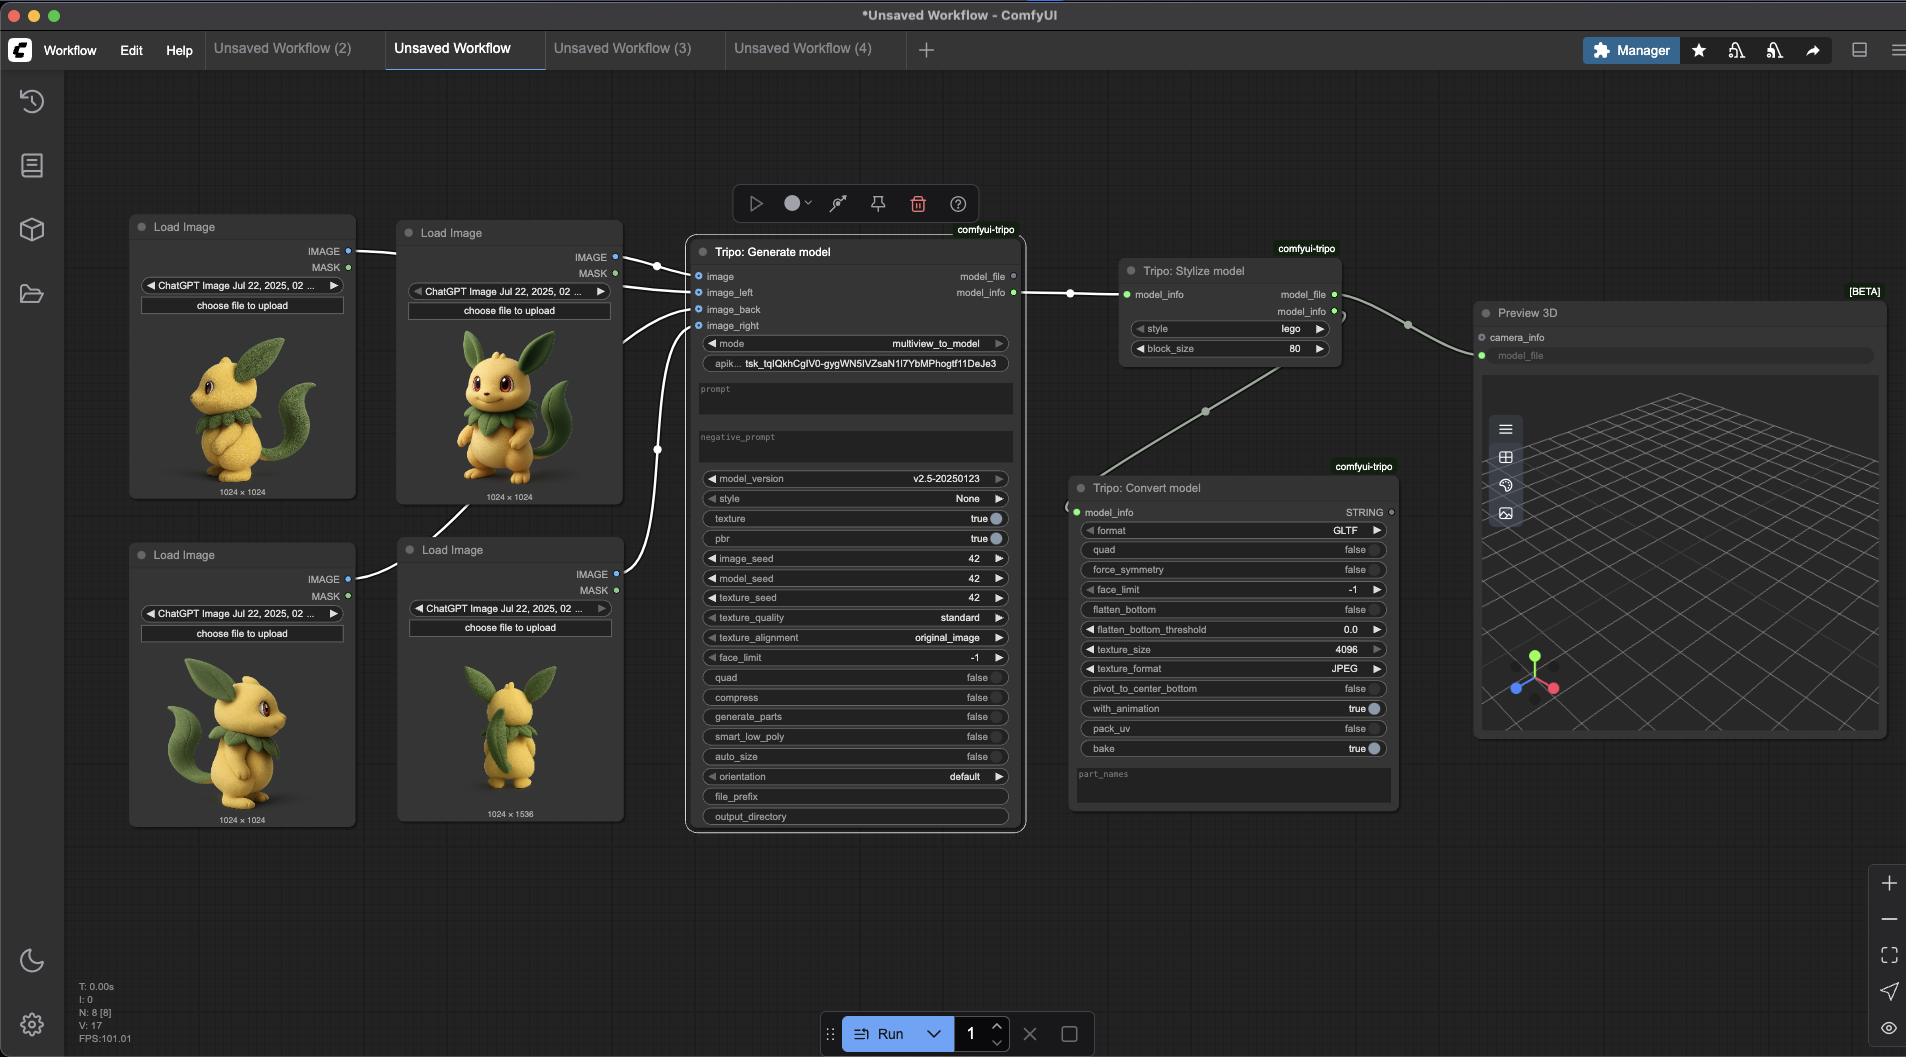
從本質上說,這個 plugin 為你的 ComfyUI toolbox 加入了一整套強大的 3D 工具。這些 nodes 可以串接在一起建立精密的 pipelines,讓你能從一個簡單想法走到完整實現的 3D asset。以下是你可使用的核心能力:
從任何輸入生成 3D Models
幾秒內從概念變成 3D。你可以從文字描述建立 models(text to 3D)、從單張 reference image 重建為 3D,或透過提供多角度 images(multiview to 3D)來達到更高真實度。
精修並強化幾何結構
你的第一次生成不必是最後一次。有了專用的 refinement nodes,你可以拿一個基本的「draft」model,自動提升其細節、平滑表面,並增強整體品質。
建立並套用進階 Textures
用高品質 textures 為你的 models 注入生命。這個 plugin 可讓你從文字 prompts 或 style images 生成並套用 materials,甚至支援 PBR(Physically-Based Rendering)textures,打造能正確對光線產生反應的超寫實表面。
自動化 Rigging 與 Animation
傳統上耗時的角色骨架建立流程(「rigging」)現在已自動化。你可以為 model 生成可用的 rig,甚至只需幾次點擊即可套用「idle」或「walk」等 preset animations。
透過 Stylization 與 Conversion 實現任何外觀
你的創意不受單一風格限制。將 model 外觀轉換成看起來像 Lego bricks、clay 等材質。完成後,Convert model node 可讓你將作品匯出為任何業界標準格式,包括 OBJ、FBX、GLTF,以及 3D printing 最受歡迎的 STL。
智慧分割並編輯 Models
為了達到極致控制,plugin 可以自動分析 model,並將其拆分成邏輯部件——例如分離角色的 helmet、armor 和 clothing。這讓你能對個別區塊套用不同 materials 或進行精準編輯。
既然你已了解可能性,接下來讓我們深入看看如何設定這套強大的工具組並開始創作。
開始使用:安裝與設定指南
本節將帶你完成整個流程,從安裝 plugin 到建立你的第一個進階 workflow。
步驟 1:安裝 Tripo-ComfyUI Plugin
建議使用 ComfyUI-Manager 進行安裝,因為它會自動處理 dependencies:
- 在你的 ComfyUI 介面中,點擊「Manager」按鈕
- 選擇「Install Custom Nodes」
- 使用搜尋列尋找 ComfyUI-Tripo
- 點擊旁邊的「Install」按鈕
- 完全重新啟動 ComfyUI,以確保新的 nodes 已載入
替代安裝方式:
如果你偏好手動方式,或沒有安裝 ComfyUI-Manager,可以:
方法 A:直接安裝
- 前往你的 ComfyUI 安裝資料夾
- 找到
custom_nodes/目錄(若不存在則建立它) - 使用以下指令 clone repository:
git clone https://github.com/tripodesko/ComfyUI-Tripo.git
- 進入 plugin 目錄:
cd ComfyUI-Tripo
- 安裝 dependencies:
pip install -r requirements.txt
方法 B:透過 Comfy Register
如果你使用 comfy-cli,這個單行指令會處理安裝:
comfy node registry-install comfyui-tripo
步驟 2:設定你的 API Key
要使用 plugin,你需要將它連接到你的 Tripo AI account:
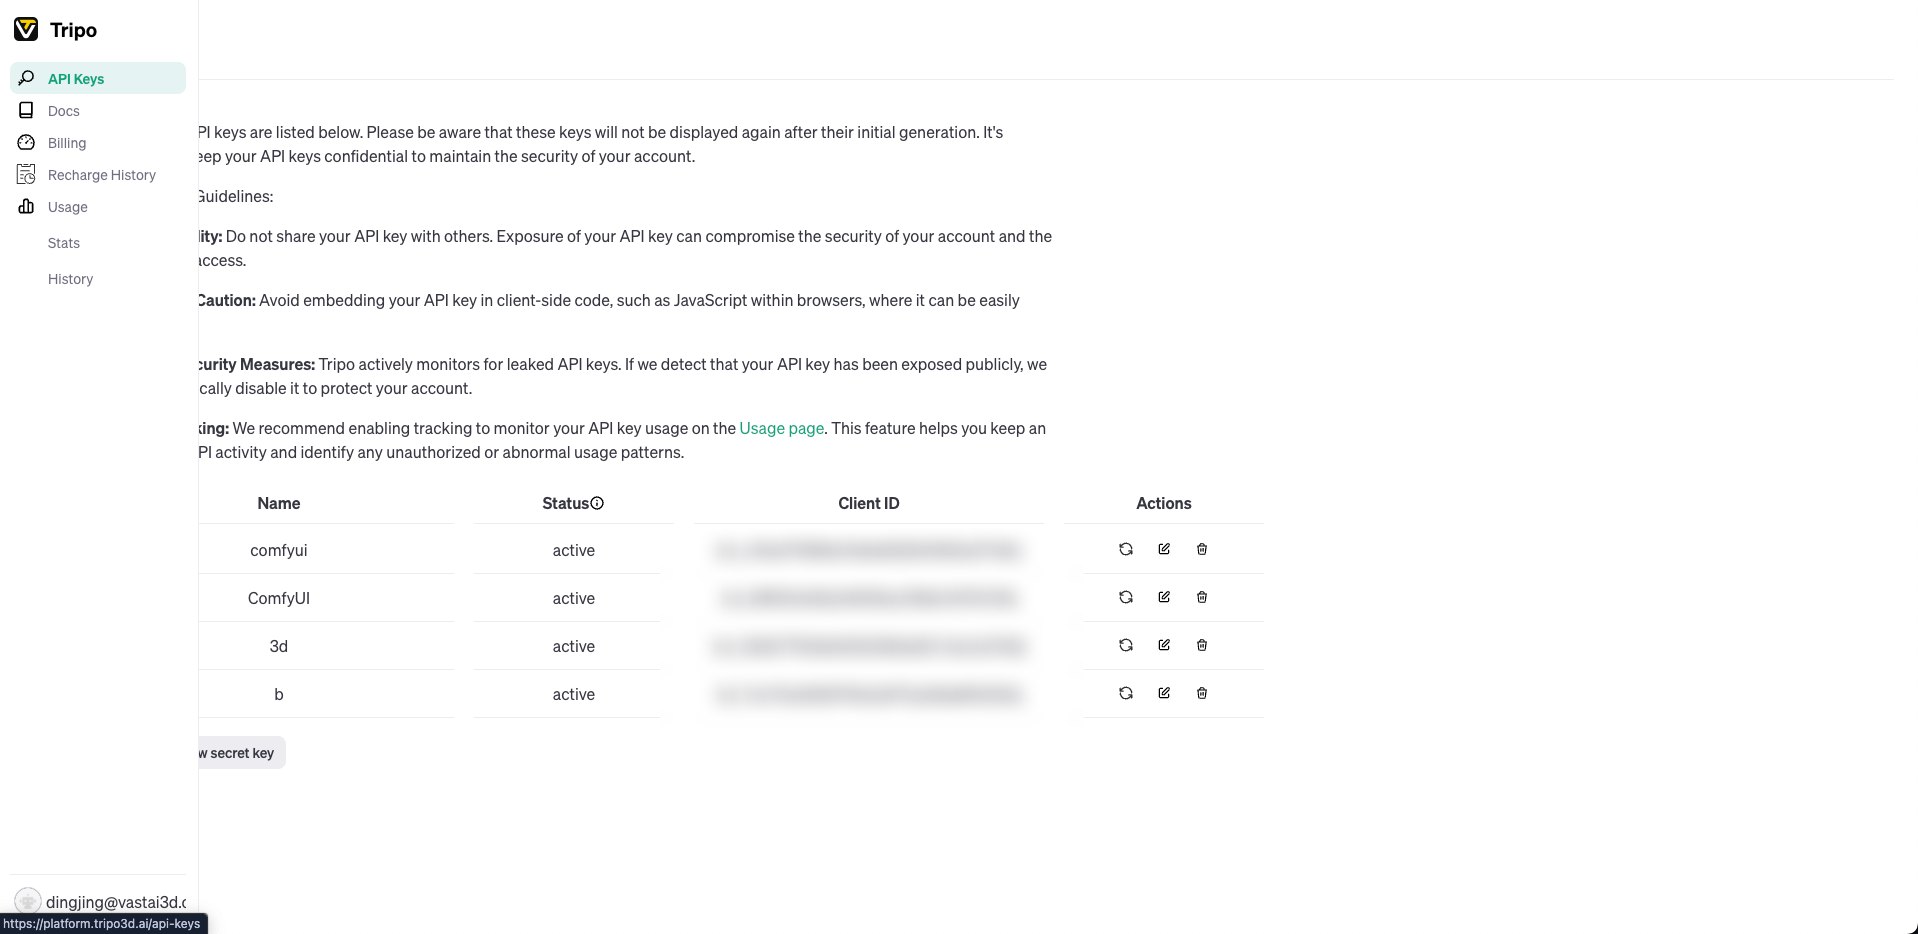
- 登入 Tripo AI website,並前往你的 account 或 developer section 以生成並複製你的 API key
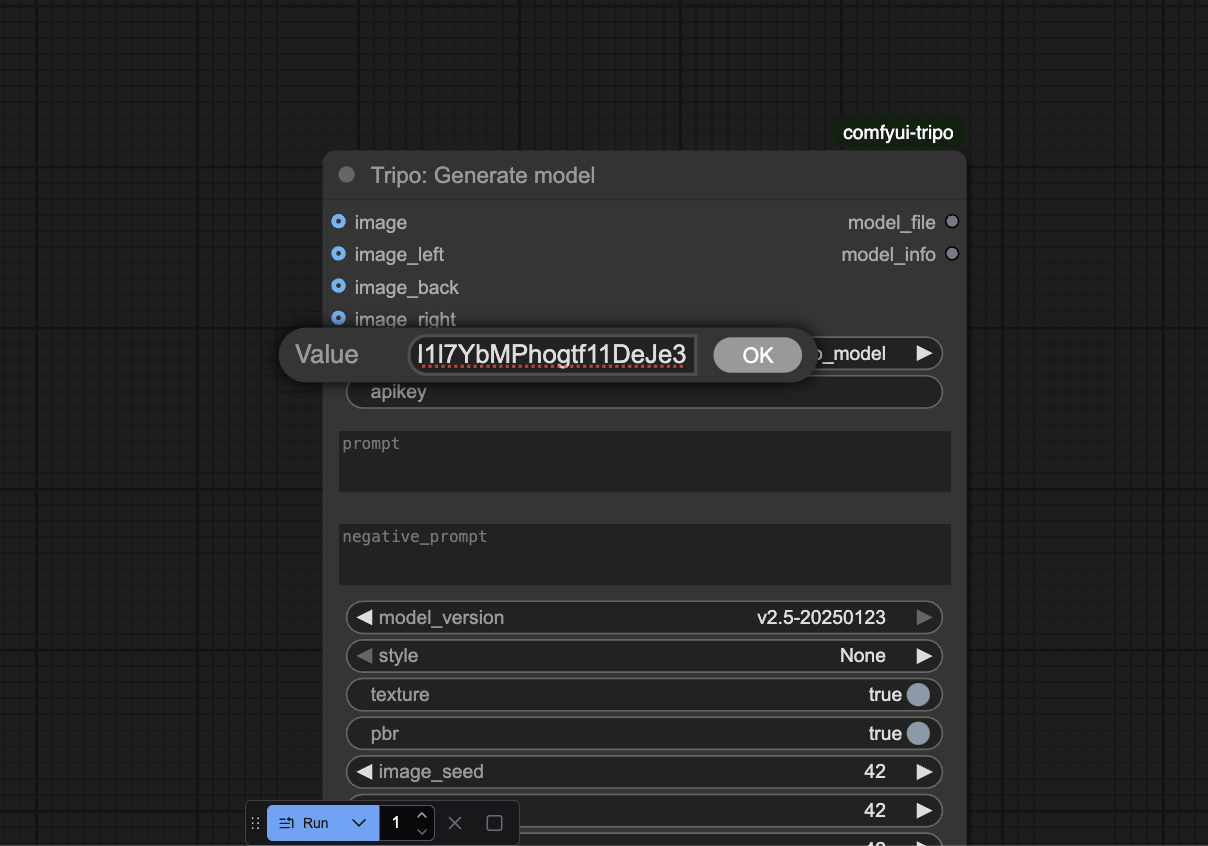
- 在 ComfyUI 中,將任何 Tripo node(例如 Generate model)加入你的 canvas
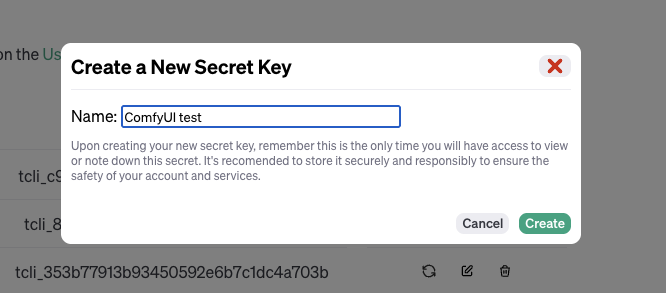
- 將你複製的 key 貼到 node 上的
api_key輸入欄位
專業提示:為避免重複輸入 API key,你可以將它加入為名為 TRIPO_API_KEY 的 environment variable,或將它包含在 plugin 目錄中的 configuration file 裡。
了解並使用 Tripo Nodes
Tripo-ComfyUI plugin 是一套模組化工具組。以下是主要 nodes 及其功能:
Core Nodes:
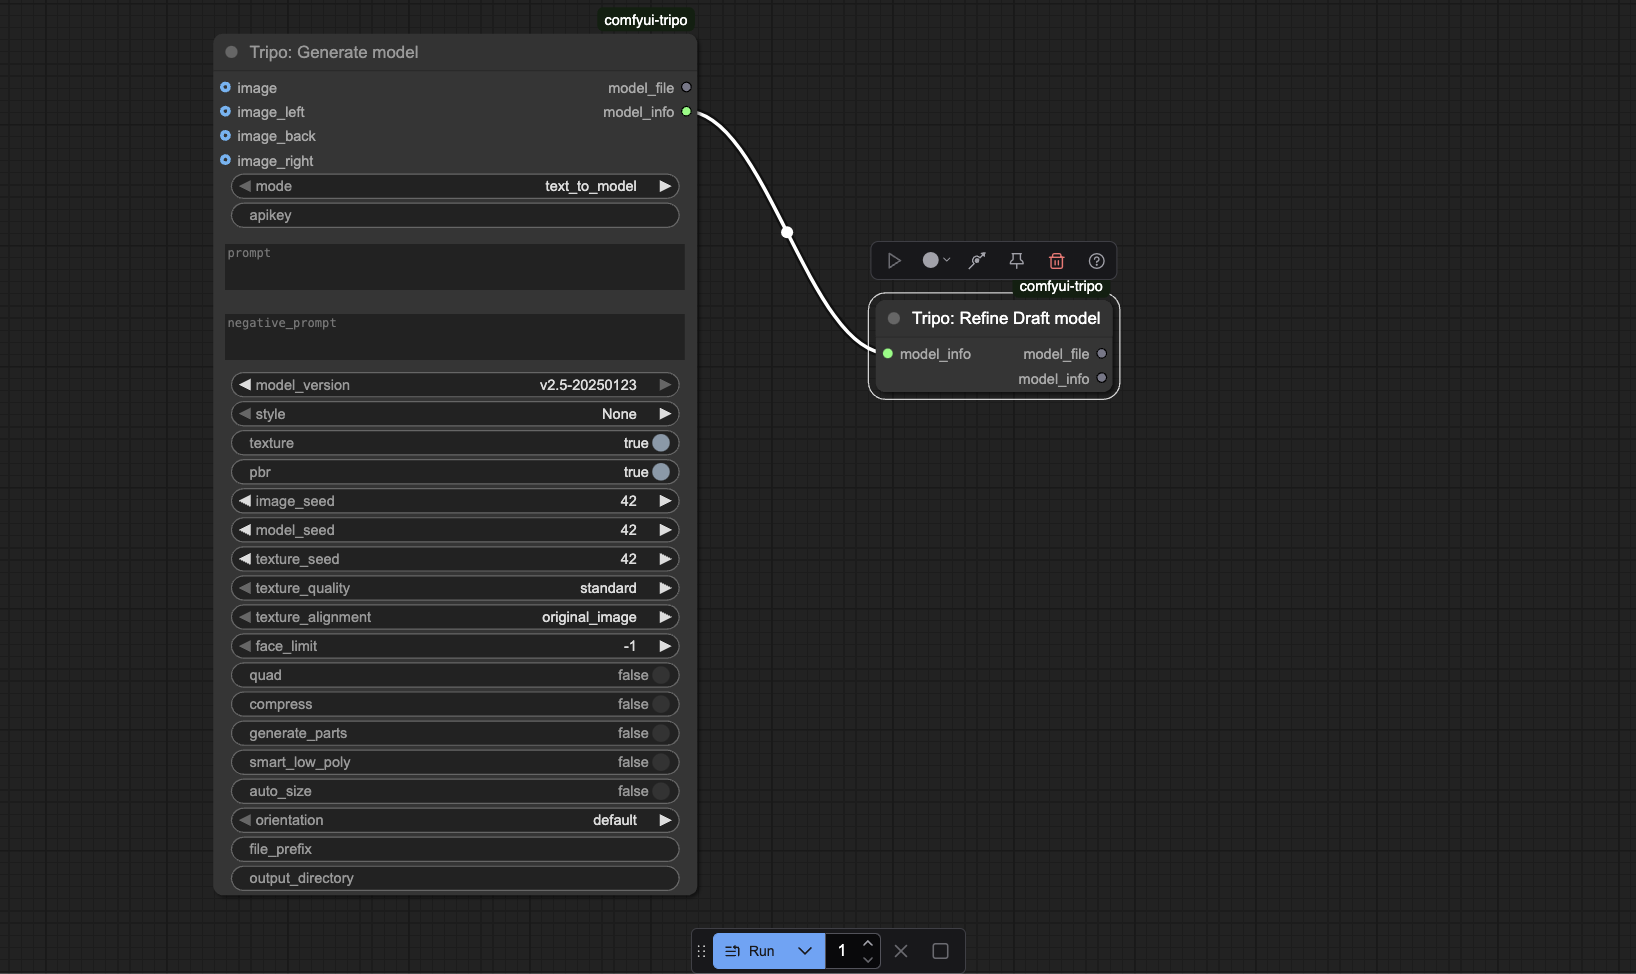
- Generate model:起點。從 text prompt 或 image 建立 3D model。
- Refine Draft model:提升基本 model 的品質。
Optimization & Style Nodes:
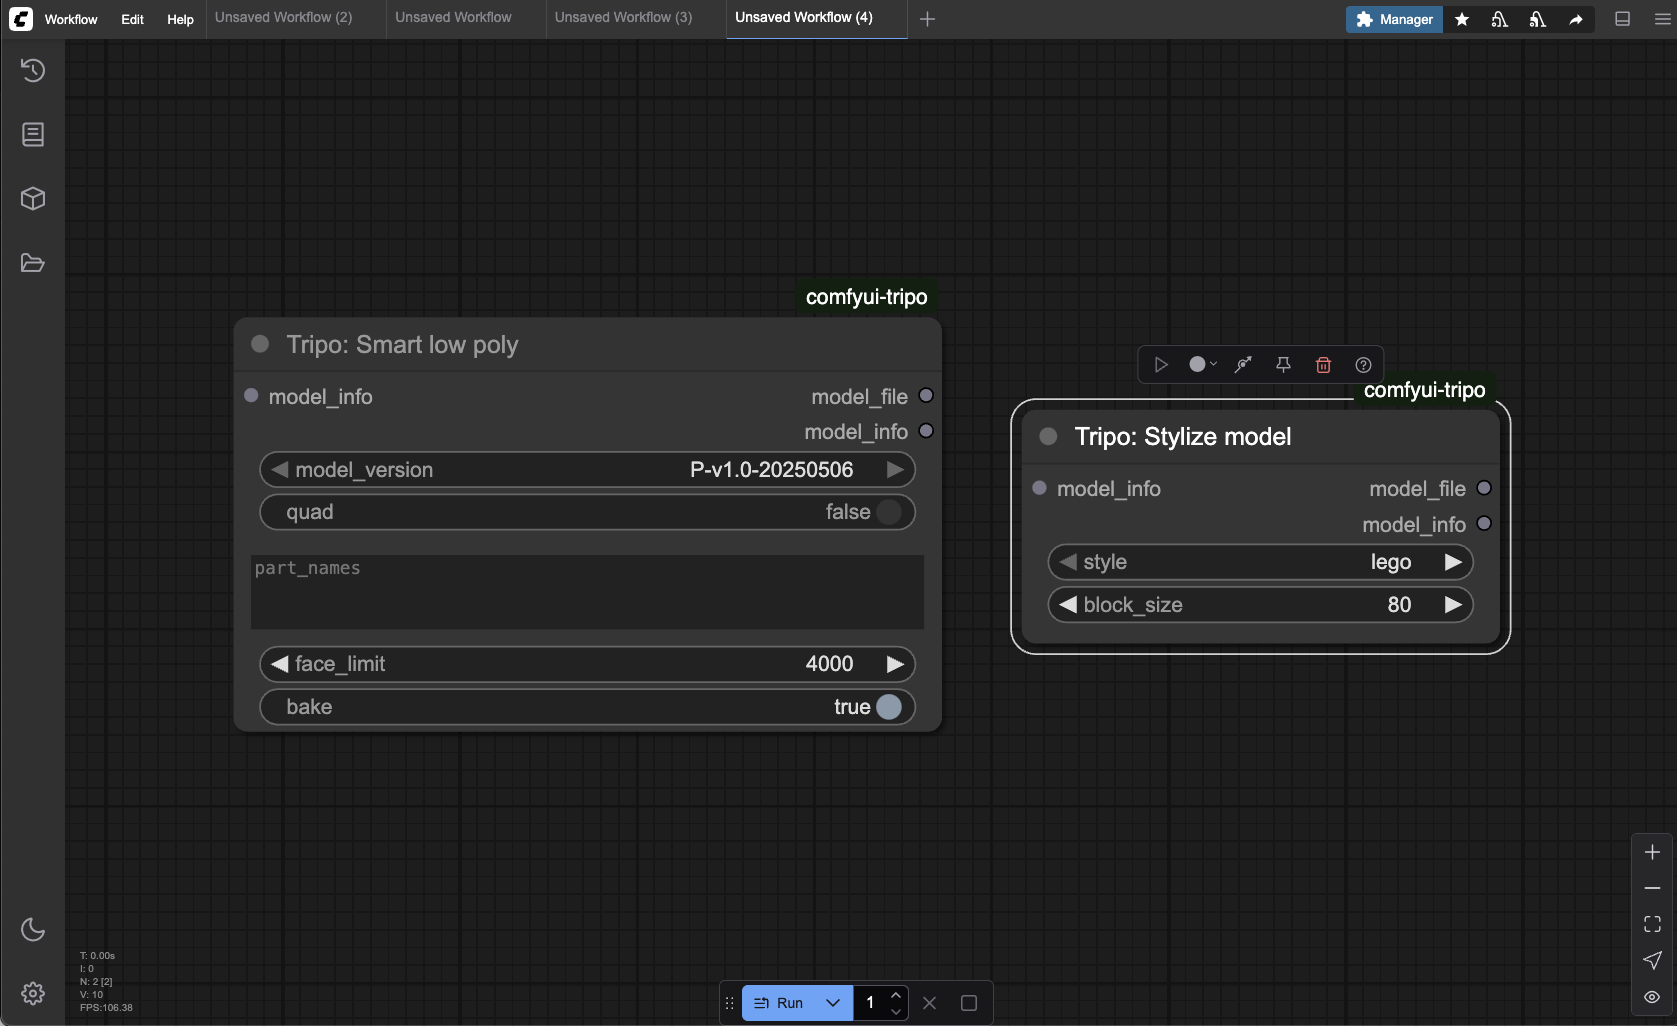
- Smart low poly:執行自動 retopology,建立輕量、game-ready 的 mesh。
- Stylize model:將「Lego」或「clay」等藝術風格套用到你的 model。
Texturing Nodes:
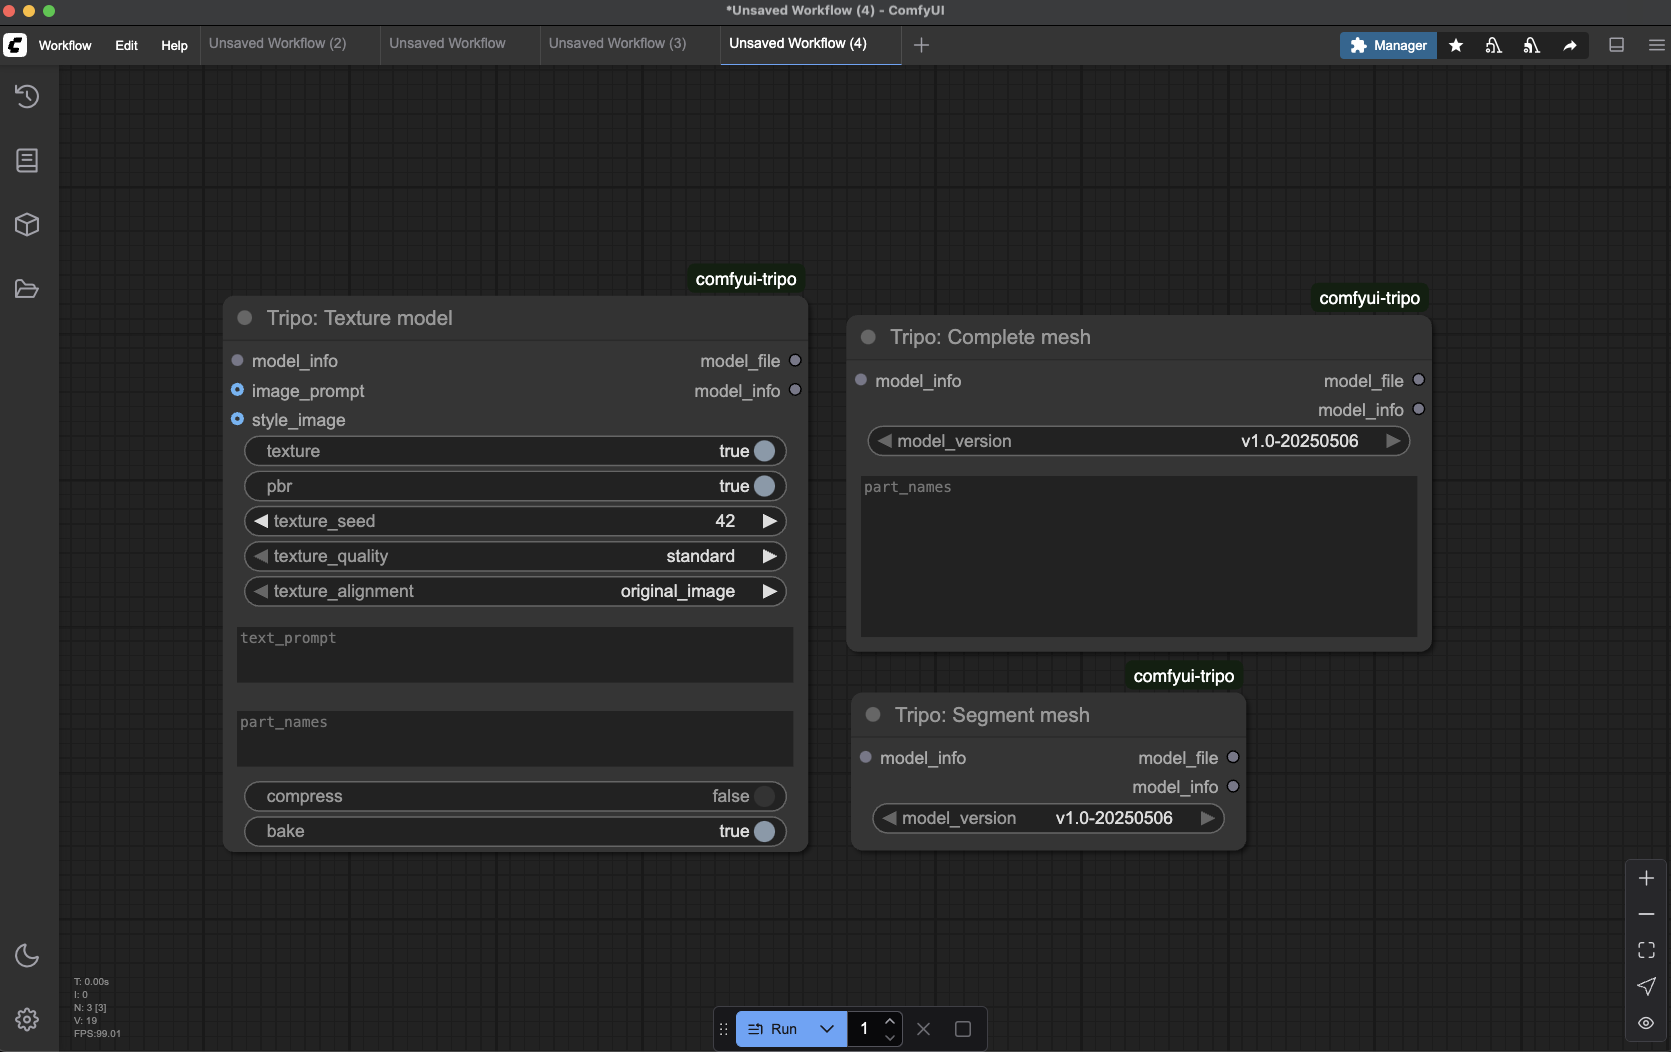
- Segment mesh:將 model 拆分為邏輯部件以便個別編輯。
- Texture model:將 textures 套用到整個 model,或套用到特定、已預先分割的 parts。
- Complete mesh:在各 parts 被處理後重新組合 model。
Finalizing Nodes:
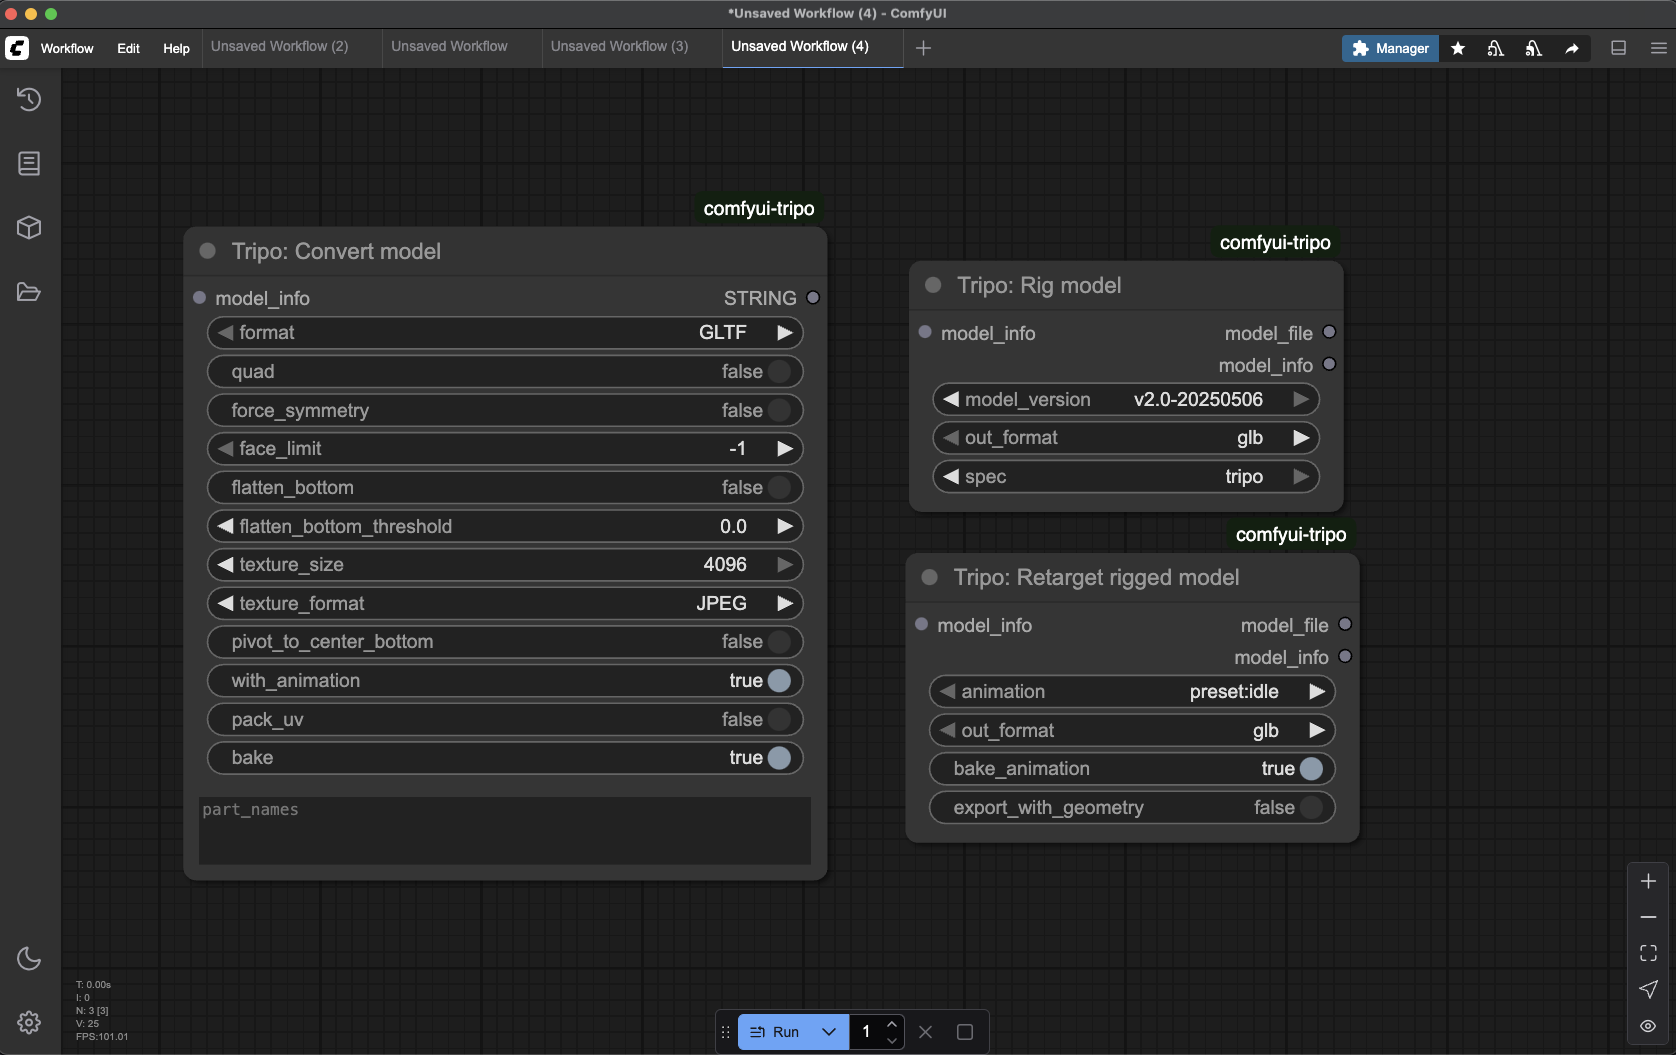
- Rig model:自動建立 animation 用骨架。
- Retarget rigged model:將 preset animation 套用到已 rigged 的 model。
- Convert model:最後一步。以你選擇的格式(OBJ、STL、FBX 等)儲存你的 model。
強大 Workflows 實戰
這個 AI 3D model generator plugin 的真正威力在於將這些 nodes 串接起來。以下是三個你現在就可以建立的實用 workflows。
Workflow 1:建立 Game-Ready Animated Character
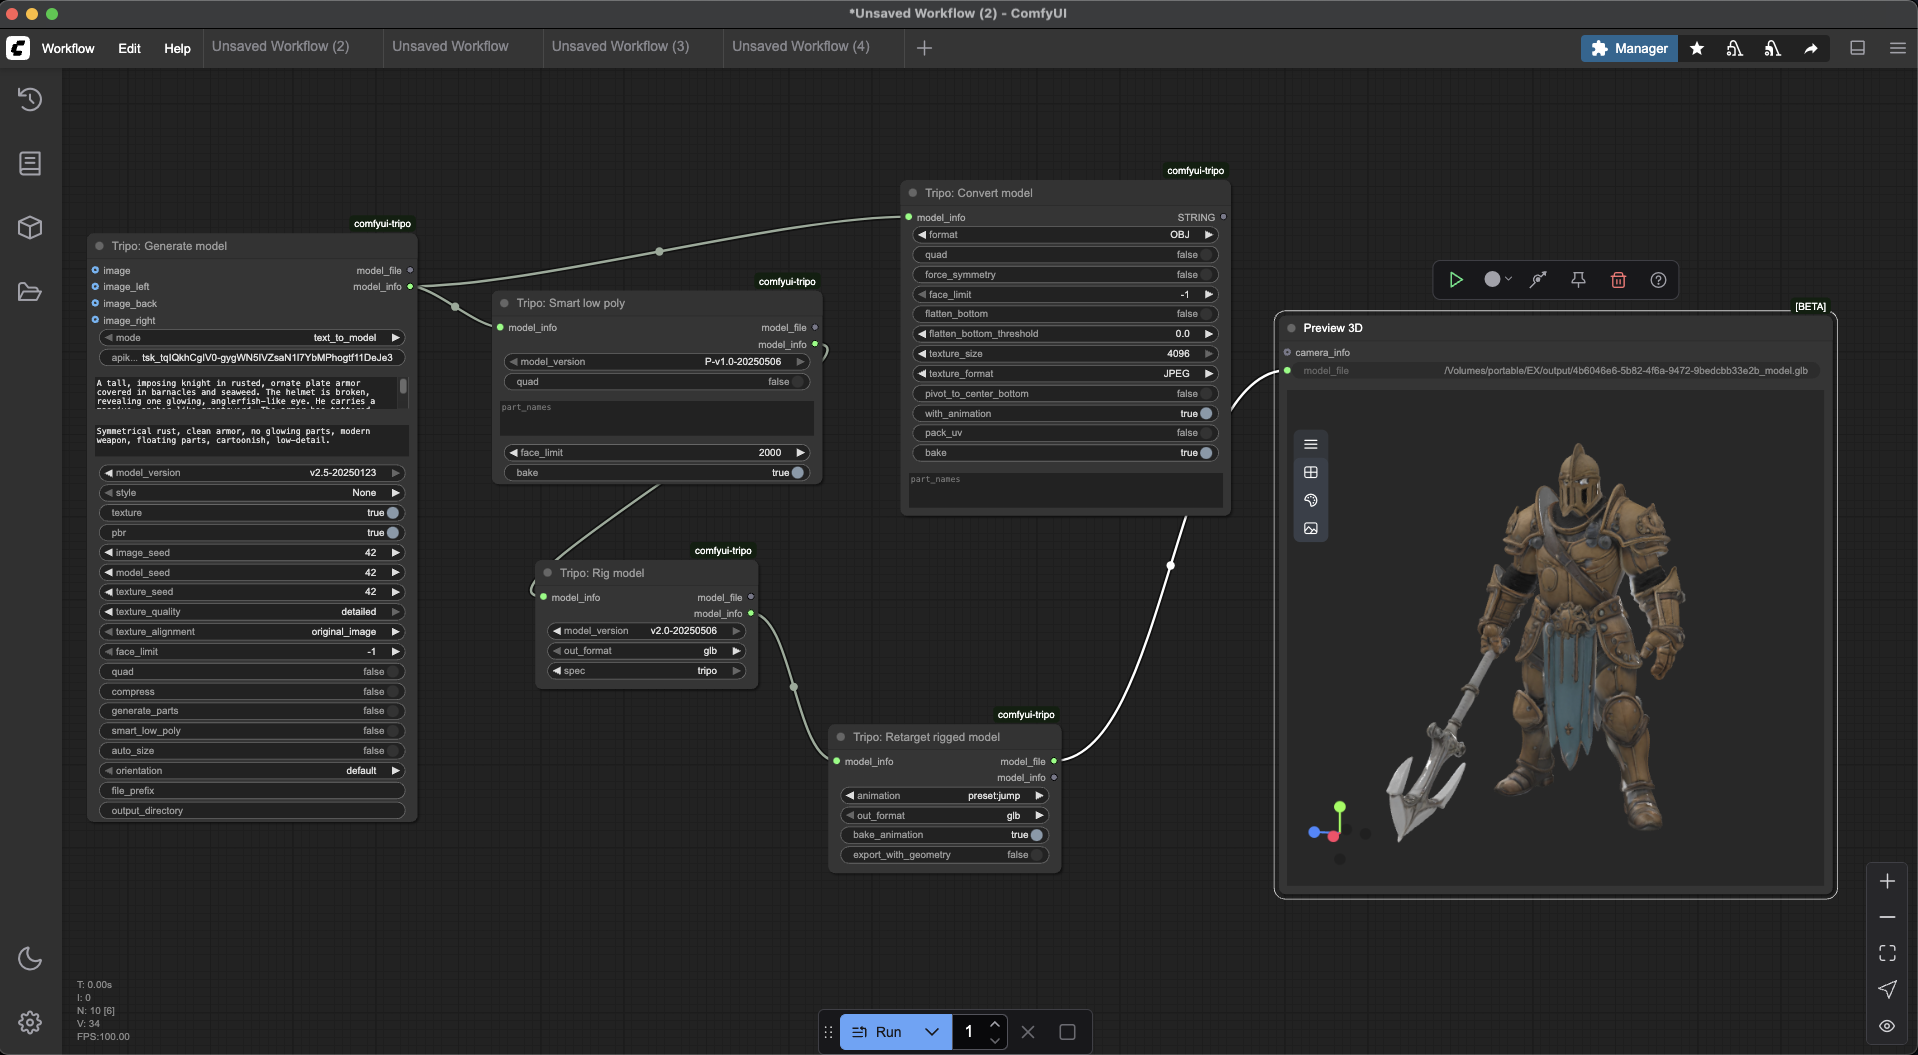
目標: 將 text prompt 轉化為完整最佳化、rigged 且 animated 的 character,可用於 Unity 或 Unreal 等 game engine。
Model Idea:「The Sunken Paladin」
Positive Prompt:A tall, imposing knight in rusted, ornate plate armor covered in barnacles and seaweed. The helmet is broken, revealing one glowing, anglerfish-like eye. Humanoid posture, optimized for game animation.
Negative Prompt:Symmetrical rust, clean armor, modern weapon, floating parts, cartoonish, low-detail.
Node Connections:
- 從 Generate model 開始。建立你的 character,並啟用 textures。
- 連接 Generate model → Smart low poly。將 generation node 的
model_infooutput 拖到 Smart low poly node 的model_infoinput。設定face_limit(例如 15,000)來建立 game-ready mesh。 - 連接 Smart low poly → Rig model。這會加入 animation skeleton。
- 連接 Rig model → Retarget rigged model。選擇像「idle」這樣的 preset animation。
- 連接 Retarget rigged model → Convert model。將格式設定為 GLTF 或 FBX,以儲存你的最終 animated character。
Workflow 2:設計用於 3D Printing 的 Model
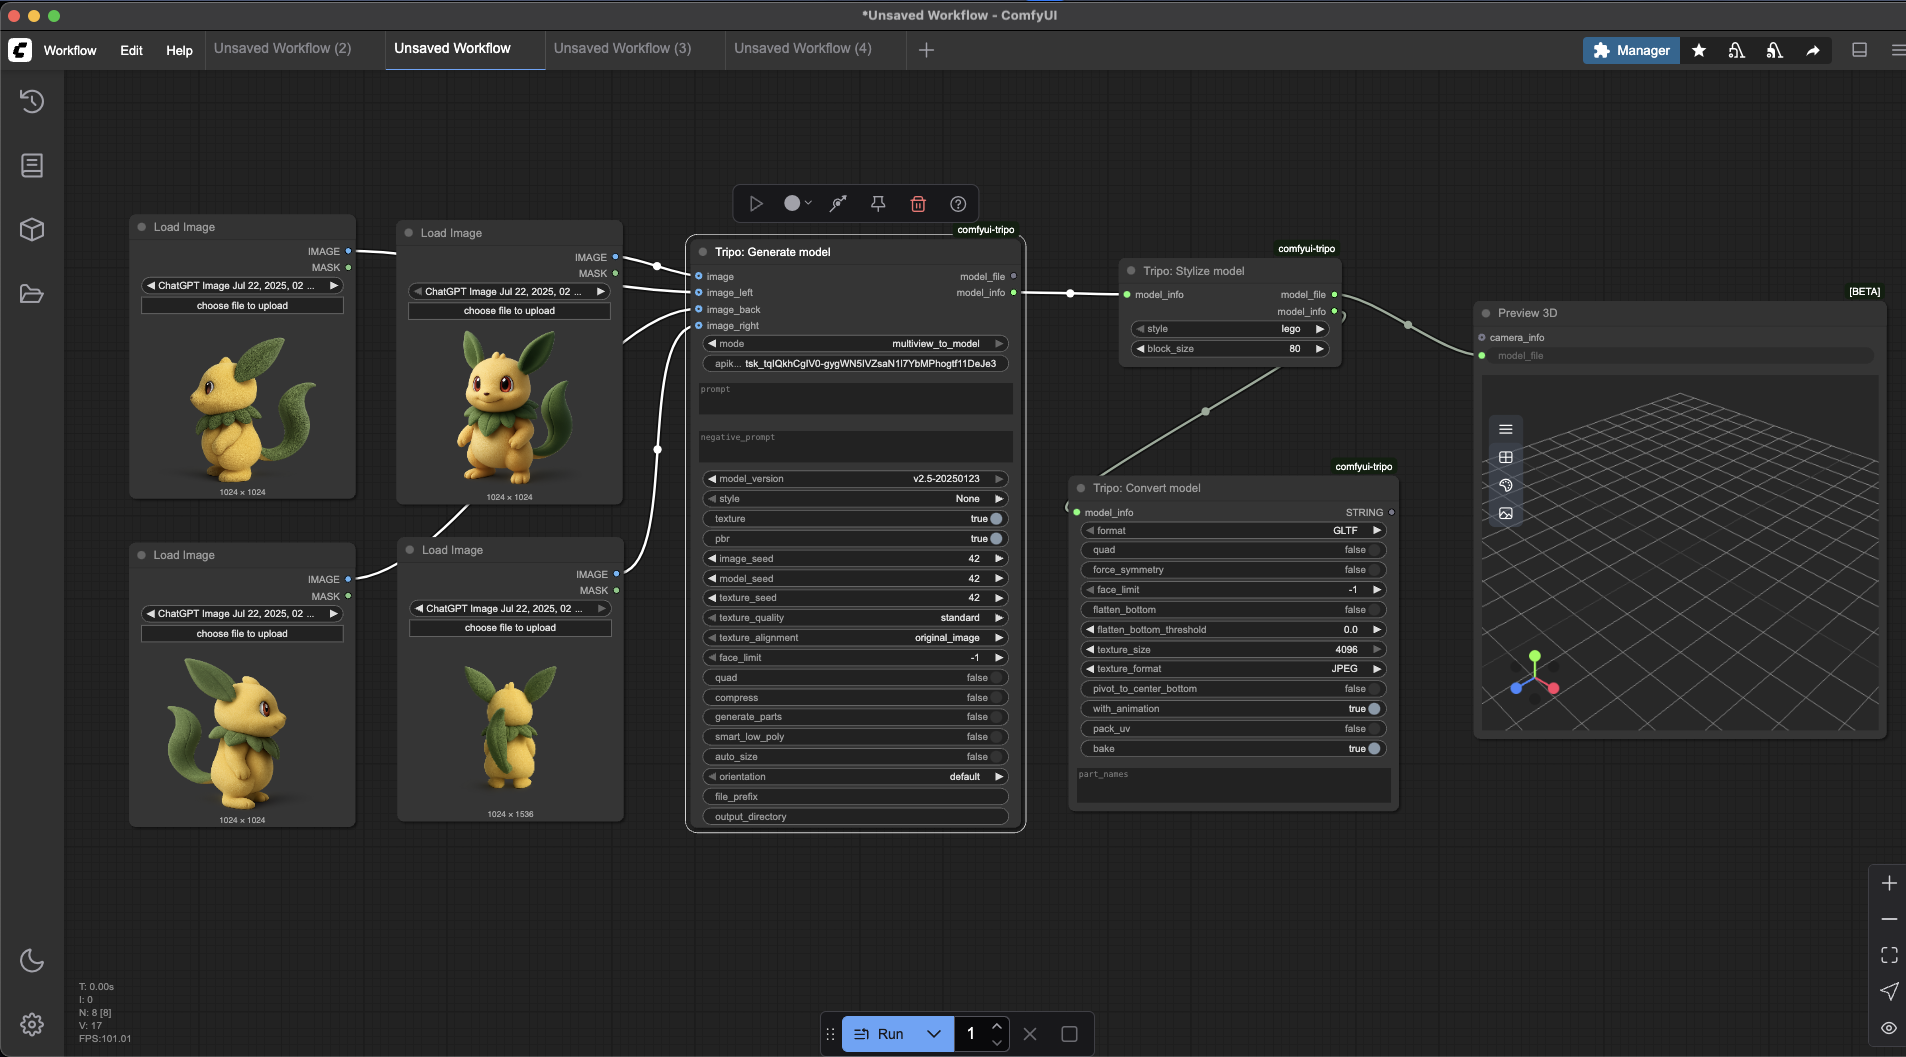
Goal:建立一個實心、靜態且可列印,並具穩定底座的 model。
Model Idea:「Art Deco Fox Statue」
Positive Prompt:A stylized Art Deco statuette of a sitting fox, composed of sharp, clean geometric shapes. The model should be a single, solid, manifold mesh with a wide, flat base for stability.
Negative Prompt:Realistic fur, organic shapes, thin parts, hollow model, detailed textures.
Node Connections:
- 從 Generate model 開始。不需要 textures。
- (選用)連接 Generate model → Stylize model 以套用獨特的藝術外觀。
- 連接到 Convert model。將上一個 node 的
model_infooutput 拖到 Convert model node。在此 node 的 settings 中,務必將format設為 STL,並將flatten_bottom設為 true。
Workflow 3:進階多部件 Texturing
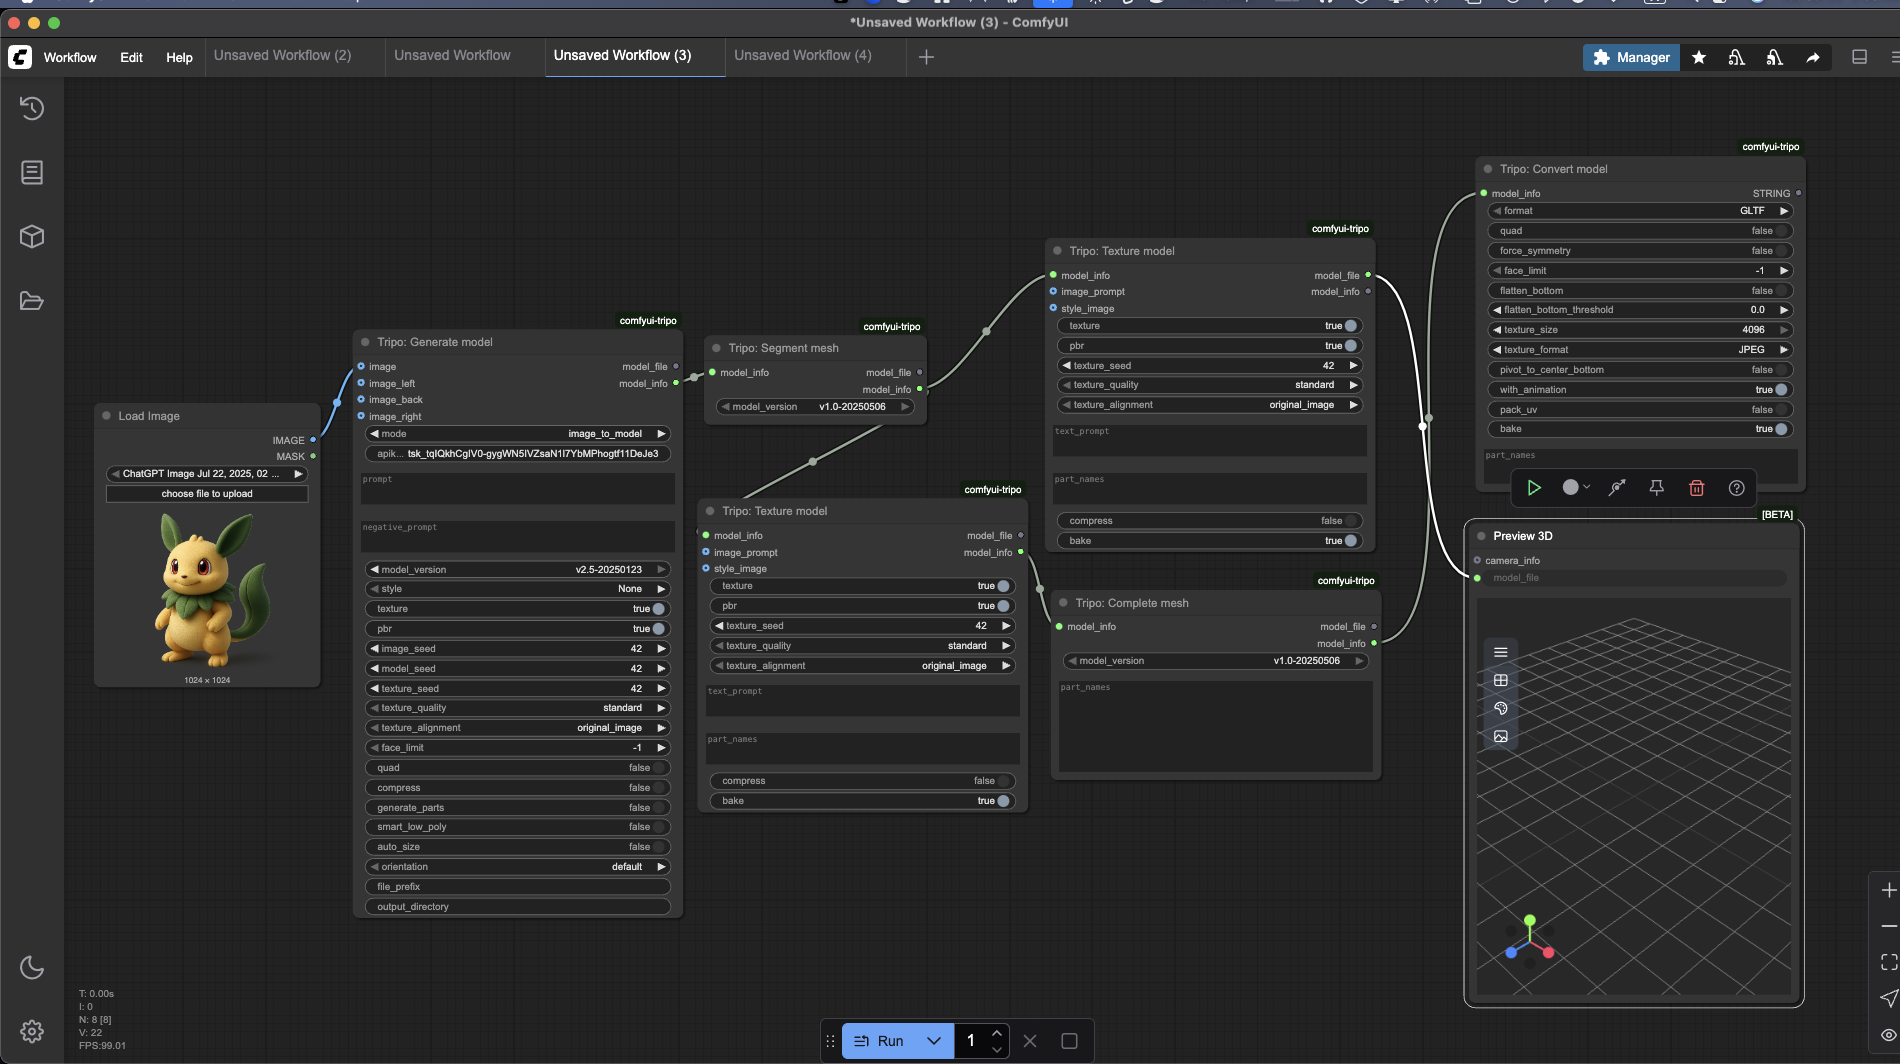
Goal:透過對同一個複雜 model 的不同 parts 套用不同的高品質 textures,達到最高寫實度。
Model Idea:「The Dwarven Astrolabe」
Prompt for Generate model:An intricate, complex Dwarven astrolabe device. Features multiple rotating brass rings, a solid dark oak base carved with runes, and a central crystal held by a metal claw.
Node Connections:
- 從 Generate model 開始。
- 連接 Generate model → Segment mesh。這會辨識 astrolabe 的不同 parts(rings、base、crystal 等)。
- 建立 Parallel Branches:
Branch A:連接 Segment mesh → 一個新的 Texture model node。在此 node 中,於 part_names 欄位輸入「rings, claw」以鎖定 brass parts,並在 prompt 中描述「weathered brass」texture。
Branch B:連接 Segment mesh → 第二個 Texture model node。於 part_names 輸入「base」以鎖定 wooden parts,並描述「dark, polished oak」texture。
- (合併)連接 Both Texture model nodes → Complete mesh。這會用新的不同 textures 重新組合 model。
- 連接 Complete mesh → Convert model 以儲存你的最終高細節 model。
常見問題排解
即使是最好的 AI 3D model generator 也可能遇到問題。以下是常見問題的解決方案:
API Key 錯誤
如果你看到「Invalid API key」或 authentication errors:
- 確認你的 key 已正確輸入,且沒有多餘空格
- 確保你在 Tripo 平台上的 subscription 仍然有效
- 嘗試直接在 node 中輸入 key,而不是使用 environment variables
Generation Timeouts
針對「Request timed out」錯誤:
- 檢查你的 internet connection
- 先嘗試使用較低 quality setting 生成
- 確認你的 Tripo subscription limits 尚未達到
Model Quality Issues
如果 models 缺乏細節或準確性:
- 使用更具體、詳細的 text prompts
- 對於 Image to 3D,確保你的 reference image 有良好的 lighting 和 contrast
- 對複雜 objects 嘗試 Multi-View 方法
- 試驗不同的 quality settings
獲得最佳結果的 Best Practices
為了充分發揮 Tripo-ComfyUI plugin 的能力:
- 撰寫詳細 prompts - 不要只寫「car」,試試「sleek red sports car with aerodynamic design and detailed chrome wheels」
- 使用清晰 reference images - 選擇 lighting 良好、background distraction 少、object boundaries 清楚的 images
- 反覆迭代並精修 - 先用 draft quality 做快速測試,確認 concept 後再提高 quality
- 以模組化 components 思考 - 將複雜 models 拆成邏輯 parts,以便更輕鬆地 texturing 與 manipulation
- 針對最終用途最佳化 - 設定 export settings 時,考慮你的 target platform(game engine、3D printing、rendering)
輪到你創作
這些 workflows 只是開始。Tripo-ComfyUI plugin 的真正力量在於它的模組化。你可以用無數方式混合搭配這些 nodes:
- 在 retopologize 前嘗試加入 Refine step
- 在 texture model 後進行 stylize
- 透過調整 prompts 生成同一 concept 的多個 variations
- 將 Tripo nodes 與其他 ComfyUI capabilities 結合,開創更多創意可能
盡情實驗、打破框架,並建立完全貼合你個人創作任務的 workflows。有了 Tripo-ComfyUI plugin,AI 3D model generation 的未來就在你手中。
傳統上耗時的 3D modeling 流程,已透過 AI 的力量轉化為直覺且易於使用的創意媒介。結合 Tripo 的 image to 3D 與 text to 3D capabilities,以及 ComfyUI 彈性的 node system,你現在能比以往更快地讓想像化為現實。