AI Character Models for Games: From Concept to Rigged Asset
TL;DR
- AI handles the whole pipeline now: concept art or text → 3D mesh → game-ready topology → rig → engine.
- "Game-ready" ≠ "looks good": you need a sane polygon budget (~5K–30K tris for a character) and clean topology, not a 2M-poly sculpt.
- Rigging is the step that makes a model an asset—an unrigged mesh can't animate. Auto-rigging tools fit a skeleton in seconds for T-pose humanoids.
- Export to FBX or GLB; these carry the rig and animations into Unity, Unreal, Godot, or Blender.
- AI assets are generally yours to ship commercially if your inputs are clean—but platforms like Steam require you to disclose AI use.
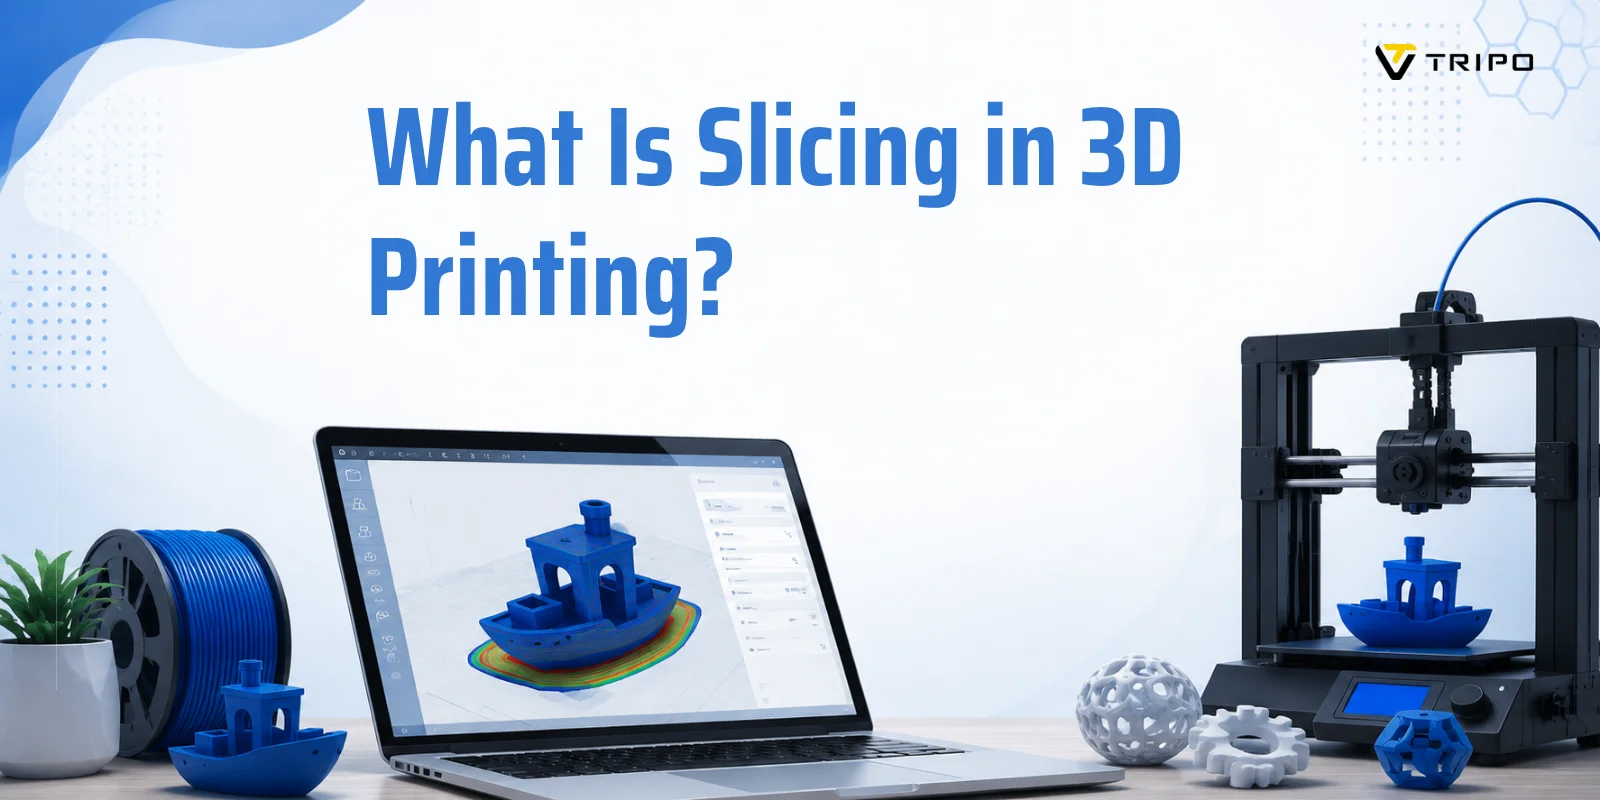
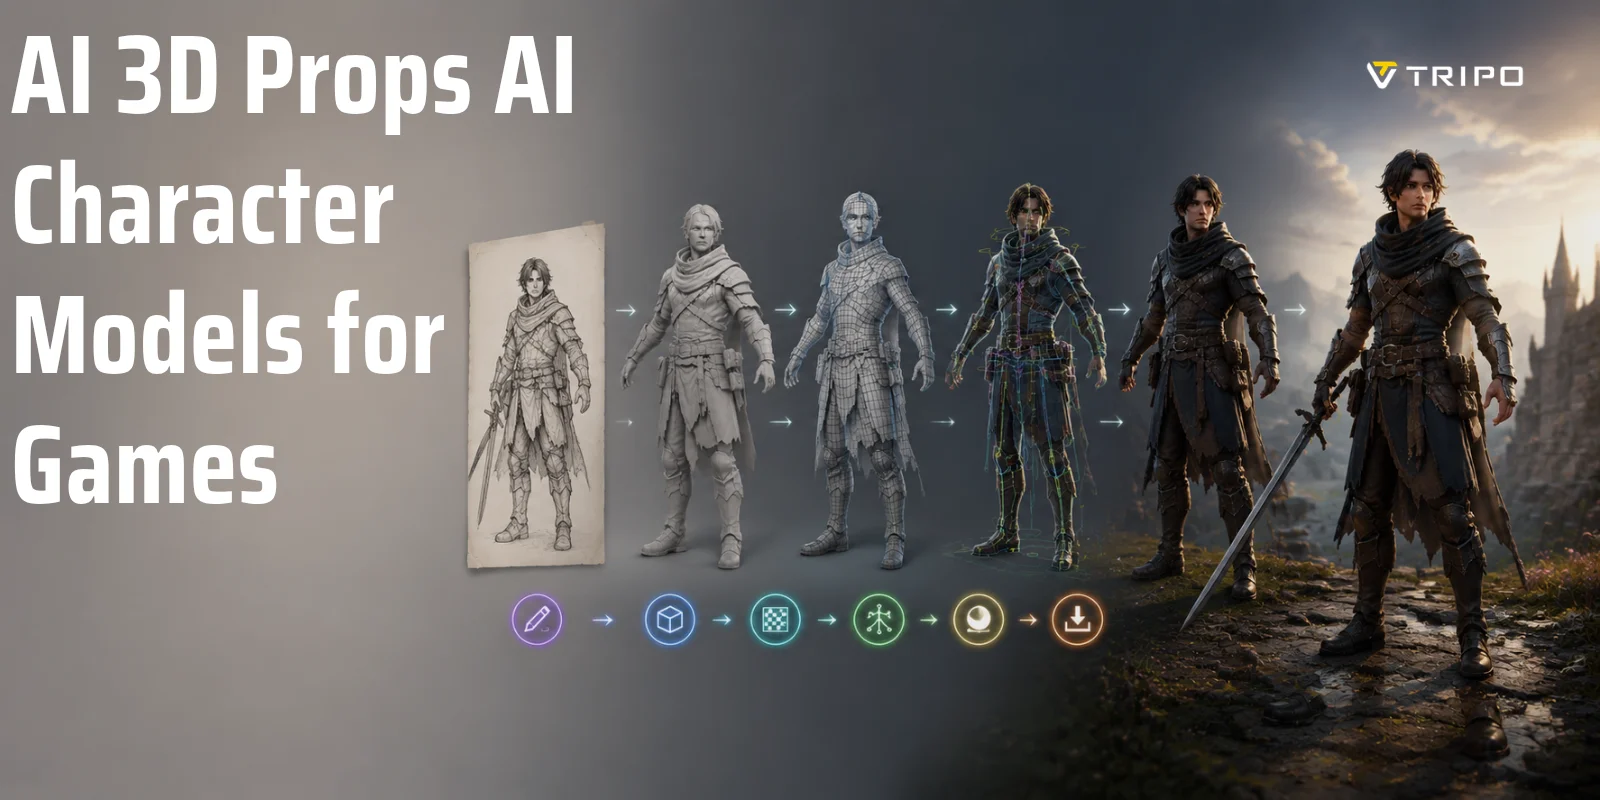
To create AI character models for games, artists typically use an AI 3D character generator for games to turn a concept or text prompt into a mesh, optimize and texture it for real-time performance, then auto-rig it for animation. This guide shows the complete process of transforming game character assets with AI into a rigged AI character ready for Unity, Unreal Engine, or other game engines.
What "Game-Ready" Actually Means for a Character Model
One of the biggest misconceptions about AI character models for games is that a detailed 3D mesh automatically means the asset is ready to use. In reality, a high-poly character generated from concept art or an AI 3D character generator for games is only the starting point. A visually impressive model may still be unsuitable for real-time rendering or animation.
A game-ready character is defined by much more than appearance. It needs clean topology, a polygon count appropriate for the target platform, properly laid-out UVs, optimized textures, and a skeleton that supports animation. These technical elements ensure the character behaves correctly in a game engine rather than simply looking good in a static render.
In practical terms, "game-ready" means the asset can run efficiently in Unity, Unreal Engine, or another engine while maintaining stable performance. It should deform naturally during movement, support animation systems, and fit within memory and rendering budgets. A rigged AI character with poor topology or excessive polygons can still cause clipping, deformation issues, or frame-rate drops.
Think of game character assets created with AI as raw material rather than finished products. The generation stage creates the shape and style, but optimization and rigging transform that output into a production asset. That's why the workflow covered in this guide—mesh generation, retopology, UV mapping, texturing, and auto-rigging—is essential. Every step contributes to one goal: creating a character that not only looks good, but can move and perform reliably inside a game.
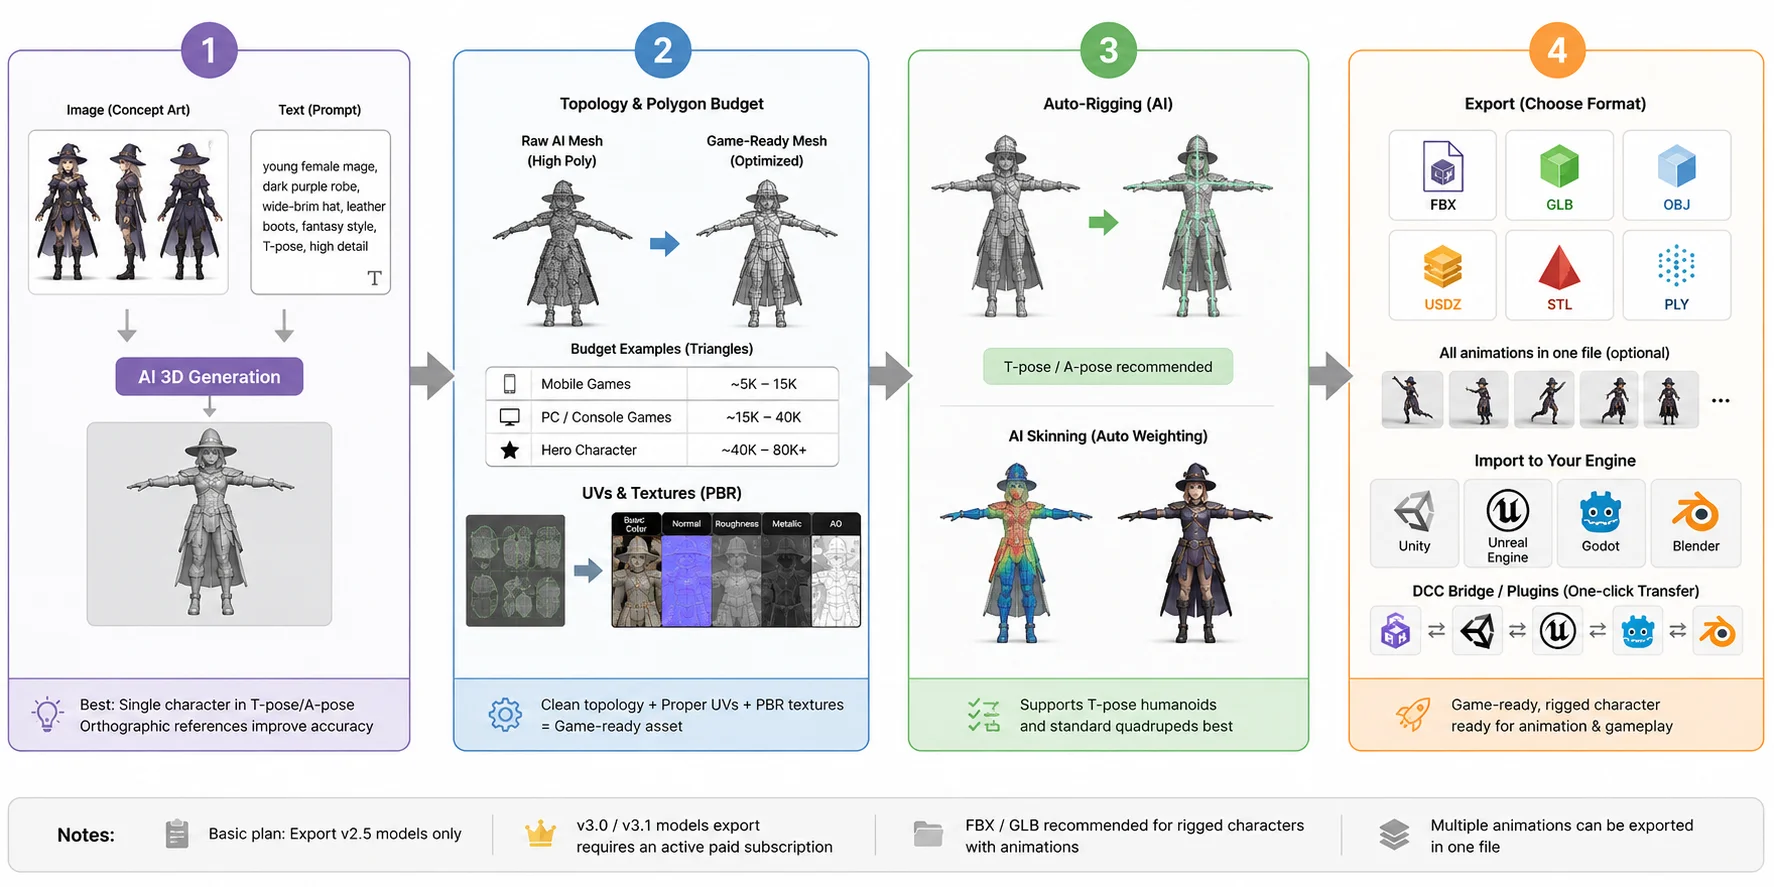
Step 1 — Start From a Concept (Image or Text)
Every AI character workflow begins with a concept. Whether you start with artwork or a text prompt, the goal is the same: generate a clean base mesh that can eventually become a rigged, game-ready asset. For the best results, focus on a single character in a neutral T-pose or A-pose. Starting with a symmetrical stance makes later steps like retopology and auto-rigging significantly easier.
Image-to-3D (from Concept Art or a Reference)
Image-to-3D is ideal when you already have character art, sketches, or reference images. Orthographic front and side views usually produce more accurate geometry than perspective illustrations, and keeping the character isolated from busy backgrounds helps preserve proportions.
Quick steps:
- Upload concept art or reference images.
- Use an AI 3D character generator for games to convert the image into a mesh.
- Review the output and regenerate if proportions or details need improvement.
- Export the model for optimization and rigging.
Whenever possible, use a character in a T-pose or A-pose. Characters with extreme action poses often create topology and skeleton problems later in the pipeline.
Text-to-3D (from a Prompt)
Text-to-3D works well during ideation or when no artwork exists yet. The quality of the output depends heavily on prompt clarity. Besides describing the character itself, specify style, materials, and body proportions.
For example:
"Stylized female ranger, athletic build, leather armor, green cloak, realistic fabric textures, shoulder-length brown hair, neutral T-pose, suitable for RPG games."
Quick steps:
- Enter a descriptive prompt.
- Generate the 3D character mesh.
- Adjust style and proportions through iterations.
- Export the model for retopology, texturing, and rigging.
Regardless of whether you use image-to-3D or text-to-3D, think of this stage as creating raw geometry rather than a finished asset. A good starting pose and clear design choices will make every downstream step—from optimization to creating a rigged AI character—much smoother.
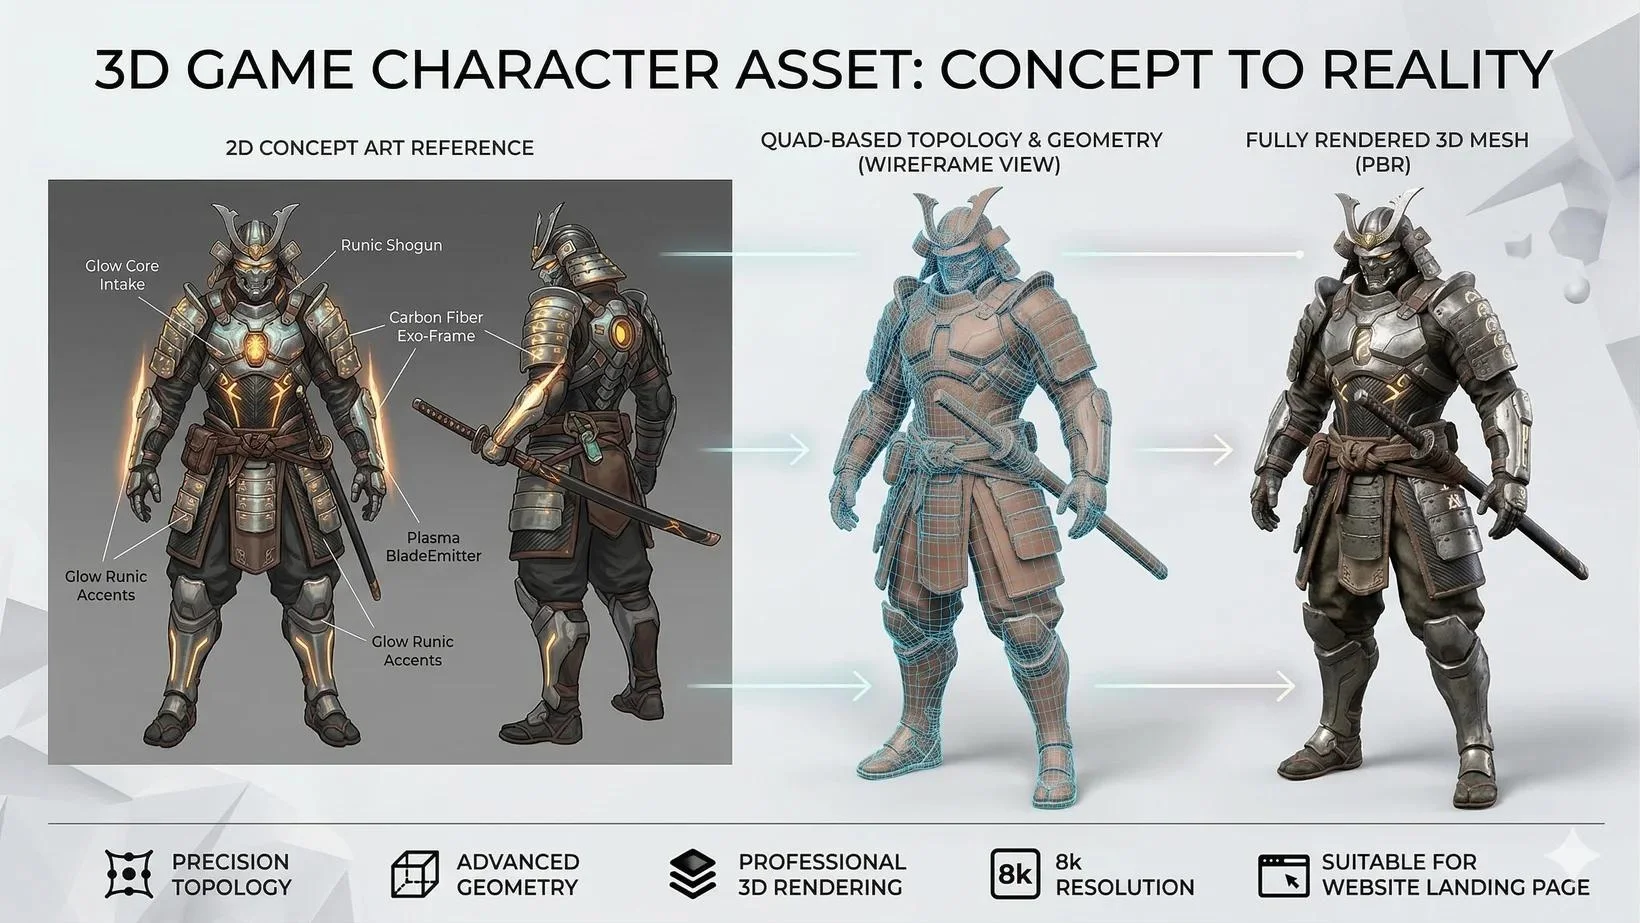
Step 2 — Make It Game-Ready (Topology & Polygon Budget)
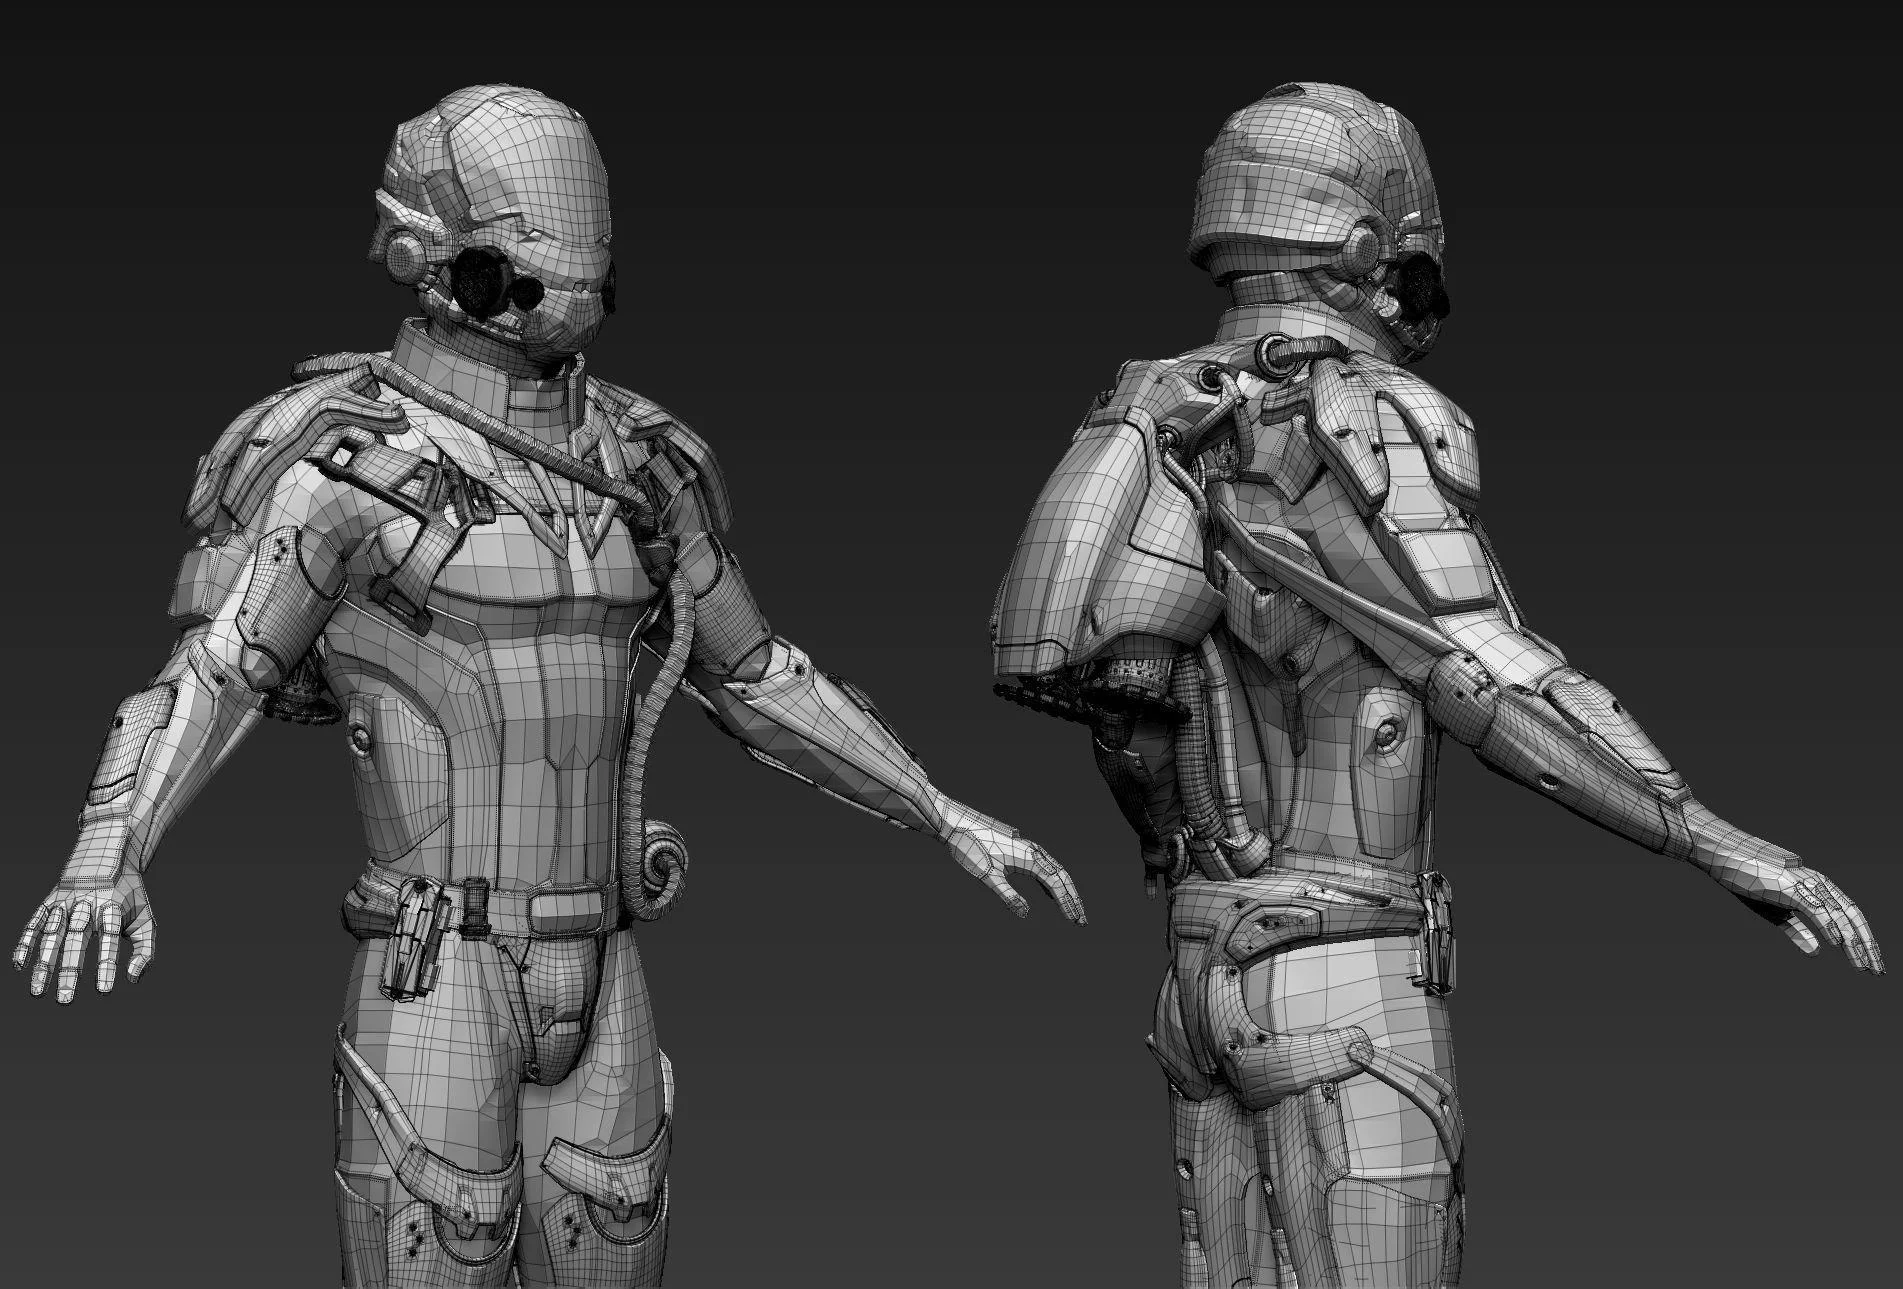
Generating a character is easy. Turning that output into a production asset is where most of the work happens. Raw AI meshes often prioritize visual detail over efficiency, which makes them unsuitable for real-time engines. Before rigging or animation, the model needs clean topology, a reasonable polygon count, UVs, and optimized textures.
Why Raw AI Meshes Aren't Game-Ready
Many AI-generated models contain millions of polygons, irregular triangles, and messy edge flow. While these high-resolution meshes look impressive in renders, they can cause poor performance and deformation problems in animation.
For example, HD models may contain up to 2 million polygons, making them useful for sculpting or baking details but far too heavy for games. In contrast, optimized meshes generated with Smart Mesh workflows typically target around 5K polygons by default, making them much easier to process for game engines.
The goal is not maximum detail—it's achieving a balance between visual quality and performance.
Pick a Polygon Budget
Polygon budgets depend on the platform and the importance of the character.
| Platform | Character Type | Triangle Budget |
|---|---|---|
| Mobile | Background NPC | 2K–5K |
| Mobile | Hero Character | 5K–15K |
| PC / Console | Background NPC | 5K–15K |
| PC / Console | Hero Character | 15K–40K |
| Cinematic / High-End | Hero Character | 40K–80K+ |
These are guidelines rather than strict limits, but defining a budget early prevents unnecessary optimization work later.
Retopology & Decimation
Raw AI meshes usually require retopology before they become usable. Retopology creates clean edge loops and converts dense geometry into a structure better suited for animation.
Common approaches include:
- One-click decimation to reduce excessive polygons.
- Smart Mesh optimization for lighter meshes.
- Automatic retopology tools.
- Manual retopology for production-quality assets.
- Converting irregular triangles into quad-based topology.
Good topology matters because a rigged AI character depends on clean edge flow around joints such as shoulders, elbows, knees, and facial areas. Without proper topology, even a perfectly weighted skeleton can deform poorly.
UVs & Textures (PBR)
Once the mesh has been optimized, the next step is UV mapping and texture generation. Automatic UV unwrapping creates the coordinate layout required for texturing, while AI-assisted tools can generate physically based rendering (PBR) maps.
Typical texture sets include:
- Base Color (Albedo)
- Normal Map
- Roughness Map
- Metallic Map
- Ambient Occlusion
These PBR textures allow game engines like Unity and Unreal Engine to render materials accurately while maintaining real-time performance.
At this stage, the character has evolved from raw geometry into a true game character asset with efficient topology, controlled polygon density, UVs, and engine-ready materials. Only then is it ready for the next step: rigging and animation.
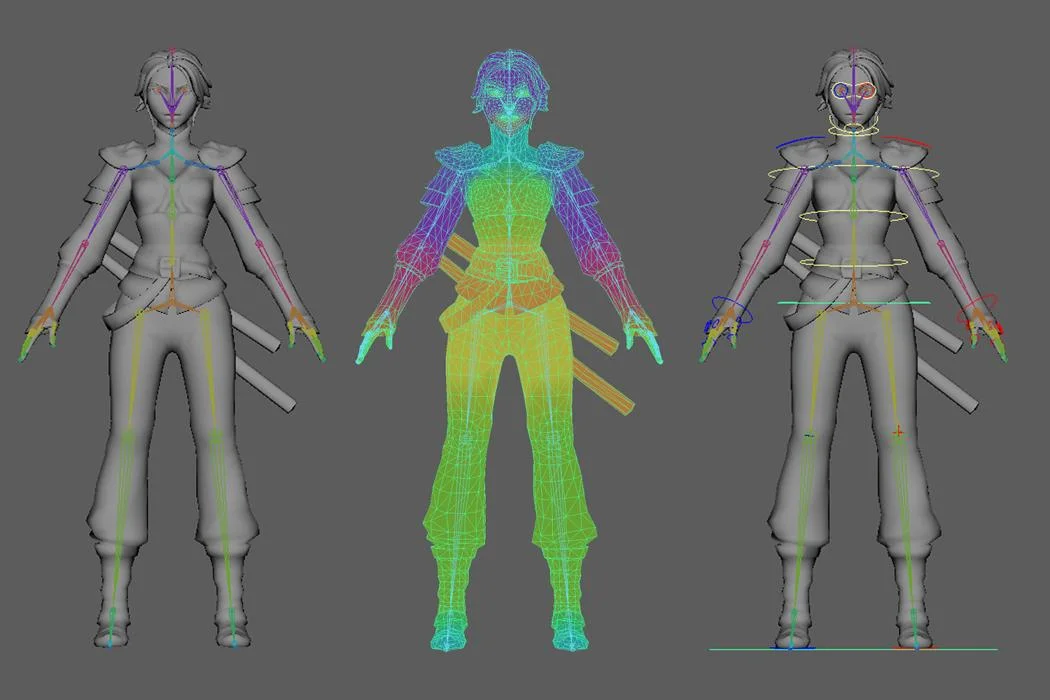
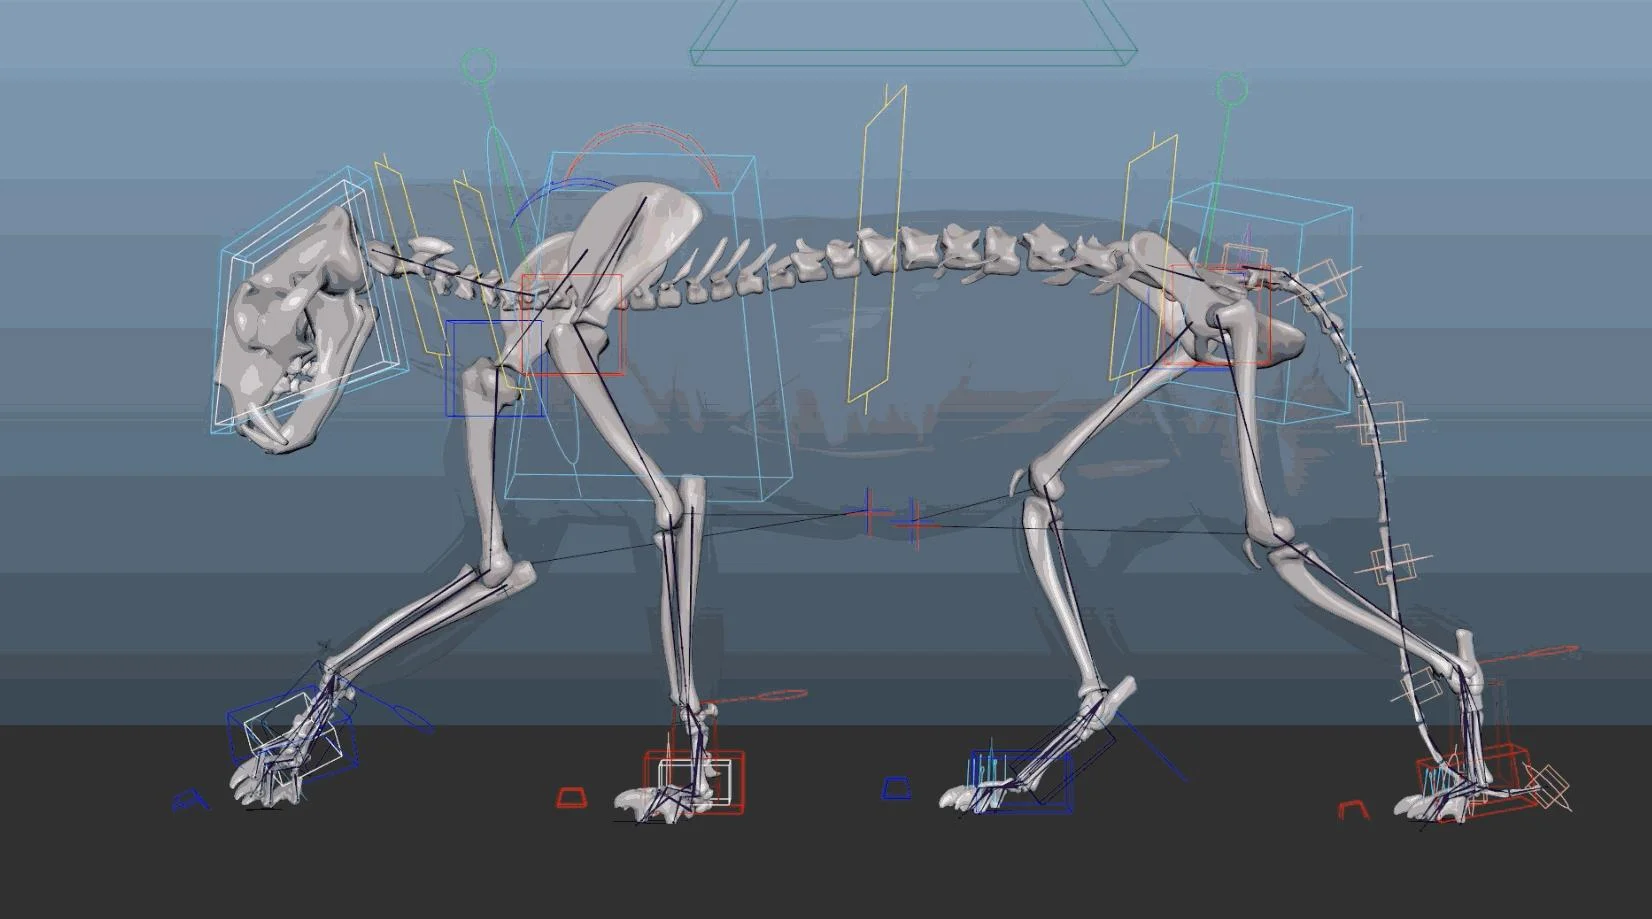
Step 3 — Rig the Character (Skeleton & Skinning)
After optimizing the mesh, the next step is to turn it into something that can actually move. This is where rigging comes in. A beautiful model without a skeleton is essentially a statue—it may look impressive, but it cannot walk, run, or interact inside a game engine.
What Rigging Is and Why an Unrigged Model Is Useless In-Game
Rigging is the process of attaching a skeleton to a character and defining how the mesh deforms when the bones move. Skinning, also called weight painting, determines how strongly different parts of the mesh are influenced by each bone.
Without a rig, game engines like Unity or Unreal Engine have no information about how a character should bend or animate. In other words, an unrigged model cannot be used for locomotion systems, motion capture, idle animations, or combat sequences.
That's why creating a rigged AI character is a critical step between modeling and animation.
Auto-Rigging with AI
Modern AI Auto-Rigging tools can dramatically reduce manual work. Instead of placing dozens of bones and painting weights by hand, AI-based systems automatically generate skeletons and skin weights in seconds.
For best results, characters should begin in a T-pose or A-pose. Standard humanoids and quadrupeds in neutral standing poses are typically the easiest to process.
A typical workflow looks like this:
- Upload the optimized mesh.
- Run AI Auto-Rigging.
- Generate the skeleton automatically.
- Apply AI-assisted skinning weights.
- Export a rigged character ready for animation.
This process allows game character assets created with AI to move naturally without requiring extensive manual rigging.
When Auto-Rig Struggles
Auto-rigging is powerful, but it has limitations. Non-standard poses, asymmetrical characters, abstract creatures, or unusual body structures can confuse automated systems.
Characters that are not in a T-pose—or creatures with extra limbs, wings, or highly stylized anatomy—may require manual corrections to bone placement and skin weights. Likewise, some exaggerated or non-humanoid designs still benefit from traditional rigging workflows.
In practice, AI rigging works best with standard humanoids and standing quadrupeds. For more complex designs, automatic rigging should be viewed as a starting point rather than a complete replacement for manual refinement.
Step 4 — Export & Drop It Into Your Engine
Once the character has been optimized, textured, and rigged, the final step is exporting it into your game engine or DCC workflow. Choosing the correct file format and import pipeline ensures that the mesh, skeleton, materials, and animations remain intact.
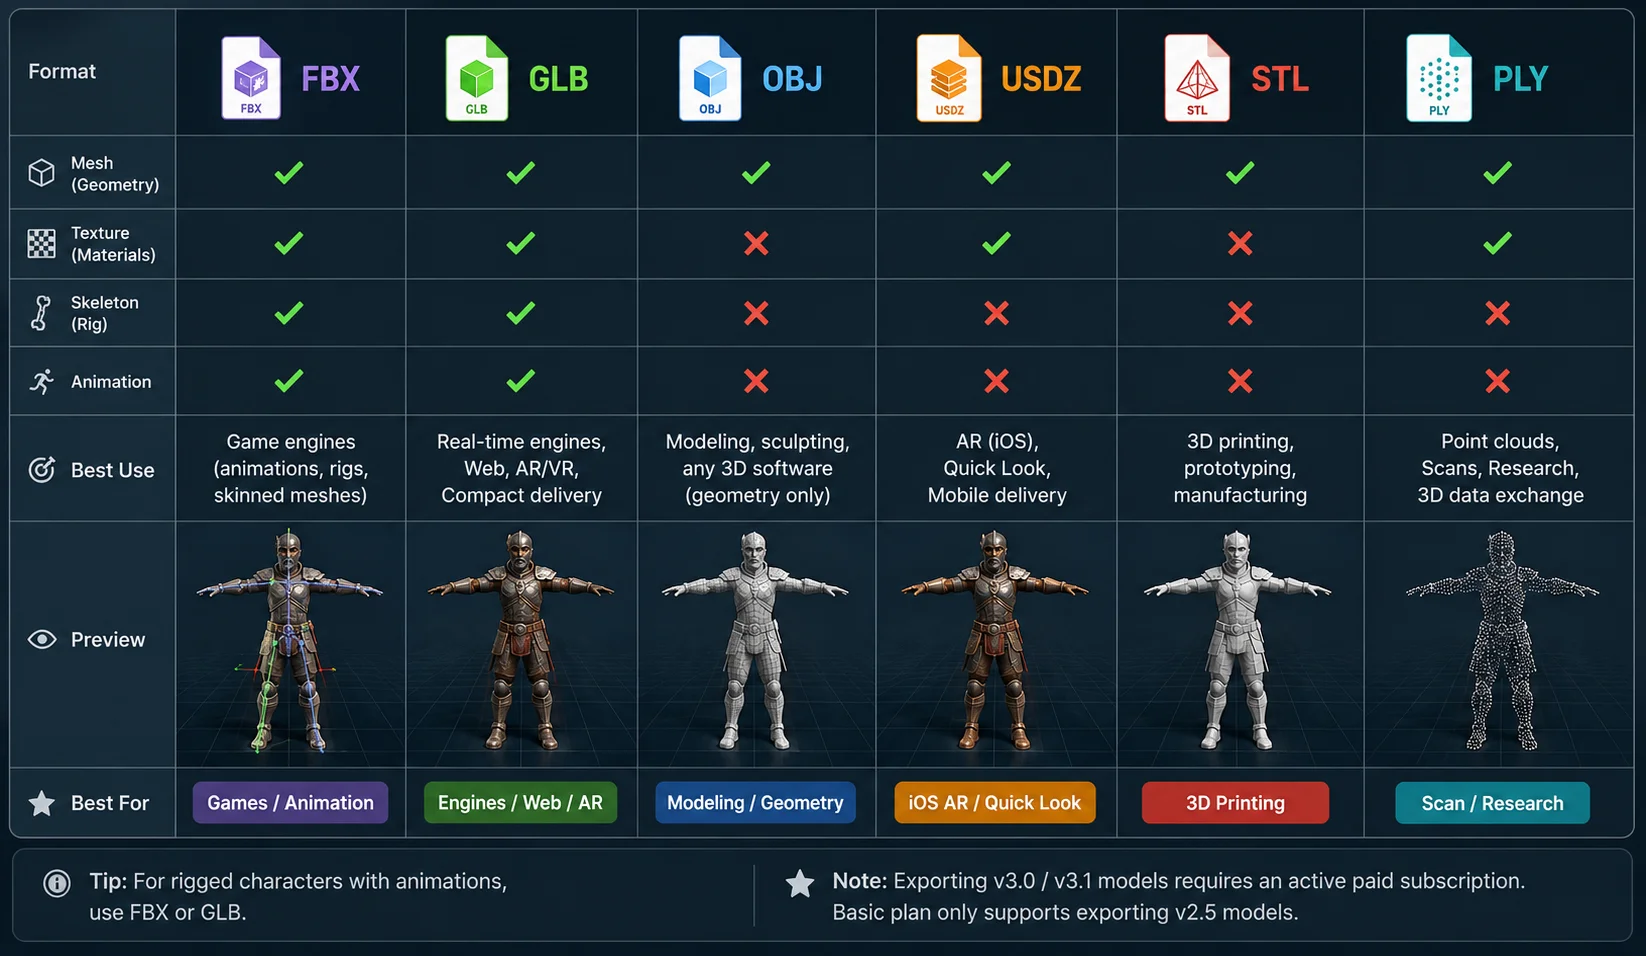
Pick the Right Format
Different formats serve different purposes, and selecting the wrong one can lead to missing textures or broken rigs.
- FBX — The industry standard for games. Supports meshes, skeletons, skin weights, and animations, making it ideal for Unity and Unreal Engine workflows.
- GLB — A compact format that packages geometry, textures, and materials together. Popular for web, AR, and modern engine pipelines.
- OBJ — Stores geometry only. Useful for modeling workflows but does not preserve bones or animation data.
- USD, STL, and 3MF — Commonly used for VFX/animation workflows and 3D printing applications rather than game animation.
If your character includes a skeleton or animation clips, FBX and GLB are generally the best choices. Multiple animation clips can also be exported together to simplify asset management.
Some platforms support six export formats in total, though access may depend on the subscription level. For example, Basic plans may only export legacy v2.5 models, while exporting newer v3.0 or v3.1 assets requires an active paid subscription.
3D Export Formats Comparison
Unity, Unreal, Godot, and Blender
Most engines and DCC applications support direct imports of FBX and GLB files.
- Unity automatically detects humanoid rigs and animation clips through its Avatar system.
- Unreal Engine imports skeletons and animations into the Skeletal Mesh pipeline.
- Godot works well with GLB files and supports real-time PBR materials.
- Blender serves as a common staging environment for editing, baking, and refining assets.
Some workflows also provide DCC Bridge plugins, allowing one-click transfer between generation tools and applications such as Unity, Unreal Engine, Godot, and Blender. This minimizes manual export steps and helps preserve textures, materials, and rig data.
At this point, the AI character model has completed the journey from concept to a fully rigged, engine-ready asset that can be animated and deployed in production.
AI Character Workflow: From Concept to Engine-Ready Asset
AI vs. Hand-Built vs. Marketplace Assets — Which Route?
There is no single "best" way to create game characters. AI generation, traditional modeling, and marketplace assets each serve different needs.
AI Generation
AI tools are fast, affordable, and highly customizable. They are ideal for prototypes and unique hero characters, but the output still needs optimization, texturing, and rigging before it becomes game-ready.
Hand-Modeling (Blender or Maya)
Manual modeling provides the highest level of control over topology, style, and deformation quality. The tradeoff is time and skill—building characters from scratch is slower and requires experienced artists.
Marketplace Packs (Unity Asset Store or TurboSquid)
Marketplace assets offer ready-made characters that can be integrated quickly. They are useful for NPCs and supporting roles, but customization is limited and many projects may end up using the same assets.
In general, AI generation is best for prototypes and exclusive characters, hand-built assets suit established production pipelines, and marketplace packs are a practical choice for filling out game worlds efficiently.
| Method | Speed | Cost | Customization | Game-Ready Out of Box |
|---|---|---|---|---|
| AI Generation | Fast | Low–Medium | High | No (needs optimization + rigging) |
| Hand-Modeling | Slow | High (artist time) | Full | No (same pipeline applies) |
| Marketplace Assets | Instant | Medium | Low | Often yes |
Is It Legal? Commercial Use & Steam's AI Disclosure
Yes, in many cases AI-generated game assets can be used commercially, but legality depends on the source material and platform requirements.
If the prompts, concept art, or reference images you provide do not infringe on someone else's copyright, the generated 3D models are generally considered your assets and can be used in commercial projects. This makes AI character models a viable option for indie games and professional productions alike. However, using copyrighted inputs without permission may create legal risks, so the quality of the source material matters.
Platform policies are equally important. Steam currently allows games containing AI-generated content, but developers are required to disclose how AI is used during the submission process. This applies whether AI is involved in creating art, characters, or other assets.
A practical approach is to treat documentation as part of your workflow. Keep copies of prompts, concept art, and generation records, and use clean, properly licensed inputs whenever possible. These records can help demonstrate ownership and simplify compliance if questions arise later.
In short, AI-generated characters are generally commercial-friendly, but responsible inputs and transparent disclosure remain essential for long-term use.
When AI Character Modeling Falls Short (Limits)
AI character generation has become remarkably capable, but it is not a perfect replacement for traditional character artists.
Highly stylized designs, abstract creatures, and non-humanoid characters can still present challenges. Auto-rigging systems work best with standard humanoids and quadrupeds, so unusual anatomy or extreme poses may require manual rigging and weight adjustments.
Facial animation is another limitation. While AI can generate and rig a character quickly, cinematic-quality facial expressions, lip-sync, and subtle deformations often need additional blendshapes and artist-driven refinement. This is especially important for story-heavy games with close-up cutscenes.
Likewise, AAA-quality hero characters rarely come straight from AI. Professional studios typically use AI as a starting point, then spend significant time refining topology, materials, facial details, and animation quality.
In practice, AI excels at accelerating character creation and prototyping, but the highest-end assets still benefit from human expertise. Treat AI as a powerful assistant rather than a complete replacement for traditional character workflows.
Frequently Asked Questions
Can AI make game models?
Yes, AI can generate 3D character models from text prompts or reference images. These outputs are useful for fast prototyping and concept creation. However, they are not game-ready by default. You still need retopology, UV mapping, texturing, and rigging before using them in a real-time engine.
What is the best AI character creator for games?
The best AI character creator depends on your workflow and engine. Tools that support clean mesh output, texture generation, and FBX or GLB export are usually preferred. For production use, compatibility with Unity and Unreal Engine is important. In practice, the best tool is the one that fits your pipeline from generation to rigging.
Is it legal to make a game with AI?
Yes, in most cases AI-generated assets can be used commercially if your inputs do not violate copyright. This includes prompts and reference images. However, platforms such as Steam require disclosure of AI-generated content during submission. Keeping records of your generation process is recommended for compliance.
Can AI auto-rig a character for animation?
Yes, AI auto-rigging can quickly generate a skeleton and basic skin weights. It works best with humanoid characters in a T-pose or A-pose. The result is often usable for animation in Unity or Unreal Engine. Complex or unusual characters may still need manual adjustment.
What polygon count should a game character be?
Typical budgets vary by platform. Mobile characters are usually 5K–15K triangles, while PC and console characters range from 15K–40K. Hero characters can go higher depending on performance limits. The key is balancing visual quality and real-time performance.
How do I get an AI character into Unity or Unreal?
Export the model as FBX or GLB to preserve mesh, rig, and materials. Then import it into Unity or Unreal Engine and verify the skeleton and textures. Unity supports humanoid rig configuration, while Unreal uses skeletal meshes. Always test animations after import to ensure correct deformation.
Conclusion
From a single concept to a fully rigged, engine-ready character, the pipeline is straightforward: generate the mesh, optimize it into a game-ready asset, auto-rig it for animation, and export it into your engine. Each step turns raw AI output into something usable in real-time production. Your character is now ready to move, animate, and exist inside your game world.
If you want to try this workflow, you can start building your own characters in Tripo AI Studio.