What Is Slicing in 3D Printing? A Beginner's Guide

TL;DR
- Slicing converts a 3D model (STL/3MF) into G-code that the printer can read.
- It breaks the model into thin layers and generates toolpaths for each layer.
- Without slicing, a 3D printer cannot understand or print the model.
- Settings like layer height, infill, supports, and speed control print quality, strength, and time.
- FDM and resin printers use different slicers, but both rely on slicing to create printable instructions.
This guide covers everything you need to know about slicing in 3D printing, from how a slicer converts an STL or 3MF file into G-code to the best slicing software, essential settings, and common mistakes to avoid.
What Is Slicing in 3D Printing?
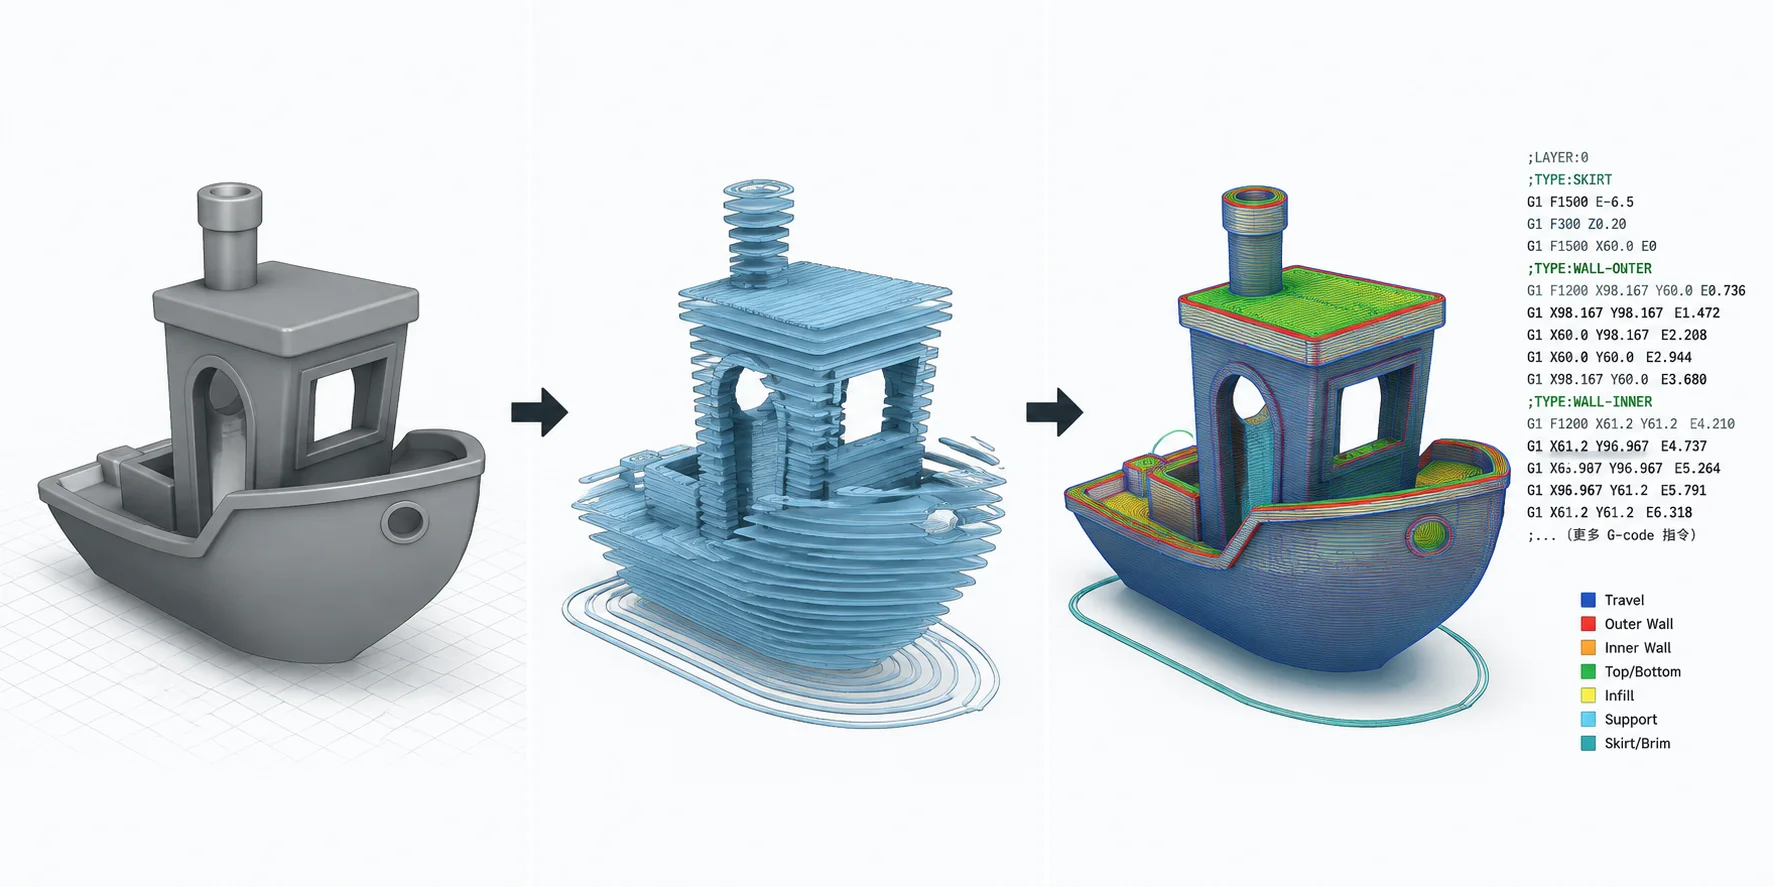
If you're wondering what is slicing in 3D printing, the simplest answer is this: slicing is the process of turning a 3D digital model into a set of thin horizontal layers that a 3D printer can understand and build one by one. Since most 3D printers cannot "see" or interpret a full 3D shape directly, they rely on instructions that describe movement step by step. These instructions are written in a language called G-code, which tells the printer exactly where to move, how fast to move, and when to extrude material.
This translation job is done by slicing software, also known as a 3D printing slicer. The slicer takes a model file—usually an STL / 3MF file—and virtually "cuts" it into hundreds or thousands of thin layers, similar to slicing a loaf of bread or stacking sheets of paper. Each layer becomes a 2D path that the printer can follow, and all layers together recreate the original 3D object. In this sense, the slicer acts like a translator between human-designed geometry and machine-readable motion.
During slicing, the software also decides important print parameters such as layer height, infill, and whether supports are needed for overhanging parts. These settings directly affect print strength, surface quality, and print time. Without slicing, the printer would have no structured plan—just an unreadable 3D shape. With it, the model becomes a precise, layer-by-layer blueprint that the machine can execute reliably.
Why Is Slicing Essential? (What Happens Without It)
Slicing is essential in 3D printing because a printer cannot directly understand a 3D model. Even though you may design an object in CAD and export it as an STL / 3MF file, the printer itself does not recognize solid geometry, surfaces, or mesh structures. Instead, it only understands simple motion instructions—moving along X, Y, Z coordinates and controlling extrusion. Without slicing, the model is just an unreadable digital shape with no actionable instructions.
This is where slicing software (or a 3D printing slicer) becomes critical. It converts the model into a step-by-step build plan by generating G-code, which is the only language most FDM printers understand. The slicer essentially fills the gap between "what the object looks like" and "how the printer should build it." It transforms a static mesh into a dynamic, layer-by-layer route map that controls every movement of the print head.
Without slicing, a 3D printer would have no idea how to start, where to move, or how much material to extrude—meaning printing would be impossible. This is why slicing is not optional but a mandatory step in any workflow.
How Slicing Works (From STL to G-code)
Slicing is the core workflow step that turns a digital 3D model into something a 3D printer can actually build. While designers work with STL / OBJ / 3MF files, these files only describe surfaces and geometry. A printer cannot directly use them. Instead, a 3D printing slicer converts them into G-code, a set of precise machine instructions that control movement, speed, temperature, and extrusion.
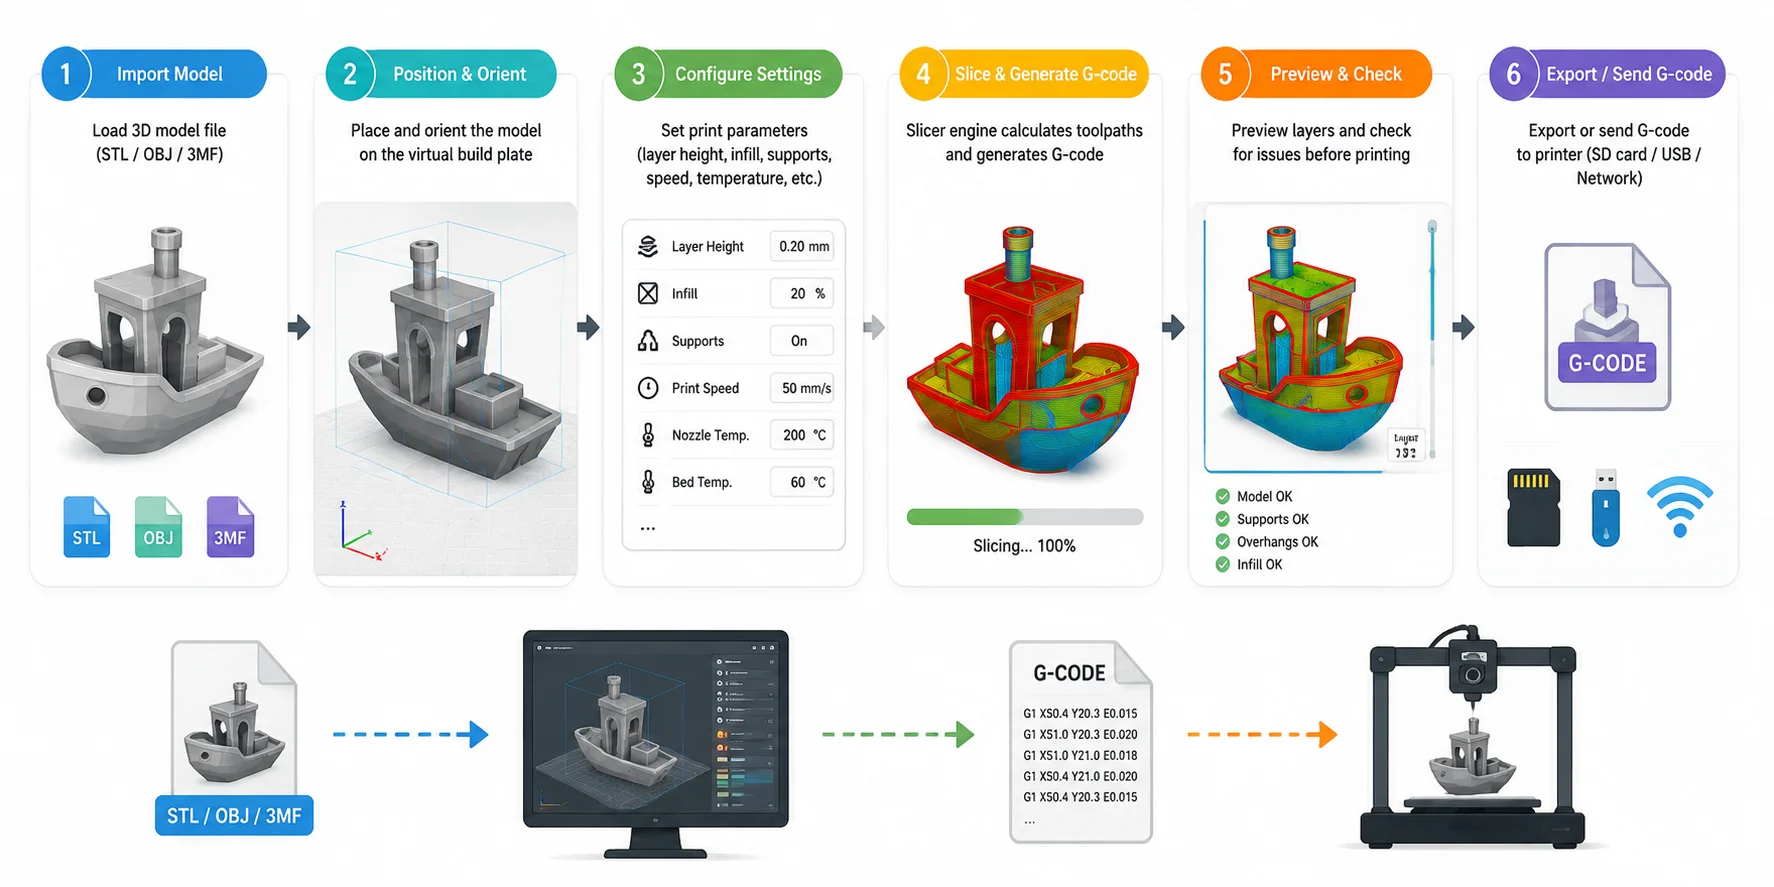
Below is the typical 6-step slicing workflow used in most slicing software:
1. Import the 3D Model (STL / OBJ / 3MF)
You start by loading your model into the slicer. These formats store the shape of the object but not how to print it.
2. Position and Orient on the Virtual Build Plate
The model is placed on a simulated printer bed. Orientation matters a lot—wrong angles can increase supports, weaken strength, or increase print time.
3. Configure Print Settings
This is where key parameters are defined:
- Layer height (detail vs speed)
- Infill (internal structure strength)
- Supports (for overhangs)
- Print speed & temperature
These settings heavily influence quality, strength, and cost.
4. Slice Engine Generates G-code
The slicer now calculates every toolpath and converts the model into G-code, a line-by-line instruction set that tells the printer exactly where to move.
5. Preview and Quality Check (Critical Step)
Most slicers generate a layer preview before printing. This step is often underestimated, but it's effectively a pre-print quality inspection:
- Detect missing supports
- Spot weak overhangs
- Check infill consistency
- Avoid printing failures before they happen
Skipping this step is one of the most common beginner mistakes.
6. Export or Send G-code to Printer
Finally, the G-code is transferred via SD card, USB, or Wi-Fi to the printer, ready for execution.
What Is G-code?
G-code is the fundamental language of 3D printers. It is a line-by-line set of machine commands that tells the printer:
- where to move (X, Y, Z coordinates)
- how fast to move
- when to extrude filament
- when to heat the nozzle or bed
Each line is a direct instruction, such as moving the print head or extruding a specific amount of material. Without G-code, a printer has no idea how to physically build the object—even if it has the full 3D model.
In simple terms:
STL/3MF = shape Slicer = translator G-code = execution language
Where Slicing Fits in the 3D Printing Workflow
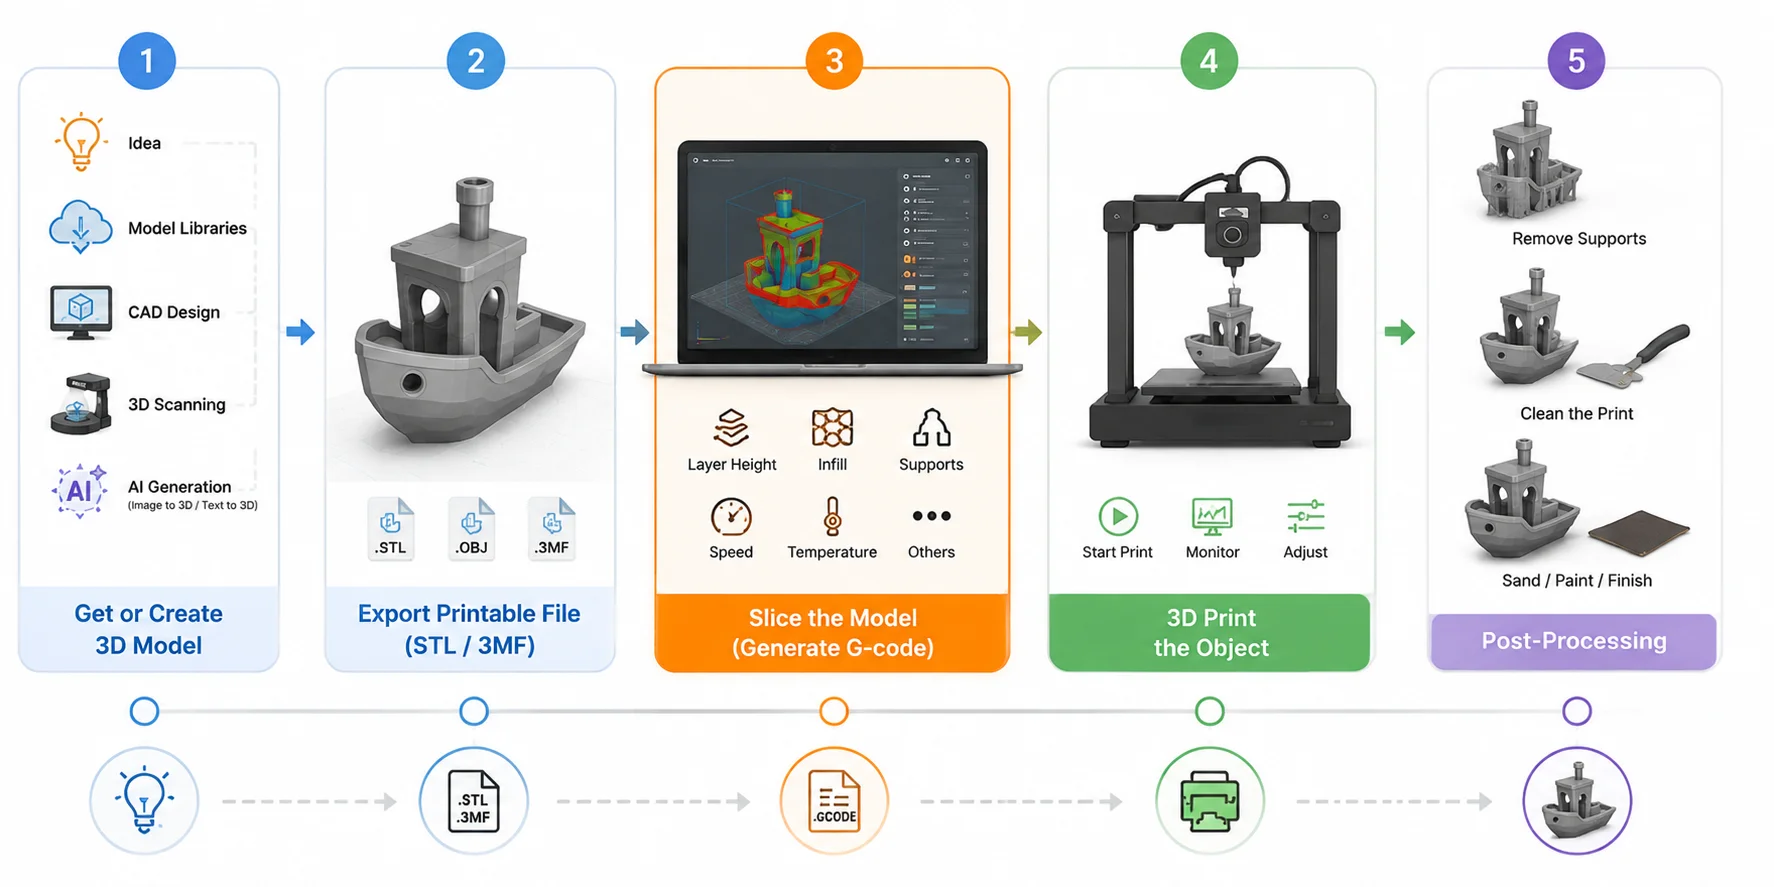
Slicing sits in the middle of the entire 3D printing pipeline, acting as the critical bridge between design and physical production. A complete workflow usually follows five stages:
- Create or obtain a 3D model
- Export it as a printable file (STL / 3MF)
- Slice the model into G-code ← this is the key step
- 3D print the object
- Post-processing (removing supports, sanding, finishing)
So where exactly does slicing fit in? It happens at Step 3, after you already have a valid 3D model file, but before the printer begins any physical movement. In other words, slicing is the point where a digital object becomes a real manufacturing plan.
Without a model, slicing cannot start. You first need a 3D file, which can come from several sources:
- Downloaded from model libraries
- Created in CAD software
- Captured using 3D scanning
- Or generated using AI tools
For example, modern AI platforms like Tripo AI Image to 3D and Tripo AI Text to 3D can generate printable models from a single image or text prompt. These models can then be exported as STL or 3MF files, ready for slicing and printing. In some ecosystems, slicing software is even deeply integrated—models can be sent directly into tools like Bambu Studio for one-click preparation and printing.
Why This Position Matters
This "middle step" is what makes the entire workflow possible. Before slicing, you only have a static mesh file. After slicing, you get a fully defined manufacturing plan (G-code) that tells the printer exactly how to build the object layer by layer.
This is why slicing is often described as the translation layer between design and manufacturing.
Idea → 3D Model → STL/3MF → Slicer → G-code → Physical Object
The slicer is the only stage that:
- converts geometry into motion paths
- defines layer-by-layer construction
- transforms a digital model into machine instructions
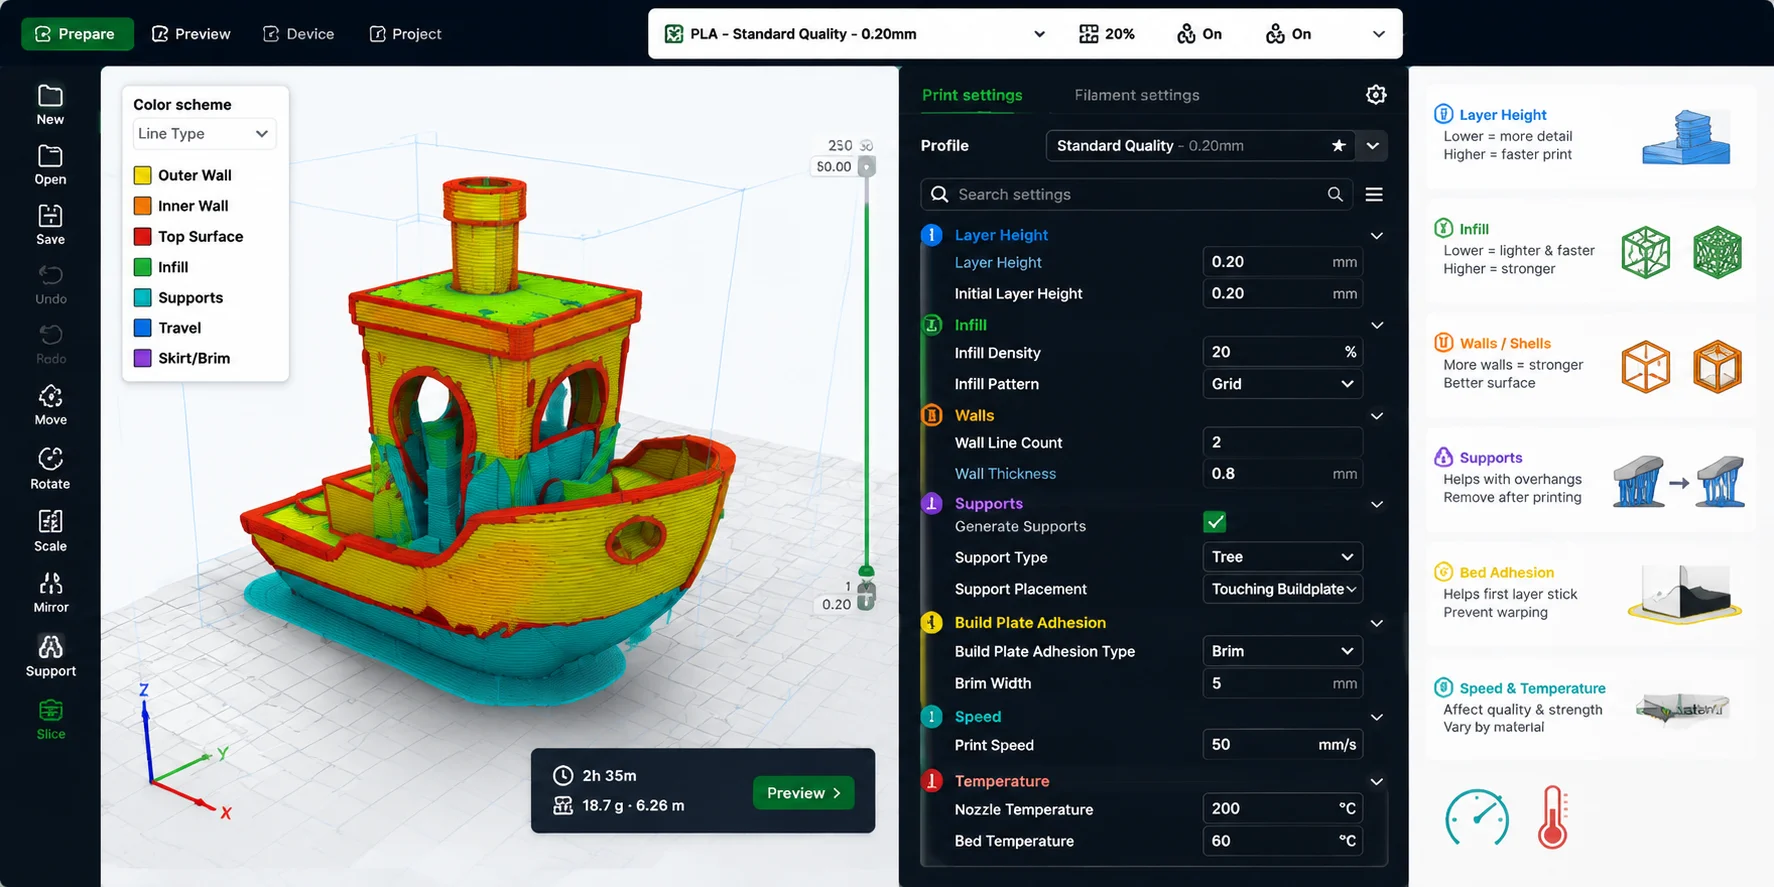
Key Slicing Settings That Control Your Print
Once a model is sliced, the real control over print quality, strength, and speed comes from a set of core parameters inside the 3D printing slicer. These settings decide how the printer interprets the same model in very different ways—ranging from a fast draft print to a highly detailed engineering part.
Layer Height
Layer height is the thickness of each printed layer. It directly controls print resolution and print time.
- What it is: The vertical height of each layer in the sliced model
- How it affects print:
- Smaller layer height → smoother surface, higher detail, slower print
- Larger layer height → faster print, more visible layer lines
- Trade-off: Detail vs speed
- Beginner recommendation: 0.2 mm
Think of it like slicing bread: thinner slices look more refined but take longer to prepare.
Infill
Infill defines how much material fills the inside of the object.
- What it is: Internal structure density inside the shell
- Range: 0% (hollow) to 100% (solid)
- How it affects print:
- Low infill → lighter, faster, weaker
- High infill → stronger, heavier, slower, more material usage
- Beginner recommendation: 15–20%
Most functional prints don't need to be solid; the slicer creates internal patterns (grid, gyroid, etc.) to balance strength and efficiency.
Walls / Shells
Walls (also called shells) are the outer perimeter of a print.
- What it is: Number of outer layers forming the surface
- How it affects print:
- More walls → stronger part, better durability
- Fewer walls → faster print, weaker structure
- Beginner recommendation: 2–3 walls
Walls usually matter more for strength than infill because they take external load first.
Supports
Supports are temporary structures generated by the slicer for overhangs.
- What it is: Removable scaffolding for unsupported geometry
- How it affects print:
- Prevents sagging or collapse in overhangs
- Increases print time and post-processing work
- Beginner recommendation: Enable only when needed
Common beginner issue:
- Too few supports → print drooping or failure
- Too many supports → hard cleanup, surface damage after removal
Bed Adhesion (Skirts, Brims & Rafts)
Bed adhesion settings help the first layer stick properly to the print bed.
- Skirt: A line around the model (no contact) to prime extrusion
- Brim: Extra lines attached to the base to prevent warping
- Raft: A full base layer under the model for difficult prints
- How it affects print:
- Better adhesion → fewer failed prints
- Worse adhesion → warping, detachment mid-print
- Beginner recommendation:
- Skirt: default
- Brim: use for warping-prone parts
- Raft: only for difficult geometries/materials
Print Speed & Temperature
These two settings control how the material is physically deposited and bonded.
- Print speed: How fast the nozzle moves
- Temperature: How hot the nozzle/bed is
- How it affects print:
- Higher speed → faster print, lower accuracy
- Lower speed → better detail, more reliable adhesion
- Higher temperature → better flow, risk of stringing
- Lower temperature → cleaner edges, risk of under-extrusion
- Beginner recommendation: Use slicer defaults for your material (PLA usually works well around moderate speed and ~200°C nozzle temperature)
Popular 3D Printing Slicing Software
When it comes to 3D printing slicers, different software is optimized for different printing technologies and ecosystems. Most slicing software is free to use, but some tools are tightly integrated with specific printer brands for better performance and reliability.
Broadly, slicers fall into two categories: FDM (filament-based) slicing and resin (SLA/DLP) slicing.
FDM vs Resin (SLA) Slicing
FDM and resin printing do not just use different machines—they also use fundamentally different slicing logic.
- FDM slicing focuses on toolpaths (nozzle movement, extrusion, infill structures)
- Resin slicing focuses on layer exposure (light patterns, curing time, layer masks)
In other words:
FDM = drawing paths with melted plastic Resin = projecting light to solidify layers
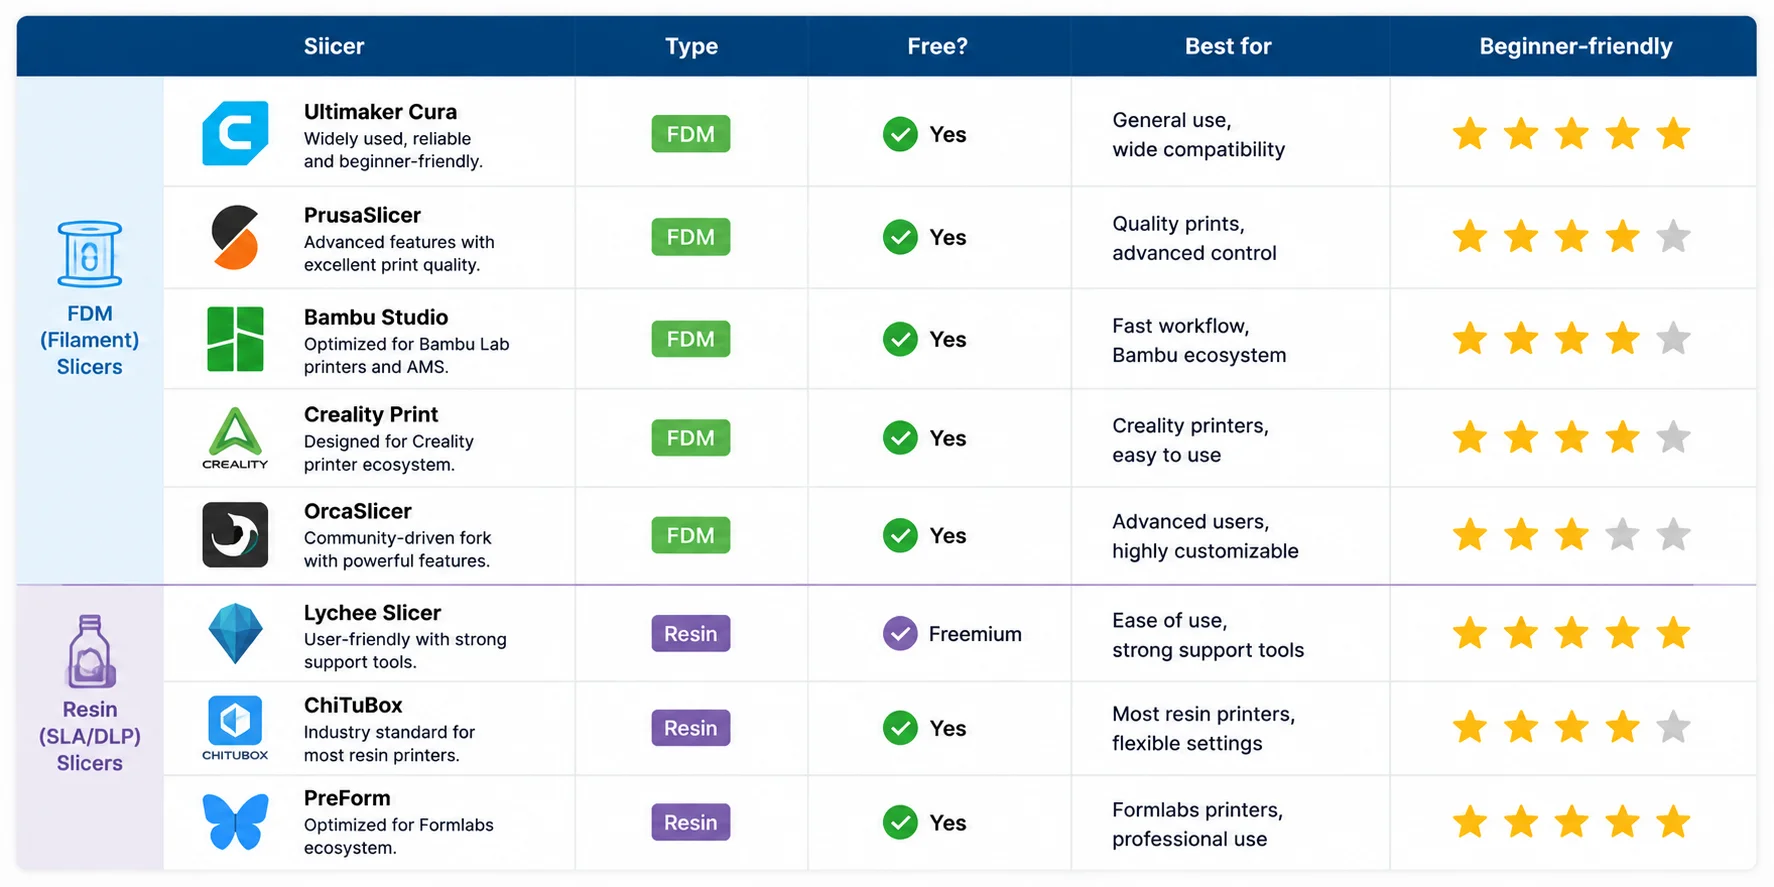
Popular FDM Slicing Software
These are the most widely used slicers for filament 3D printing:
- Ultimaker Cura – beginner-friendly, widely supported
- PrusaSlicer – advanced features, excellent quality control
- Bambu Studio – optimized for Bambu printers, fast workflow
- Creality Print – designed for Creality ecosystem
- OrcaSlicer – powerful community-driven fork with advanced tuning
Popular Resin (SLA/DLP) Slicing Software
Resin slicers are designed for photopolymer printing:
- Lychee Slicer – very user-friendly, strong support tools
- ChiTuBox – industry standard for many resin printers
- Formlabs PreForm – optimized for Formlabs ecosystem
Quick Comparison Table
Common Slicing Mistakes (and How to Fix Them)
Even with good models and a powerful 3D printing slicer, many print failures actually come from incorrect slicing settings rather than the printer itself. Understanding these common mistakes can save a lot of time, material, and frustration.
Supports Set Incorrectly
One of the most common issues is improper support settings.
- What goes wrong:
- Too few supports → overhangs collapse or droop
- Too many supports → hard to remove, surface damage
- Slicer fix:
- Enable tree supports for complex shapes
- Adjust support density and overhang angle
- Use "support only where needed" mode if available
Supports act like temporary scaffolding—just enough, not excessive.
Layer Height Too High or Too Low
Layer height directly affects both quality and print time.
- Too high:
- Visible layer lines
- Weaker layer bonding
- Too low:
- Extremely long print time
- Increased chance of under-extrusion issues
- Slicer fix:
- Balance between speed and detail
- Use 0.2 mm as a safe default
Bed Adhesion Failure (Warping / "Spaghetti Prints")
If the first layer does not stick properly, prints often fail early.
- What goes wrong:
- Model detaches mid-print
- Corners curl upward (warping)
- Filament turns into "spaghetti"
- Slicer fix:
- Enable brim or raft
- Increase first-layer width
- Slow down first layer speed
Bed adhesion is critical because every print depends on a stable foundation.
Under-Extrusion (Gaps Between Layers)
This happens when not enough material is being deposited.
- What goes wrong:
- Weak structure
- Visible gaps between layers
- Brittle parts
- Slicer fix:
- Increase flow rate (extrusion multiplier)
- Raise nozzle temperature slightly
- Reduce print speed
Skipping Slicing Preview
Many beginners skip the preview stage, which often leads to avoidable failures.
- What goes wrong:
- Missing supports not detected
- Weak overhangs unnoticed
- Wrong infill structure
- Slicer fix:
- Always use layer preview mode
- Check toolpaths before printing
This is one of the most effective "free improvements" in 3D printing.
Quick Fix Table
| Mistake | Cause | Slicer Fix |
|---|---|---|
| Support failure | Wrong support density/placement | Adjust supports, use tree supports |
| Layer issues | Wrong layer height | Set ~0.2 mm default |
| Bed adhesion failure | Poor first layer setup | Brim / raft / slower first layer |
| Under-extrusion | Low flow or temp | Increase flow/temperature |
| Print failure ignored | No preview check | Always use slicer preview |
Frequently Asked Questions
Do you have to slice a 3D print?
Yes. Printers cannot read STL/3MF files directly, so slicing is required to generate G-code.
What does slicing mean in 3D printing?
It means turning a 3D model into layers and converting them into G-code instructions.
How long does slicing take?
Usually seconds to minutes, depending on model size and complexity.
What is G-code in 3D printing?
G-code is a set of line-by-line machine instructions that controls how the printer moves and prints.
What is the best slicing software for beginners?
Ultimaker Cura, PrusaSlicer, and Bambu Studio are the easiest for FDM beginners.
Is SLA or FDM better?
FDM is better for strength and cost, while SLA is better for detail and surface quality.
Conclusion
Slicing comes after you have a 3D model. Don't have one yet? With Tripo AI you can turn a single image or a text prompt into a 3D model in seconds and export it as an STL or 3MF file—ready to drop straight into your slicer.