AI Slicer for 3D Printing: AI Across the Whole Pipeline
TL;DR
- "AI slicer" usually means automated help with orientation, supports, calibration, or settings—not fully autonomous printing.
- AI now supports the full workflow, from ideas and model creation to slicing, monitoring, and iteration.
- Bambu Studio, OrcaSlicer, Cura, PrusaSlicer, and Ackuretta offer different levels of automation and control.
- Obico uses camera-based monitoring to detect visible failures such as spaghetti, detached prints, or nozzle blobs.
- Tripo AI works before slicing, generating 3D models from text or images for export to slicers or direct 3MF transfer to Bambu Studio.
This guide covers what "AI slicer" really means, how AI tools fit into every stage of the 3D printing pipeline from model generation to slicing and monitoring, what each major tool actually does, and how to put them together in a practical workflow.
An "AI slicer" usually means slicing software that uses AI to automate the tedious parts of 3D printing—auto-orienting models, generating supports, tuning infill and parameters in one click. But AI now touches the whole pipeline: generating models, slicing, and monitoring prints. Here's where each AI tool actually fits.
What Does "AI Slicer" Actually Mean?
Before discussing AI, it helps to understand slicing.
A 3D printer cannot directly print an STL, OBJ, or 3MF model. It needs instructions that describe how to move the nozzle or light source layer by layer. A slicer takes a 3D model, divides it into horizontal layers, chooses walls, infills, supports, speeds, temperatures, travel moves, and other print settings, then exports machine-readable instructions such as G-code.
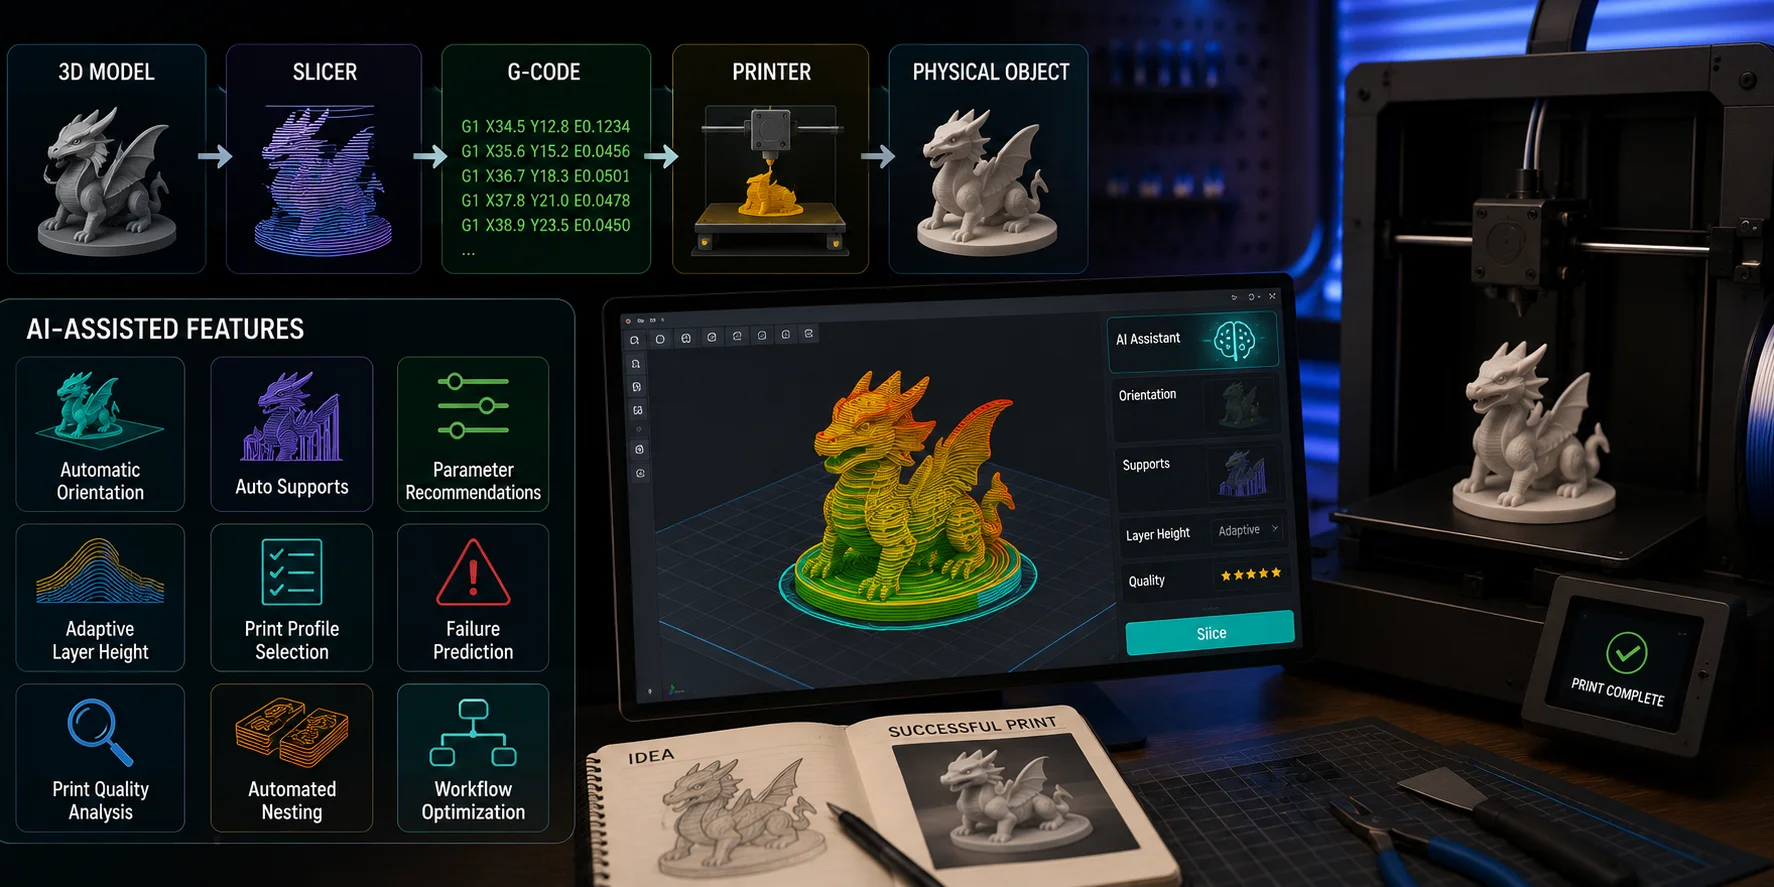
In other words:
3D model → slicer → G-code → printer → physical object
An "AI slicer" usually means a slicer or print-preparation tool that adds AI-assisted or automated functions. These may include:
- automatic model orientation;
- automatic support generation;
- parameter recommendations;
- adaptive layer-height decisions;
- print-profile selection;
- failure prediction;
- print-quality analysis;
- automated nesting;
- workflow optimization.
The important distinction is that AI slicer is not always a separate product category. Sometimes it refers to a dedicated AI-assisted slicer, especially in professional or dental workflows. Other times, it is informal language used for standard slicers with automatic tools.
That is why you should look at the actual feature, not just the label.
A tool may say "smart orientation," "intelligent supports," "automatic calibration," or "adaptive slicing" without using machine learning in the strictest sense. These functions can still be valuable, but they are not identical to generative AI or camera-based failure detection.
There is also a naming trap: 3D Slicer is a separate medical-imaging software platform used for analyzing medical scans and creating visualizations. It is not a consumer FDM slicer like Cura, OrcaSlicer, PrusaSlicer, or Bambu Studio. The names are similar, but the purposes are completely different.
For hobby printing, the practical question is not "Which slicer has the most AI?" It is:
Which tools reduce setup time or failed prints without taking away the control I need?
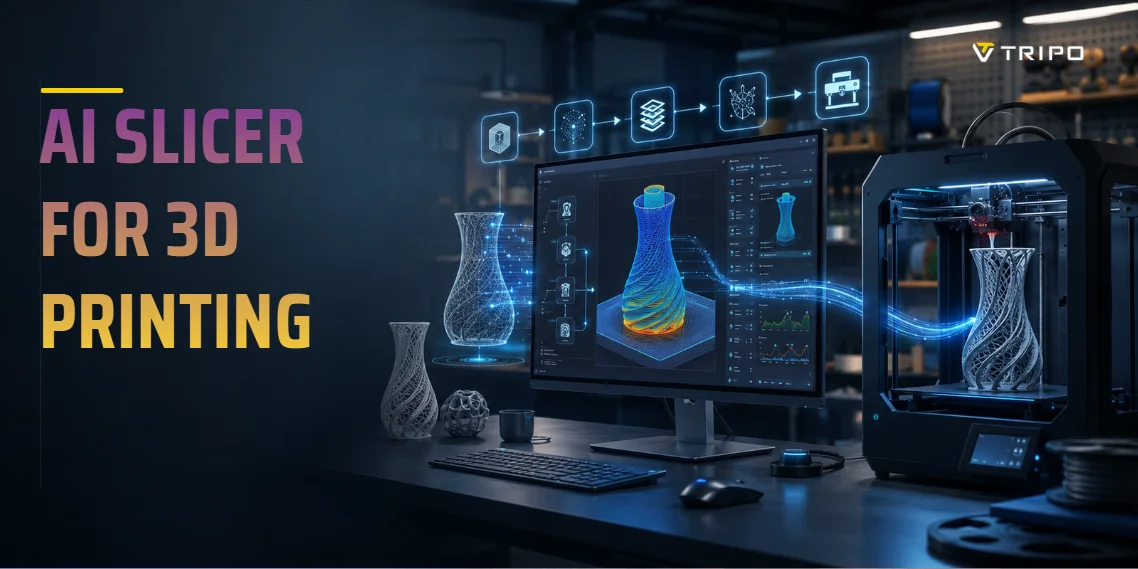
AI Across the 3D Printing Pipeline: Design → Model → Slice → Print → Post
AI does not live in only one place. It is gradually entering every stage of the printing workflow.
A complete AI-assisted print pipeline can look like this:
- Design and ideation — generate concepts, reference images, product ideas, or variations.
- Model creation — Turn text, sketches, or images into a 3D model.
- Model preparation — Repair geometry, check thickness, simplify details, and prepare printable surfaces.
- Slicing — Choose orientation, supports, infill, layer height, temperature, speed, and toolpaths.
- Printing and monitoring — Watch the print, detect failures, pause when something goes wrong, and collect print data.
- Post-processing — Remove supports, clean surfaces, paint, assemble, inspect, and improve the next iteration.
The important point is that different tools serve different stages.
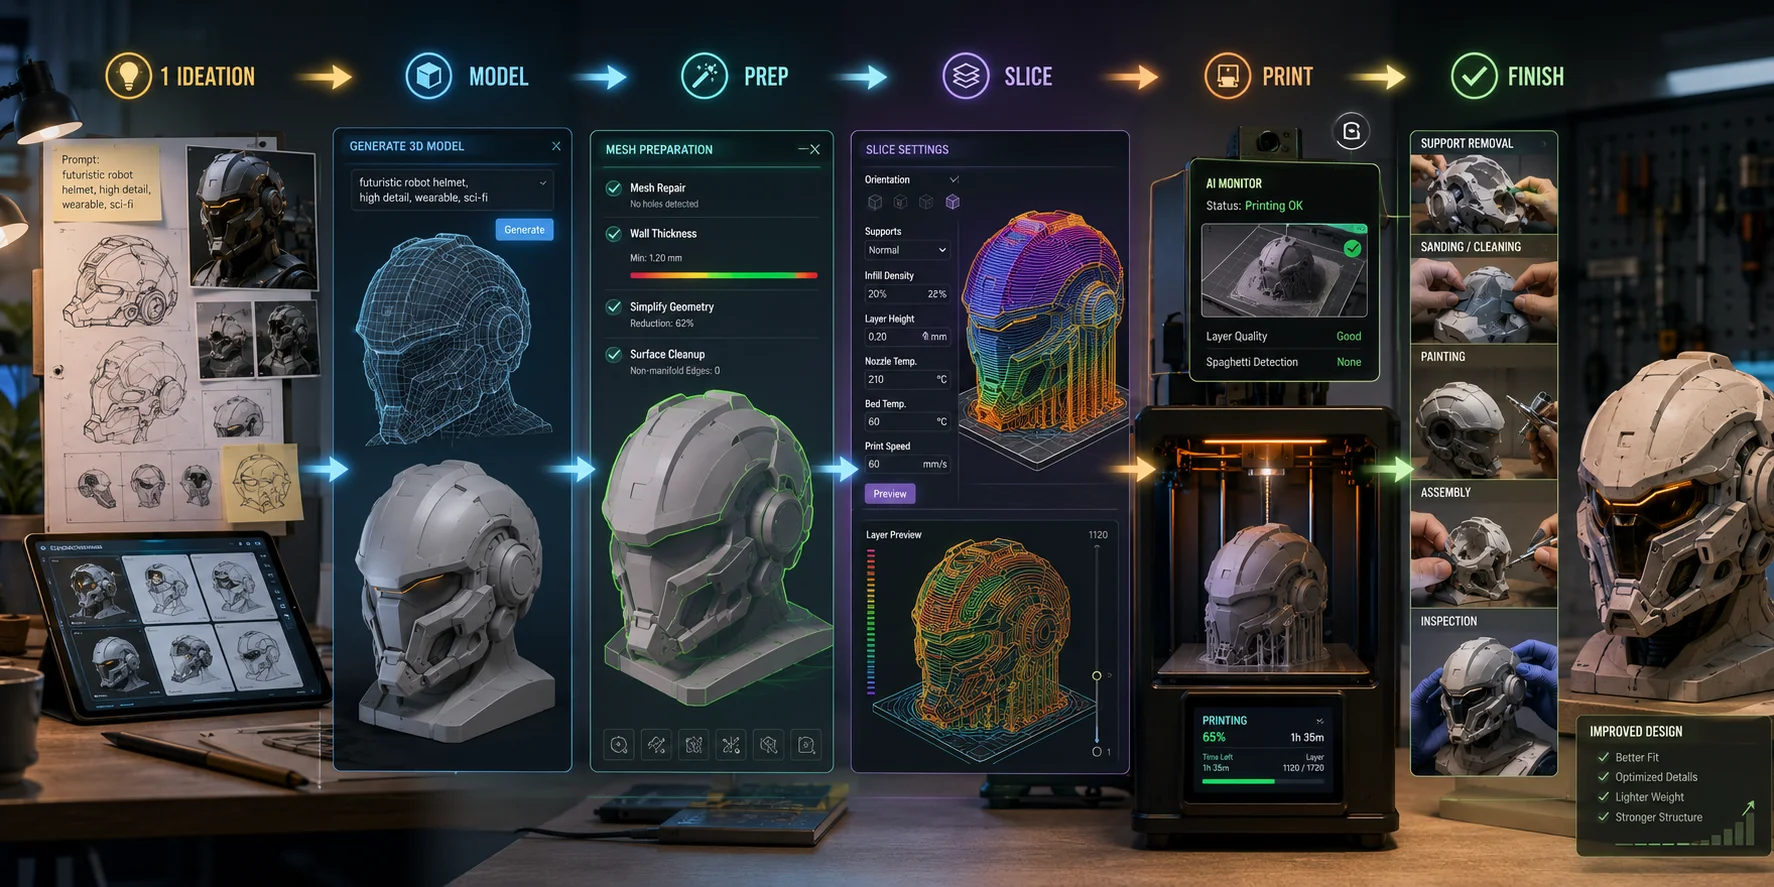
An AI model generator is not a slicer. A camera-based failure detector is not a model generator. A slicer with automatic support is not a full print-monitoring system. A strong workflow uses the right tool at the right stage.
Design and ideation
At the very beginning, AI can help you decide what to make. You might use an image generator or language model to explore ideas such as a fox-shaped planter, a sci-fi cable organizer, a fantasy dice tower, a custom desk ornament, or a wall-mounted headphone holder.
This stage is not about G-code or printer settings. It is about deciding what the object should look like, how it should function, and what constraints it needs to meet.
For practical objects, it helps to include print-related details in the design brief from the start—a flat base, thick walls, no fragile spikes, room for drainage, or minimal overhangs.
Model creation
The model must exist before any slicer can slice it.
Traditionally, you create the model in CAD, sculpting software, or polygon-modeling tools. AI now adds another route: text-to-3D and image-to-3D generation.
A model generator can start with a text description, a hand sketch, a product photo, a concept-art image, a pet photo, a logo, or a reference object, then produce a 3D starting model that can be exported into a traditional print workflow.
This is useful when you want something that STL libraries do not have: a custom figurine, unusual planter, personalized ornament, themed desk toy, photo-based keepsake, or a visual prototype for an idea you may later refine.
However, AI-generated models are not automatically perfect for printing. They may need mesh repair, a flatter base, thicker features, fewer floating details, or simpler geometry.
Model preparation
Model preparation is where an attractive 3D object becomes a practical printable part. Before slicing, inspect the model carefully: is the mesh watertight, are there holes or non-manifold edges, is the model scaled correctly, does it have a stable base, are thin details strong enough at the intended size?
Automation can help identify some of these problems, but it cannot fully judge how the object will be used. A decorative figurine may need a different approach from a tool holder.
Slicing
This is the stage most people mean when they talk about AI slicing.
Slicing software can automate or assist decisions such as choosing a stable orientation, detecting overhangs, generating supports, selecting tree or standard supports, varying layer height, arranging models on the build plate, estimating material use, and suggesting printer profiles.
These functions can save time, especially when you are preparing many models or learning how a new material behaves. Still, automatic settings should be treated as a first draft. A slicer cannot always know which surface will be visible, which direction the part will be stressed, or whether a small orientation change will make a functional part much stronger.
Printing and monitoring
During the print, AI is less about G-code and more about observation. Camera-based monitoring tools can watch a print in progress and look for visible failure patterns such as spaghetti, detached models, nozzle blobs, severe layer shifts, and first-layer failures. This can save material and stop a printer from continuing a failed job for hours.
Monitoring does not replace proper setup. You still need clean build surfaces, good first-layer adhesion, dry filament, a stable printer, and sensible print settings.
Post-processing and iteration
AI can also help after printing—summarizing print notes, comparing failed settings, generating a troubleshooting checklist, suggesting design revisions, or creating a revised model concept. The physical print still gives the final answer.
AI Features Inside Slicers: OrcaSlicer, Bambu Studio, and Others
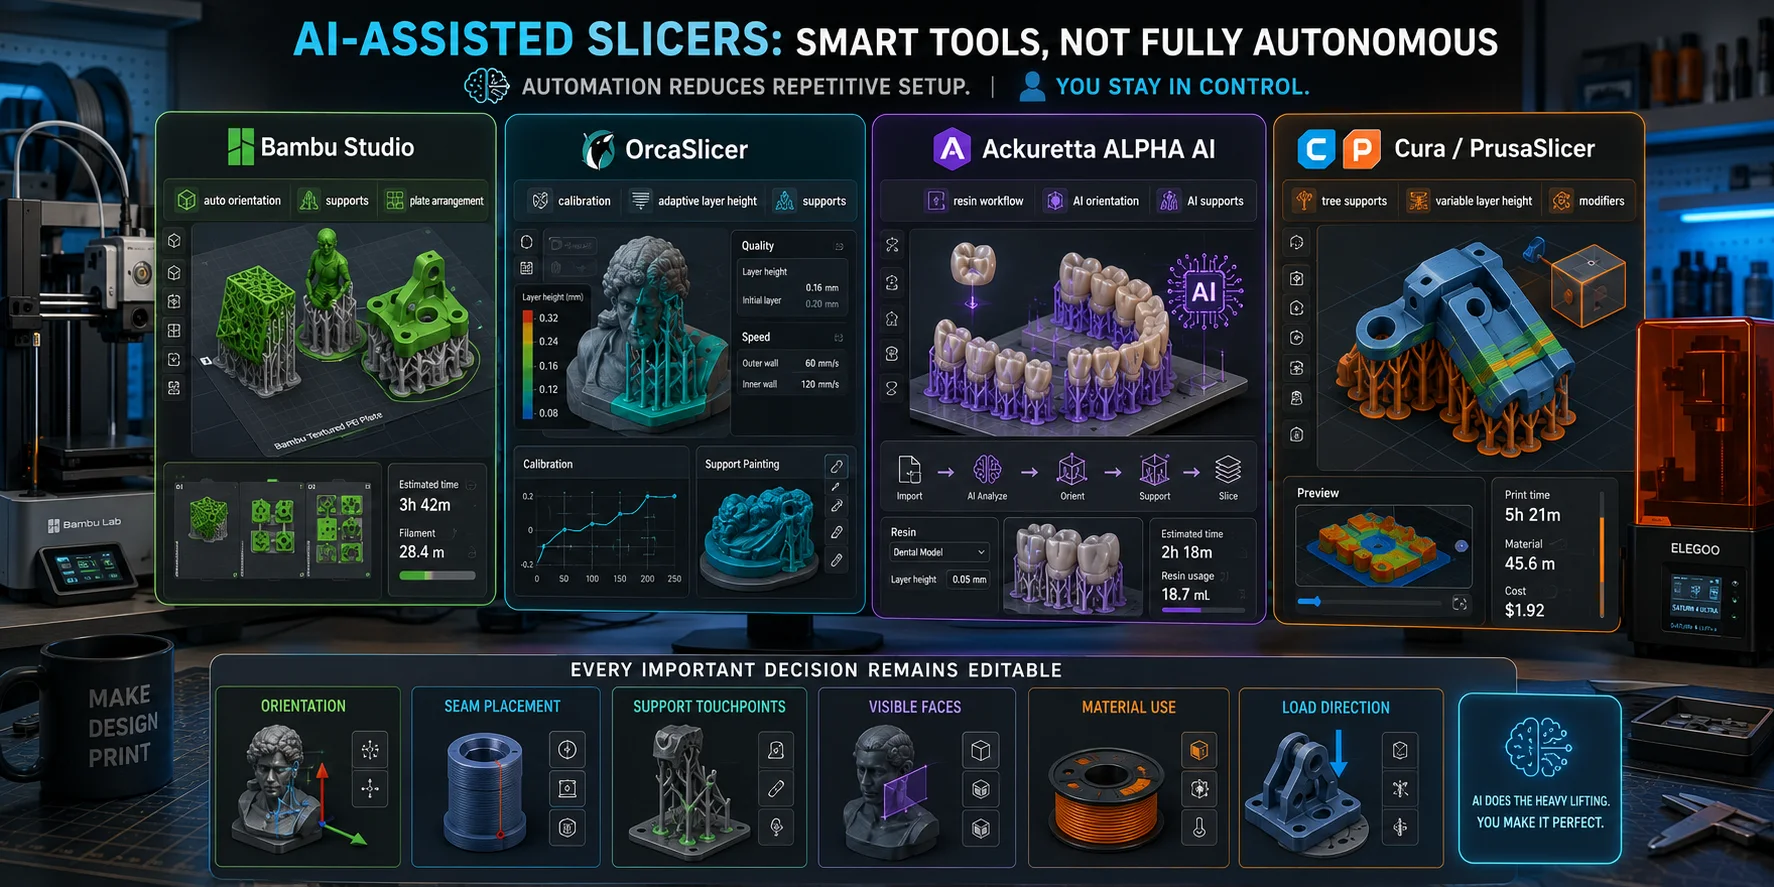
Most consumer slicers are not autonomous AI systems. They are print-preparation tools that combine established slicing logic with automation for orientation, supports, calibration, and profile selection.
Bambu Studio
Bambu Studio provides automated tools for model orientation, support generation, plate arrangement, material assignment, and print analysis. These features can quickly produce a workable starting setup, especially for organic models or beginner projects.
However, automatic orientation is not always the best choice. Before printing, review bed contact, support touchpoints, seam placement, visible faces, material use, and load direction.
OrcaSlicer
OrcaSlicer is an open-source slicer focused on calibration, multi-printer compatibility, and detailed print control. Key functions include automatic supports, support painting, adaptive layer height, printer profiles, flow and pressure-advance calibration, temperature towers, retraction testing, and detailed speed controls.
Ackuretta ALPHA AI
Ackuretta ALPHA AI uses AI-generated orientation and supports for resin-based professional workflows, particularly dental applications such as crowns, splints, surgical guides, and dental models. Its one-click workflow suits repeatable, validated production environments.
Lychee Slicer
Lychee Slicer targets resin printing. Its Gen 2 release added AI-assisted automatic orientation and support generation, a custom support editor, and batch import for preparing multiple models in a single session.
Cura and PrusaSlicer
Cura and PrusaSlicer include automatic supports, tree supports, variable layer height, orientation tools, support blockers, modifier meshes, material presets, and print-time estimates. For most users, reliable automation matters more than an AI label.
AI for Print Monitoring: Catching Failures Live
Obico, formerly The Spaghetti Detective, uses camera-based AI detection to monitor prints and identify visible failure patterns. Depending on the setup, it can send alerts, provide remote viewing, or pause the printer when a potential issue is detected.
It may help identify spaghetti from a detached print, nozzle blobs, failed first layers, major layer shifts, and collapsed supports. Monitoring is not perfect—lighting changes, reflections, and blocked camera angles can lead to false alerts or missed failures.
Where AI Model Generation Fits: Before You Even Slice
A slicer cannot slice an idea. It needs a 3D model first. Text-to-3D and image-to-3D tools operate before slicing. They create the model that is later opened in Cura, OrcaSlicer, PrusaSlicer, Bambu Studio, or another slicer.
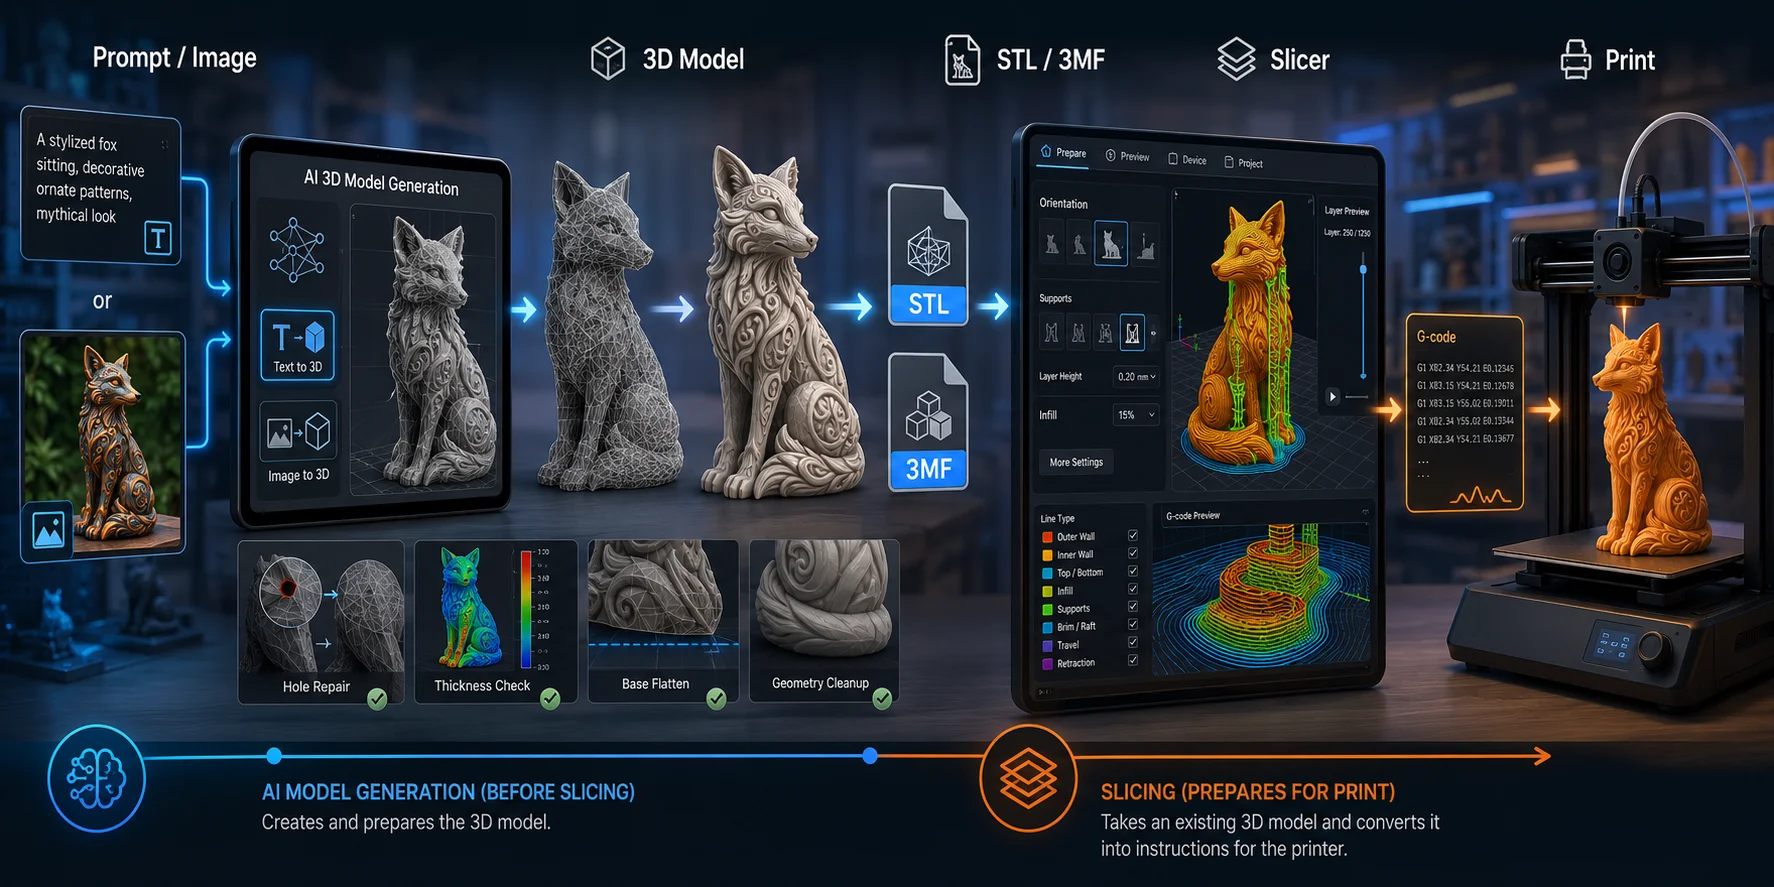
The workflow is:
Prompt or image → 3D model → mesh review and repair → export → slicer → G-code → print
Tripo AI Image to 3D can turn a reference image into a 3D starting model. For more polygon detail and texture fidelity, Tripo AI High-Detail Model generates up to 2 million triangles with richer geometry, suited for 3D printing and detailed visual output.
For 3D printing, export format matters. "STL – Standard format for 3D printing (geometry only)" is the practical choice when you only need the printable shape. "3MF – Modern 3D printing format supporting colors and textures" is useful when your print workflow benefits from additional information beyond geometry.
For Bambu Lab users, Tripo Studio provides a more direct handoff. A 3D model generated by Tripo AI can go straight from your browser into Bambu Studio with just one click. The model is sent in 3MF format. Note that one-click sending of colored models to Bambu Studio is not supported yet—for colored models, use "Export Multi-Color Printable File" and import manually.
For image-based workflows, Tripo recommends: Upload or generate image → Grayscale processing → HD Model with Texture OFF, Ultra, 2M triangles, Parts: Medium, latest version → Retry → Segment & Complete → Export
After export, you may still need to flatten the base, remove floating geometry, repair holes, thicken fragile parts, simplify tiny details, reduce extreme overhangs, or add drainage holes for resin prints.
AI model generation is especially useful for personalized figurines, pet-inspired decor, photo-based keepsakes, themed planters, one-off ornaments, custom desk toys, and visual prototypes. For precise mechanical parts, CAD remains the better choice.
Pros and Cons of AI Slicing and AI Print Tools
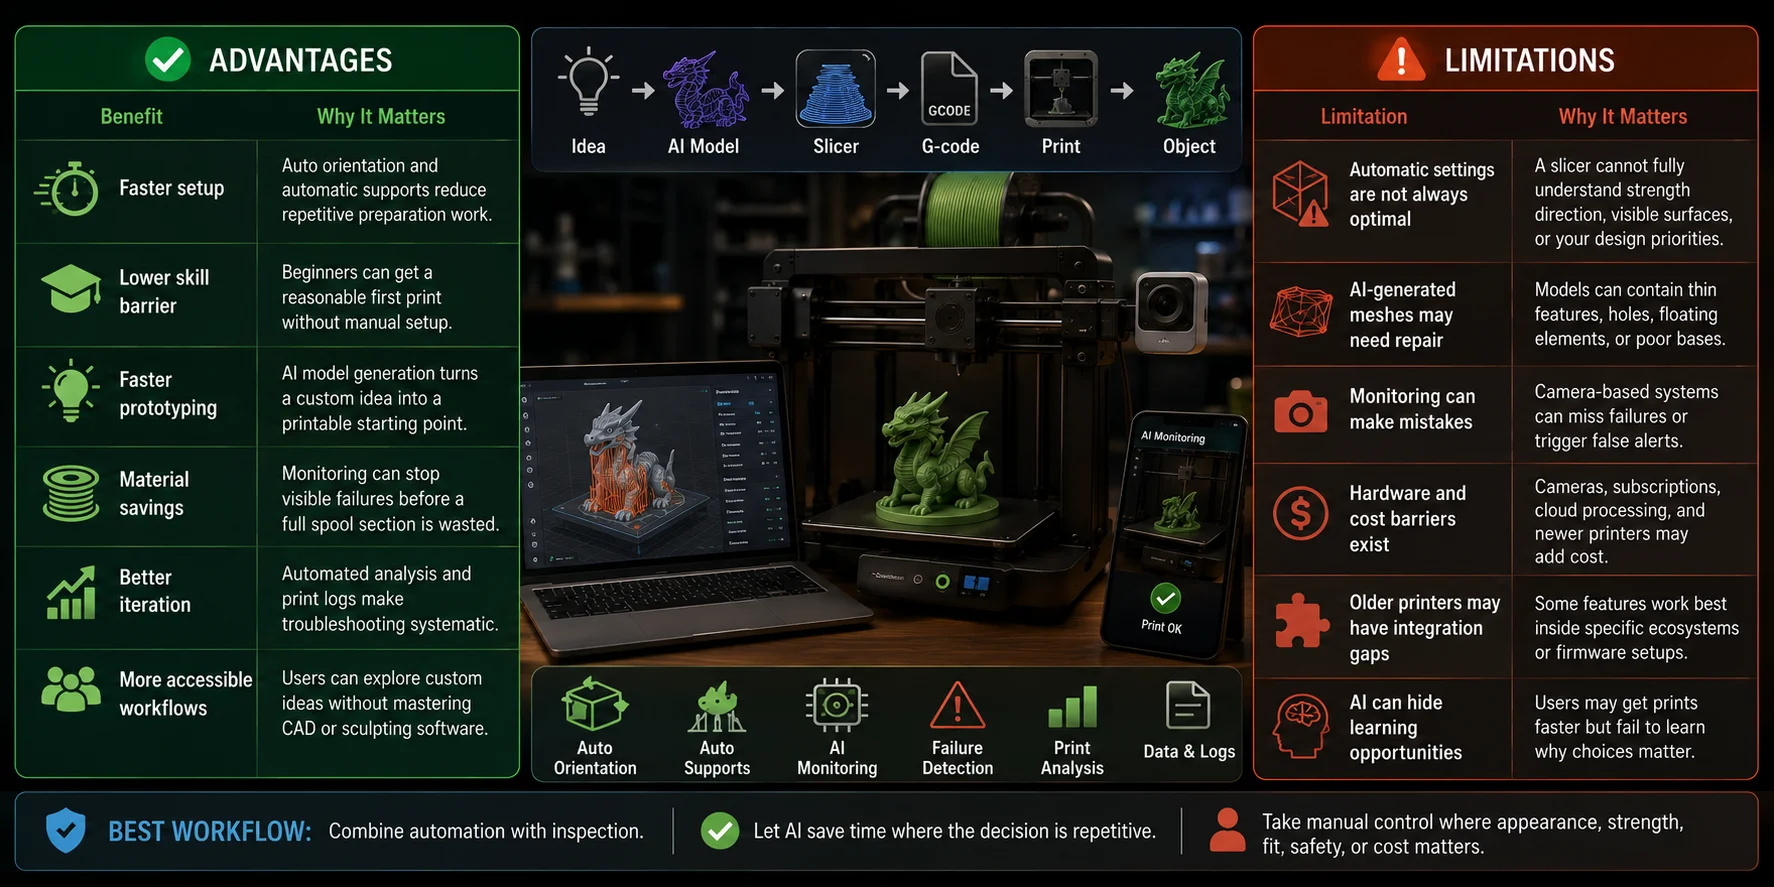
Advantages
| Benefit | Why It Matters |
|---|---|
| Faster setup | Auto orientation and automatic supports reduce repetitive preparation work. |
| Lower skill barrier | Beginners can get a reasonable first print without manually configuring every option. |
| Faster prototyping | AI model generation can turn a custom idea into a printable starting point. |
| Material savings | Monitoring can stop visible failures before a full spool section is wasted. |
| Better iteration | Automated analysis and print logs can make troubleshooting more systematic. |
| More accessible workflows | Users can explore custom ideas without mastering full CAD or sculpting software first. |
Limitations
| Limitation | Why It Matters |
|---|---|
| Automatic settings are not always optimal | A slicer cannot fully understand strength direction, visible surfaces, or your design priorities. |
| AI-generated meshes may need repair | Models can contain thin features, holes, floating elements, or poor bases. |
| Monitoring can make mistakes | Camera-based systems can miss failures or trigger false alerts. |
| Hardware and cost barriers exist | Cameras, subscriptions, cloud processing, and newer printers may add cost. |
| Older printers may have integration gaps | Some features work best inside specific ecosystems or firmware setups. |
| AI can hide learning opportunities | Users may get prints faster but fail to learn why supports, orientation, and material choice matter. |
The best workflow combines automation with inspection. Let AI save time where the decision is repetitive. Take manual control where appearance, strength, fit, safety, or cost matters.
How to Use AI From Image or Text to Finished Print: Step by Step
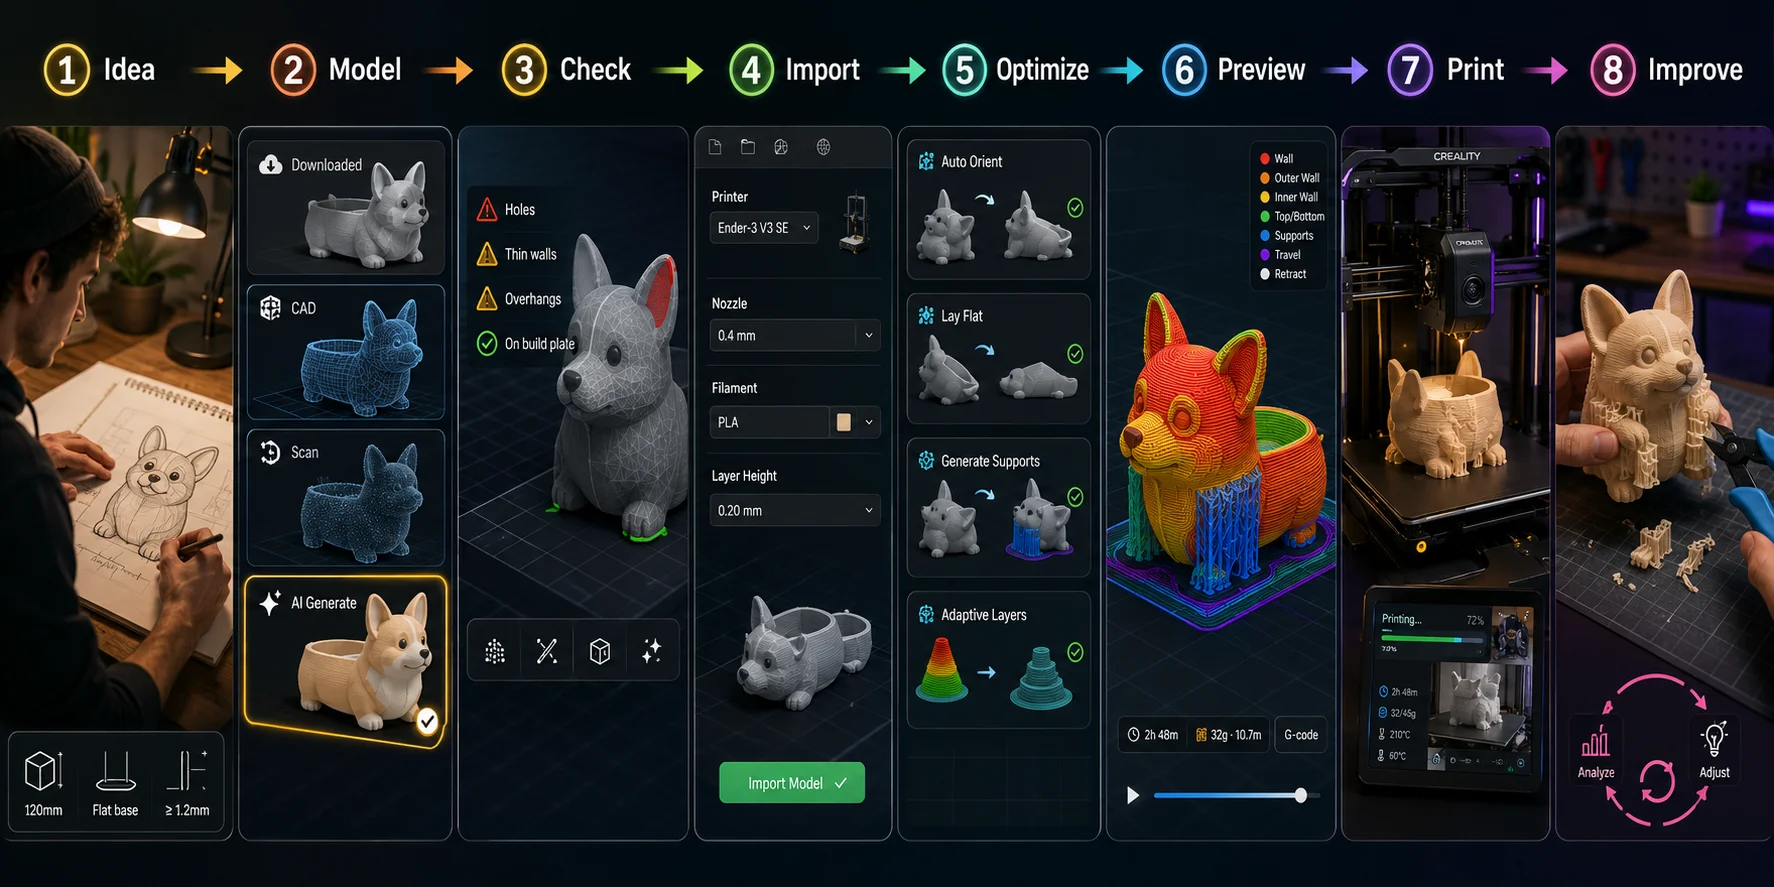
Start with an idea
Choose a project that benefits from customization, such as a pet-shaped planter, a custom game token, a photo-based gift, or a themed wall decoration. Write down the important constraints: approximate size, intended material, flat base, wall thickness, whether it needs drainage, whether it will hold weight, and whether it should print without support.
Generate or acquire a 3D model
You can download an existing model, create one in CAD, scan an object, or use an AI generator. For an AI workflow, use a clear text prompt or an image with one obvious subject and minimal background clutter. Export the model as STL, OBJ, or 3MF depending on the tool and your intended workflow.
Inspect and repair the model
Open the model in your slicer or mesh-repair software. Check scale, base contact, wall thickness, disconnected geometry, holes, tiny details, overhangs, trapped material, and support needs.
Import into a slicer
Open the file in OrcaSlicer, PrusaSlicer, Bambu Studio, Cura, or the slicer recommended for your printer. Choose the correct printer profile, nozzle diameter, filament type, and build plate.
Use automatic tools as a starting point
Use auto orientation or lay-flat tools to find a reasonable starting position. Enable automatic supports if the model has overhangs, then inspect them manually. Check whether supports touch an important visible surface, whether they are too dense, and whether the model has enough bed contact.
Preview the slice
Never print without checking the preview. Look for missing layers, unsupported islands, thin walls, unexpected gaps, support overload, seams on visible faces, excessive print time, and weak layer orientation. The preview is where you catch many expensive mistakes.
Print and monitor
Watch the first layer in person. For longer jobs, use a camera and AI monitoring tools such as Obico if it fits your setup. Configure alerts carefully and avoid assuming the tool will catch every failure.
Finish, test, and improve
Remove supports, inspect the object, test fit, and evaluate strength. If the print fails, identify the cause—poor bed adhesion, weak orientation, incorrect temperature, insufficient support, moisture in filament, too-fast print speed, or geometry problems—then update the model or settings and print again. That loop—idea, model, slice, print, test, revise—is where AI becomes genuinely useful.
Frequently Asked Questions
Is there an AI tool for 3D printing?
Yes. AI tools now exist for model generation, support and orientation assistance, failure detection, print monitoring, workflow analysis, and design ideation. Different tools serve different stages, so an AI model generator is not the same as an AI-assisted slicer or camera-monitoring system.
Can ChatGPT actually make STL files?
ChatGPT can help write code for simple parametric models, generate OpenSCAD scripts, explain CAD steps, or help create a model specification. It does not reliably replace dedicated 3D modeling software for complex printable objects. For visual objects, you may also use text-to-3D tools, then inspect and repair the exported geometry before slicing.
What is the best slicer program for 3D printing?
The best slicer depends on your printer and goals. Cura is widely compatible and beginner-friendly. PrusaSlicer is respected for reliability and detailed controls. OrcaSlicer is popular for advanced calibration and multi-printer workflows. Bambu Studio is the natural choice for Bambu Lab printers.
What is an AI slicer in 3D printing?
An AI slicer is slicing software that uses machine learning or automated algorithms to handle tasks like model orientation, support generation, parameter tuning, and layer height adjustment. The term is used loosely—some tools apply strict machine learning, while others use rule-based automation marketed as AI.
How does AI improve 3D printing slicing?
AI helps by automating decisions that would otherwise require trial and error: finding a stable orientation, placing supports only where the model needs them, adjusting layer height across curved surfaces, and suggesting material profiles. The result is faster setup and fewer failed first attempts.
What is the difference between an AI slicer and a regular slicer?
A standard slicer lets you configure settings manually and applies fixed algorithms for toolpath generation. An AI-assisted slicer adds automation that suggests or applies settings based on the model's geometry. The underlying slicing engine is often the same—the difference is how much of the setup the software handles for you.
What AI features does Bambu Studio have?
Bambu Studio includes automated orientation, support generation, plate arrangement, material assignment, and print analysis. These tools can produce a workable starting setup quickly, but the results should still be reviewed before printing.
Is there a free AI slicer for 3D printing?
Yes. OrcaSlicer, PrusaSlicer, and Cura are free and include automation features commonly described as AI-assisted. Bambu Studio is also free for Bambu Lab printers. Paid tiers appear mainly in professional or cloud-connected tools.
Can AI detect 3D printing errors automatically?
Yes, with camera-based monitoring tools. Obico watches a print in real time and flags visible failure patterns—spaghetti, detached models, nozzle blobs, layer shifts—then can pause the printer when it detects a likely problem. Detection is not foolproof, so treat it as an extra safety layer rather than a replacement for first-layer inspection.
What is the best AI slicer for beginners?
For FDM printing, Bambu Studio is beginner-friendly if you own a Bambu Lab printer. Cura works well for other printers and has a large community for troubleshooting. OrcaSlicer offers more control but has a steeper learning curve.
Conclusion
AI is becoming part of the full 3D printing workflow, from early ideas and model creation to slicing, monitoring, and iterative improvement. Its best role is not to remove your control, but to reduce repetitive work and help you get from concept to test print more quickly.
A slicer still needs a printable model to begin with. When you want to turn a photo or prompt into a custom starting model, Tripo AI Studio can generate the geometry upstream of slicing, then send compatible models directly to Bambu Studio in 3MF format for final print preparation.