Von flachen Diagrammen zur 3D-Realität: Wie eine Geografielehrerin YouMind und Tripo nutzte, um unterirdische Strukturen an die Oberfläche zu bringen
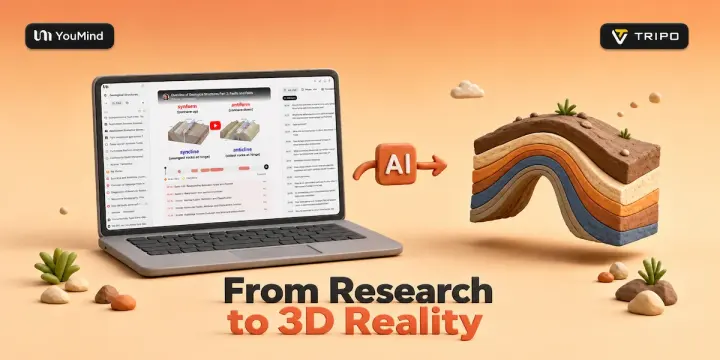
Sarah starrte auf das Querschnittsdiagramm eines Faltengebirges in ihrem Lehrbuch und runzelte die Stirn.

Dies war ihr fünftes Jahr als Geografielehrerin an einer Highschool, und jedes Mal, wenn sie das Kapitel „Krustenbewegung und geologische Strukturen“ erreichte, zeigten die Schüler dieselbe Reaktion: Sie starrten auf diese roten und grünen Querschnittsdiagramme, versuchten sich vorzustellen, wie sich Gesteinsschichten tausende Meter unter der Erde verbiegen könnten, und lernten dann vor der Prüfung den Satz „Antiklinalen bilden Berge, Synklinalen bilden Täler“ auswendig.
Das Problem war nicht, dass die Schüler sich nicht genug anstrengten. Das Problem war, dass zweidimensionale Querschnittsdiagramme dreidimensionale geologische Strukturen nicht vermitteln können, geschweige denn den Schülern helfen, die Dimension der „Zeit“ zu verstehen.
Letztes Jahr versuchte sie, Dokumentarfilme zu zeigen, aber diese Luftaufnahmen zeigten nur die Berge an der Oberfläche, nicht die unterirdischen Gesteinsschichten. Sie versuchte auch, fertige geologische Modelle zu kaufen, aber diese Kunstharzmodelle waren entweder zu einfach (nur drei oder vier Schichten, konnten keine Sedimentationsabfolgen zeigen) oder zu teuer (ein detailliertes Modell kostete mehrere hundert Dollar, und ihr Budget ließ nur eines für ihr Büro zu).
Vor allem aber hatte sie keine Möglichkeit, die vorhandenen Modelle anzupassen, um es zu demonstrieren, wenn Schüler fragten: „Was passiert mit der Falte, wenn die horizontale Kompressionskraft größer ist?“
Dieses Jahr beschloss sie, einen anderen Ansatz zu versuchen.
Schritt 1: Verstreute Materialien an einem Ort sammeln
Sarah öffnete YouMind und erstellte ein neues Board mit dem Namen „Unterrichtsmodelle für geologische Strukturen“.
In den fünf Jahren, in denen sie diesen Kurs unterrichtete, hatte sie eine ganze Menge Material angesammelt, das jedoch überall verstreut war:
- Klassische Querschnittsdiagramme aus Lehrbuch-PDFs
- YouTube-Lehrvideos wie „Geology 101: Folds in Rocks“
- Eine im Journal of Structural Geology veröffentlichte Arbeit über die Visualisierung von Faltenstrukturen für den Unterricht
- Detaillierte Beschreibungen aus den Wikipedia-Einträgen zu „Antiklinale“ und „Synklinale“
- Fotos von Gesteinsschichten von Exkursionen
- Mehrere Beispiele für typische Missverständnisse von Schülern aus Hausaufgaben
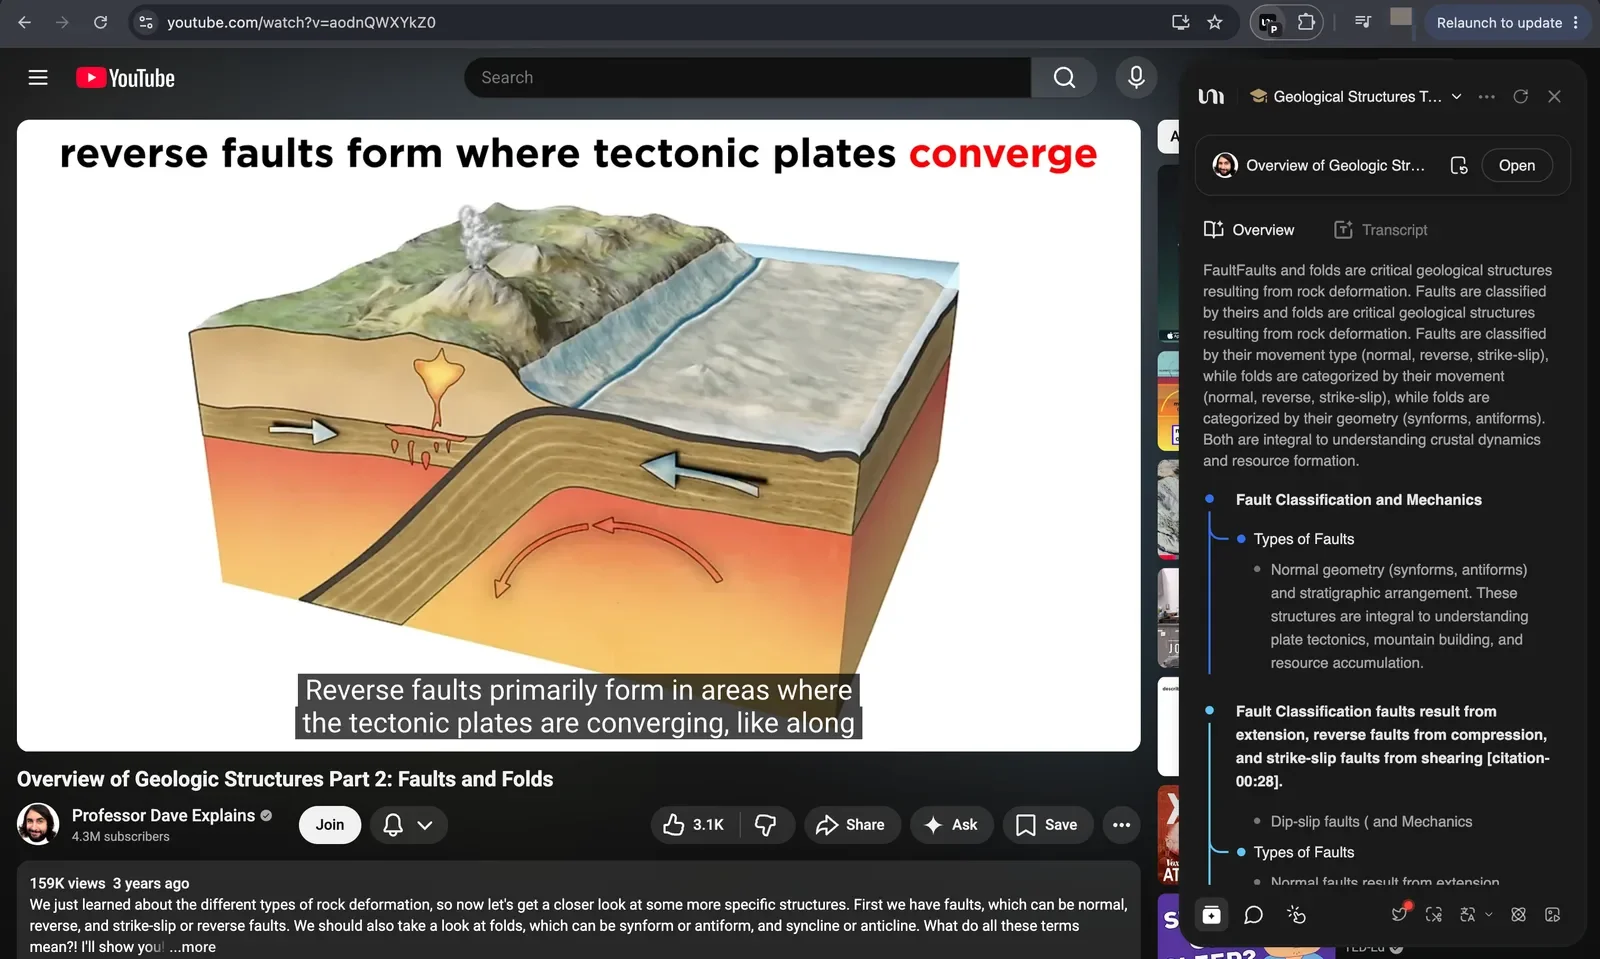
Hier spielte die Browser-Erweiterung von YouMind eine entscheidende Rolle. Sarah musste nicht unzählige Browser-Tabs öffnen oder Links kopieren und einfügen. Sie musste lediglich:
- Auf das Symbol der Erweiterung auf einer YouTube-Videoseite klicken → das Video wurde automatisch auf ihrem Board gespeichert, zusammen mit dem Transkript, und die KI generierte automatisch wichtige Auszüge („Picks“)
- Auf die Erweiterung auf einer Wikipedia-Seite klicken → der gesamte Eintrag wurde gespeichert, wobei alle Diagramme und Referenzen erhalten blieben
- Auf die Erweiterung auf einer Seite mit einer wissenschaftlichen Arbeit klicken → das PDF landete direkt auf ihrem Board
Innerhalb von fünfzehn Minuten waren alle Materialien an einem Ort gesammelt.
Schritt 2: Die KI in die „3D-Sprache“ übersetzen lassen
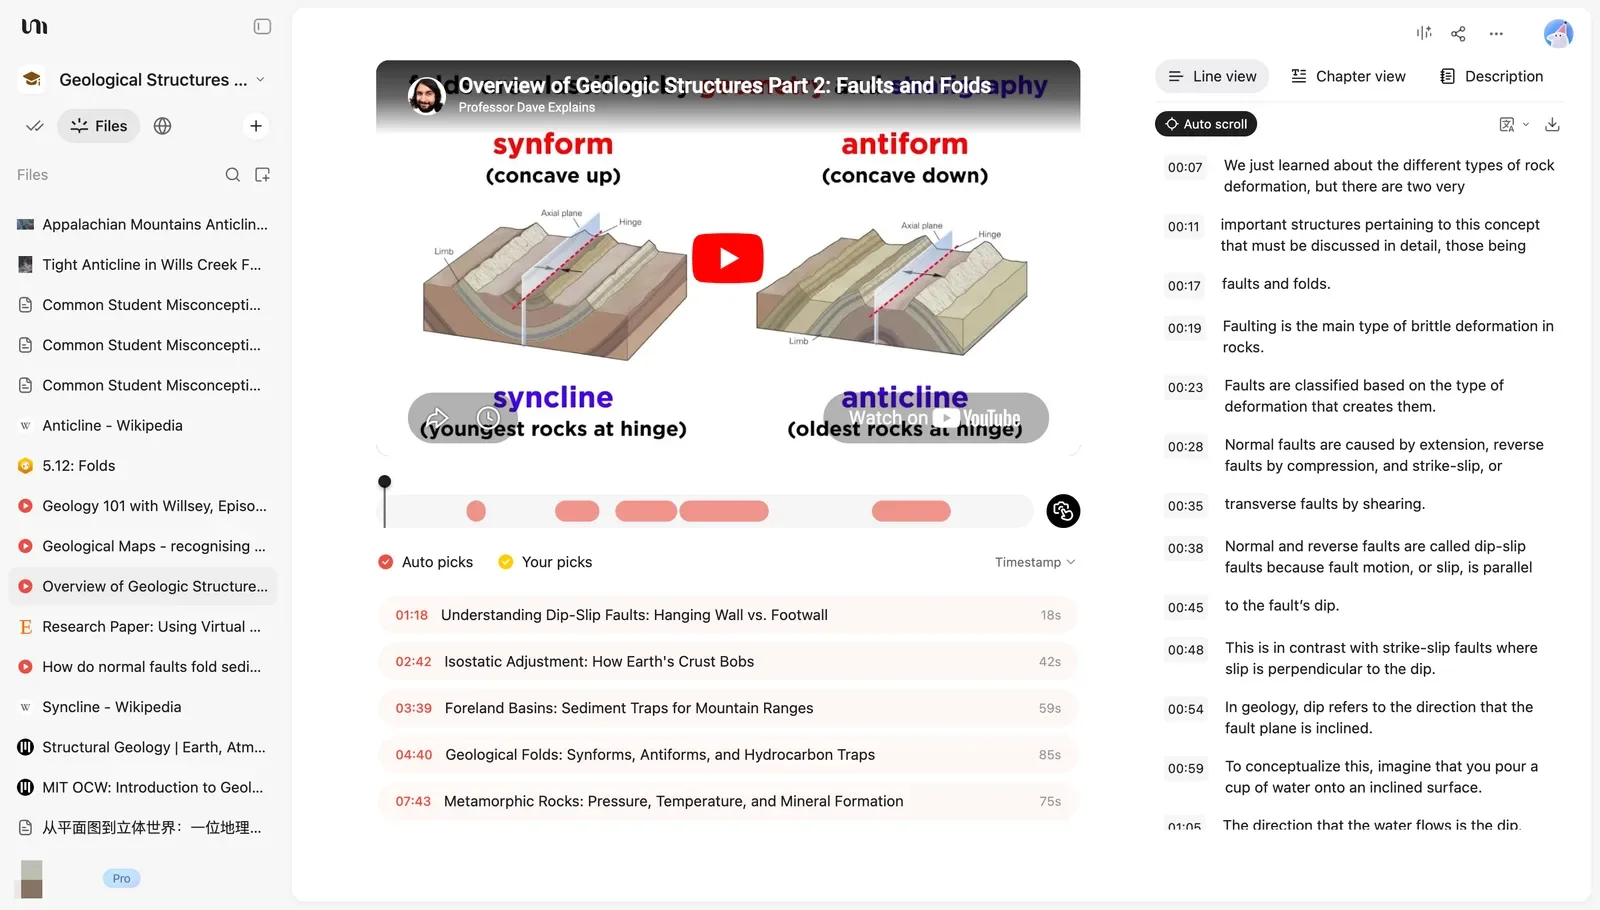
Nun enthielt Sarahs Board:
- 4 YouTube-Lehrvideos
- 2 Wikipedia-Einträge (Antiklinale & Synklinale)
- 2 Kursseiten des MIT OpenCourseWare
- 1 wissenschaftliche Arbeit (über den Unterricht mit 3D-Visualisierung)
- 1 Online-Lehrbuchressource (Geosciences LibreTexts)
- 3 Feldfotos von Gesteinsschichten
- 3 Dokumente, die typische Missverständnisse von Schülern festhielten
- 1 Lehrbuch-PDF
Früher hätte sie nur weiter flache Diagramme aus Lehrbüchern verwenden oder eine Woche damit verbringen können, ein einfaches Modell aus Hartschaumplatten zu basteln.
Doch jetzt musste sie der KI von YouMind nur eine Frage stellen:
„Hilf mir, basierend auf diesen Materialien eine Beschreibung geologischer Faltengebirgsstrukturen zu erstellen, die für die 3D-Modellierung geeignet ist. Anforderungen:
- Zeige den Querschnitt einer typischen Antiklinalstruktur
- Mindestens 5 verschiedenfarbige Sedimentschichten, die die Ablagerungsfolge zeigen
- Die Schichten sollten eine deutliche Biegung aufweisen, um die Auswirkungen horizontaler Kompression zu demonstrieren
- Der Querschnitt soll aufgeschnitten sein, um die innere Schichtstruktur zu zeigen
- Geeignet für Highschool-Schüler zum Verständnis, nicht zu komplex“
Zehn Sekunden später lieferte die KI eine strukturierte Beschreibung:
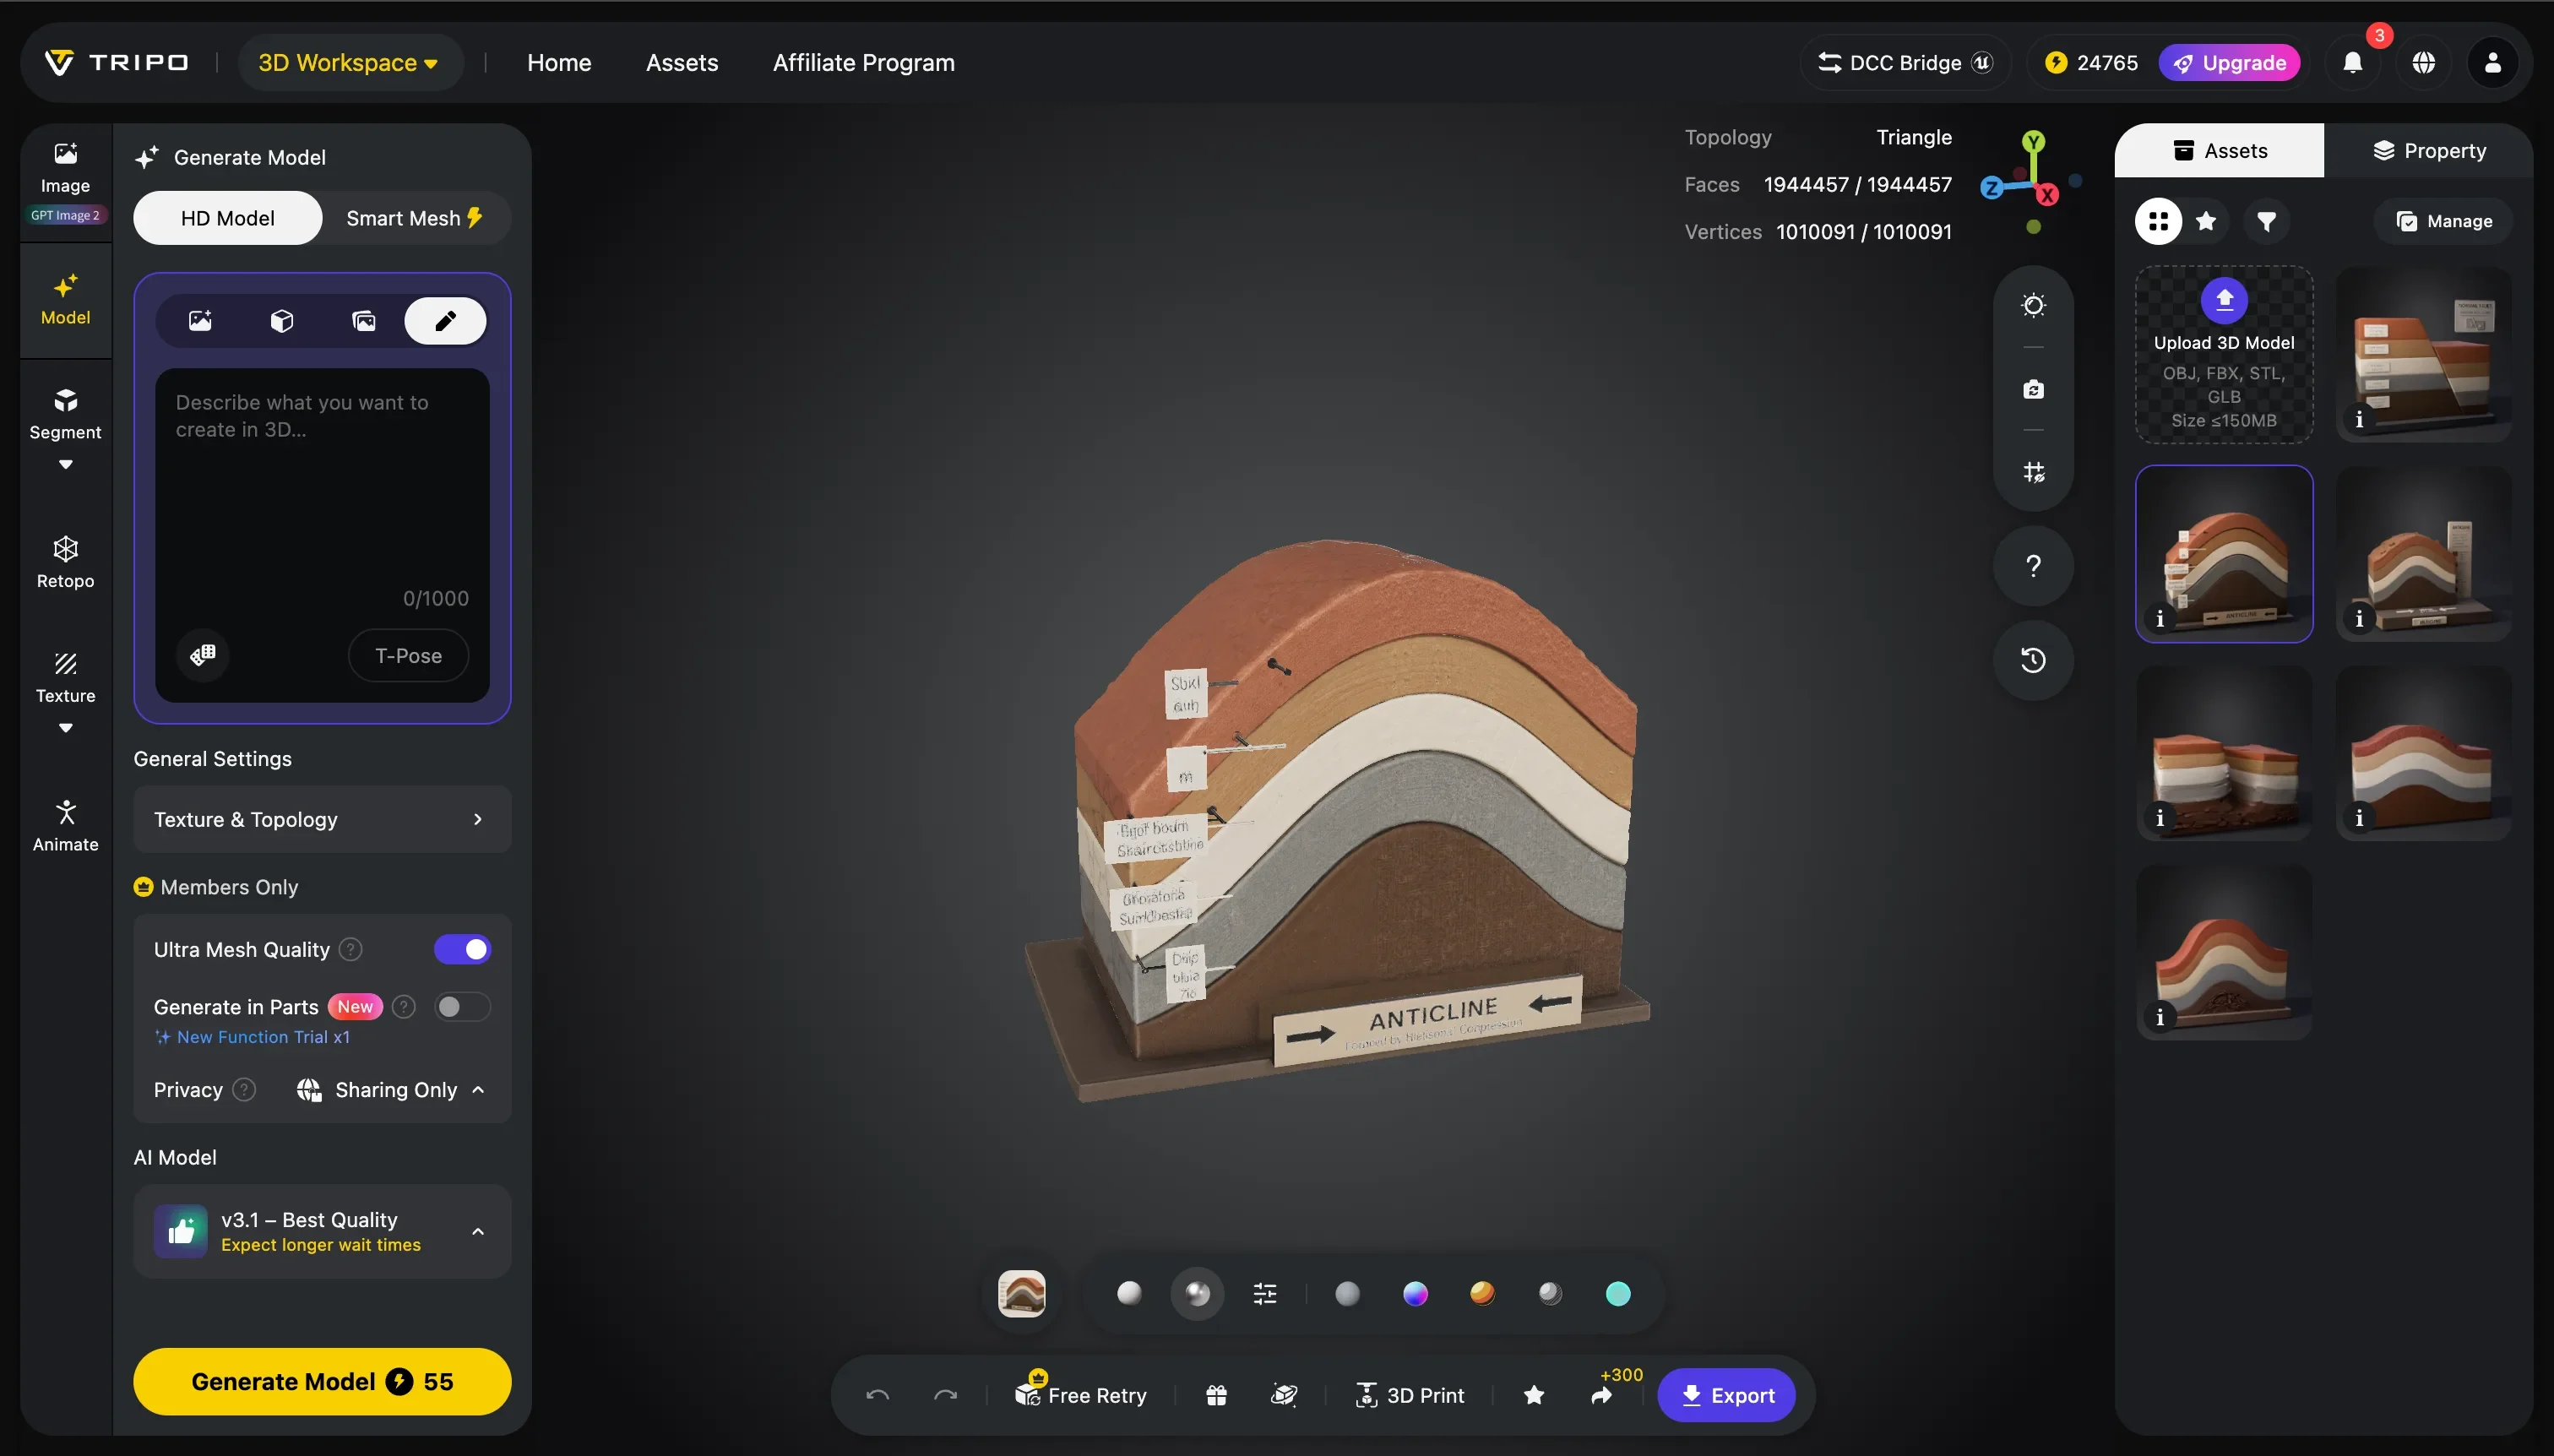
„Ein Querschnittsmodell einer geologischen Faltenstruktur, das die Entstehung einer Antiklinale zeigt. Das Modell enthält 5 unterschiedliche Sedimentschichten von unten nach oben: tiefbrauner Sandstein (älteste), grauer Kalkstein, cremeweißer Gips, hellbrauner Tonstein und rotbrauner Sandstein (jüngste). Jede Schicht ist etwa 20 cm dick. Die Schichten sind in einer glatten Bogenform gebogen, was die horizontale Kompression demonstriert. Das Modell ist an einer Seite aufgeschnitten, um die innere Struktur freizulegen. Es steht auf einer flachen Basis. Weiches, natürliches Licht, pädagogischer Diagrammstil.“
Sarah las es durch und nickte zufrieden. Diese Beschreibung enthielt alle wichtigen Punkte, die sie wollte:
- 5 verschiedenfarbige Schichten → Schüler konnten die stratigrafische Abfolge klar erkennen
- Farbreihenfolge von unten nach oben → im Einklang mit dem „Lagerungsgesetz“ (ältere Schichten unten, jüngere oben)
- Glatte, bogenförmige Biegung → zeigt die typische Morphologie einer Antiklinale
- Seitlich aufgeschnitten → man konnte die innere Struktur sehen, nicht nur die Oberfläche
Sie kopierte die Beschreibung.
Schritt 3: In drei Minuten vom Text zum Modell
Sarah öffnete Tripo, wählte „Text to 3D“ und fügte die soeben erhaltene Beschreibung ein.
Sie klickte auf „Generate“.
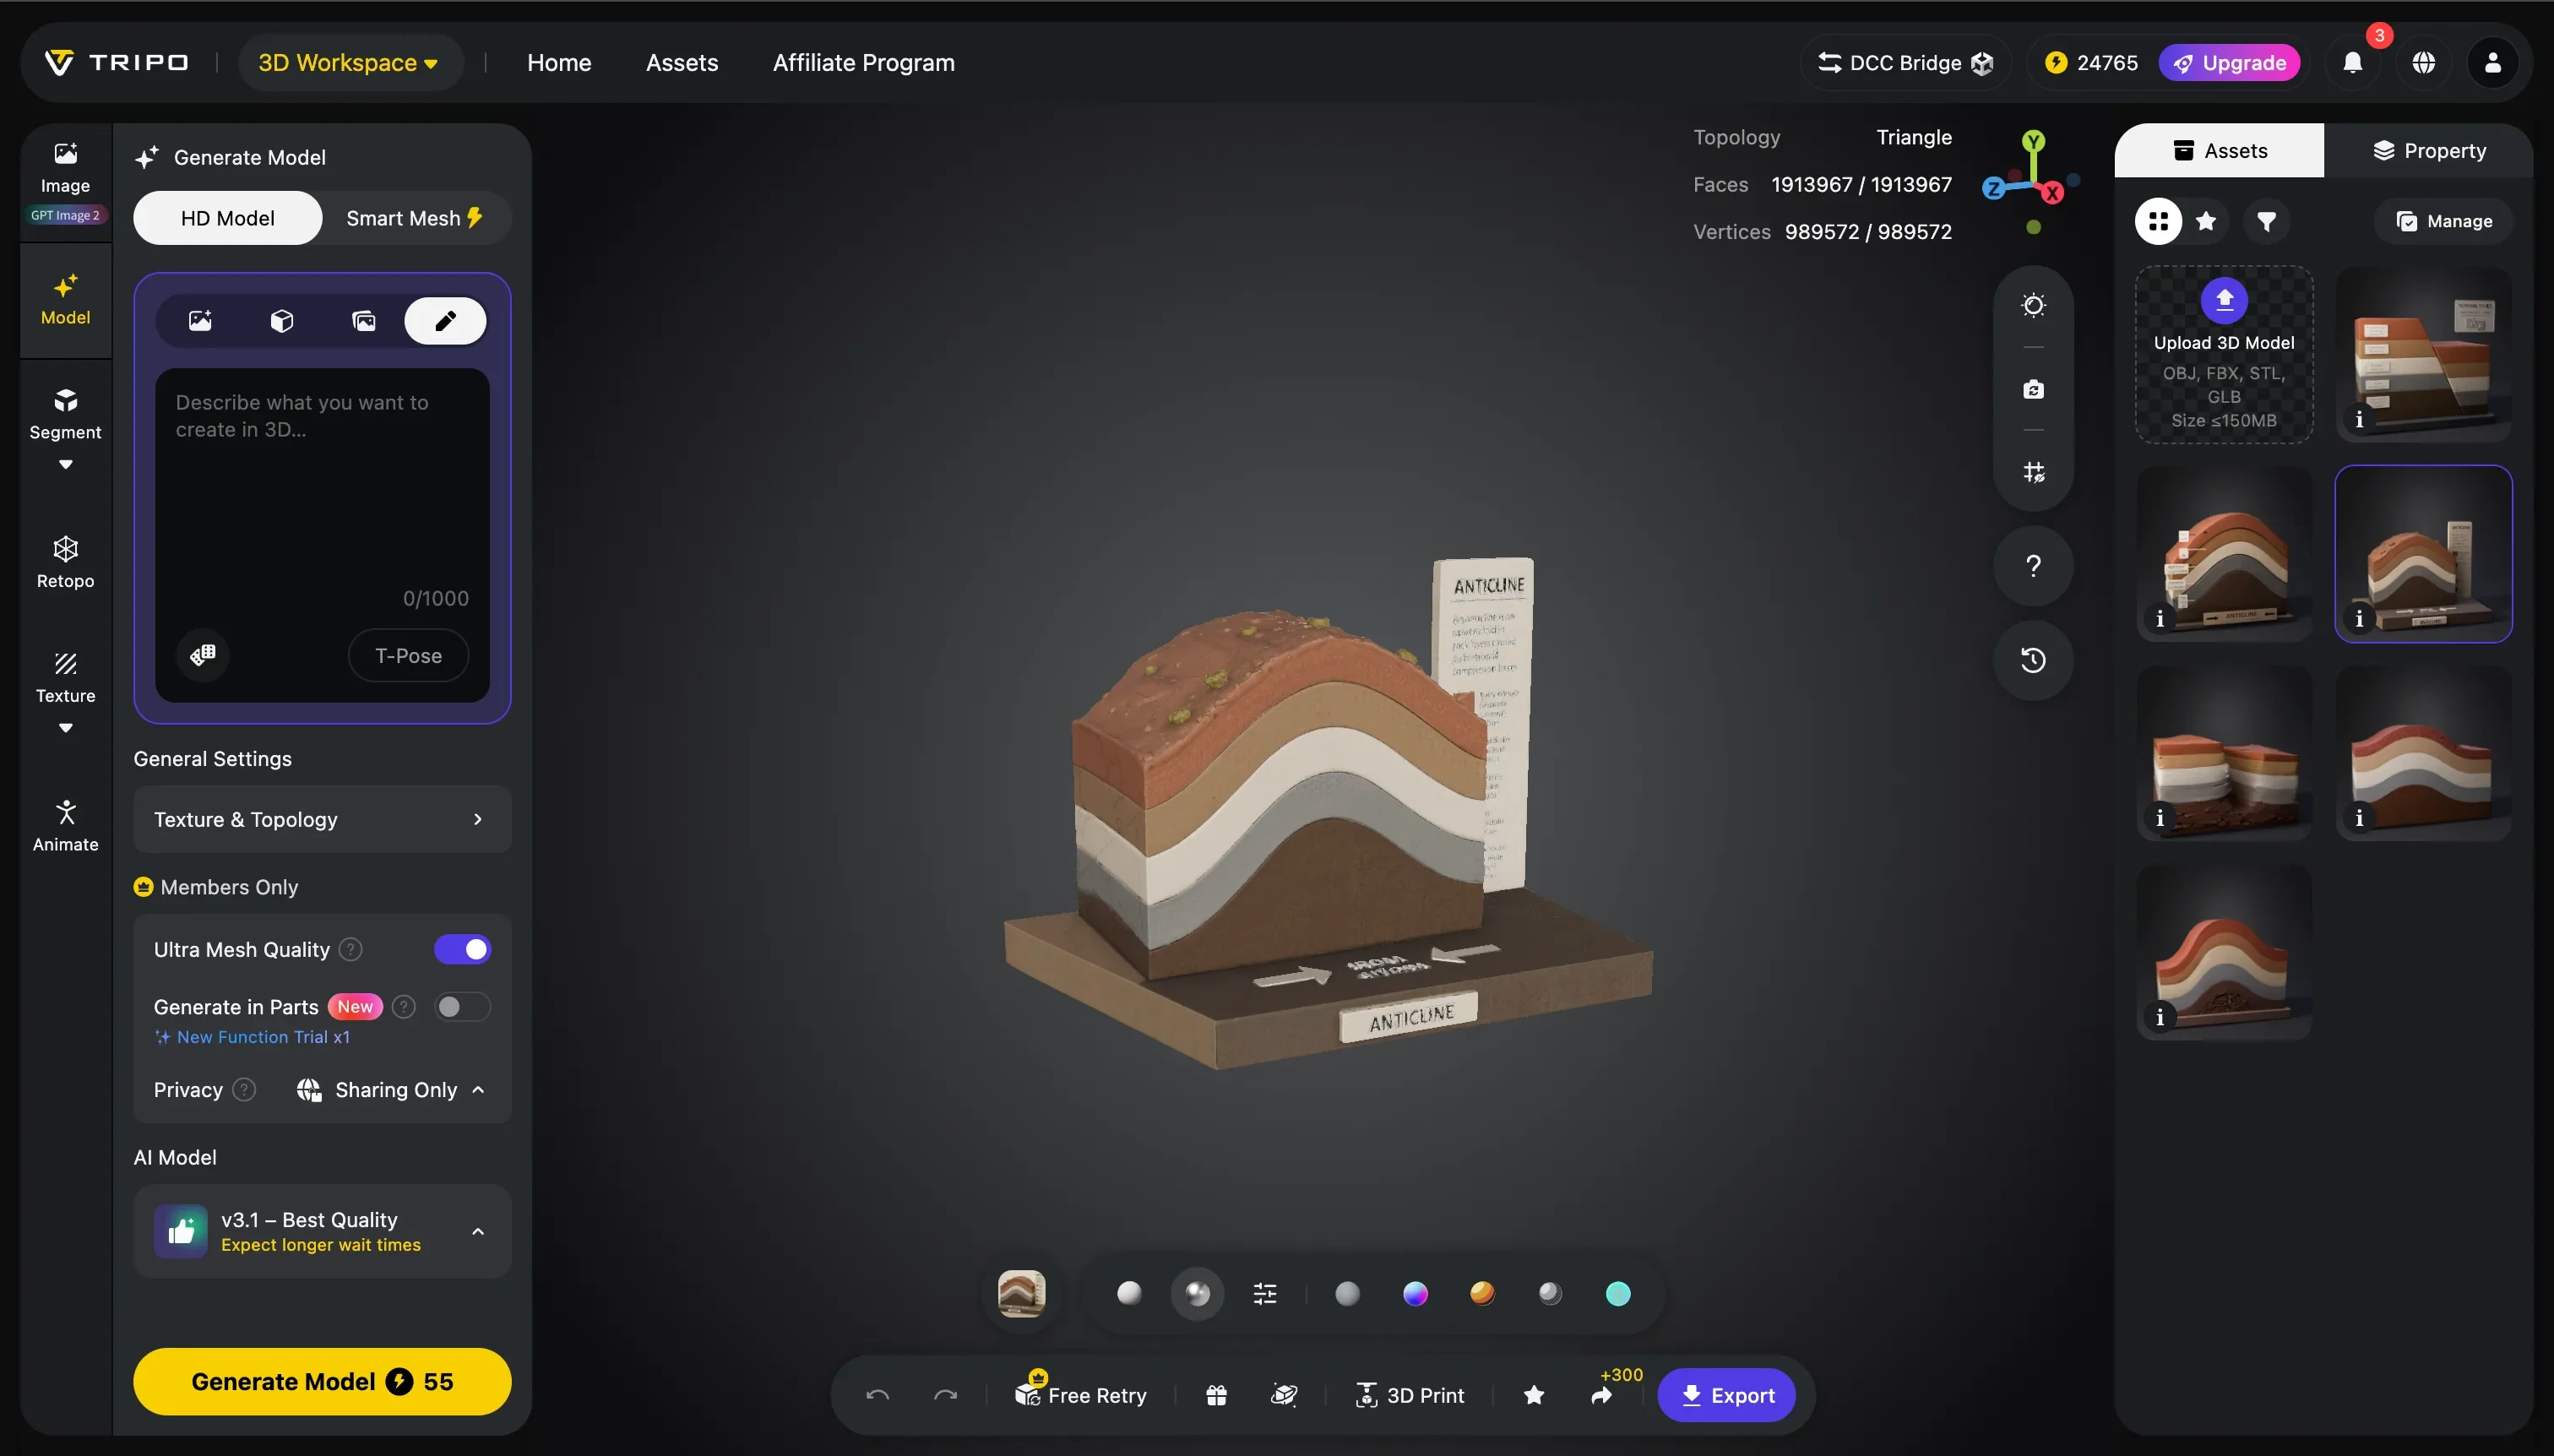
Als sie mit einer Tasse Kaffee zurückkam, war das Modell fertig gerendert.
Sie bewegte die Maus, um das Modell zu drehen, heran- und herauszuzoomen. Der Farbkontrast der fünf Gesteinsschichten war deutlich, die geschwungene Morphologie der Falte auf einen Blick erkennbar. Sie versuchte, es aus verschiedenen Winkeln zu betrachten – die Draufsicht zeigte die Achsenlinie des Bogens, die Seitenansicht den vollständigen Querschnitt, die Schrägansicht die Dicke der Schichten.
Das war genau das, was sie wollte.
Aber sie war nicht sofort zufrieden. Als Lehrerin mit fünf Jahren Berufserfahrung wusste sie, dass die erste Version nie die endgültige Version war.
Ihr fiel ein Problem auf: Die Basis des Modells war etwas dick, und wenn es auf die große Leinwand projiziert würde, könnte es die unterste Schicht verdeckt werden.
Sie ging zurück zu YouMind und fragte die KI:
„Ändere die Beschreibung von eben: Mach die Basis dünner, gerade genug, um das Modell zu stützen, verdeckt die Gesteinsschichten nicht.“
Die KI aktualisierte die Beschreibung. Sie kopierte sie, ging zurück zu Tripo und generierte das Modell neu.
Zwei Minuten später war die neue Version fertig. Perfekt.
Schritt 4: YouMind zur Erstellung der Präsentation nutzen
Sarah hatte ihr 3D-Modell, aber sie brauchte noch eine Präsentation für den Unterricht, um Konzepte, Modelle und wichtiges Wissen zu integrieren.
Früher war dies der zeitaufwendigste Teil. Sie musste:
- Titel und Inhalt für jede Folie selbst entwerfen
- Das Layout in PowerPoint anpassen
- Passende Bilder finden
- Schriftarten, Farben und Ausrichtung immer wieder anpassen
Das dauerte normalerweise 2 bis 3 Stunden.
Doch jetzt musste sie in YouMind nur noch drei Dinge tun:
Sie kehrte zu ihrem Board zurück, wählte alle soeben organisierten Materialien aus (YouTube-Videos, Wikipedia-Einträge, Zusammenfassungen von wissenschaftlichen Arbeiten, Beschreibungen von 3D-Modellen) und bat die KI:
„Hilf mir, basierend auf diesen Materialien einen Entwurf für eine Unterrichtspräsentation über Faltenstrukturen zu erstellen, die für Highschool-Schüler geeignet ist, 15–20 Folien.“
Zehn Sekunden später erstellte YouMind eine komplette Gliederung basierend auf der detaillierten Folienstruktur:
- Folie 1: Was sind geologische Falten
- Folien 2–3: Definitionen von Antiklinalen und Synklinalen
- Folien 4–5: Entstehungsmechanismen von Falten
- Folien 6–7: Das Lagerungsgesetz
- Folien 8–10: 3D-Modell-Anzeige (verschiedene Winkel)
- Folien 11–12: Reales Beispiel: Die Appalachen
- Folien 13–15: Klärung typischer Missverständnisse
- Folien 16–17: Wirtschaftliche Bedeutung und Gebirgsbildung
- Folie 18: Vorschau auf die interaktive Aktivität
- Folien 19–20: Wichtigste Erkenntnisse und weitere Erkundung
Jede Folie enthielt:
- Einen Titel
- Beschreibungen der Kernpunkte
- Vorgeschlagene Bilder (automatisch aus den Materialien im Board zugeordnet)
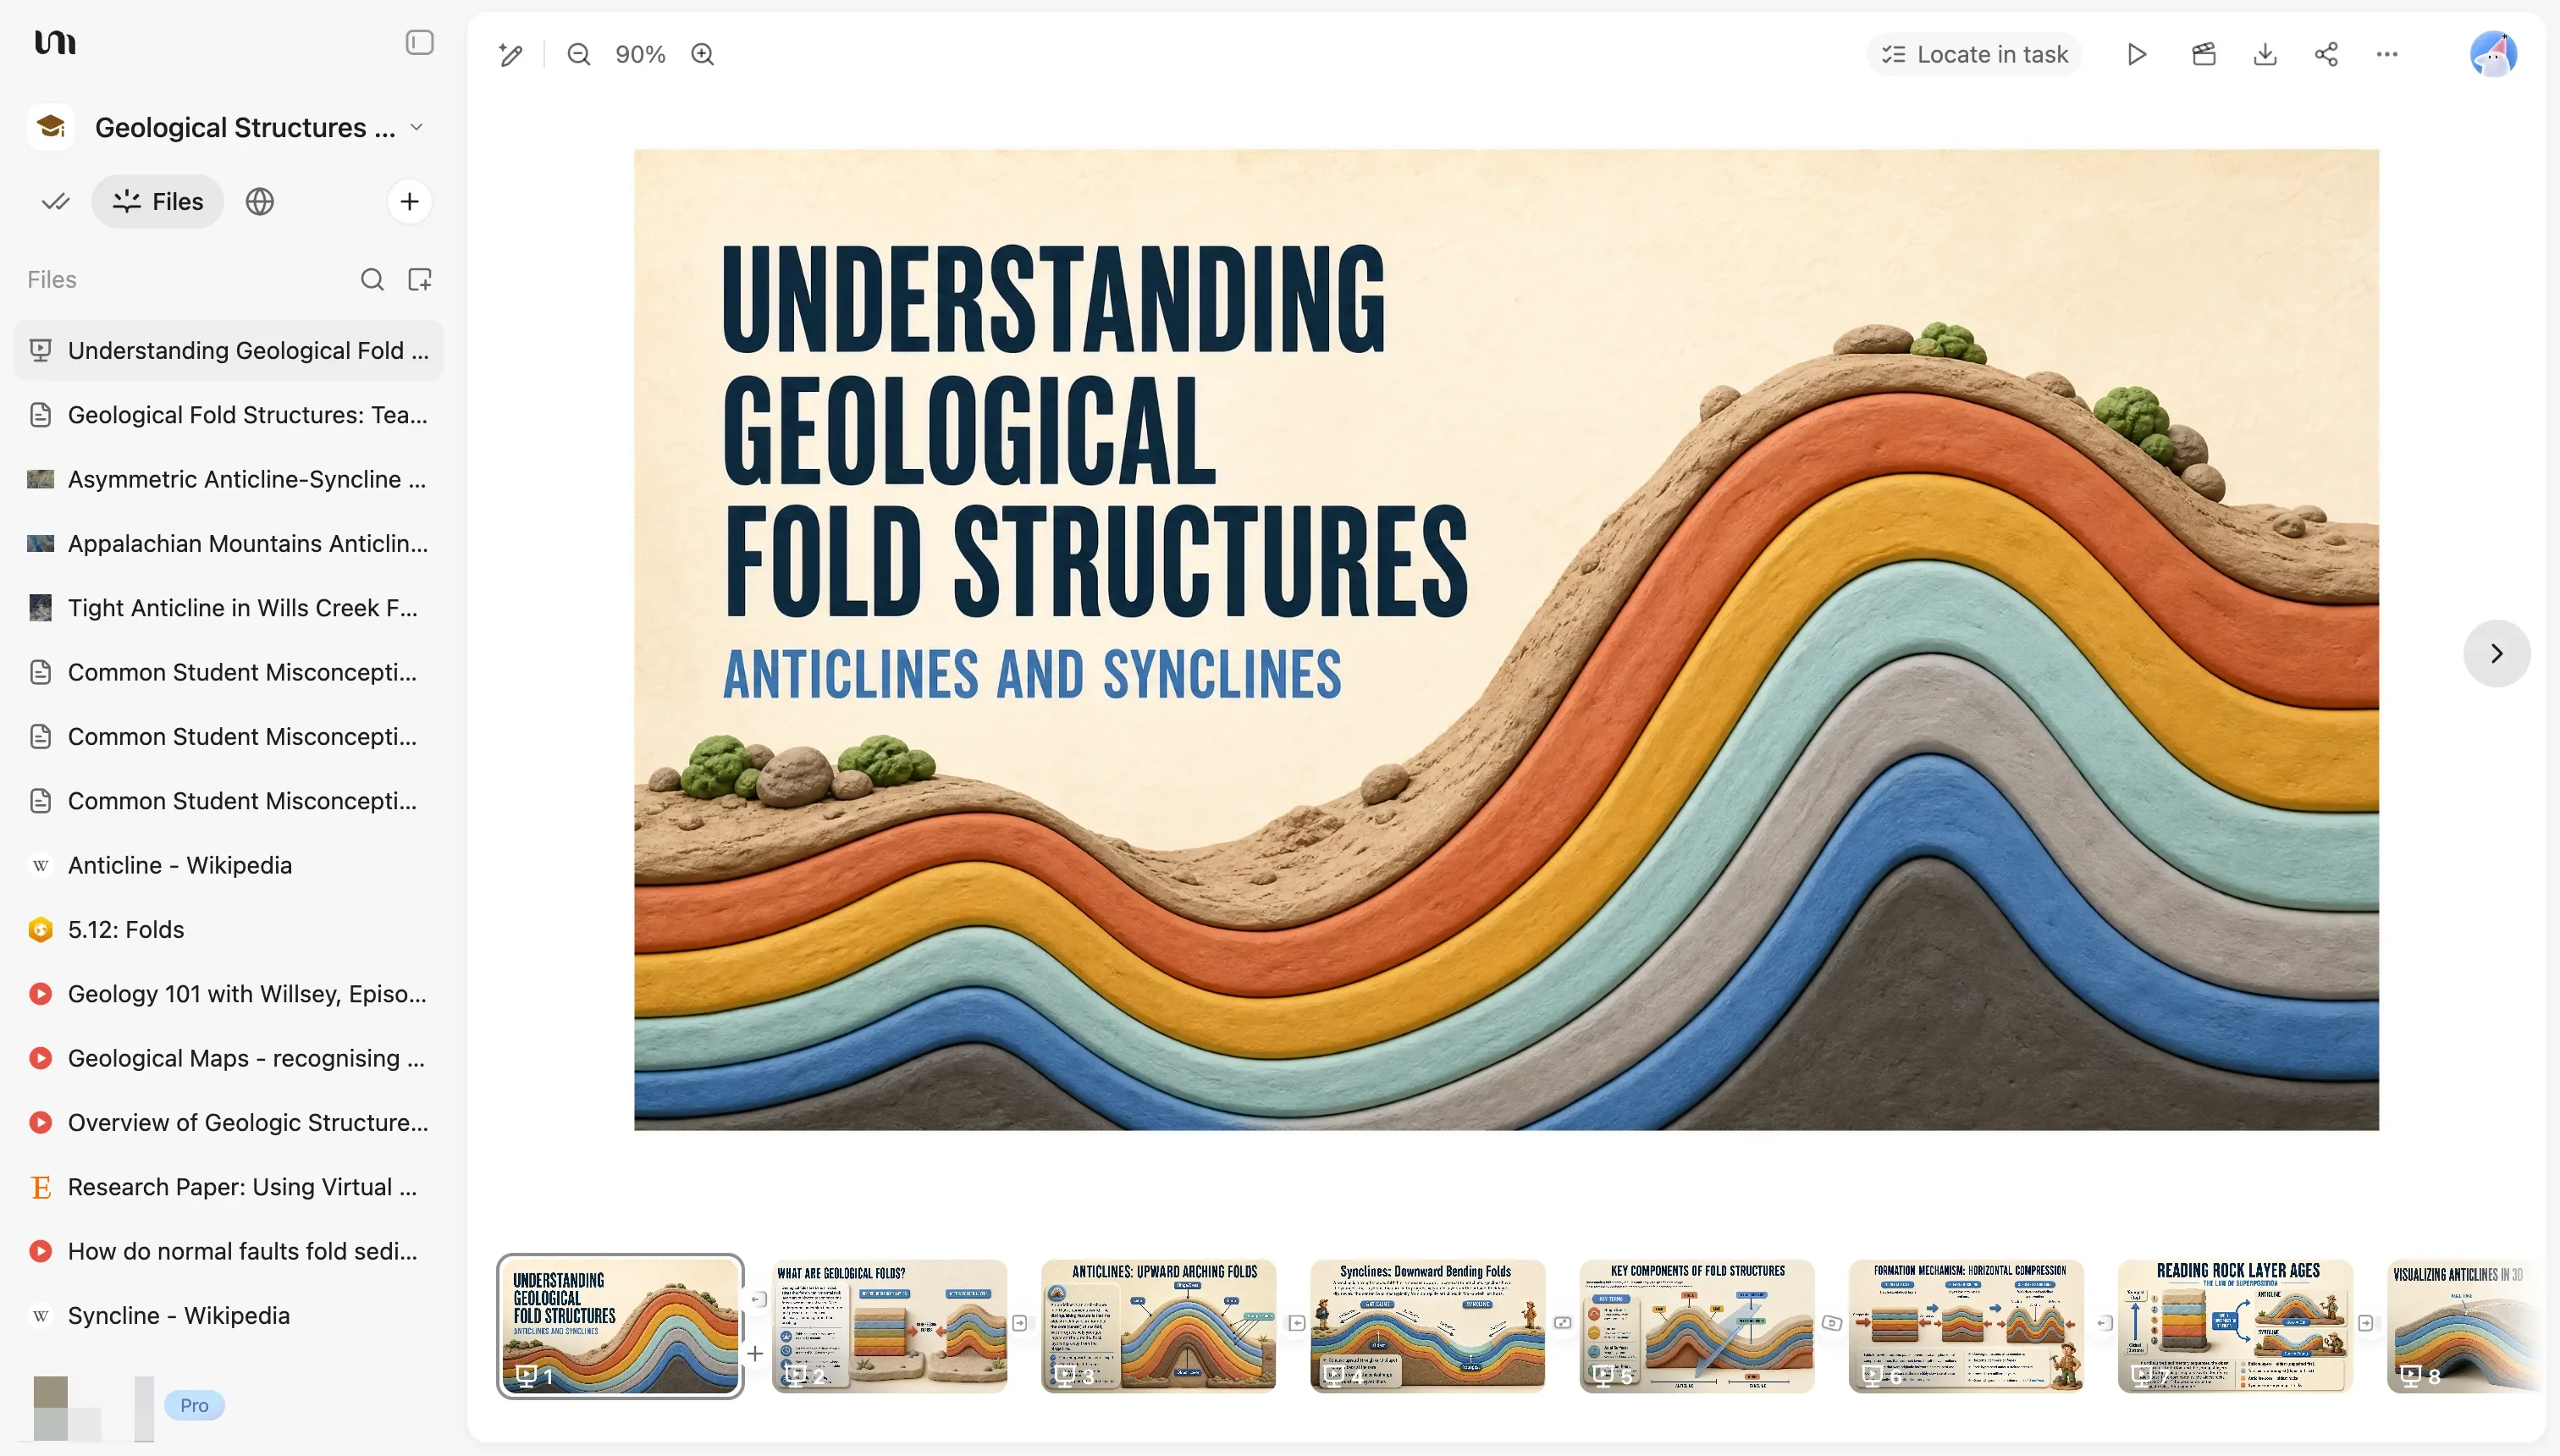
Sarah überprüfte die Gliederung und nickte zufrieden. Dann klickte sie auf „Generate Slides“, stöberte im Pop-up-Fenster in der Folien-Vorlagen-Galerie von YouMind und wählte den „3D Clay-Stil“ aus – dies war der visuelle Lieblingsstil der Schüler mit weichen Farben und dreidimensionalen Grafiken, der nicht wie eine traditionelle akademische Präsentation aussah.
Sie klickte auf „Generate“.
Einige Minuten später war eine komplette Präsentation erstellt. Sarah öffnete die Vorschau:
- Das Layout jeder Folie war verfeinert, Titel, Fließtext und Bilder waren automatisch ausgerichtet
- Symbole im 3D-Ton-Stil und dekorative Elemente ließen die gesamte Präsentation lebendig und ansprechend wirken
- Wichtige geologische Bilder und Screenshots des 3D-Modells wurden automatisch an den passenden Stellen eingefügt
- Die Farben waren einheitlich, die Schriftgrößen angemessen, auf der großen Leinwand würde alles gut erkennbar sein
- Sie musste nur noch ein paar Details anpassen; der gesamte Prozess dauerte weniger als 20 Minuten
Schritt 5: Der „Aha-Effekt“ im Unterricht
Donnerstagnachmittag, Geografieunterricht der 10. Klasse, Kapitel 3: „Krustenbewegung und geologische Strukturen“.
Sarah öffnete die von YouMind generierte Präsentation und projizierte sie auf die Leinwand.
Die Schüler reagierten sofort, als sie die Präsentation sahen – das Design im 3D-Ton-Stil ließ den gesamten Vortrag völlig anders aussehen als typische Geografiepräsentationen. Weiche Farben, dreidimensionale Symbole, verfeinertes Layout.
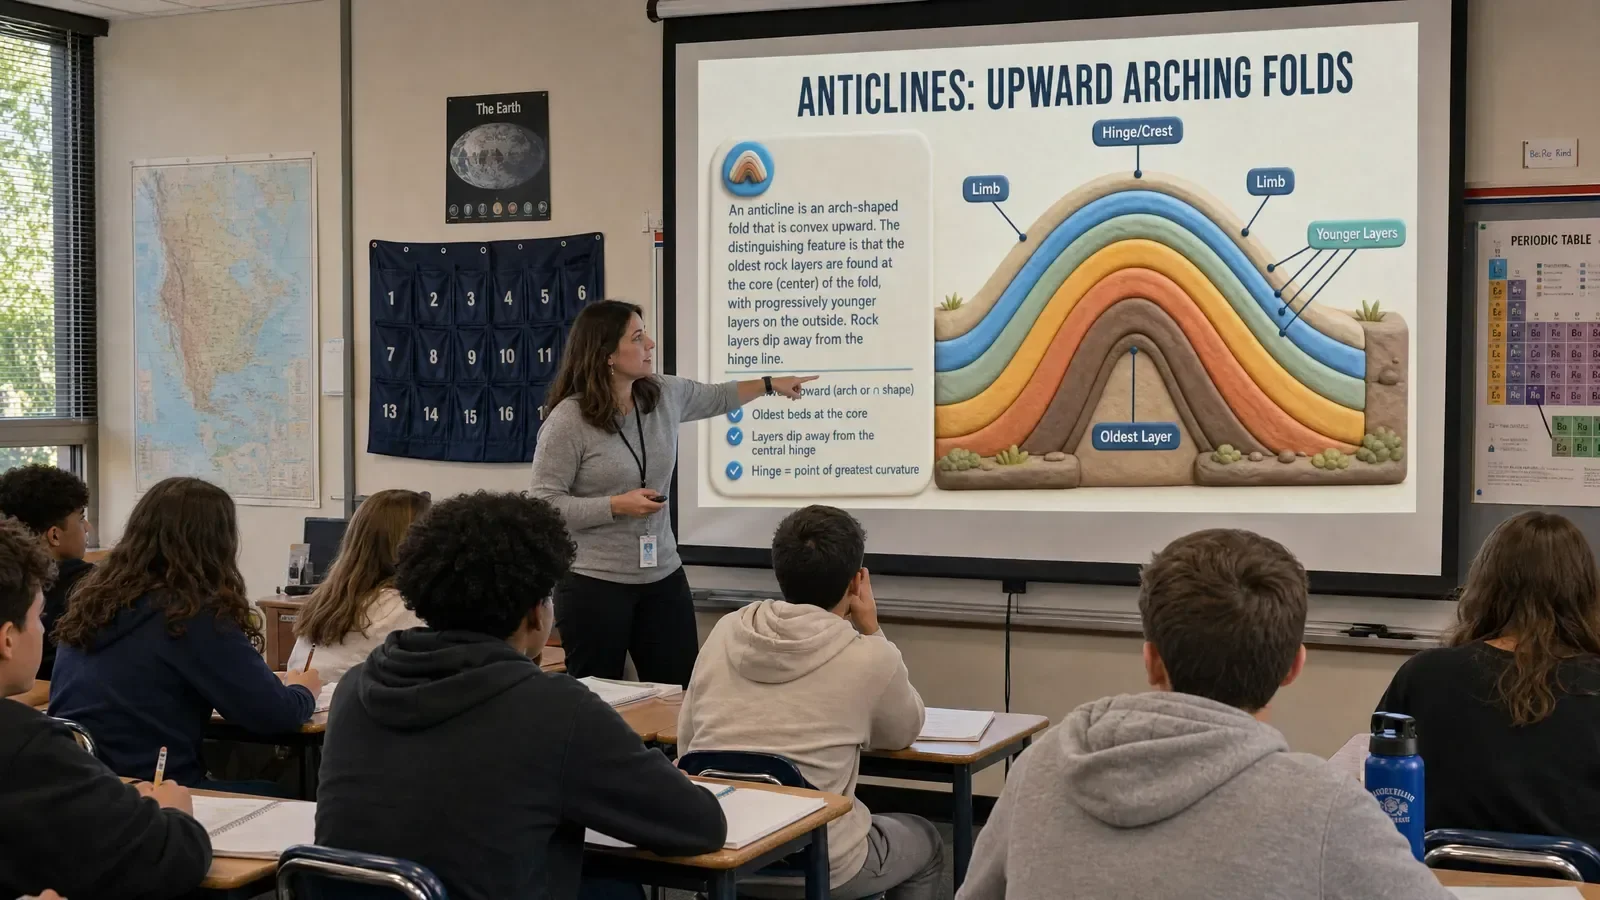
„Heute besprechen wir Faltenstrukturen.“ Sarah ging zur ersten Folie, die unter dem Titel ein hübsches 3D-Erd-Symbol im Ton-Stil zeigte.
Sie folgte dem Rhythmus der Präsentation: Was sind Falten, Definitionen von Antiklinalen und Synklinalen, Entstehungsmechanismen. Die Kernpunkte jeder Folie waren klar, die Bilder perfekt platziert.
Als sie Folie 8 erreichte, wechselte sie zu dem mit Tripo generierten 3D-Modell und drehte es langsam. Die Flüstergespräche im Klassenzimmer verstummten allmählich.
„Schaut alle her, das sind fünf Schichten von Sedimentgestein.“ Sie zoomte an die Schichten des Modells heran: „Die unterste Schicht ist dunkelbrauner Sandstein, dann grauer Kalkstein, weißer Gips, hellbrauner Tonstein und ganz oben rotbrauner Sandstein.“
Sie machte eine Pause: „Warum ist die unterste Schicht die älteste und die oberste die jüngste?“
Ein Schüler sagte leise: „Weil sie Schicht für Schicht übereinandergestapelt sind?“
„Richtig, das ist das Lagerungsgesetz.“ Sarah drehte das Modell zur Seite: „Aber schaut noch einmal hin. Diese Gesteinsschichten, die eigentlich horizontal sein sollten – wie sehen sie jetzt aus?“
Jemand im Klassenzimmer sagte „gebogen“, jemand anderes sagte „aufgewölbt“.
„Genau, das ist eine Antiklinale.“ Sie zoomte an den gebogenen Teil in der Mitte des Modells heran und wechselte dann zurück zu Folie 9 in der Präsentation, die Screenshots des 3D-Modells aus verschiedenen Winkeln mit Texterklärungen zeigte.
Sie unterrichtete weiter und wechselte zwischen Präsentation und 3D-Modell ab. Als sie Folie 13 zu „typischen Missverständnissen“ erreichte, mussten einige Schüler lachen – die Präsentation listete genau das auf, was sie zuvor gedacht hatten.
Nach dem Unterricht blieben ein paar Schüler da.
„Frau Lehrerin, können Sie diese Präsentation mit uns teilen? Sie sieht viel besser aus als sonst.“
„Klar.“ Sarah lud sowohl die Präsentation als auch die 3D-Modelldateien in Google Classroom hoch.
Ein anderer Schüler meinte: „Diese Präsentation ist wirklich angenehm anzuschauen, nicht wie diese dichten Textwände von früher.“
Sarah lächelte: „Ja, Layout und visuelle Gestaltung sind wichtig. Gutes Kursmaterial hilft euch, den Inhalt leichter zu verstehen.“
Schritt 6: Schnelle Iteration, Reaktion auf reale Fragen der Schüler
Nach dem Unterricht kehrte Sarah in ihr Büro zurück und öffnete ihr YouMind-Board.
Sie notierte sich einige Beobachtungen aus dem heutigen Unterricht im Bereich „Schüler-Feedback“:
- Ein Schüler fragte, was passieren würde, wenn die Kompressionskraft größer wäre
- Mehrere Schüler waren neugierig auf Synklinalen (nach unten gebogene Strukturen)
- Jemand fragte nach dem Unterschied zwischen Verwerfungen und Falten
- Während der Diskussion nach dem Unterricht erwähnte ein Schüler: „Warum sind manche Berge durch Antiklinalen entstanden und andere nicht?“
Diese Fragen waren mit Worten schwer zu erklären. Aber mit Vergleichsmodellen konnten die Schüler die Unterschiede direkt sehen.
Sie fragte die KI von YouMind:
„Hilf mir, Beschreibungen für drei Vergleichsmodelle zu erstellen:
- Standard-Antiklinale (habe ich bereits)
- Synklinale Struktur (nach unten gebogen)
- Abschiebung (Gesteinsschichten gebrochen, eine Seite abgesunken)“
Die KI lieferte schnell drei Beschreibungen, die jeweils auf dem vorherigen Modell basierten und gezielte Anpassungen enthielten.
Sarah fügte sie nacheinander in Tripo ein und generierte drei Modelle.
Für die nächste Stunde hatte sie vor, diese drei Modelle nebeneinander zu projizieren, damit die Schüler den Unterschied zwischen „Kompression erzeugt Falten, Dehnung erzeugt Verwerfungen“ intuitiv erkennen konnten.
Einen Monat später: Vom einzelnen Modell zur kompletten geologischen Lehrressourcenbibliothek
Vor der Zwischenprüfung hatte sich Sarahs YouMind-Board zu einer vollständigen „3D-Modellbibliothek für geologische Strukturen“ entwickelt:
- Faltenstrukturen: Antiklinale, Synklinale, überkippte Falte
- Verwerfungsstrukturen: Abschiebung, Aufschiebung, Blattverschiebung
- Vulkanischer Querschnitt: Magmakammer, Vulkanschlot, Eruptionsprodukte
- Horst und Graben
- Plattengrenzentypen: konvergent, divergent, transform
Jedes Modell hatte mindestens zwei Iterationsrunden durchlaufen, angepasst an das tatsächliche Feedback der Schüler.
Für die Essay-Frage der Zwischenprüfung stellte sie die Frage: „Beschreiben Sie den Entstehungsprozess einer Antiklinalstruktur und erklären Sie, warum der Kern einer Antiklinale ältere Gesteinsschichten enthält, während die Flanken jüngere Schichten aufweisen.“
In den Vorjahren lag die durchschnittliche Punktzahl bei dieser Frage bei 5,8 von 10 Punkten. Die meisten Schüler konnten schreiben: „Horizontale Kompression bildet Antiklinalen“, aber nur wenige konnten klar erklären, warum der Kern ältere Schichten enthält.
In diesem Jahr lag die durchschnittliche Punktzahl bei 8,3 von 10 Punkten.
Was Sarah noch mehr überraschte, war, dass mehrere Schüler in ihren Antworten einfache 3D-Diagramme zeichneten, die die Faltenmorphologie aus verschiedenen Winkeln zeigten – das war zuvor noch nie vorgekommen.
Ein Schüler schrieb in den freien Bereich seines Antwortbogens:
„In diesem Semester habe ich endlich verstanden, was unter der Erde passiert, anstatt nur Begriffe auswendig zu lernen.“
Sarah fotografierte diese Prüfungsarbeit und speicherte sie in ihrem YouMind-Board.
Warum YouMind + Tripo Sarahs Unterrichtsansatz verändert haben
1. Browser-Erweiterung: Müheloses Sammeln von Web-Ressourcen
Früher sah Sarahs Workflow beim Sammeln von Unterrichtsmaterialien so aus:
- Ein gutes Video auf YouTube gesehen → Link kopiert → in Notizen eingefügt → beim nächsten Mal danach gesucht
- Nützlichen Wikipedia-Eintrag gesehen → Screenshot gemacht oder Text kopiert → im lokalen Ordner gespeichert
- Wissenschaftliche Arbeit gesehen → PDF heruntergeladen → in irgendeinem Ordner gespeichert → nach ein paar Monaten vergessen, wo
Jetzt verwandelte die Browser-Erweiterung von YouMind all dies in ein „Ein-Klick-Clipping“:
- YouTube-Video → Klick auf das Symbol der Erweiterung → automatisch im Board gespeichert, zusammen mit Transkript und Anmerkungen zu wichtigen Momenten
- Wikipedia-Eintrag → Klick auf die Erweiterung → vollständig gespeichert, unter Beibehaltung der gesamten Struktur und aller Referenzen
- Wissenschaftliche Arbeit → Klick auf die Erweiterung → PDF im Board gespeichert, KI extrahierte automatisch die wichtigsten Erkenntnisse
Alle Materialien wurden automatisch an einem Ort zusammengeführt, waren jederzeit durchsuchbar, referenzierbar und konnten jederzeit von der KI analysiert werden.
2. KI-generierte Präsentationen: Von 3 Stunden auf 10 Minuten
Traditioneller Workflow zur Erstellung von Präsentationen:
- Gliederung selbst schreiben (30 Minuten)
- Titel und Inhalt für jede Folie entwerfen (1 Stunde)
- Bilder finden, Layout anpassen (1 Stunde)
- Schriftarten, Farben und Ausrichtung immer wieder anpassen (30 Minuten)
Jetzt sieht der Workflow zur Präsentationserstellung mit YouMind so aus:
- Materialien im Board auswählen, KI die Gliederung erstellen lassen (10 Sekunden)
- Die KI schreibt automatisch Titel, Beschreibung und Kernpunkte für jede Folie
- Die KI ordnet automatisch passende Bilder aus den Materialien im Board zu
- Eine Vorlage aus der Folien-Vorlagen-Galerie auswählen (wie den „3D Clay-Stil“)
- Generierung mit einem Klick, die fertige Präsentation steht (2 Minuten)
Das Feedback der Schüler war eindeutig: „Diese Präsentation sieht viel besser aus als sonst“, „sie ist wirklich angenehm anzuschauen, nicht wie diese dichten Textwände von früher“.
Ein verfeinertes Layout, einheitliche Farben und ein lebendiger visueller Stil führten dazu, dass die Schüler aufmerksamer hinschauten und den Stoff leichter verstanden.
3. Abstrakte Konzepte werden erstmals greifbar
Früher konnte Sarah nur auf zweidimensionale Querschnittsdiagramme in Lehrbüchern zeigen und sagen: „Stellt euch vor, diese Schichten sind unter der Erde gebogen.“ Ob die Schüler das verstanden, hing ganz von ihrer räumlichen Vorstellungskraft ab.
Jetzt konnte sie unsichtbare unterirdische Strukturen an die Oberfläche „ziehen“ und die Schüler sie aus jedem beliebigen Winkel betrachten lassen. Drehen, heranzoomen, herauszoomen, als hielten sie ein echtes geologisches Handstück.
4. Von „Einmal unterrichten“ zu „Iterativer Optimierung“
Traditioneller Unterricht: Wie das Lehrbuch aussah, so unterrichtete sie. Wenn die Schüler es nicht verstanden, konnte sie es nur mit anderen Worten noch einmal erklären.
Jetzt konnte sie nach jeder Stunde die Modelle und die Präsentation basierend auf dem Feedback der Schüler anpassen. Wenn Schüler sagten: „Man kann die unterste Schicht nicht gut sehen“, passte sie die Basis an und generierte das Modell neu. Wenn Schüler fragten: „Was ist, wenn die Kompression stärker ist?“, generierte sie ein Vergleichsmodell für eine überkippte Falte und integrierte es in die nächste Präsentation.
Der Unterricht wurde zu einer echten Iterationsschleife: unterrichten → Unklarheiten sammeln → Modelle und Unterrichtsmaterialien anpassen → wieder unterrichten.
5. Fachwissen ohne technische Hürden
Sarah war eine Geografie-Expertin, aber sie konnte weder Blender oder 3ds Max bedienen, noch hatte sie Kenntnisse in professionellem Grafikdesign.
YouMind + Tripo ermöglichten es ihr, ihre Anforderungen in ihrer eigenen Fachsprache zu beschreiben, während die KI die Übersetzung in 3D-Modelle und verfeinerte Präsentationen übernahm. Sie musste nur klar formulieren, „welches geologische Phänomen ich zeigen möchte“ und „welche Wissenspunkte ich vermitteln will“, ohne wissen zu müssen, „wie man modelliert“ oder „wie man ein Layout gestaltet“.
6. Einmalige Investition, kontinuierliche Wiederverwendung
Die Literatur, Videos und Fotos, die Sarah in YouMind organisiert hatte, waren nicht nur für dieses eine Modell gedacht.
Wenn sie das nächste Mal vulkanische Strukturen unterrichtete, suchte sie im selben Board einfach nach „Magma“, und die relevanten Materialien tauchten automatisch auf. Wenn sie das nächste Mal Plattentektonik unterrichtete, verwendete sie die Schichtenbeschreibungen des Faltenmodells wieder und änderte nur die Biegerichtung und die Bruchstellen.
YouMind wurde zu ihrer „geologischen Wissensdatenbank“, Tripo zu ihrer „Visualisierungs-Engine“. Zusammen ermöglichten sie es ihr, schnell auf jeden Unterrichtsbedarf zu reagieren.
Wenn Sie auch Lehrkraft sind
Wenn Sie auch Konzepte unterrichten, die „unsichtbar und ungreifbar“ sind –
- Geologische Strukturen, Plattenbewegungen, Gesteinskreisläufe
- Zellstrukturen, Organsysteme, physiologische Prozesse
- Molekulare Strukturen, chemische Reaktionen, Kristallstrukturen
- Baustrukturen, mechanische Prinzipien, mechanische Getriebe
- Himmelsmechanik, kosmische Strukturen, Raumzeit-Konzepte
Wenn Sie Folgendes auch schon erlebt haben:
- Schüler starrten auf flache Diagramme und versuchten mühsam, sich dreidimensionale Strukturen vorzustellen
- Sie finden keine passenden Unterrichtsmodelle oder können sie sich nicht leisten
- Sie möchten Modelle anpassen, um auf spezifische Unklarheiten der Schüler einzugehen, sind aber machtlos
- Sie unterrichten jedes Jahr denselben Inhalt, haben aber immer das Gefühl, dass die Schüler es „nicht wirklich verstehen“
Dann ist der Workflow aus YouMind + Tripo genau das Richtige für Sie.
Beginnen Sie mit YouMind: Organisieren Sie Ihre Literatur, Notizen, Videos und Bilder auf einem Board und lassen Sie sich von der KI helfen, die wichtigsten Elemente für die Visualisierung zu extrahieren.
Vervollständigen Sie es mit Tripo: Verwandeln Sie Textbeschreibungen in drehbare, interaktive 3D-Modelle, betten Sie diese in Ihr Unterrichtsmaterial ein und teilen Sie sie mit Ihren Schülern.
Iterieren Sie anschließend: Passen Sie die Modelle basierend auf dem echten Feedback Ihrer Schüler schnell an, damit jede Schülergeneration eine noch bessere Version zu sehen bekommt.
Vom Abstrakten zum Sichtbaren, vom Flachen zum Dreidimensionalen – dieser Weg dauert jetzt nur noch wenige Minuten.
Erstellen Sie Ihr erstes Unterrichtsmodell:
YouMind ausprobieren: https://youmind.com
Tripo ausprobieren: https://tripo3d.ai