Tripo × FDM 3D-Druck-Leitfaden: Modellgenerierung, Reparatur, Slicing und Mehrfarbendruck
Als weltweit führende KI-3D-Modellplattform wurde Tripo in die Ökosysteme großer 3D-Druckerhersteller wie Bambu Lab, Anycubic, Creality und Elegoo integriert und hilft unzähligen Kreativen, hochwertige 3D-Modelle aus einem einzigen Satz oder Bild zu generieren. Wir freuen uns riesig, dass immer mehr Nutzer ihre KI-generierten digitalen Kreationen in greifbare physische Objekte verwandeln – aber gleichzeitig haben wir eine Flut von ehrlichem Feedback aus der Community erhalten:
Das Modell sieht super aus, aber wie drucke ich es eigentlich?
Wenn Sie ein wunderschönes, von Tripo generiertes Modell im Auge haben und sich fragen, wie Sie es mit einem FDM-3D-Drucker zum Leben erwecken können, ist diese Schritt-für-Schritt-Anleitung genau das Richtige für Sie.
Aufgrund der physischen Beschaffenheit des FDM-3D-Drucks erfordern KI-generierte Modelle oft eine gewisse Vorverarbeitung, um die besten Druckergebnisse zu erzielen. Dieses Tutorial führt Sie durch die schwierigsten Probleme – von der Frage, wo man beim Aufteilen von Teilen anfängt, über Slicer-Fehler bis hin zur komplexen Mehrfarbenbearbeitung – und begleitet Sie durch den gesamten Workflow:
Wichtige Phasen und Highlights:
Tripo-Generierungsphase (Bewertung & Optimierung): Lernen Sie, wie Sie Prompts nutzen, um die Modellstruktur zu verbessern, und etablieren Sie ein zuverlässiges Bewertungssystem für den Druckschwierigkeitsgrad, um Ihre Erfolgsquote von Anfang an zu steigern.
Blender-Reparatur (Technische Fehlerbehebung): Nutzen Sie effiziente Tools, um nicht-mannigfaltige Kanten (non-manifold edges), getrennte Flächen und andere Modellprobleme mit einem Klick zu beheben – so erstellen Sie einen perfekten, wasserdichten Volumenkörper und verhindern fehlende Schichten beim Slicing.
Bambu Studio-Workflow (Bemalung & Slicing): Ein tiefer Einblick in Techniken zur Ausrichtung der Unterseite und Parameteroptimierung, plus die Nutzung der Vertex-Farben-Exportfunktion von Tripo für automatisches Color Mapping – was die Hürde für den Mehrfarbendruck drastisch senkt.
Tipps:
Über FDM-3D-Druck
Bevor wir einsteigen, lassen Sie uns kurz Ihr Setup überprüfen. Dieses Tutorial konzentriert sich auf die FDM (Fused Deposition Modeling)-Technologie – derzeit die am weitesten verbreitete und kosteneffizienteste 3D-Druckmethode auf dem Markt.
Wie es funktioniert:
Eine beheizte Düse schmilzt Kunststoff-Filament (wie PLA oder PETG) und trägt es Schicht für Schicht entlang eines definierten Pfades auf, um das Modell aufzubauen.
In diesem Tutorial verwendete Ausrüstung:
Bambu Lab-Drucker + Bambu Studio Slicing-Software.
(Hinweis: Andere FDM-Drucker funktionieren nach denselben Hardware-Prinzipien, aber die Bedienung der Slicer-Software unterscheidet sich – bitte ziehen Sie die Dokumentation Ihres Herstellers zu Rate.)
Vorteile von FDM:
- Niedrige Einstiegshürde und geringe Kosten – ein Drucker für Endverbraucher und eine Spule PLA reichen aus, um eine Vielzahl von Modellen zu drucken
- Hohe Festigkeit des Modells, ideal für das Prototyping von Produkten
- Fähigkeit, große Objekte zu drucken – Desktop-Maschinen können problemlos Modelle von 25 cm und mehr ausgeben
Was Sie beachten sollten:
FDM-Drucke weisen feine Schichtlinien auf – dies ist eine normale physische Eigenschaft und kann durch Schleifen geglättet werden.
Was zu vermeiden ist: der gefürchtete „Spaghetti-Druck“
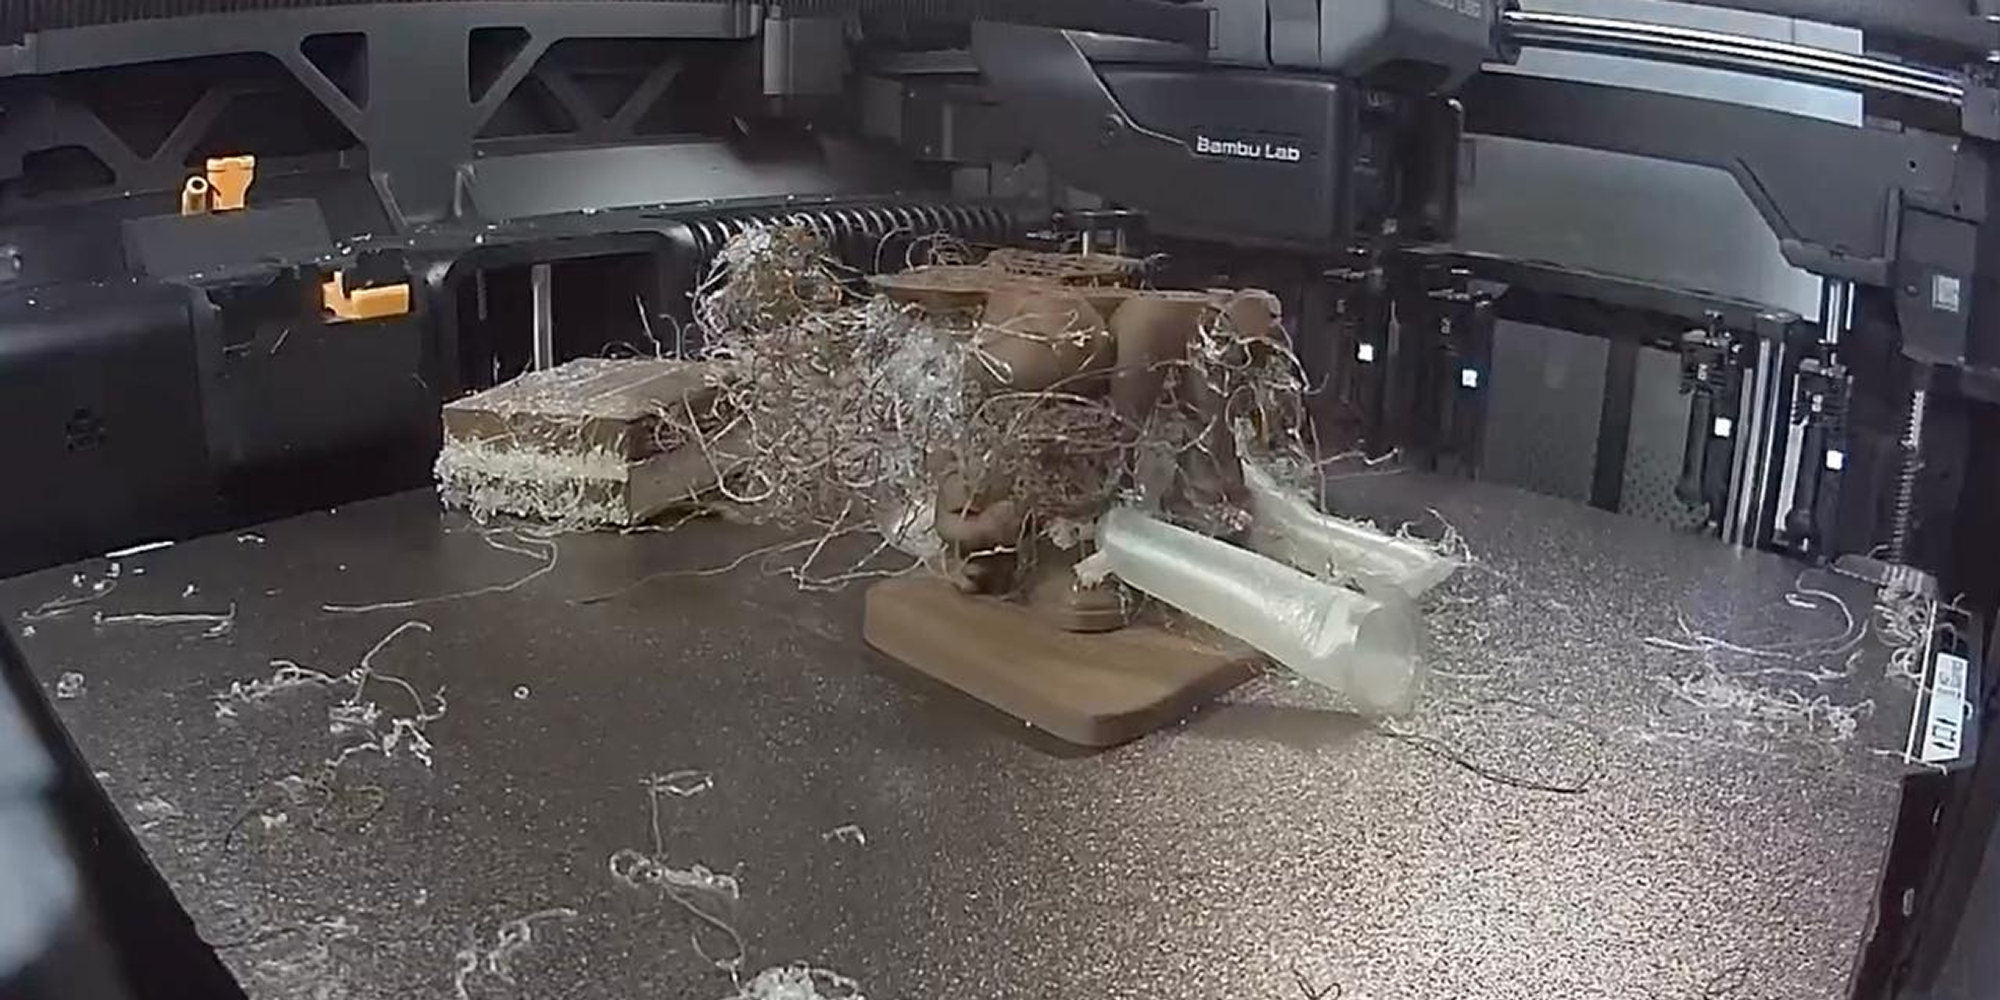
Was ist ein „Spaghetti-Druck“?
Einfach ausgedrückt: Ihr Drucker läuft die ganze Nacht und liefert Ihnen statt eines fertigen Modells einen verhedderten Haufen extrudierter Kunststofffäden.
Dies passiert normalerweise, weil das Modell nicht stabil war, die Struktur zu dünn war oder der Slicer einen Fehler ausgegeben hat. Um sicherzustellen, dass Sie in Ihrer Werkstatt nicht von einer solchen „Überraschung“ empfangen werden, lesen Sie unbedingt die folgenden Tipps.
Dieses Tutorial zeigt Ihnen, wie Sie die Vorab-Optimierung von Tripo und die Software-Verarbeitung nutzen können, um die physischen Einschränkungen von FDM so weit wie möglich zu umgehen, damit Sie saubere Drucke mit hoher Erfolgsquote erzielen.
In diesem Leitfaden verwendete Software und Tools:
Tripo Web App: studio.tripo3d.com
Blender (dringend empfohlen – es bietet viele Plugins, die speziell auf den 3D-Druck zugeschnitten sind) / ZBrush (kann als Alternative zu Blender verwendet werden)
Slicing-Software (dieser Leitfaden verwendet Bambu Studio als Beispiel)
1. Tripo-Generierungsphase
1.1 Bewertungssystem für die Druckbarkeit im FDM-3D-Druck
Nachdem Sie ein Modell in Tripo generiert haben, der erste Schritt darin, dessen geometrische Komplexität zu bewerten und festzustellen, ob es für den FDM-3D-Druck geeignet ist. Wir haben die Druckschwierigkeit in fünf Stufen unterteilt:
- A – Ausgezeichnet: Solide Struktur, keine dünnen Überhänge – ideal für den direkten Druck.
- B – Gut: Empfohlen mit geringfügigen Änderungen vor dem Druck.
- C – Akzeptabel: Druckbar nach dem Aufteilen von Teilen oder komplexerer Bearbeitung.
- D – Schlecht: Nicht empfohlen, kann aber dennoch eine grobe Form erzeugen.
- E – Katastrophal: Der Versuch, diese Modelle im FDM-Verfahren zu drucken, ist vorprogrammiertes Scheitern.
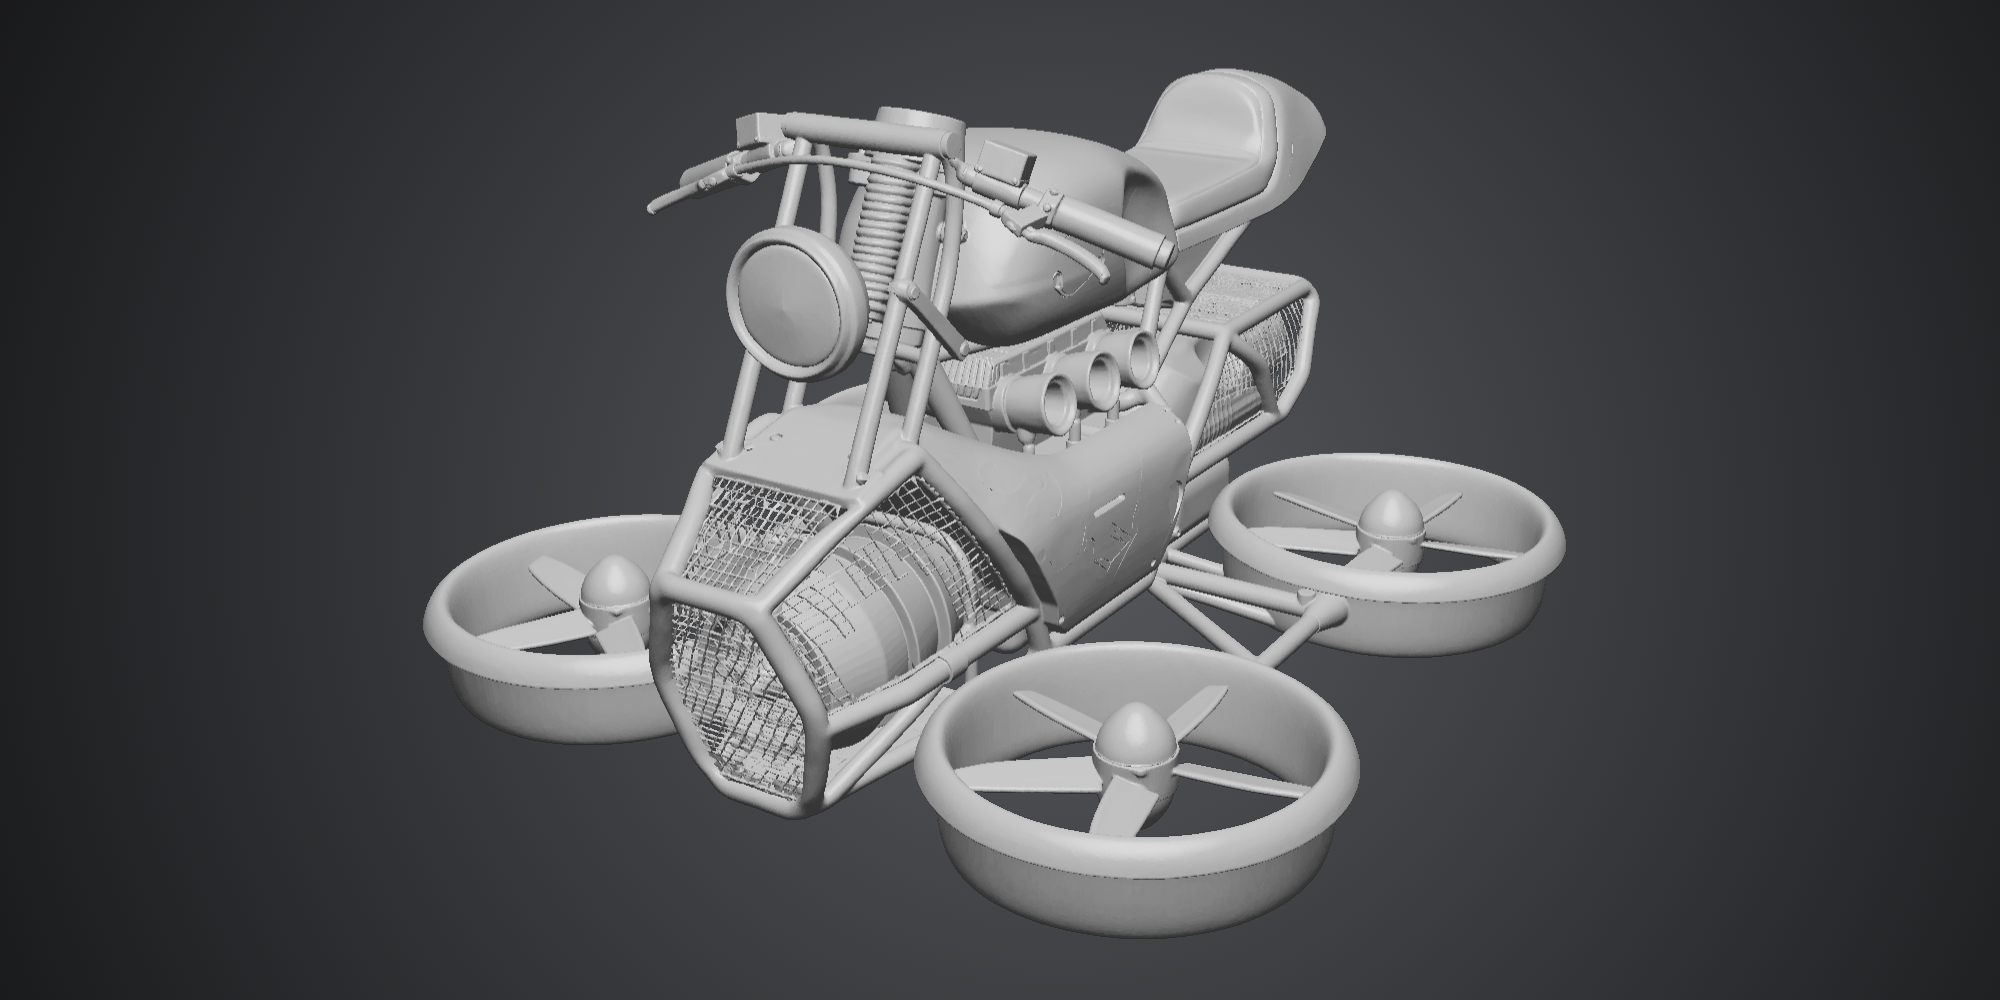
E – Mechanisch (Komplex)
Feine, netzartige Strukturen, bei denen das Stützmaterial deutlich größer als das Modell selbst und fast unmöglich zu entfernen sein wird. Das Modell weist außerdem durchgehend viele dünne, säulenartige Strukturen auf.
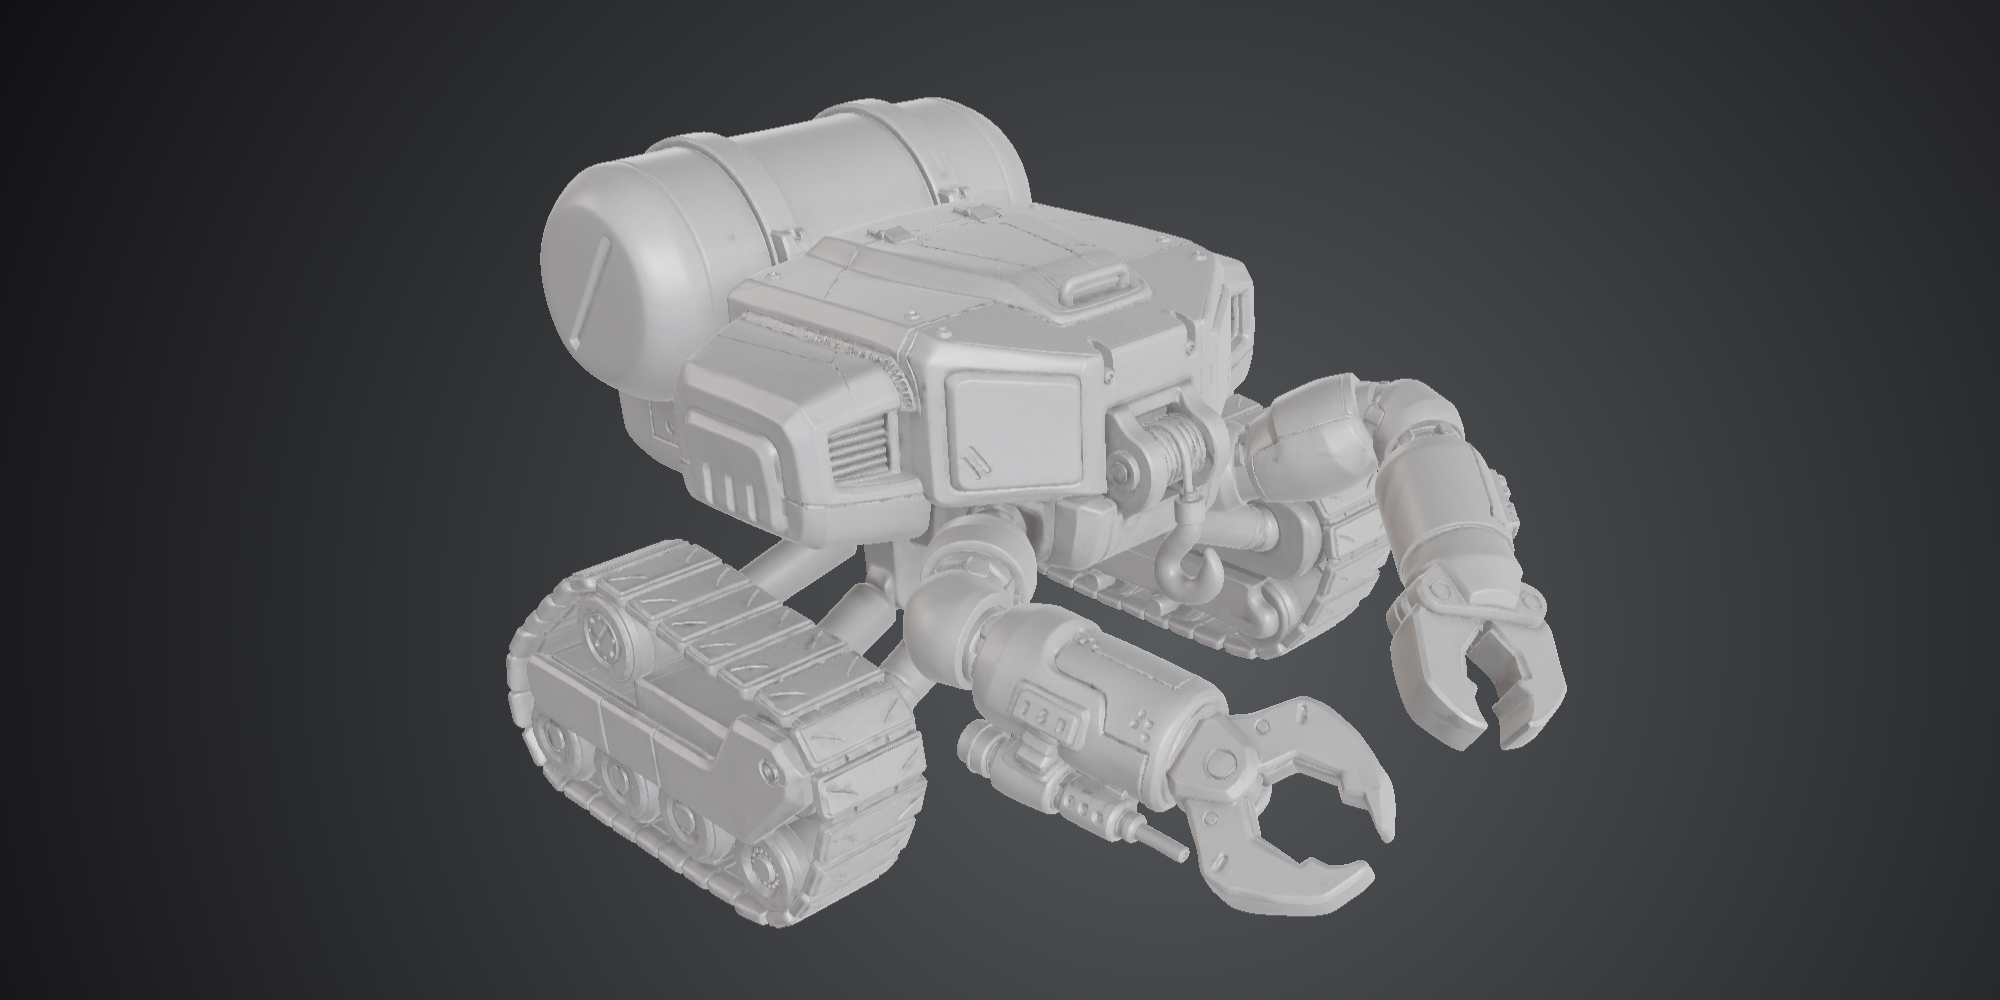
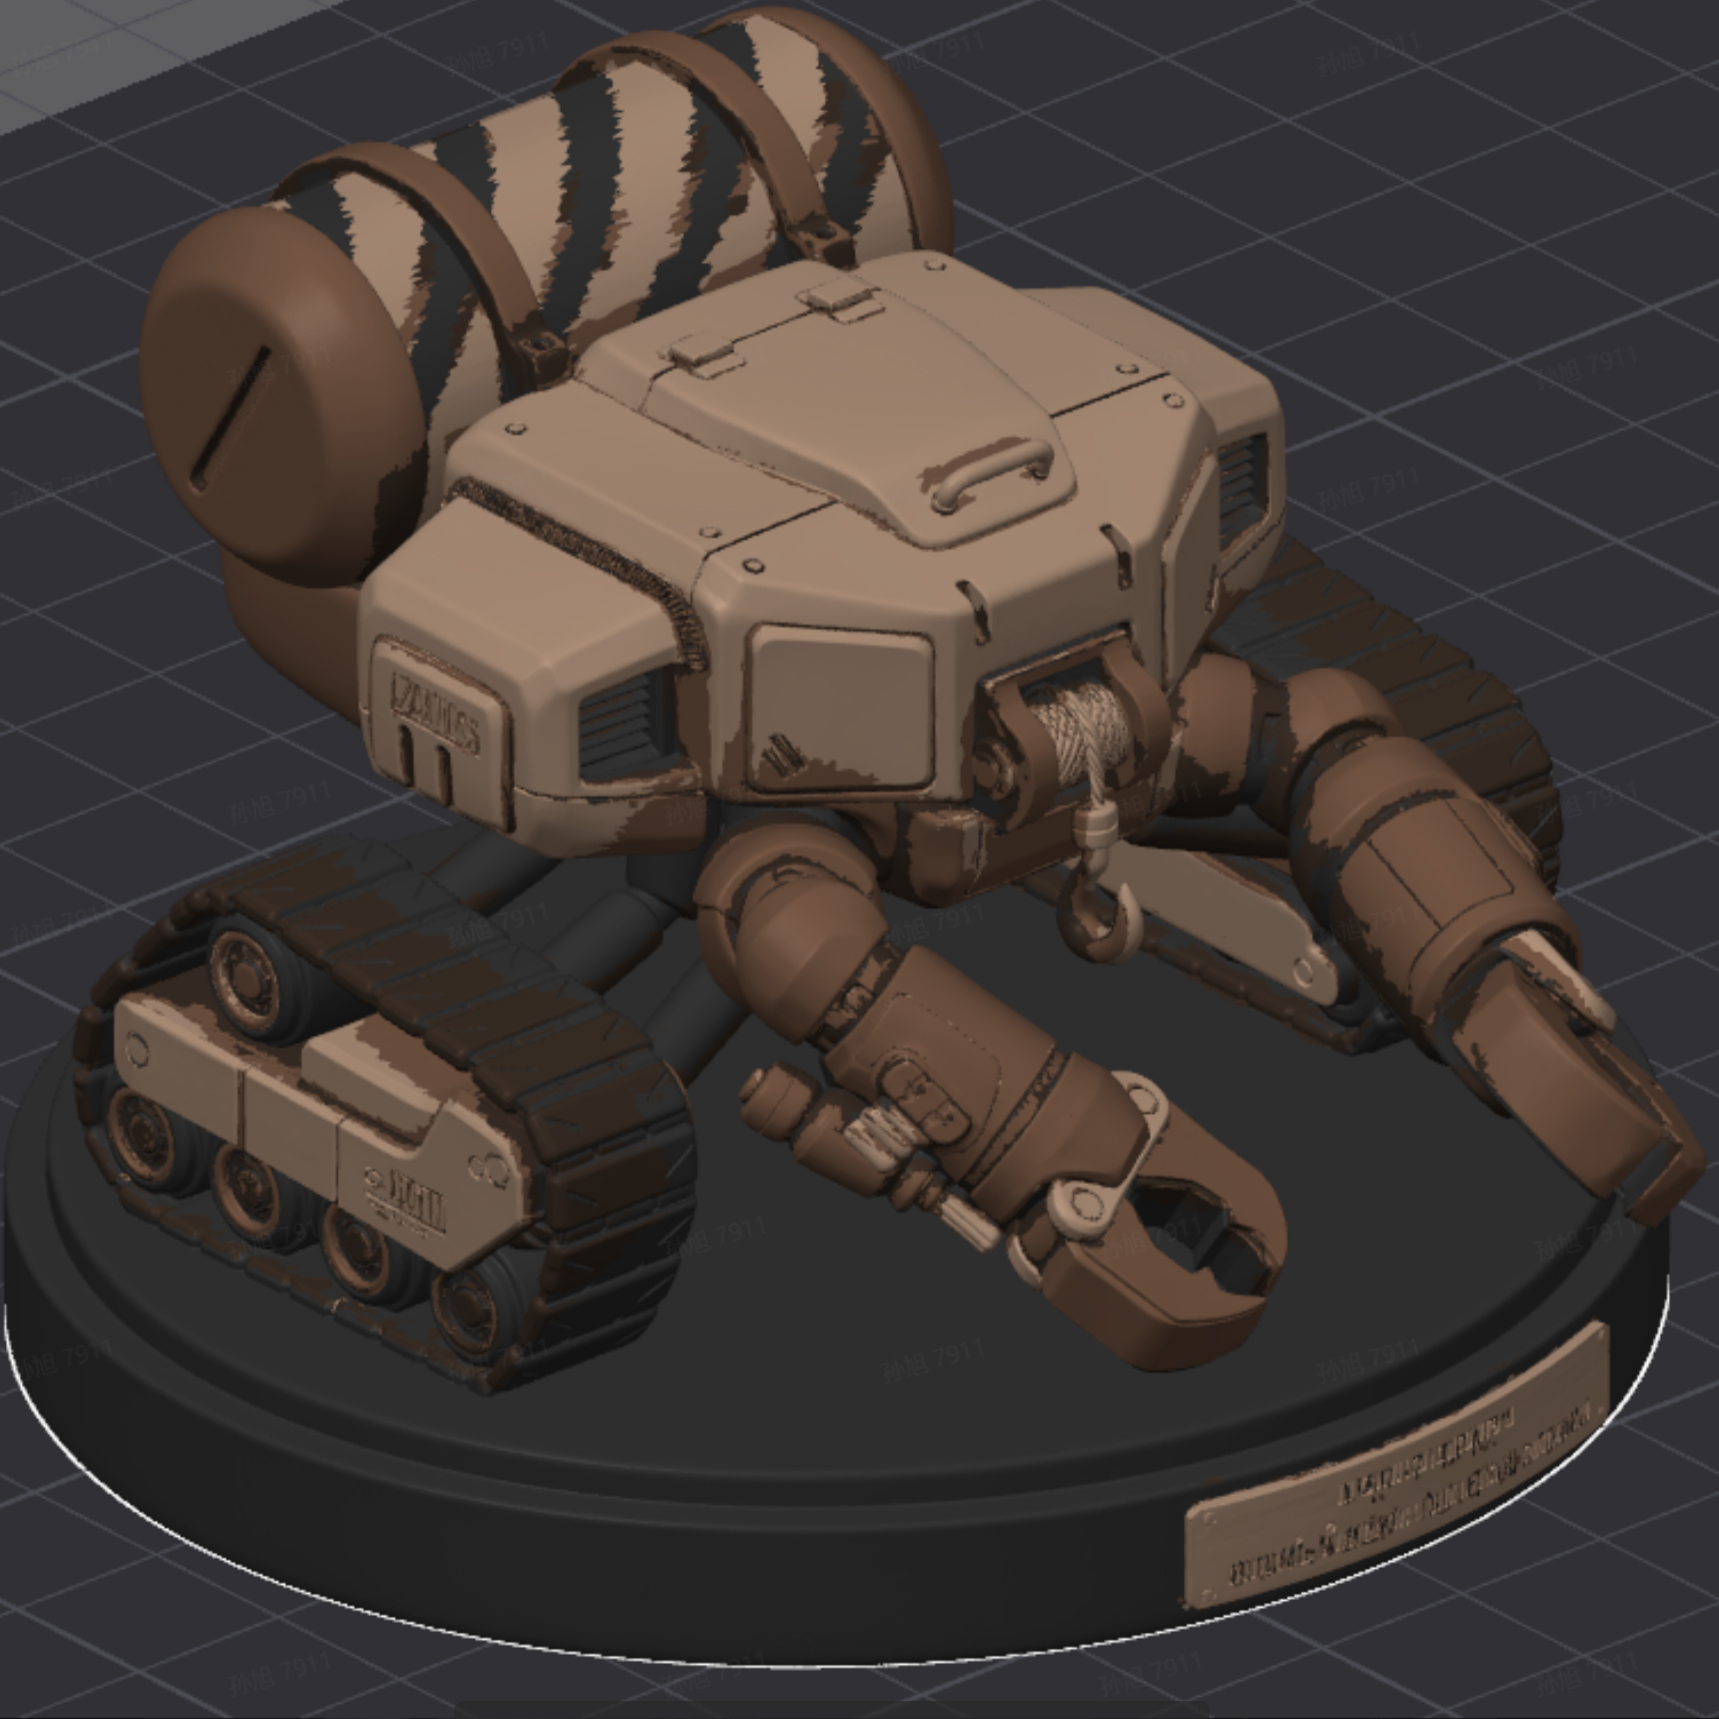
C – Mechanisch
Große überhängende Bereiche, wie z. B. schwebende Arme. Diese Modelle können gedruckt werden, aber aufgrund von FDM-Einschränkungen wird dringend empfohlen, sie vor dem Drucken in separate Teile aufzuteilen, um die Qualität und die Erfolgsquote zu verbessern.
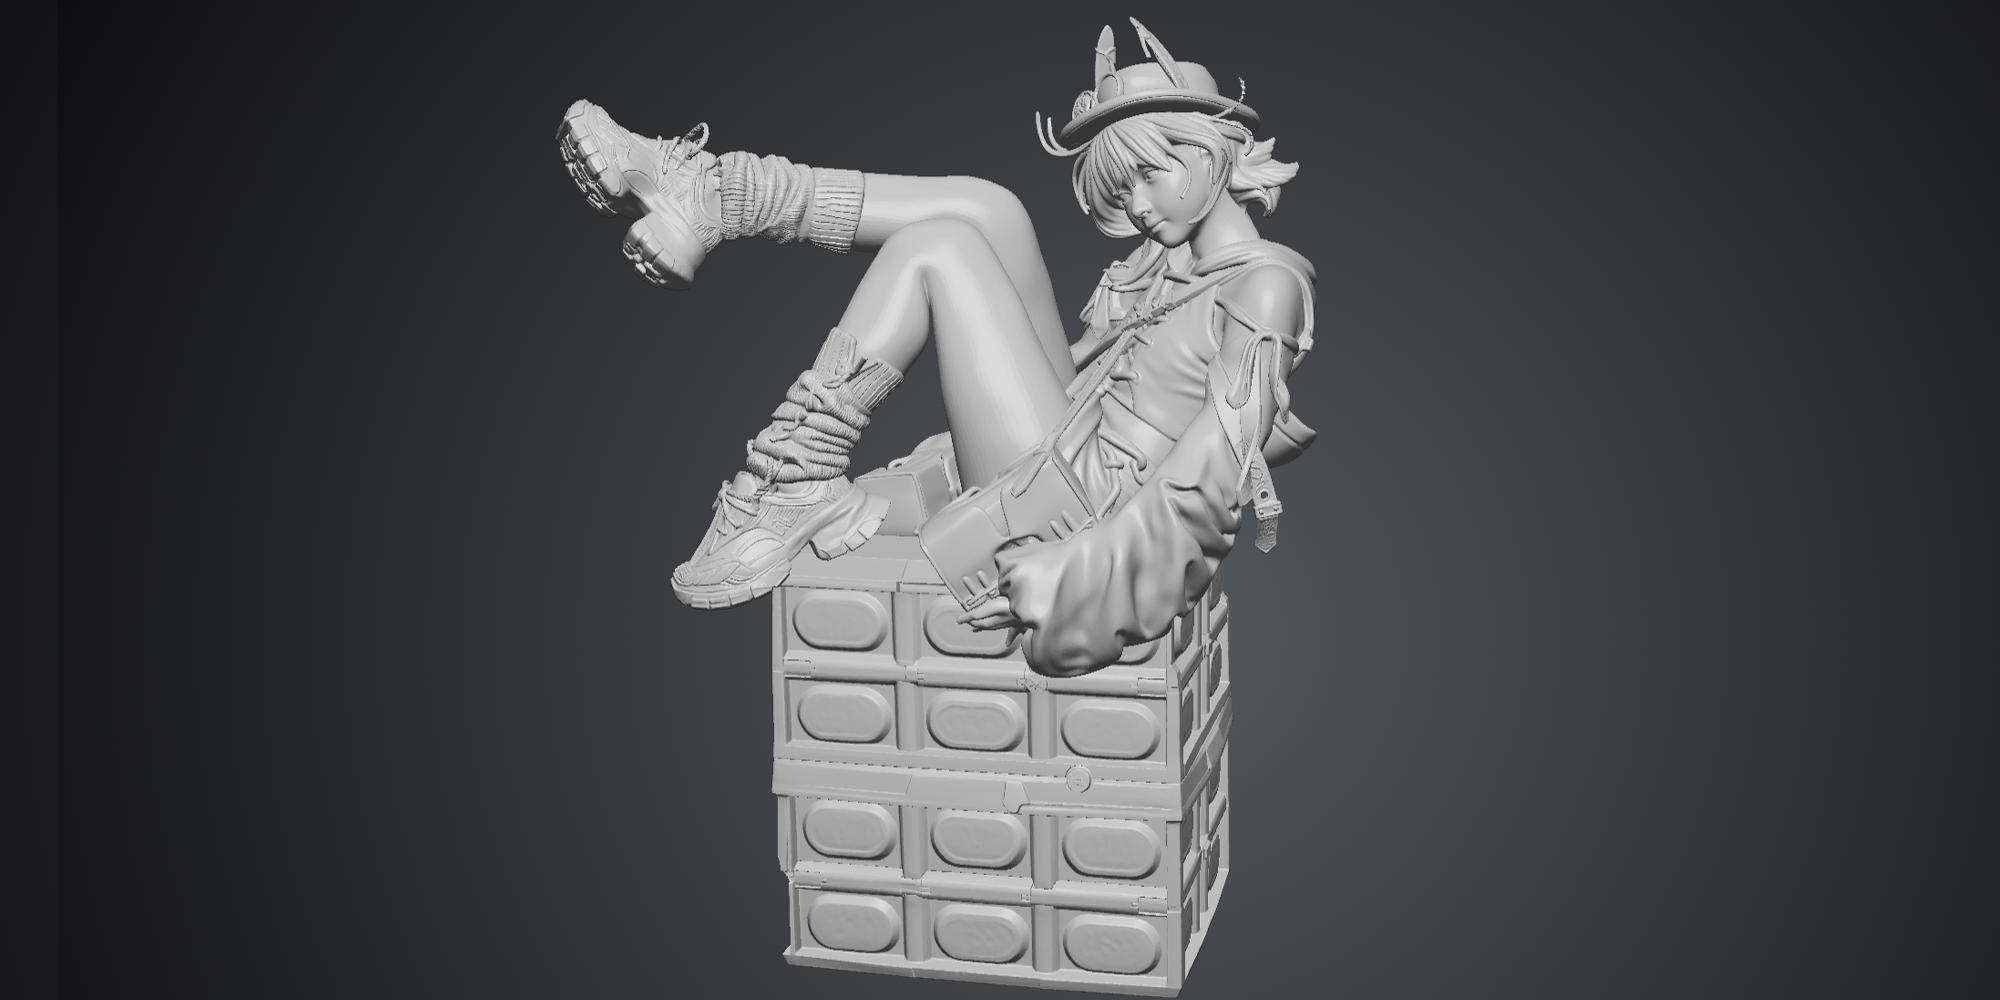
D – Realistischer Charakter
Viele dünne Stoff- und feine Haardetails erzeugen extrem dünne Stützen, die sehr anfällig für Spaghetti-Fehler sind.
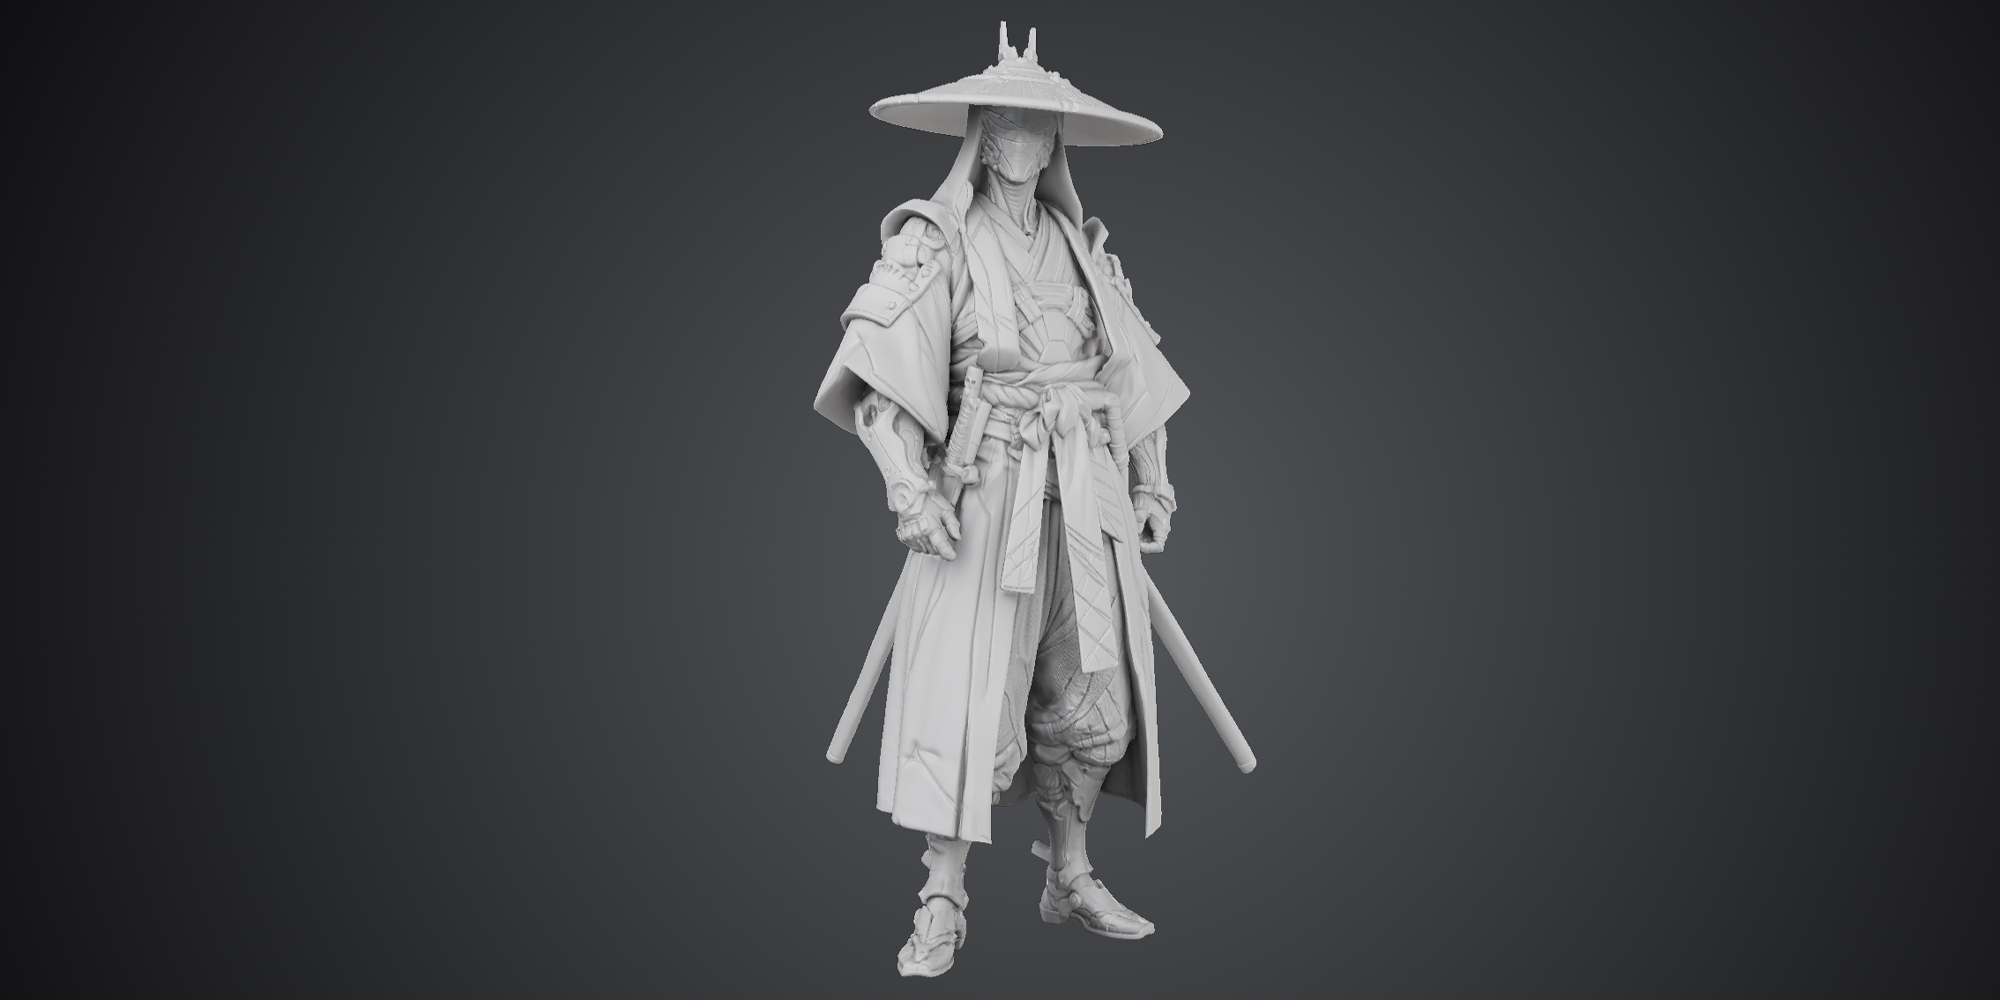
C – Charakter
Dünner Stoff und längliche, säulenartige Elemente. Das Innere von umhangähnlichen Geometrien neigt besonders dazu, Stützen zu erzeugen, die fast unmöglich zu entfernen sind.
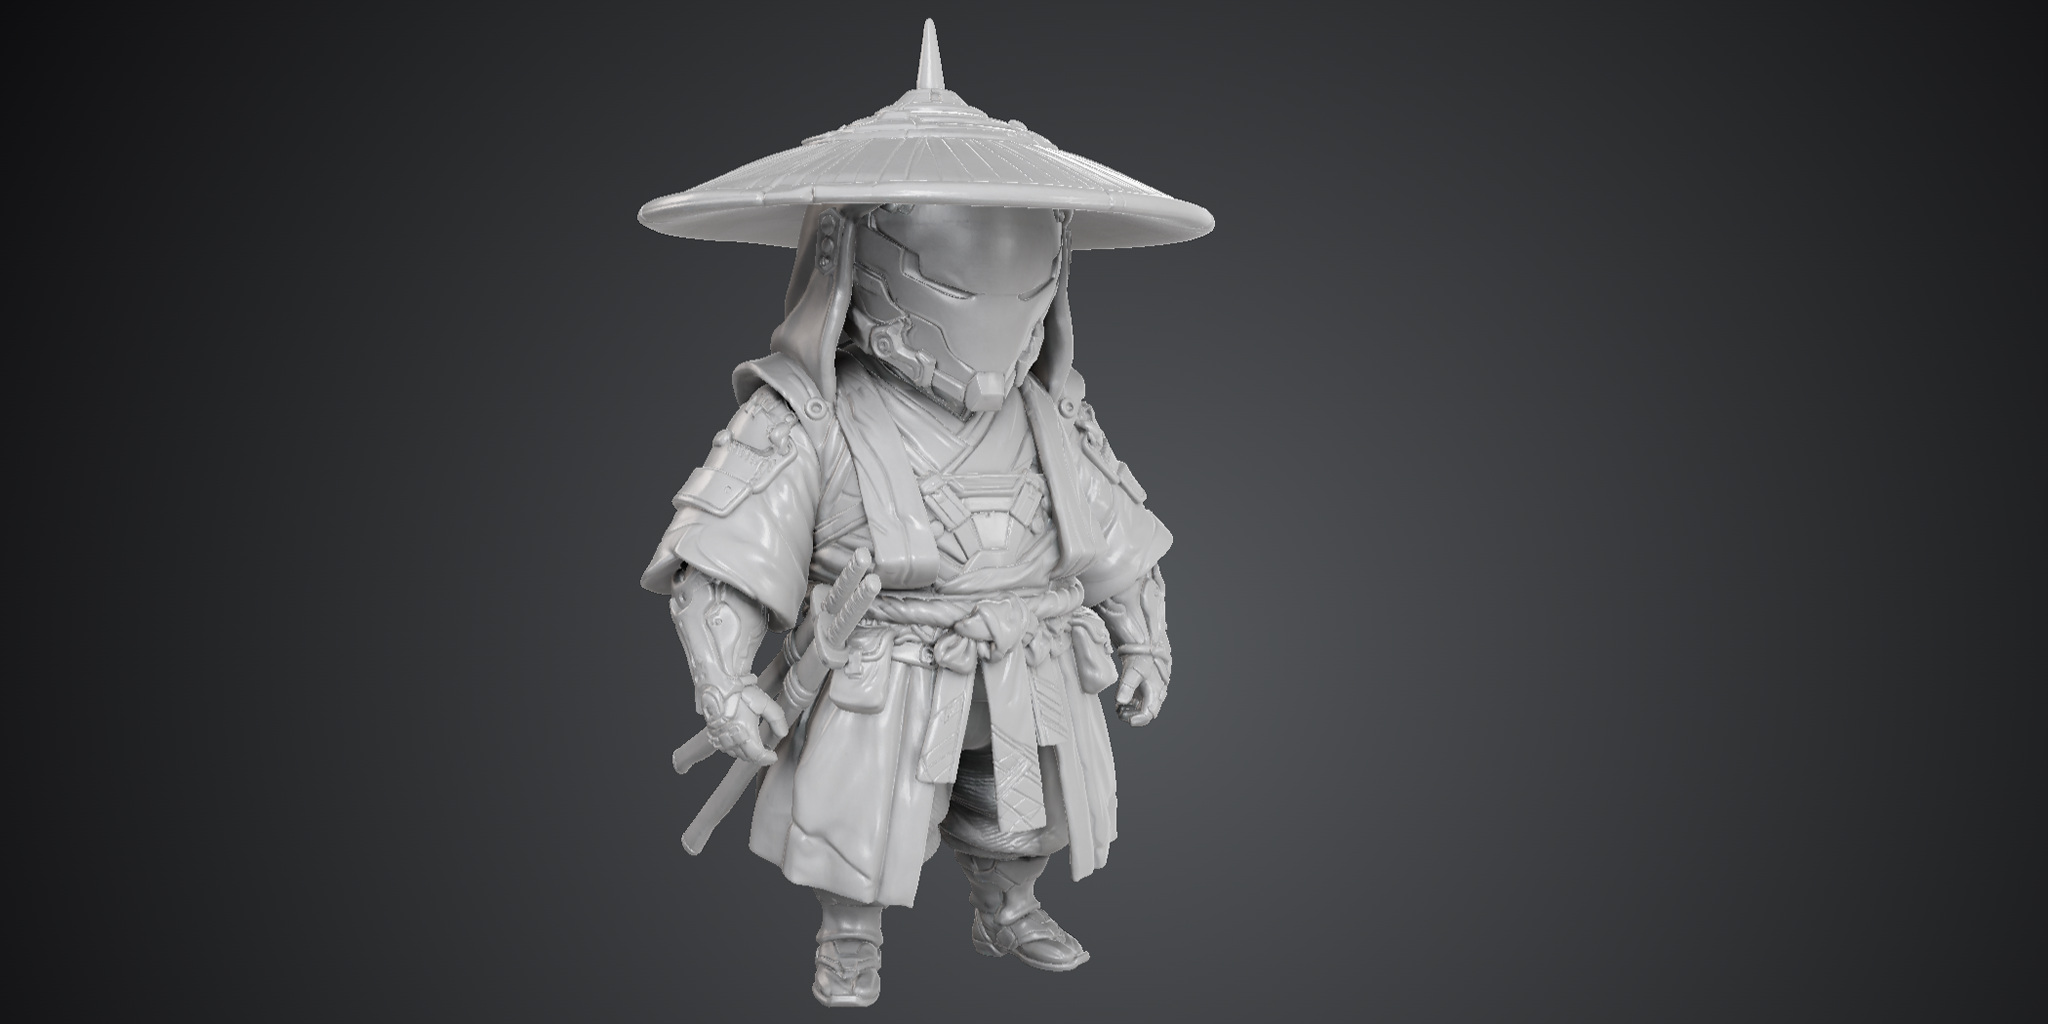
B – Chibi-Charakter
Geringe Gesamthöhe, etwas dickerer Stoff.
A – Chibi-Charakter
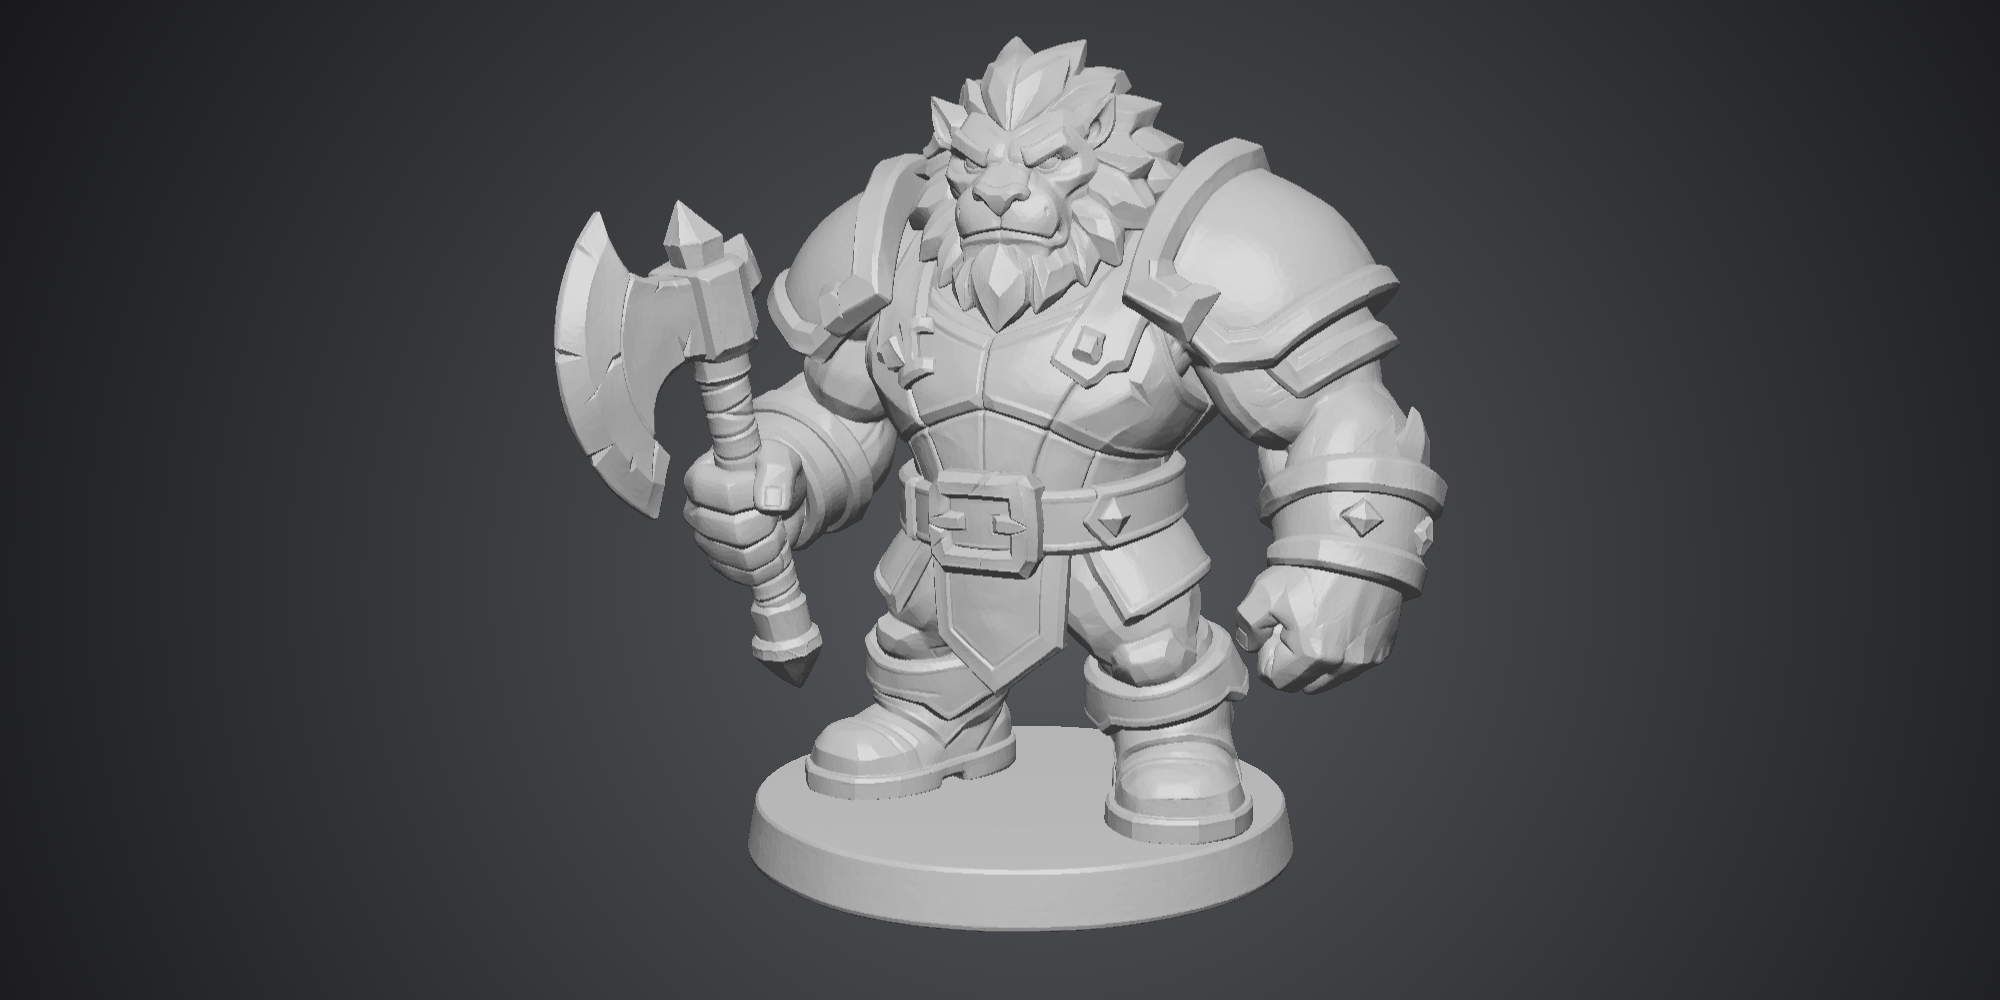
Praktisch keine feinen Teile, starke Licht- und Schattendefinition – für Tripo einfacher zu erkennen und genau zu generieren.
Ratschlag zur Modellauswahl: Im Allgemeinen sind Charaktere mit niedrigem Kopf-Körper-Verhältnis (Chibi) viel einfacher zu drucken als voll proportionierte Charaktere. Chibi-Charaktere haben klobigere Gliedmaßen und eine dickere Stoff- und Umhanggeometrie, was zu einer größeren strukturellen Stabilität führt.
Risikowarnung: Beachten Sie, dass extrem dünner Stoff oder lange, schlanke Schwerter beim Entfernen von Stützen immer noch bruchgefährdet sind. Die Kernregel lautet: Zu dünne oder kleine lokale Strukturen sind die Hauptursache für FDM-Druckfehler.
Erweiterte Option: Wenn Sie einen Drucker verwenden, der den Wechsel von mehreren Materialien oder mehrere Düsen unterstützt (wie Bambu Lab-Drucker mit AMS), sollten Sie wasserlösliche Stützen oder leicht zu entfernende Support-Filamente in Betracht ziehen. Mit diesen Materialien verbessert sich die Erfolgsquote für die oben genannten Modelle mit hohem Schwierigkeitsgrad drastisch.
1.2 Tipps zur Prompt-Optimierung
Das Hinzufügen der folgenden Keywords während der Phase der Tripo Bild-zu-3D-Generierung kann die Druckbarkeit des Modells erheblich verbessern:
- Chibi: Erzeugt einen niedlichen Charakter mit kompakten Proportionen
- Clay style / Clay texture (Ton-Stil / Ton-Textur): Verleiht den meisten Modellbildern ein Gefühl von Dicke und Volumen
1.3 Exporteinstellungen: Vorbereitung auf das automatische Color Mapping
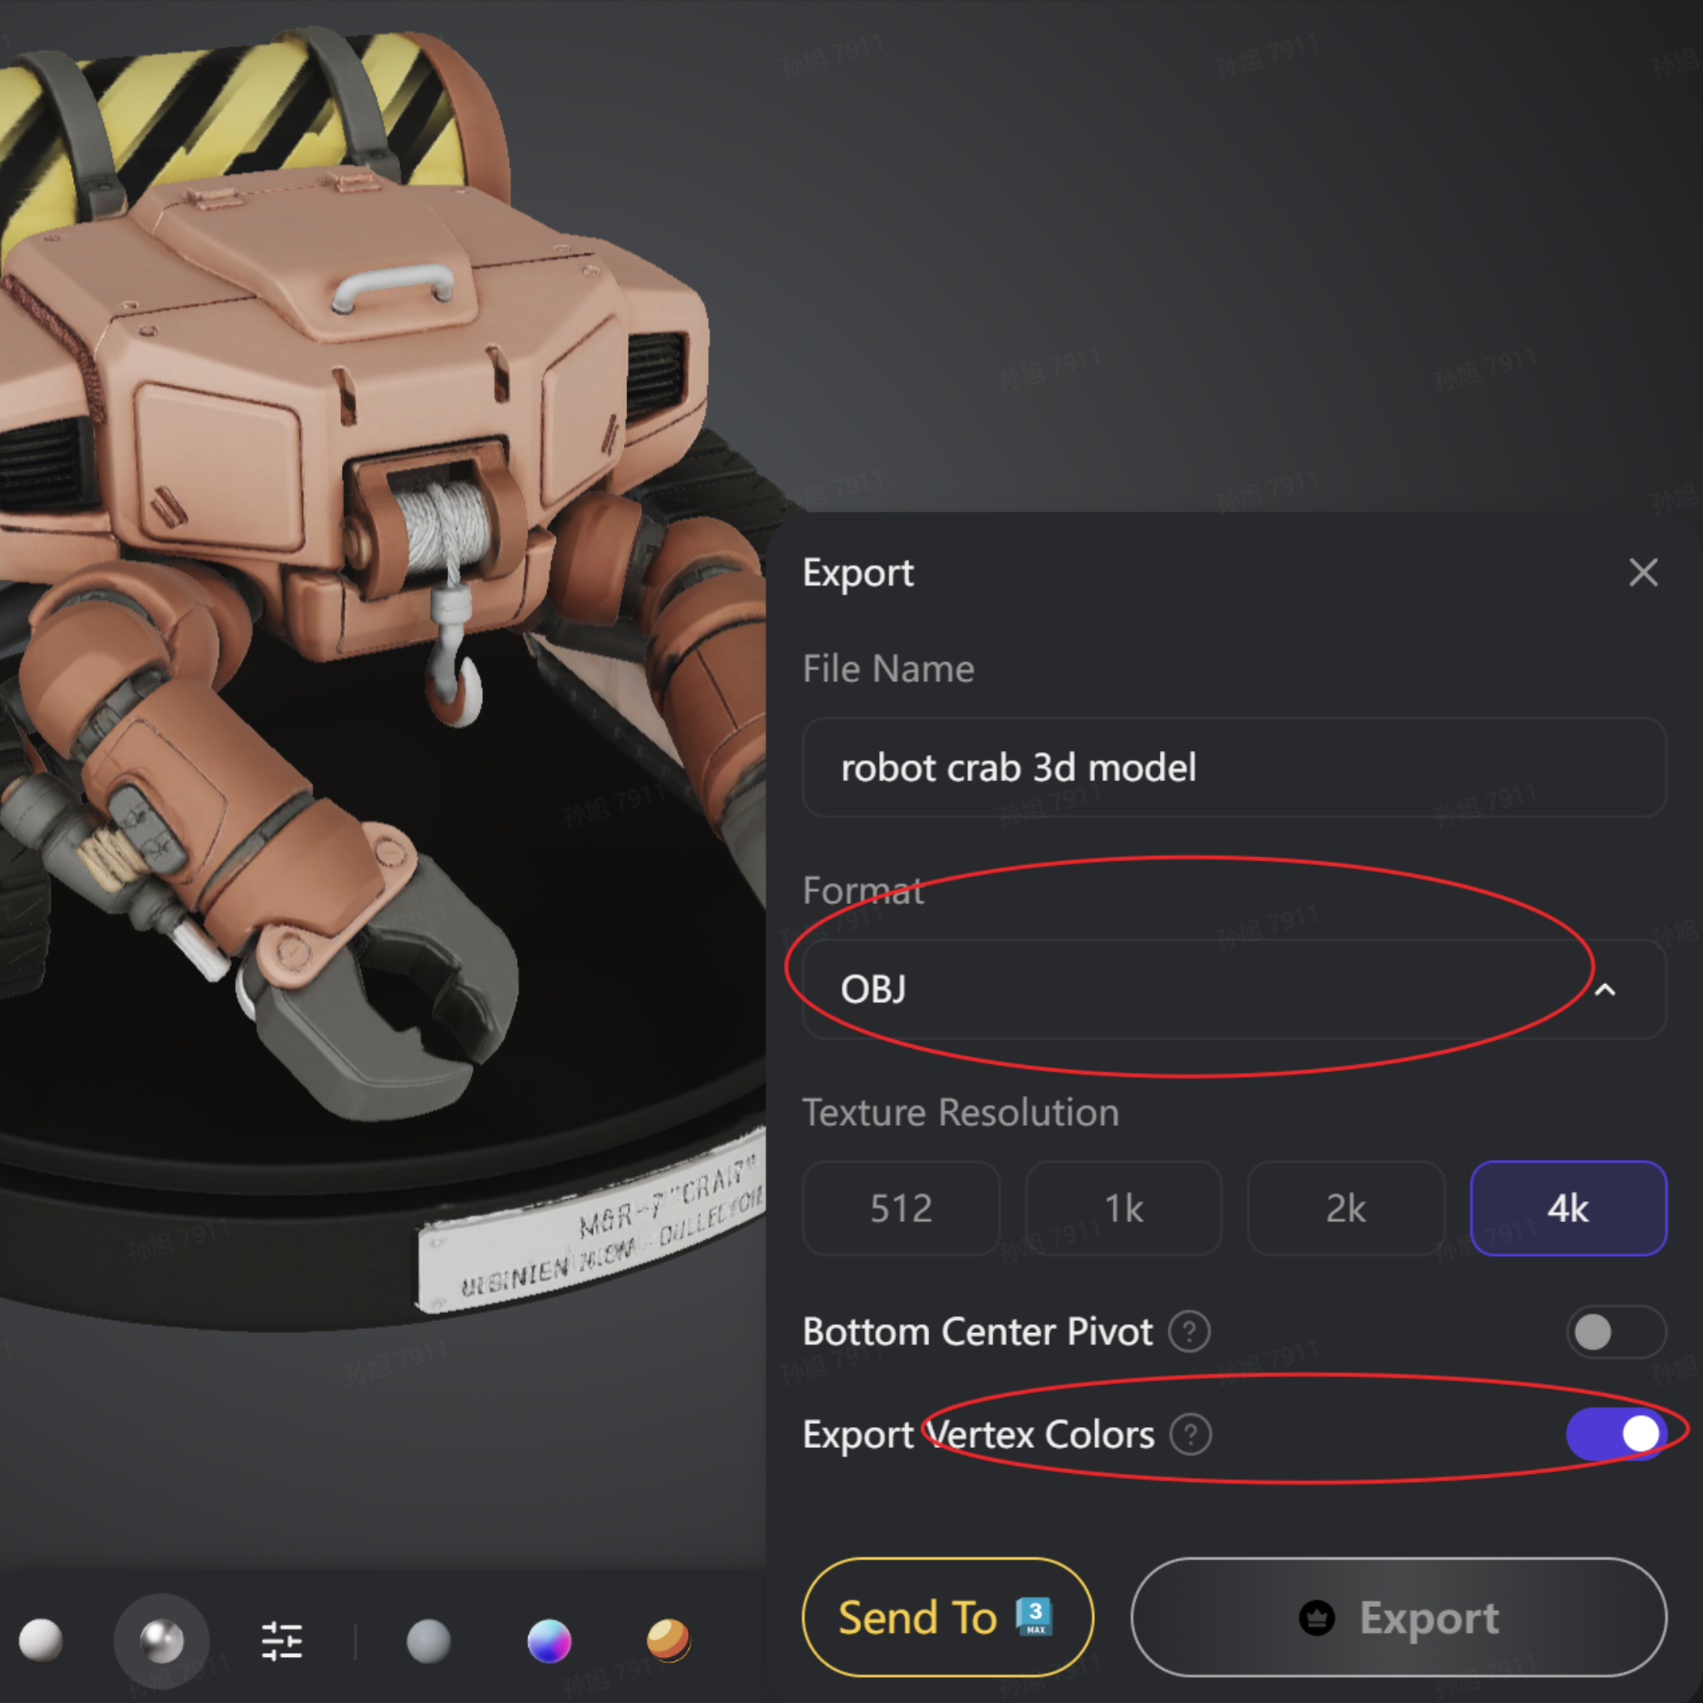
Wenn Sie einen Mehrfarbendruck in Bambu Studio erzielen möchten, wird empfohlen, beim Export aus Tripo eine der folgenden zwei Exportmethoden zu verwenden (beide funktionieren durch Konvertierung von Texturinformationen in Vertex-Farben):
Hinweis: Tripo unterstützt jetzt den direkten Export von Vertex-Farben, sodass Sie keine komplexen Baking-Operationen in Blender mehr durchführen müssen.
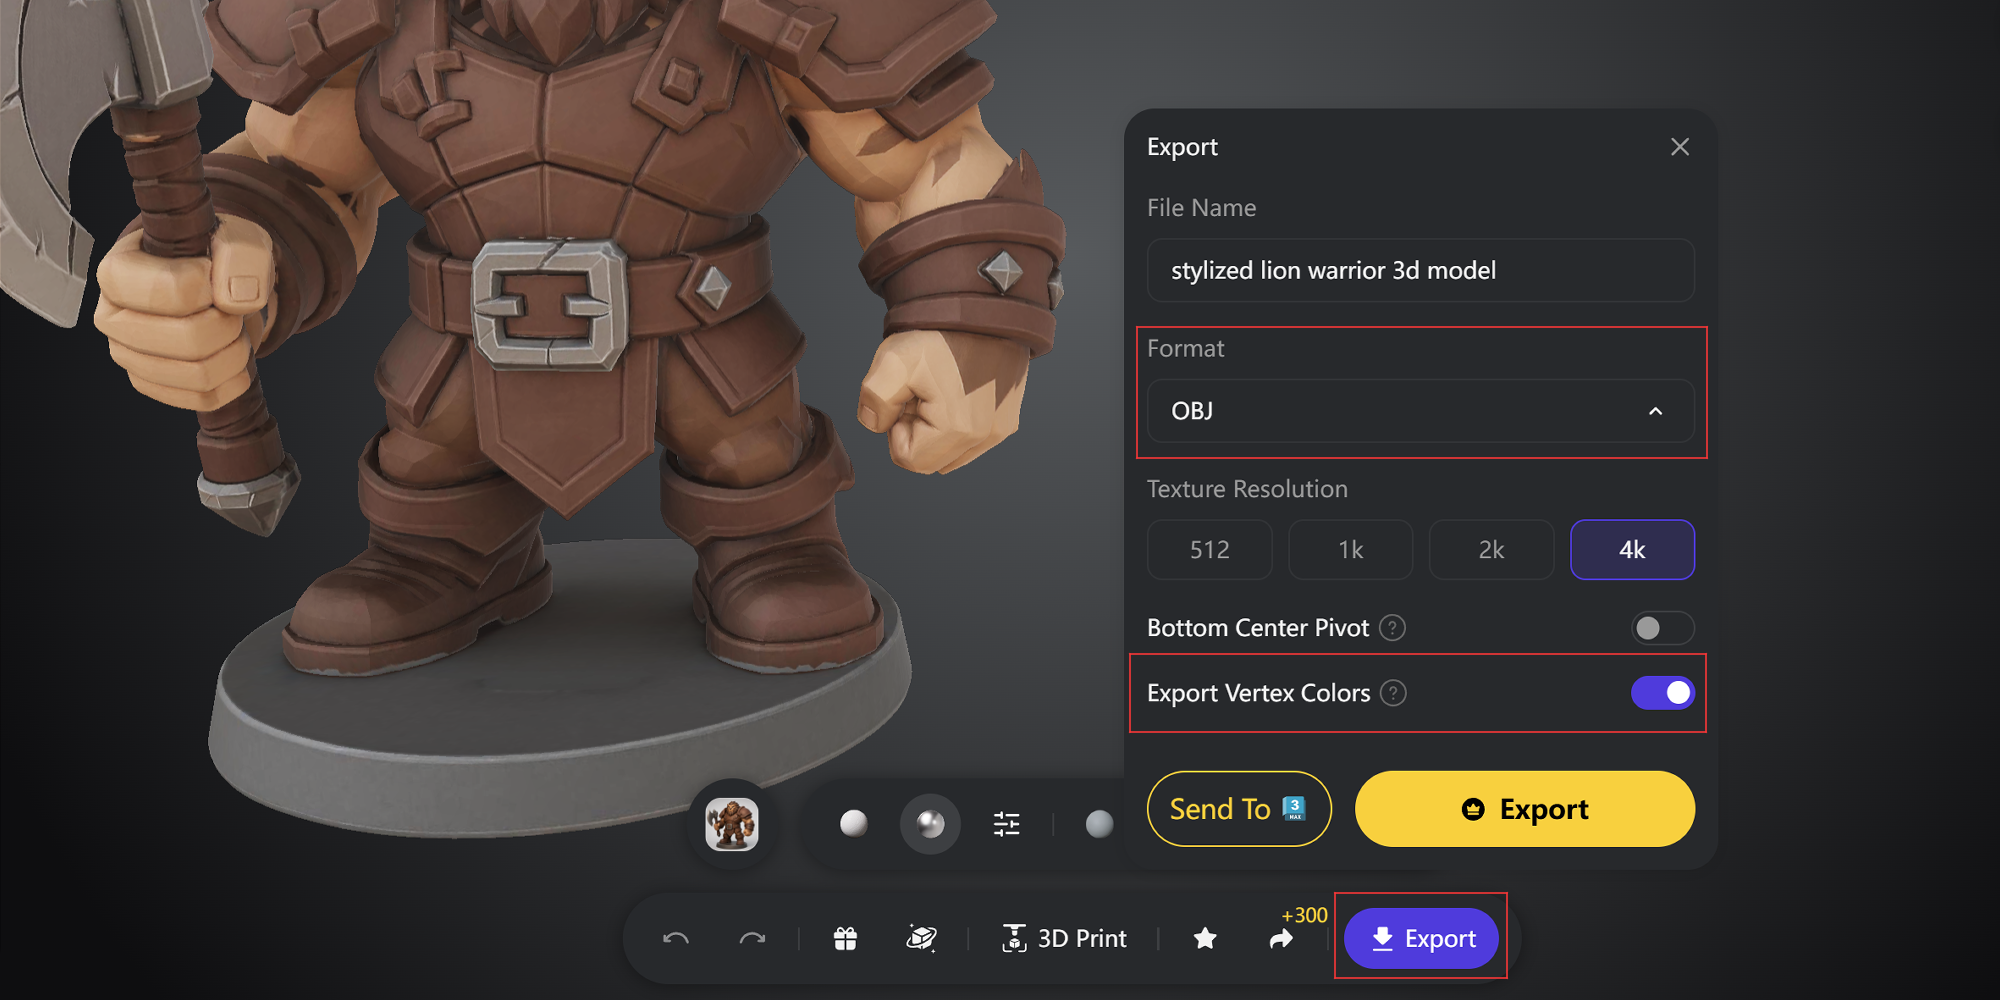
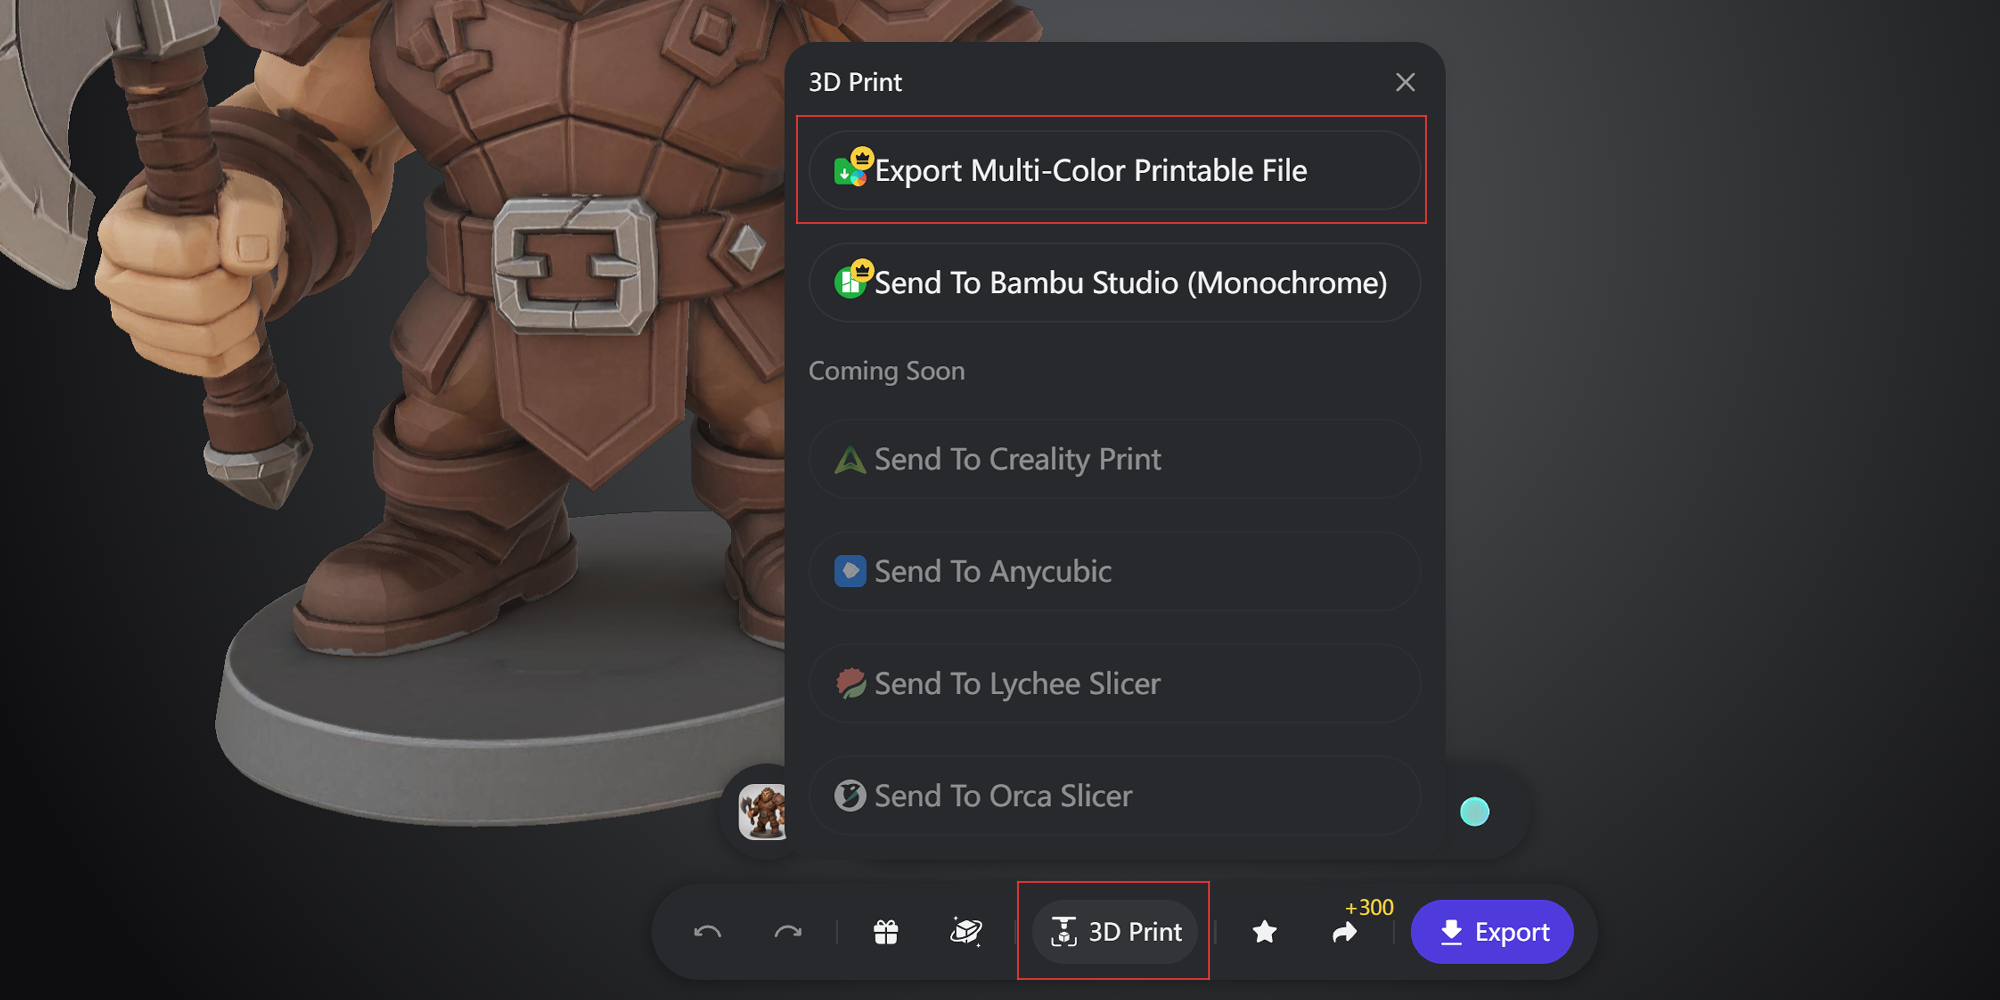
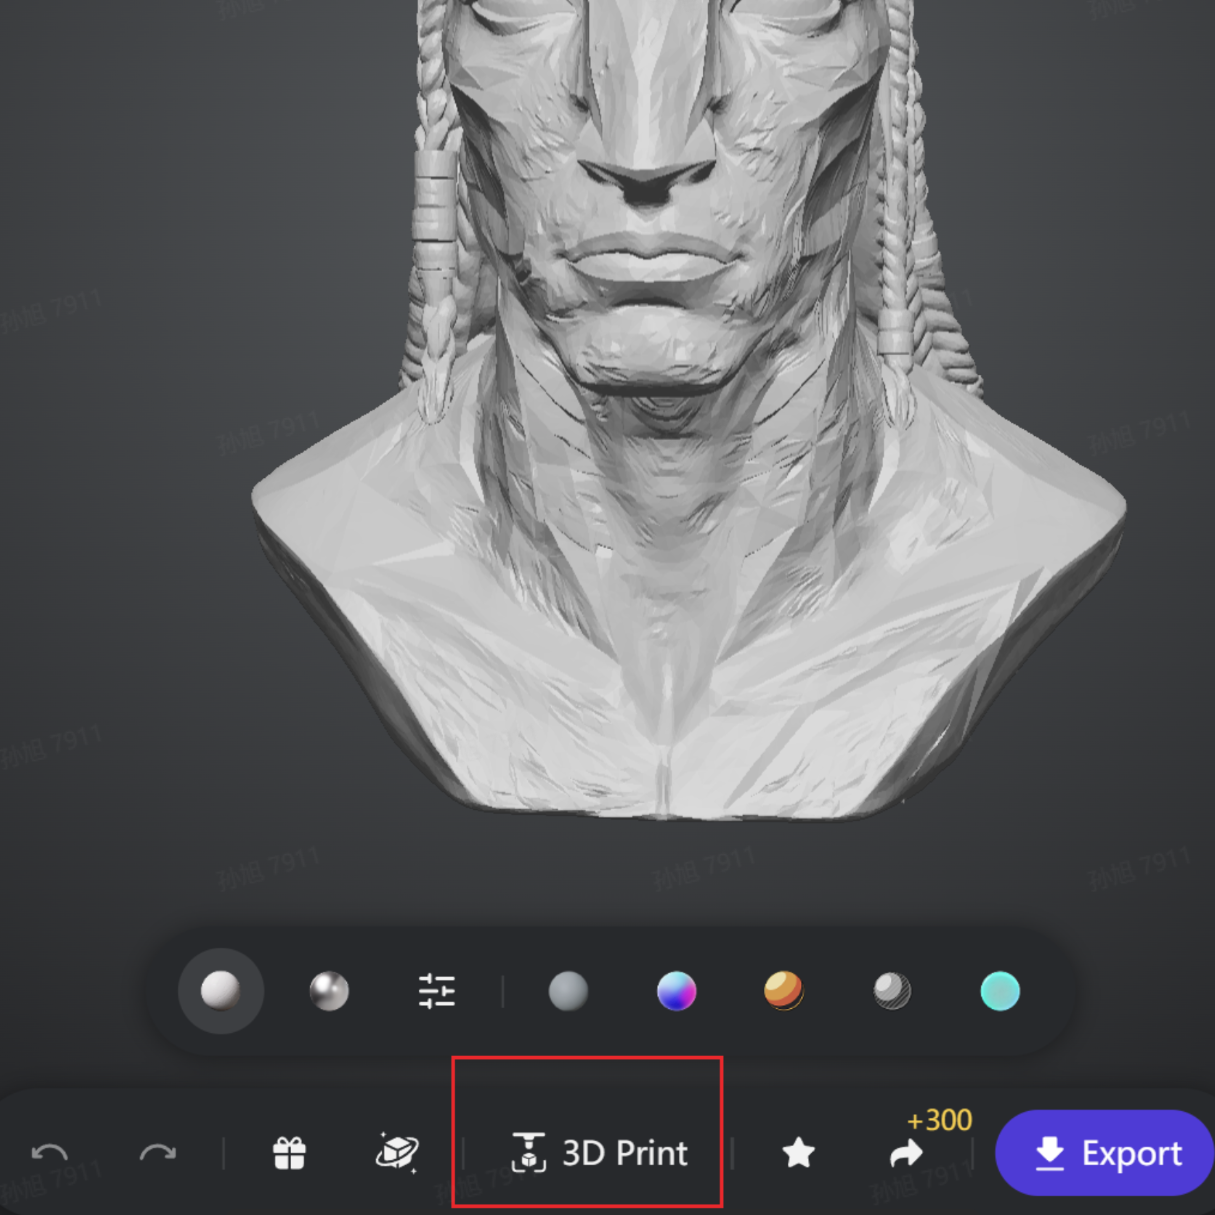
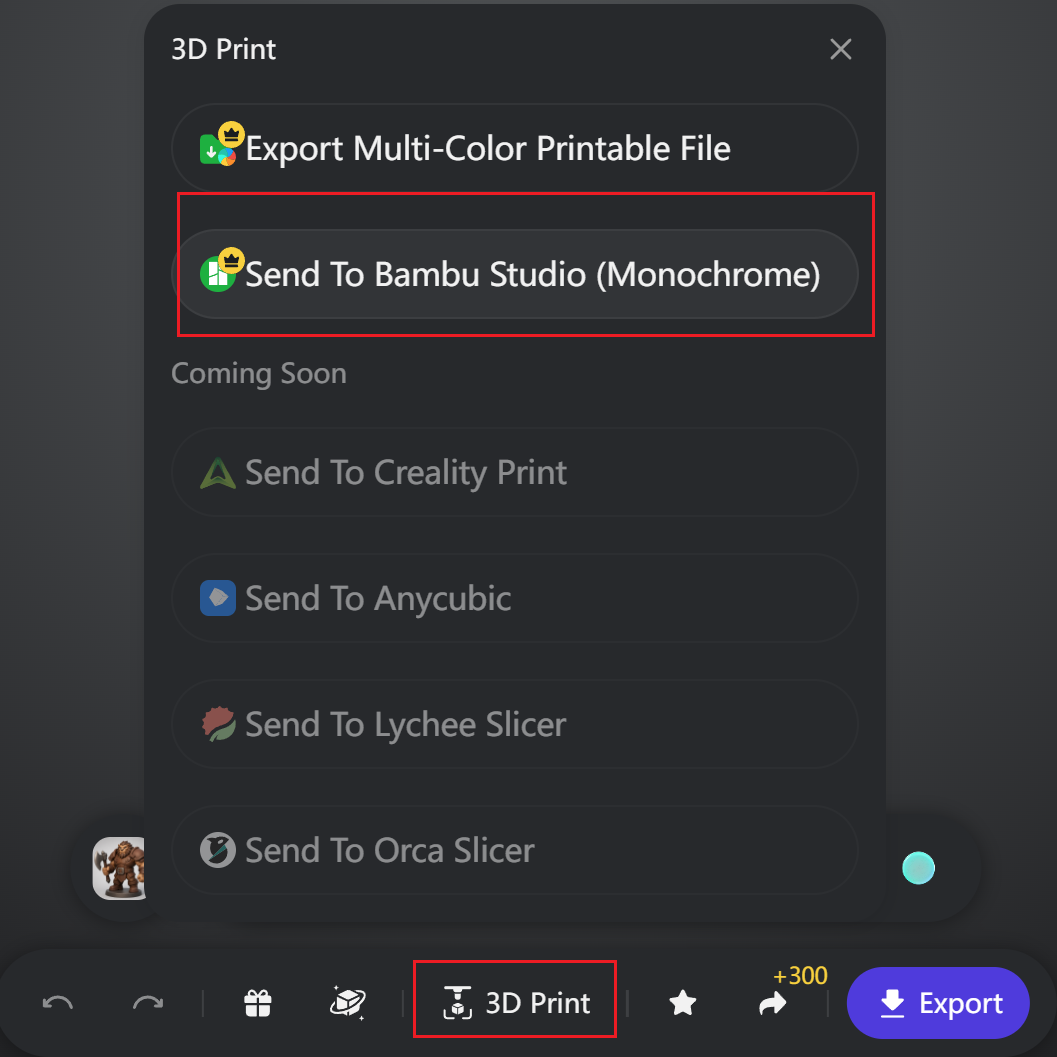
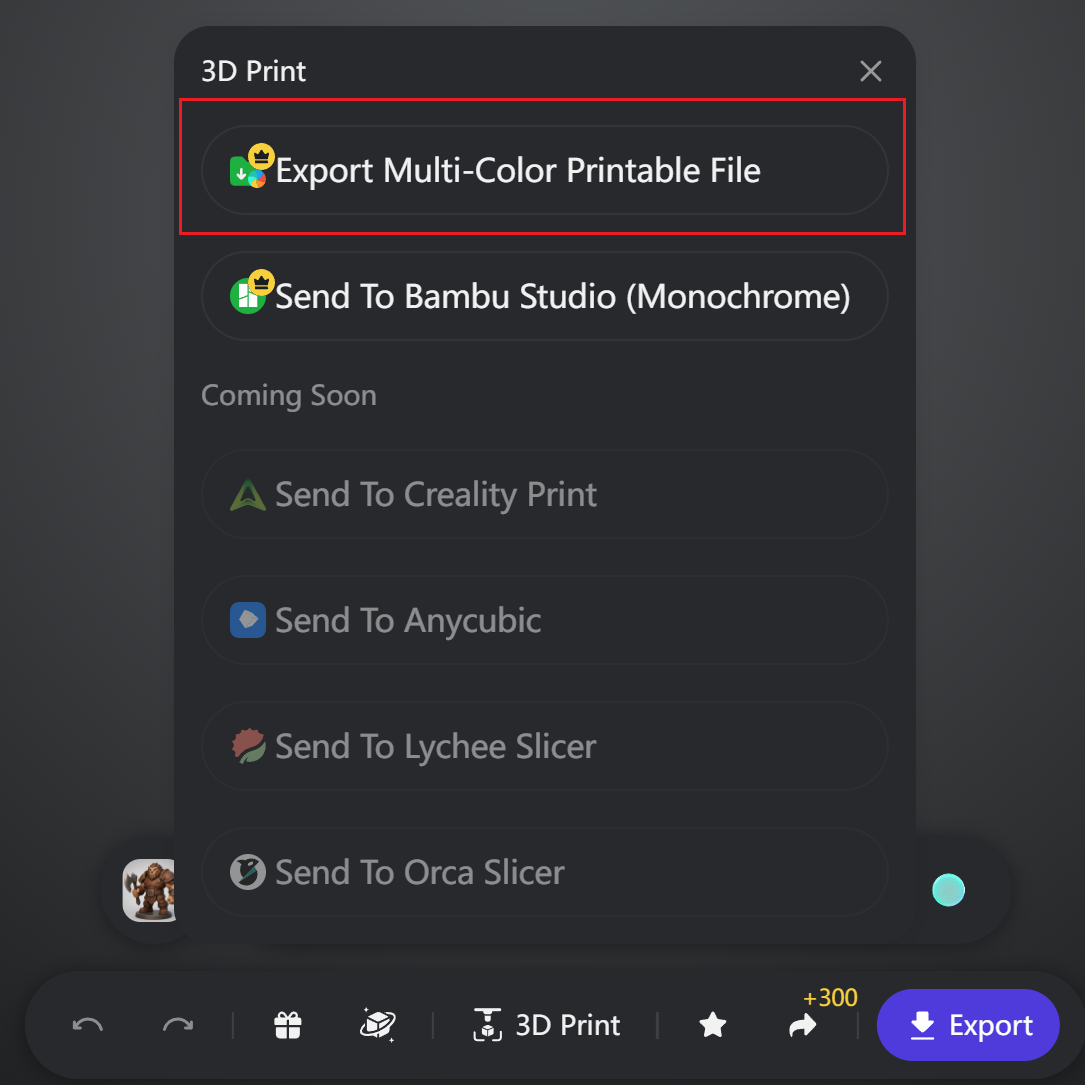
- Wählen Sie 3D Print, um eine mehrfarbige, druckfertige Datei direkt zu exportieren.
- Exportieren Sie im OBJ-Format und achten Sie darauf, „Export Vertex Colors“ zu aktivieren. Bambu Studio erkennt die Farben beim Import automatisch und ordnet sie zu.
1.4 Unverzichtbare Vorverarbeitung: Retopologie
Vor dem Export wird dringend empfohlen, das integrierte Retopology-Modul von Tripo zu verwenden. Dieser Schritt ist entscheidend, um sicherzustellen, dass das Modell in nachgelagerter Software reibungslos funktioniert:
Empfohlene Einstellungen: Stellen Sie den Modus auf Triangle (Dreieck) mit einer Polygonanzahl zwischen 100k – 150k Flächen (das aktuelle Maximum auf der Website liegt bei 150k).
Warum ist das notwendig?
- Performance-Optimierung: Reduziert die Rechenlast bei booleschen Operationen in Blender oder beim Slicing in Bambu Studio erheblich und verhindert das Einfrieren oder Abstürzen der Software.
- Fehlerbeseitigung: Behebt effektiv häufige Probleme wie getrennte Flächen und überlappende Geometrien im Originalmodell und verwandelt eine Sammlung verstreuter Fragmente in ein logisch einheitliches Ganzes – was die Erfolgsquote beim 3D-Druck erheblich verbessert.
Empfohlene Einstellungen für die Smart Retopology. Da der Export von Mehrfarben-Druckdateien nur das OBJ-Format unterstützt und in Bambu Studio importierte OBJ-Dateien keine nicht-dreieckigen Flächen erkennen können, wird hier der Triangle-Modus gewählt.

Modelle ohne Retopologie sind sehr anfällig für Probleme mit getrennten Flächen (disconnected faces). Da das Originalmodell aus vielen separaten Flächenstücken und nicht aus einem geschlossenen, wasserdichten Volumenkörper besteht, ist beim direkten Import in Bambu Studio die Wahrscheinlichkeit hoch, dass Slicing-Fehler auftreten.
Wenn Sie die ursprüngliche detailreiche Geometrie beibehalten möchten, ohne die Qualität durch Retopologie zu verringern, befolgen Sie bitte den später beschriebenen Reparatur-Workflow: Siehe unten: Abschnitt 2.2 Blender-Verarbeitung — Behebung häufiger Modellfehler
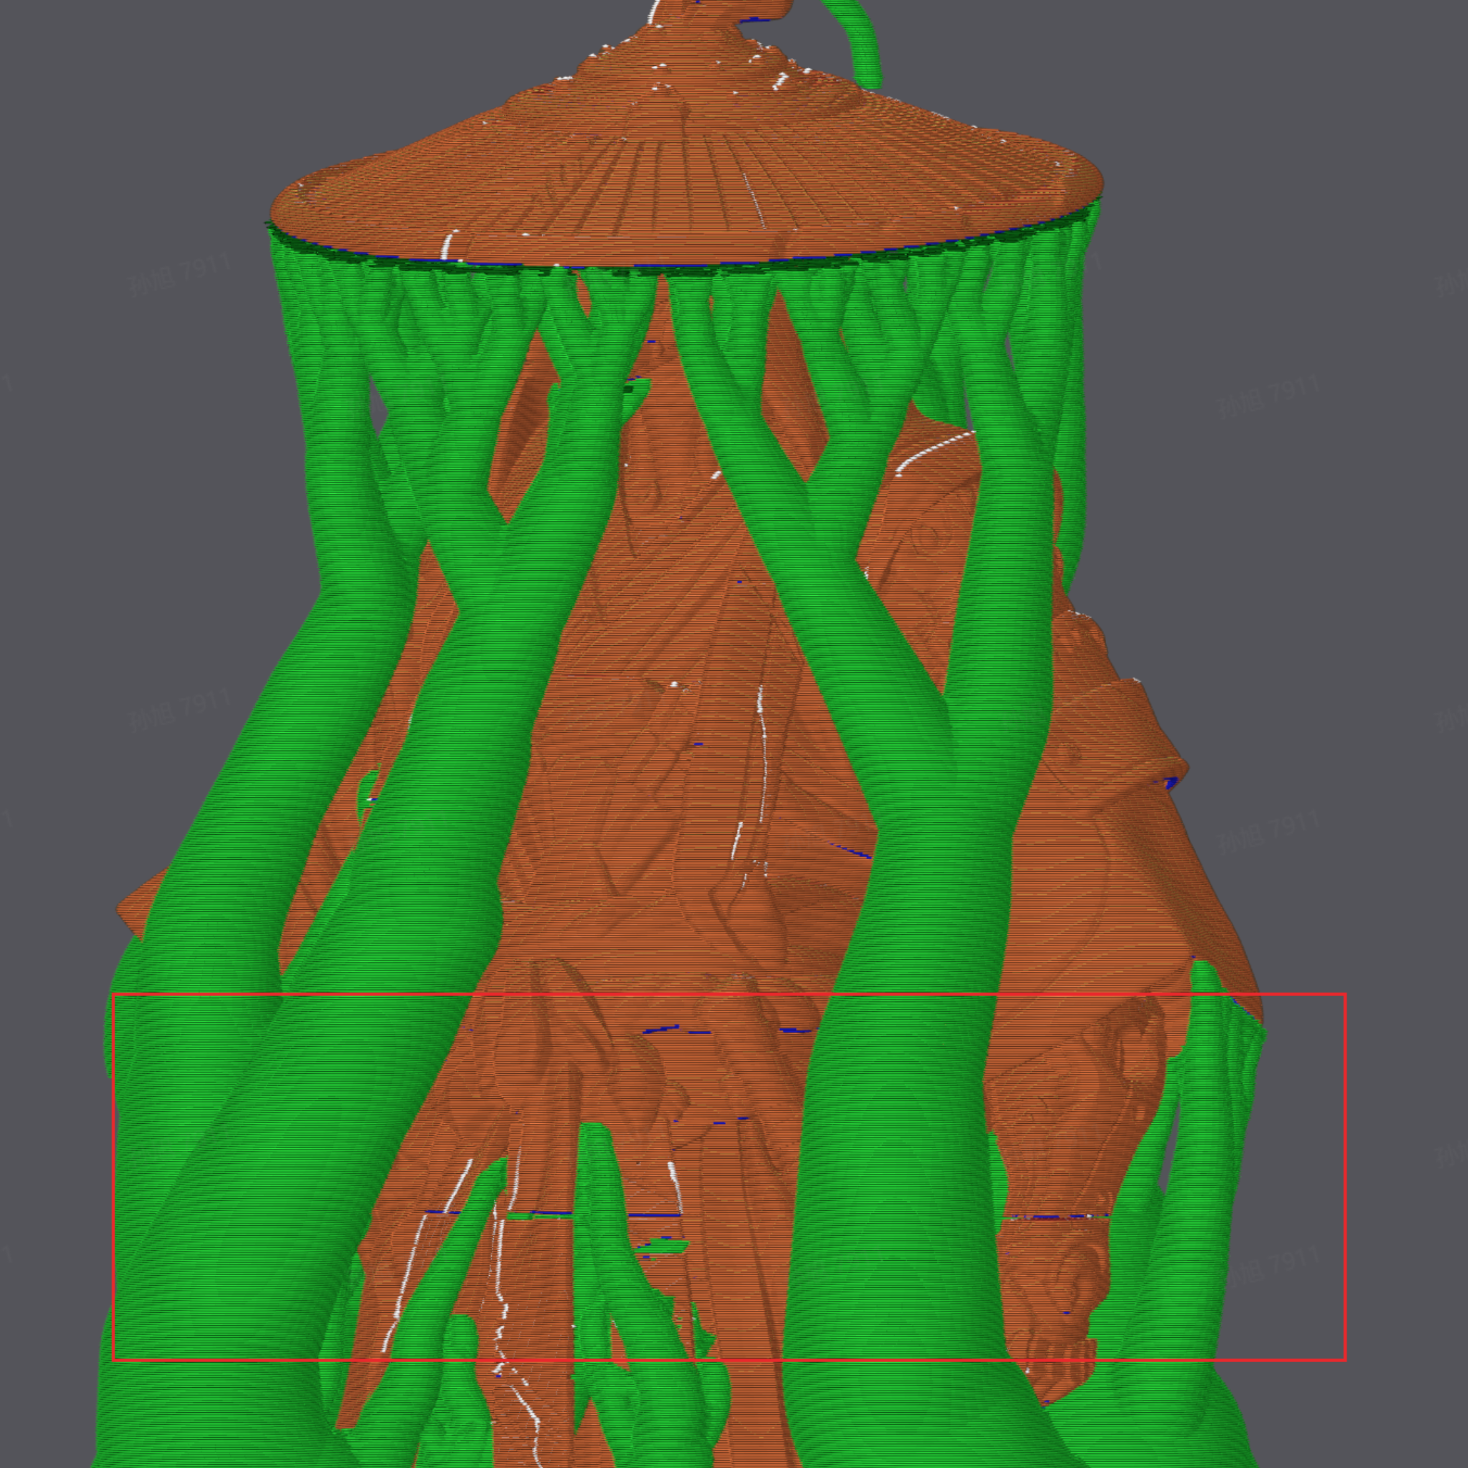
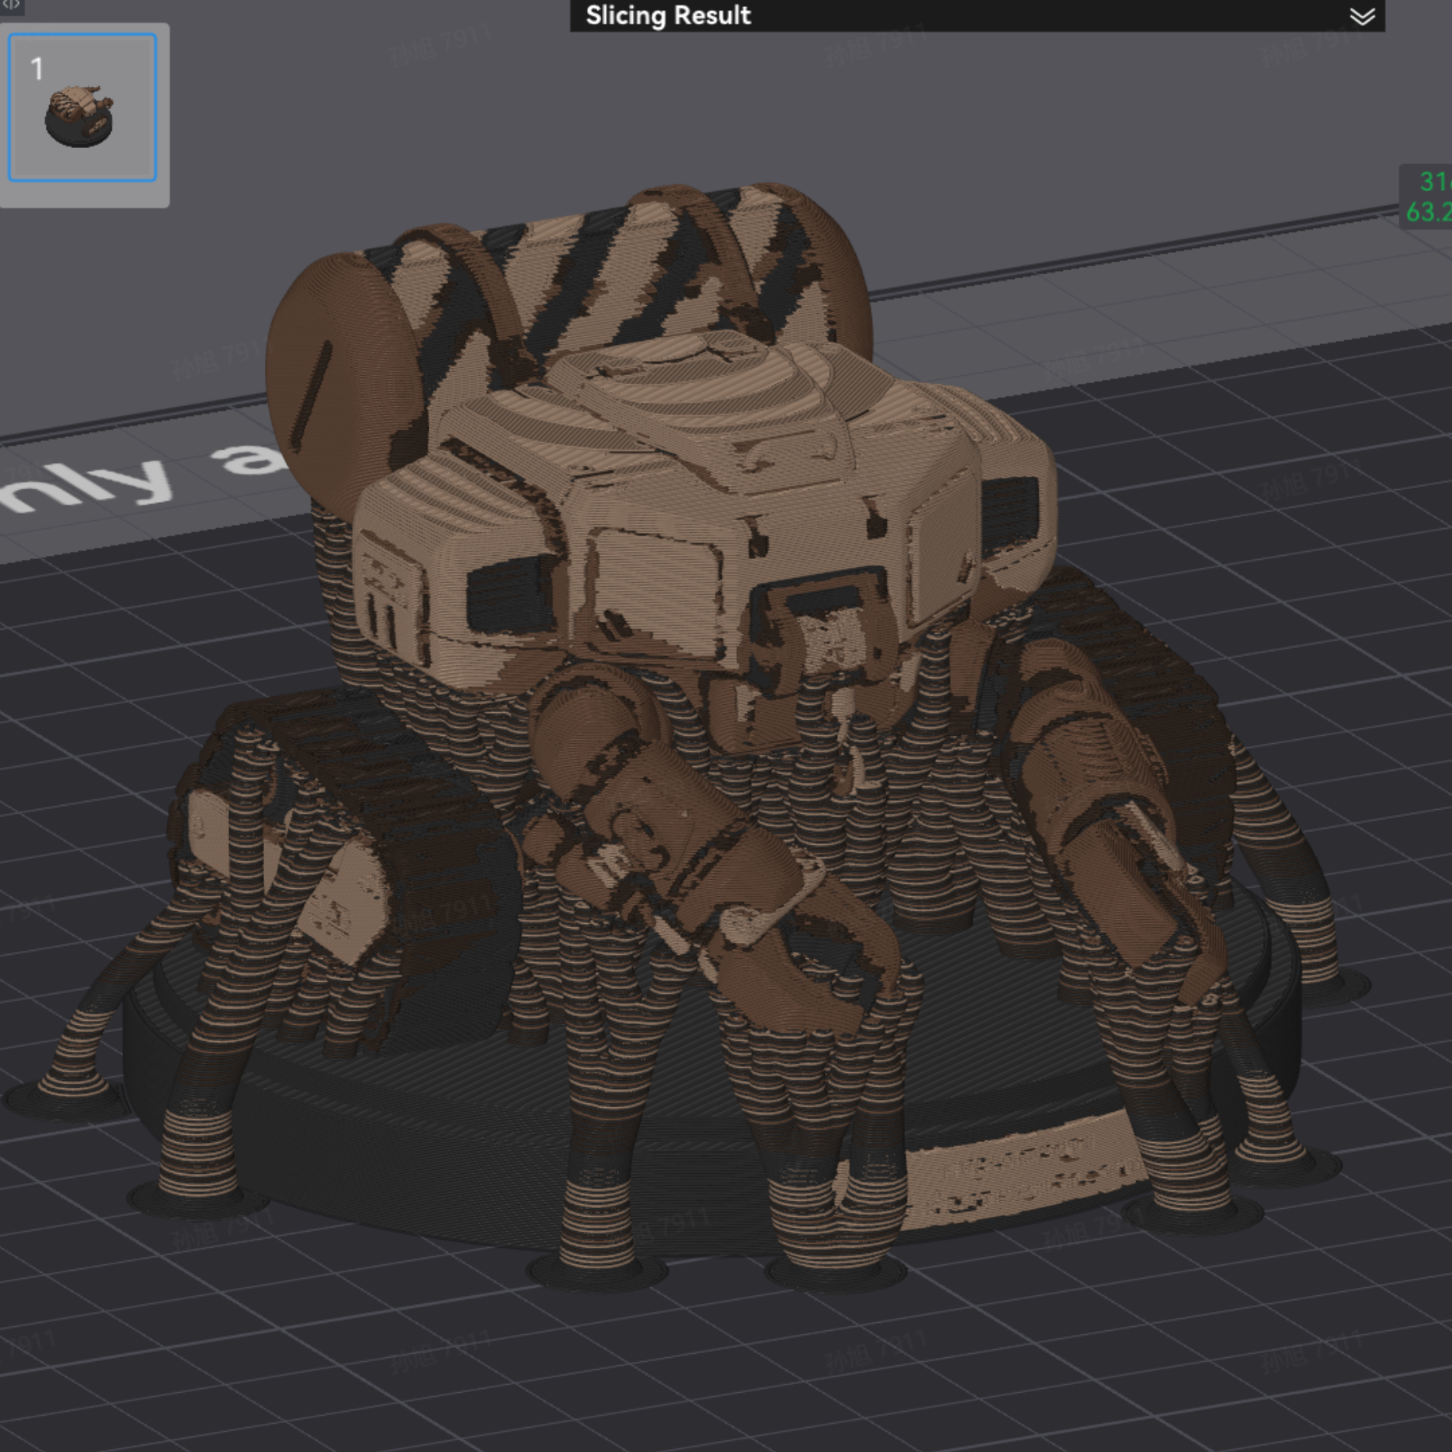
Wie gezeigt, kann eine nicht zusammenhängende Geometrie zu schwerwiegenden Slicing-Fehlern führen (es wurde kein konsistentes Muster gefunden – manchmal tritt es auf, manchmal nicht).

Eine nicht-mannigfaltige Geometrie kann dazu führen, dass beim Slicing eine ganze Schicht verschwindet – der Grund dafür ist unklar, aber der betroffene Bereich weist eine extrem geringe Festigkeit auf und das Modell ist praktisch zweigeteilt.
2. Blender-Verarbeitungsphase
Obwohl die meisten Tripo-Modelle direkt in Bambu Studio importiert werden können, kann die Verwendung von Blender zur Vorverarbeitung bei individuellen Anpassungen oder Modellreparaturen Ihre Erfolgsquote beim 3D-Druck erheblich verbessern.
2.1 Einrichtung der Umgebung: Installation wichtiger Plugins
Installieren Sie Blender-Plugins, um die Effizienz des Workflows und die Fehlerüberprüfung zu verbessern.
- Gehen Sie in Blender auf Edit → Preferences → Add-ons.
- Suchen Sie nach den folgenden integrierten offiziellen Plugins und aktivieren Sie diese:
- 3D Print Toolbox: Zur Modellfehlererkennung mit einem Klick.
- Bool Tool: Zum schnellen Zusammenführen und Schneiden von Modellen.
- LoopTools: Zur Optimierung der Mesh-Topologie.


2.2 Häufige Modellfehler & wie man sie behebt
1. Getrennte Flächen beheben (separate Flächenstücke)
Wie es aussieht:
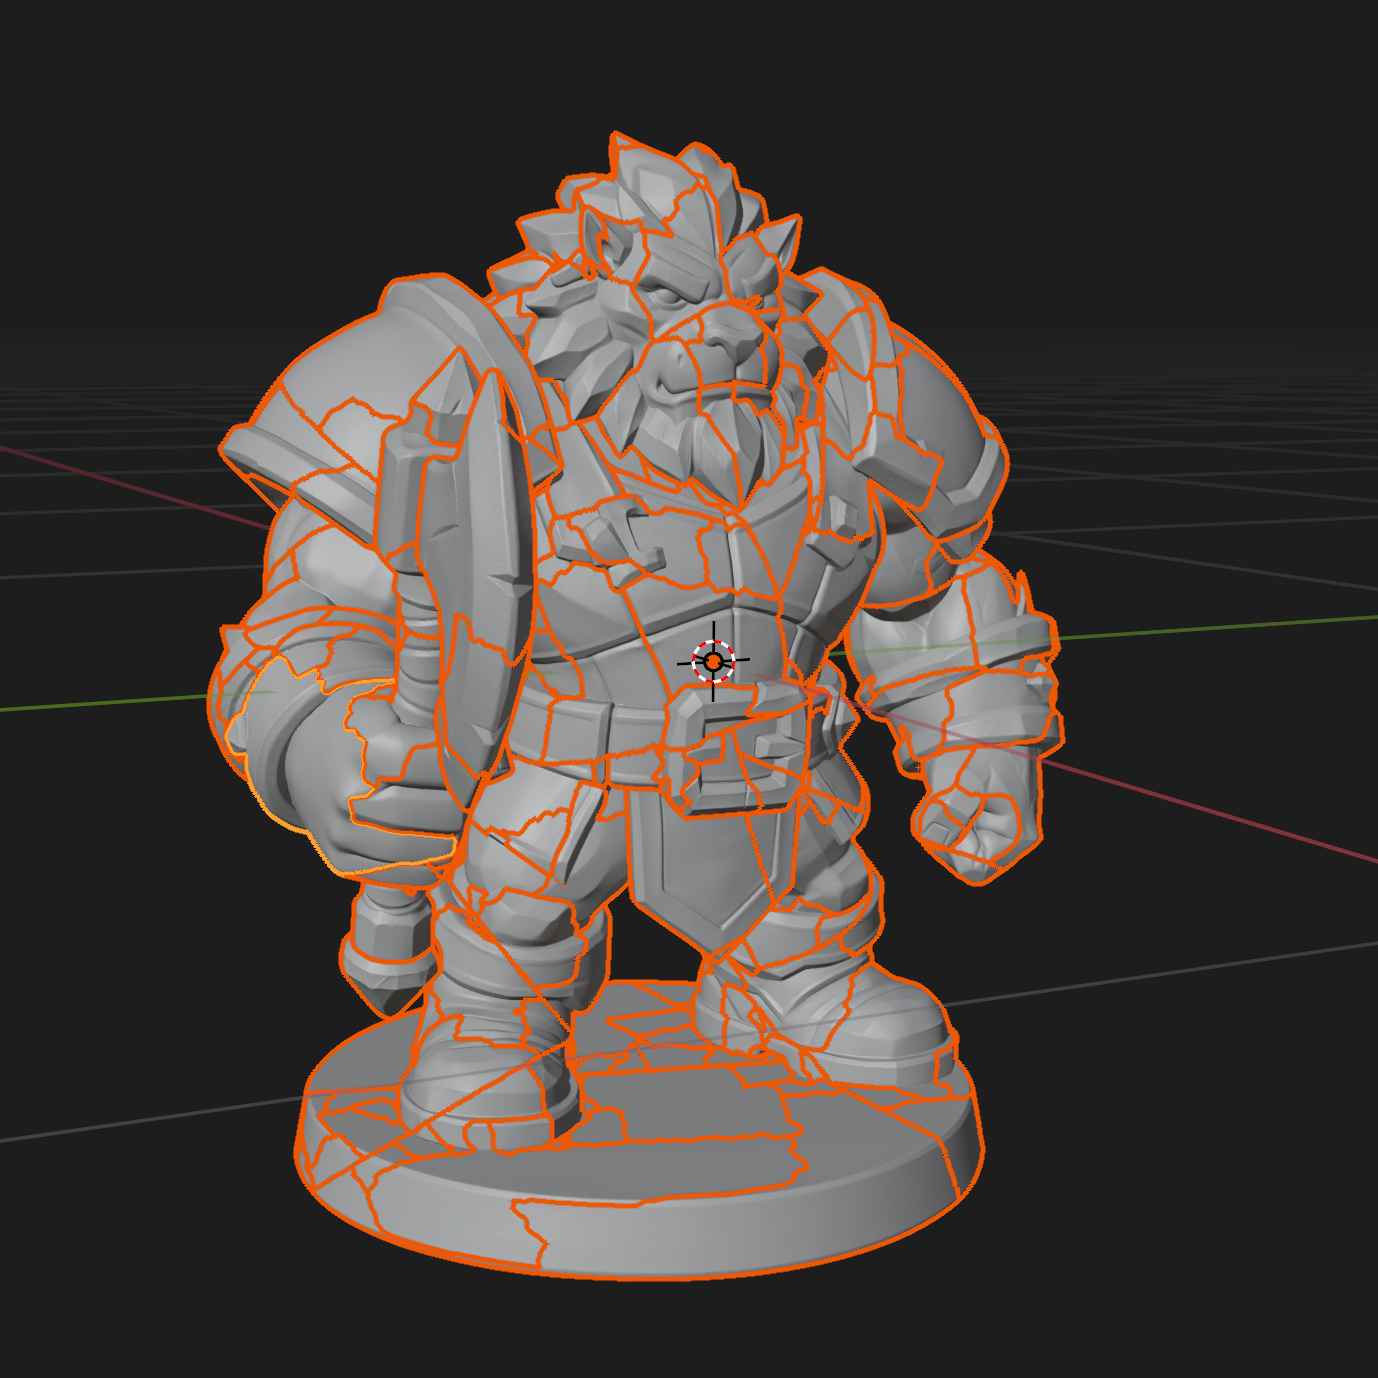
Überlappende oder fehlerhafte Bereiche auf der Modelloberfläche. Tripo-Modelle ohne Retopologie bestehen in der Regel aus mehreren getrennten Flächenstücken statt aus einem perfekten, wasserdichten Volumenkörper, was dazu führt, dass das Slicing für den 3D-Druck fehlschlägt.
Die tatsächlich fragmentierten Bereiche – jedes Modell ohne Retopologie weist dieses Problem auf. Dies ist kein wasserdichtes Modell, sondern eine Sammlung vieler separater Flächenstücke.
Lösung:
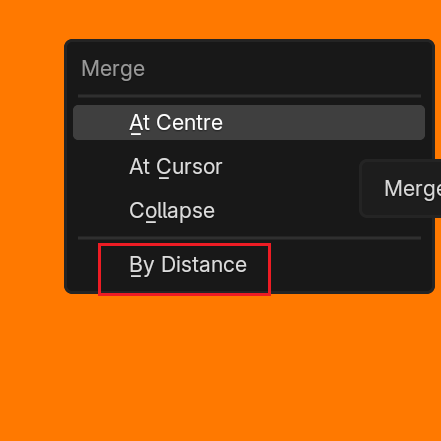
- Gehen Sie in den Edit Mode und drücken Sie A, um alle Vertices (Scheitelpunkte) auszuwählen.
- Drücken Sie M, um das Merge-Menü zu öffnen, und wählen Sie dann Merge by Distance.
- Dies verschweißt automatisch überlappende Vertices und fügt die verstreuten Stücke zu einem einzigen, einheitlichen Mesh zusammen.
Tutorial-Video
2. Nicht-mannigfaltige Kanten beheben (Non-Manifold Edges)
Wie es aussieht:
Nach dem Zusammenführen der Vertices kann das Modell immer noch kleine Löcher oder fehlerhafte Innenflächen aufweisen.
Lösung:
- Nach dem vorherigen Merge-Schritt besteht eine geringe Wahrscheinlichkeit, dass das Modell immer noch fehlerhafte Geometrie aufweist.
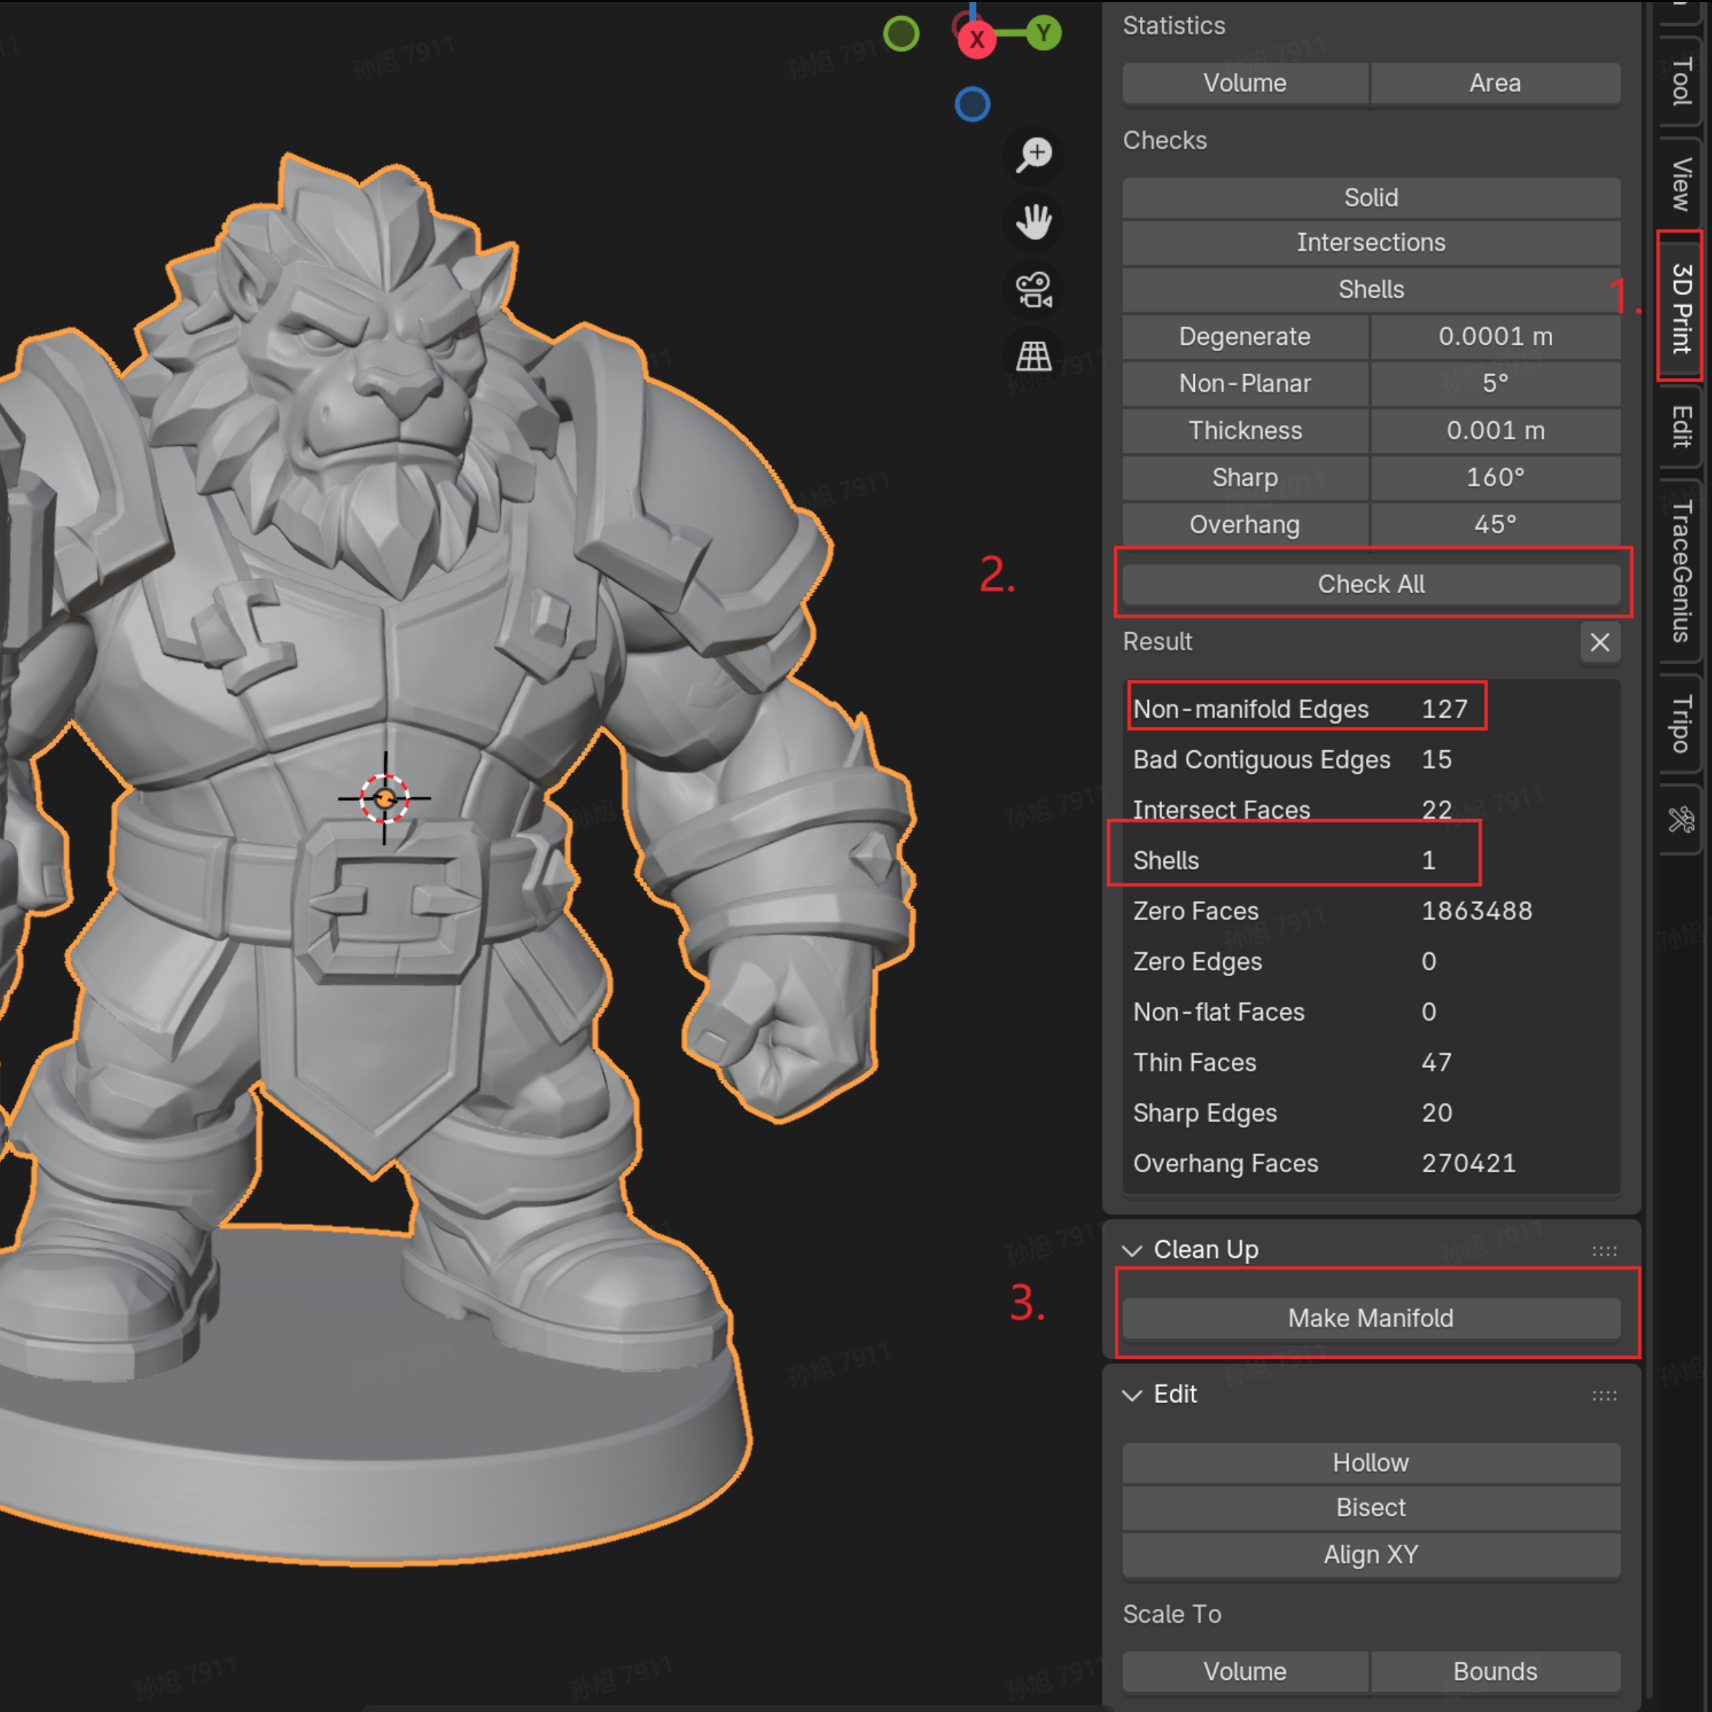
- Drücken Sie N, um die Seitenleiste zu öffnen, und wählen Sie das 3D Print-Panel. Klicken Sie auf Check All – wenn eine große Anzahl von „Non-manifold Edges“ erkannt wird, klicken Sie unten auf Make Manifold, um sie automatisch zu beheben.
- Führen Sie die Prüfung nach der Behebung erneut durch, um zu bestätigen, dass die Anzahl der Shells (Schalen) 1 beträgt, was bedeutet, dass sich das Modell in einem perfekten, druckfertigen Zustand befindet.

2.3 Erweiterte Prüfung: Schwerpunkt und Stabilitätsbewertung
Prüfung der Standfestigkeit
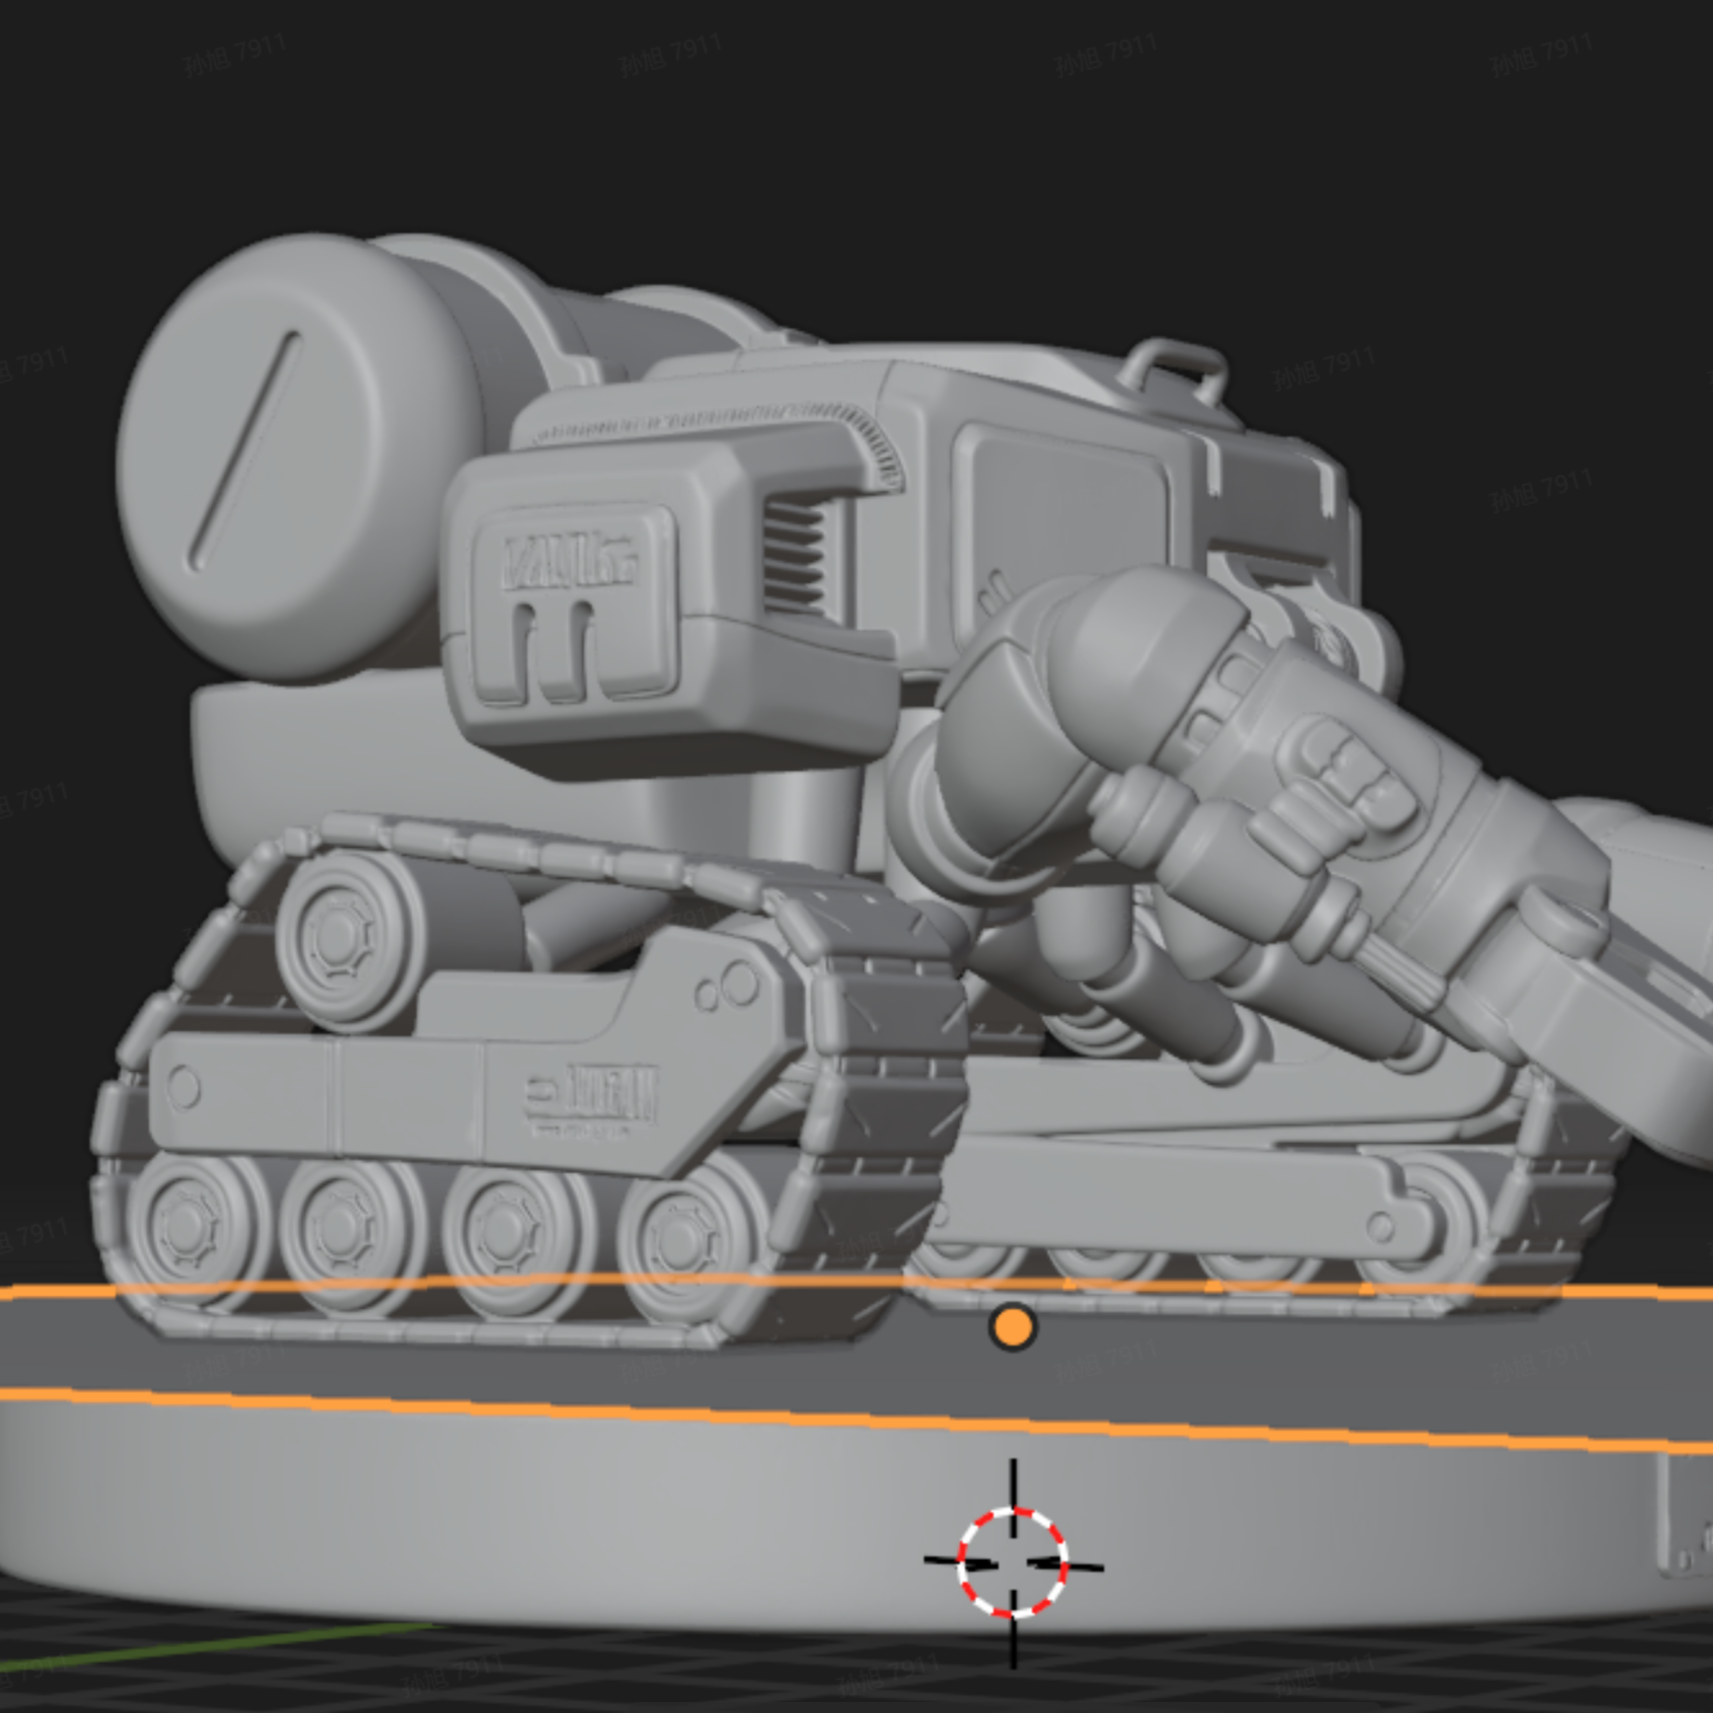
Manchmal ist ein Modell, das Sie drucken möchten, eindeutig kopflastig, oder Sie sind sich einfach nicht sicher, ob es von alleine steht. Sie können die Physiksimulation von Blender mit einer Bodenebene verwenden, um zu prüfen, ob es von selbst stehen kann.
1. Boden einrichten: Erstellen Sie eine Ebene (Plane) und fügen Sie eine Rigid Body-Komponente hinzu, wobei der Typ auf „Passive“ eingestellt ist.
2. Modell einrichten: Fügen Sie dem Modell eine Rigid Body-Komponente hinzu und wechseln Sie den Typ auf „Active“.

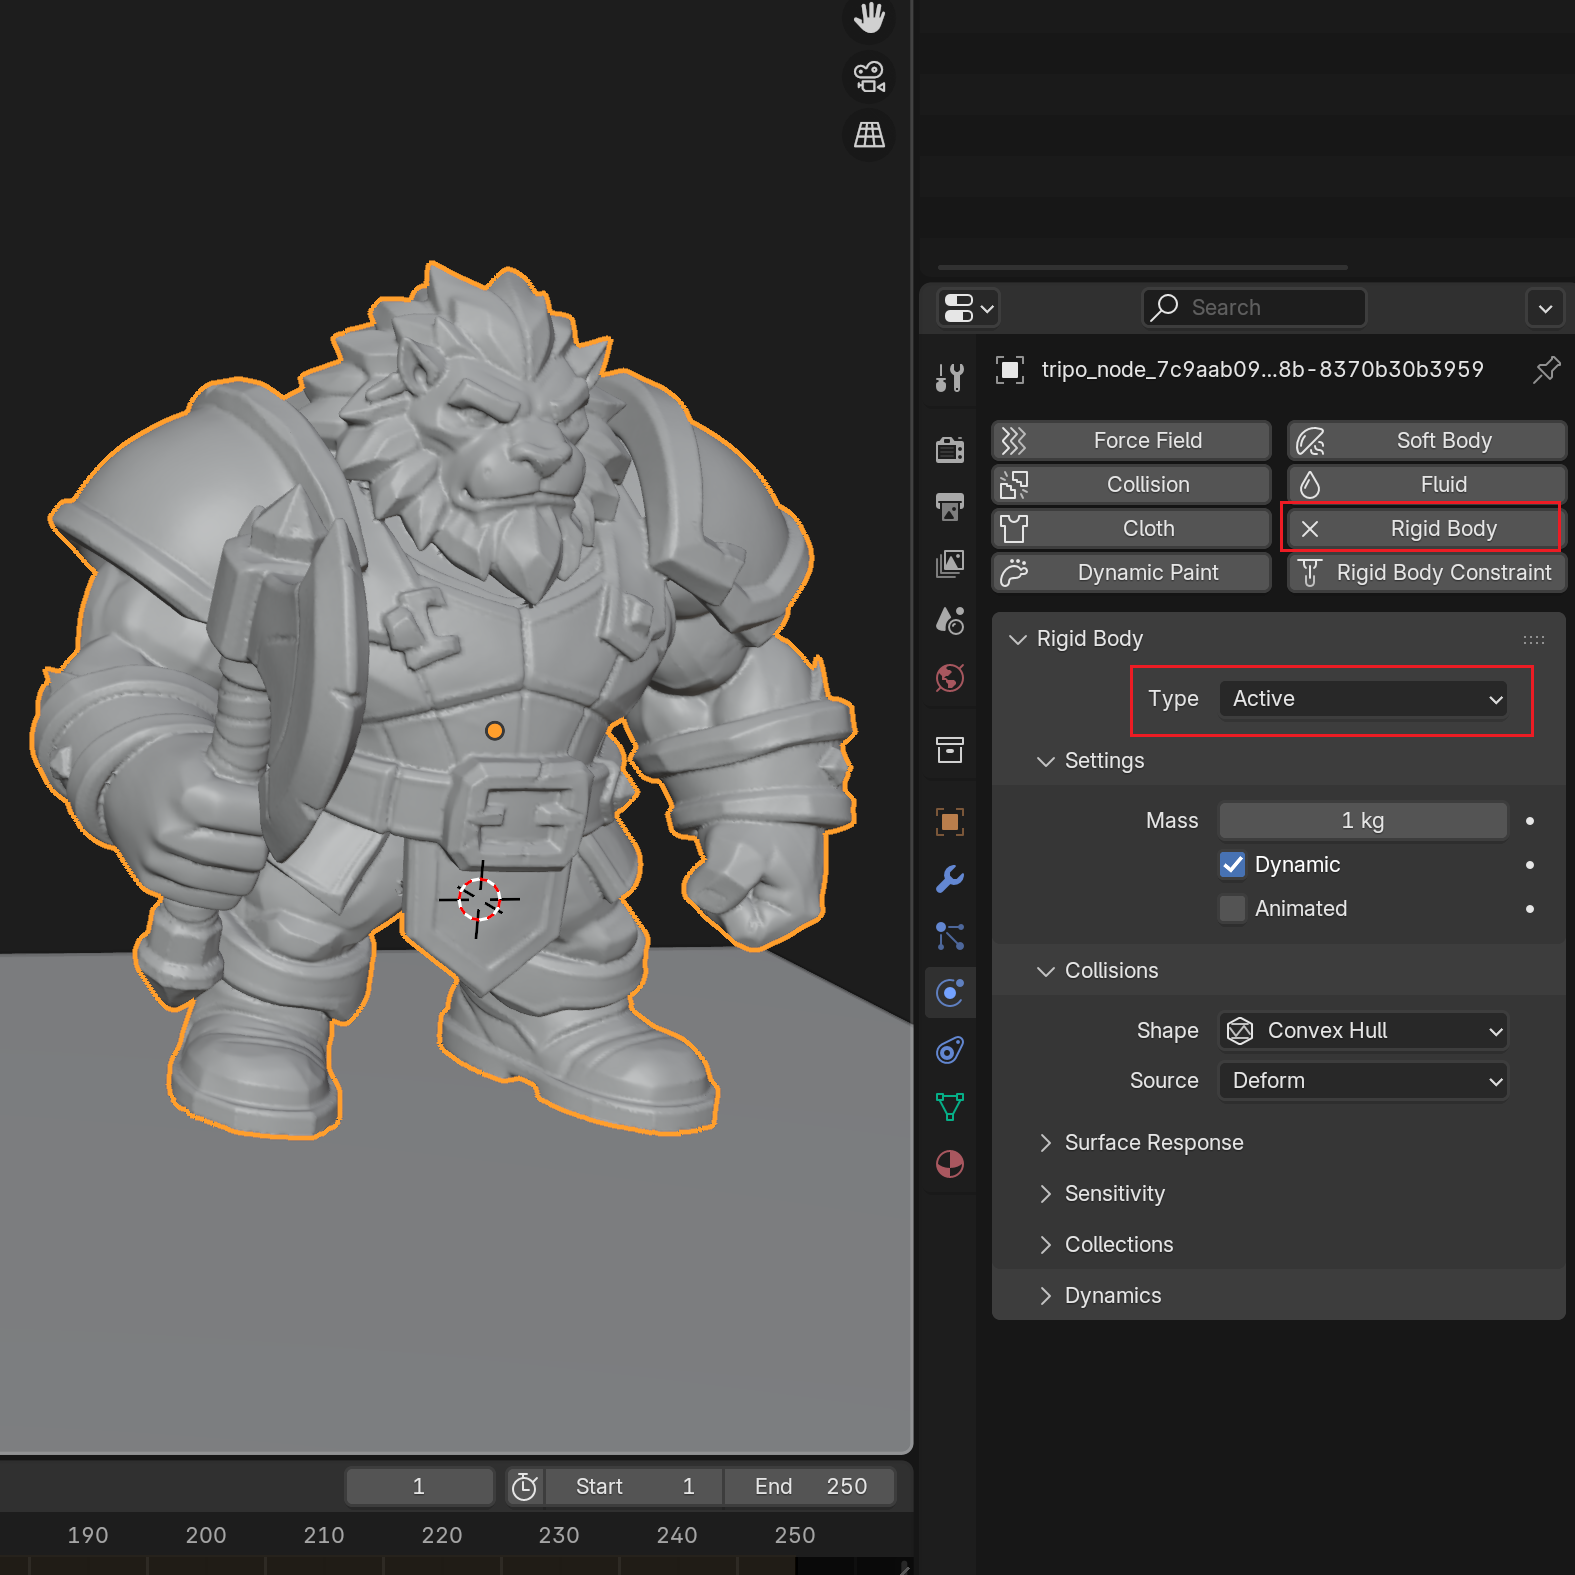
3. Simulation ausführen: Drücken Sie Play – wenn das Modell umfällt, sollten Sie eine Basis hinzufügen oder den Schwerpunkt in Blender anpassen.
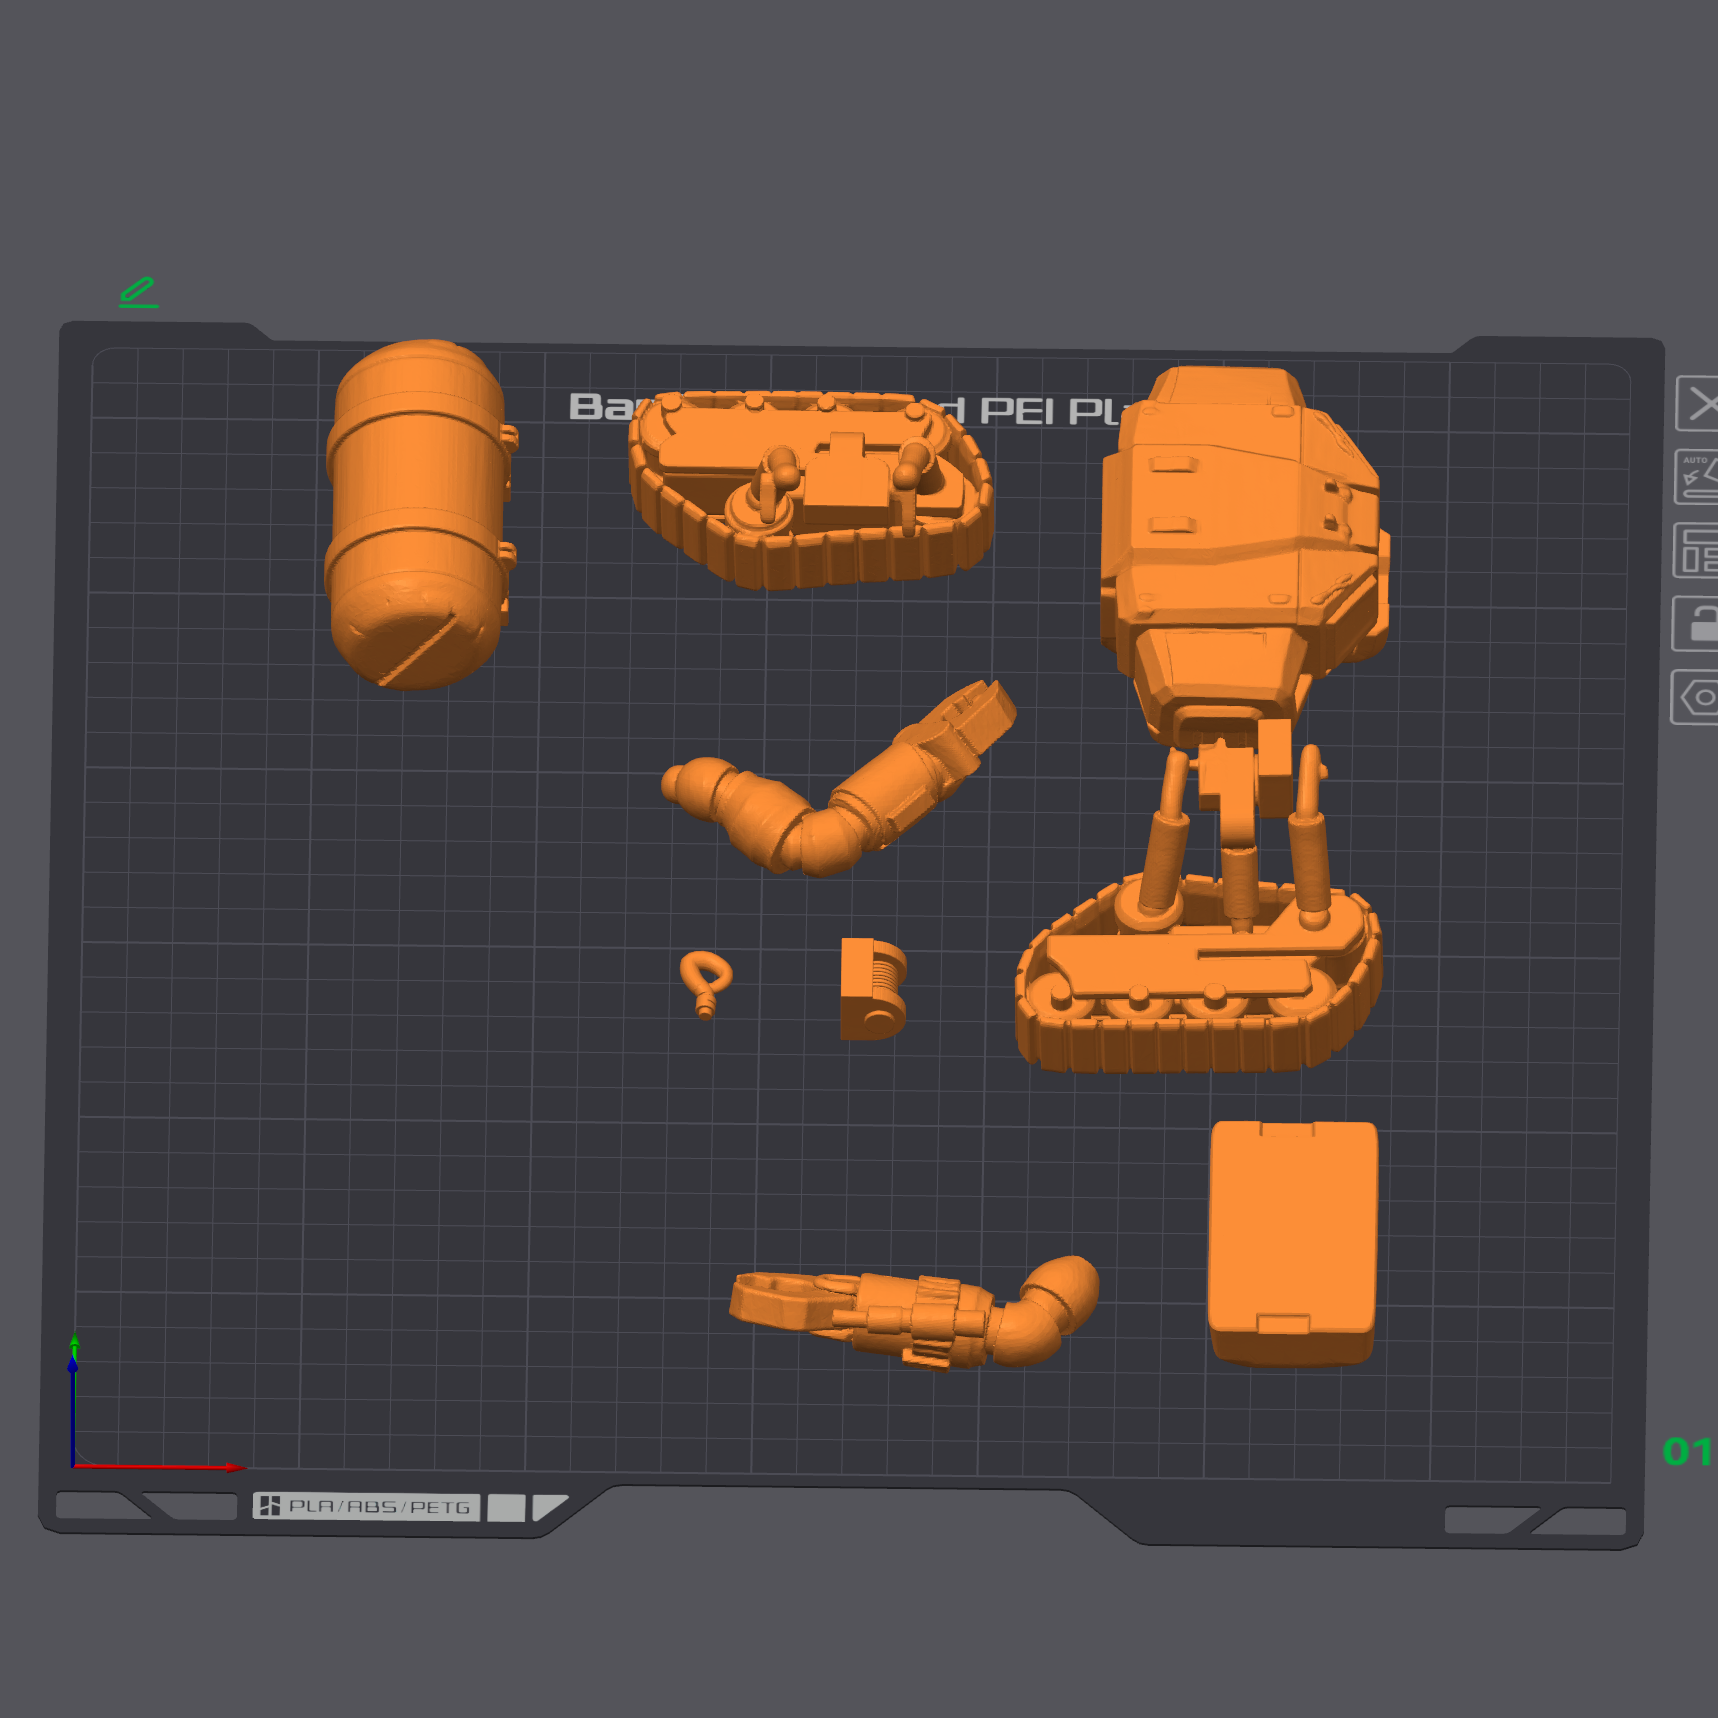
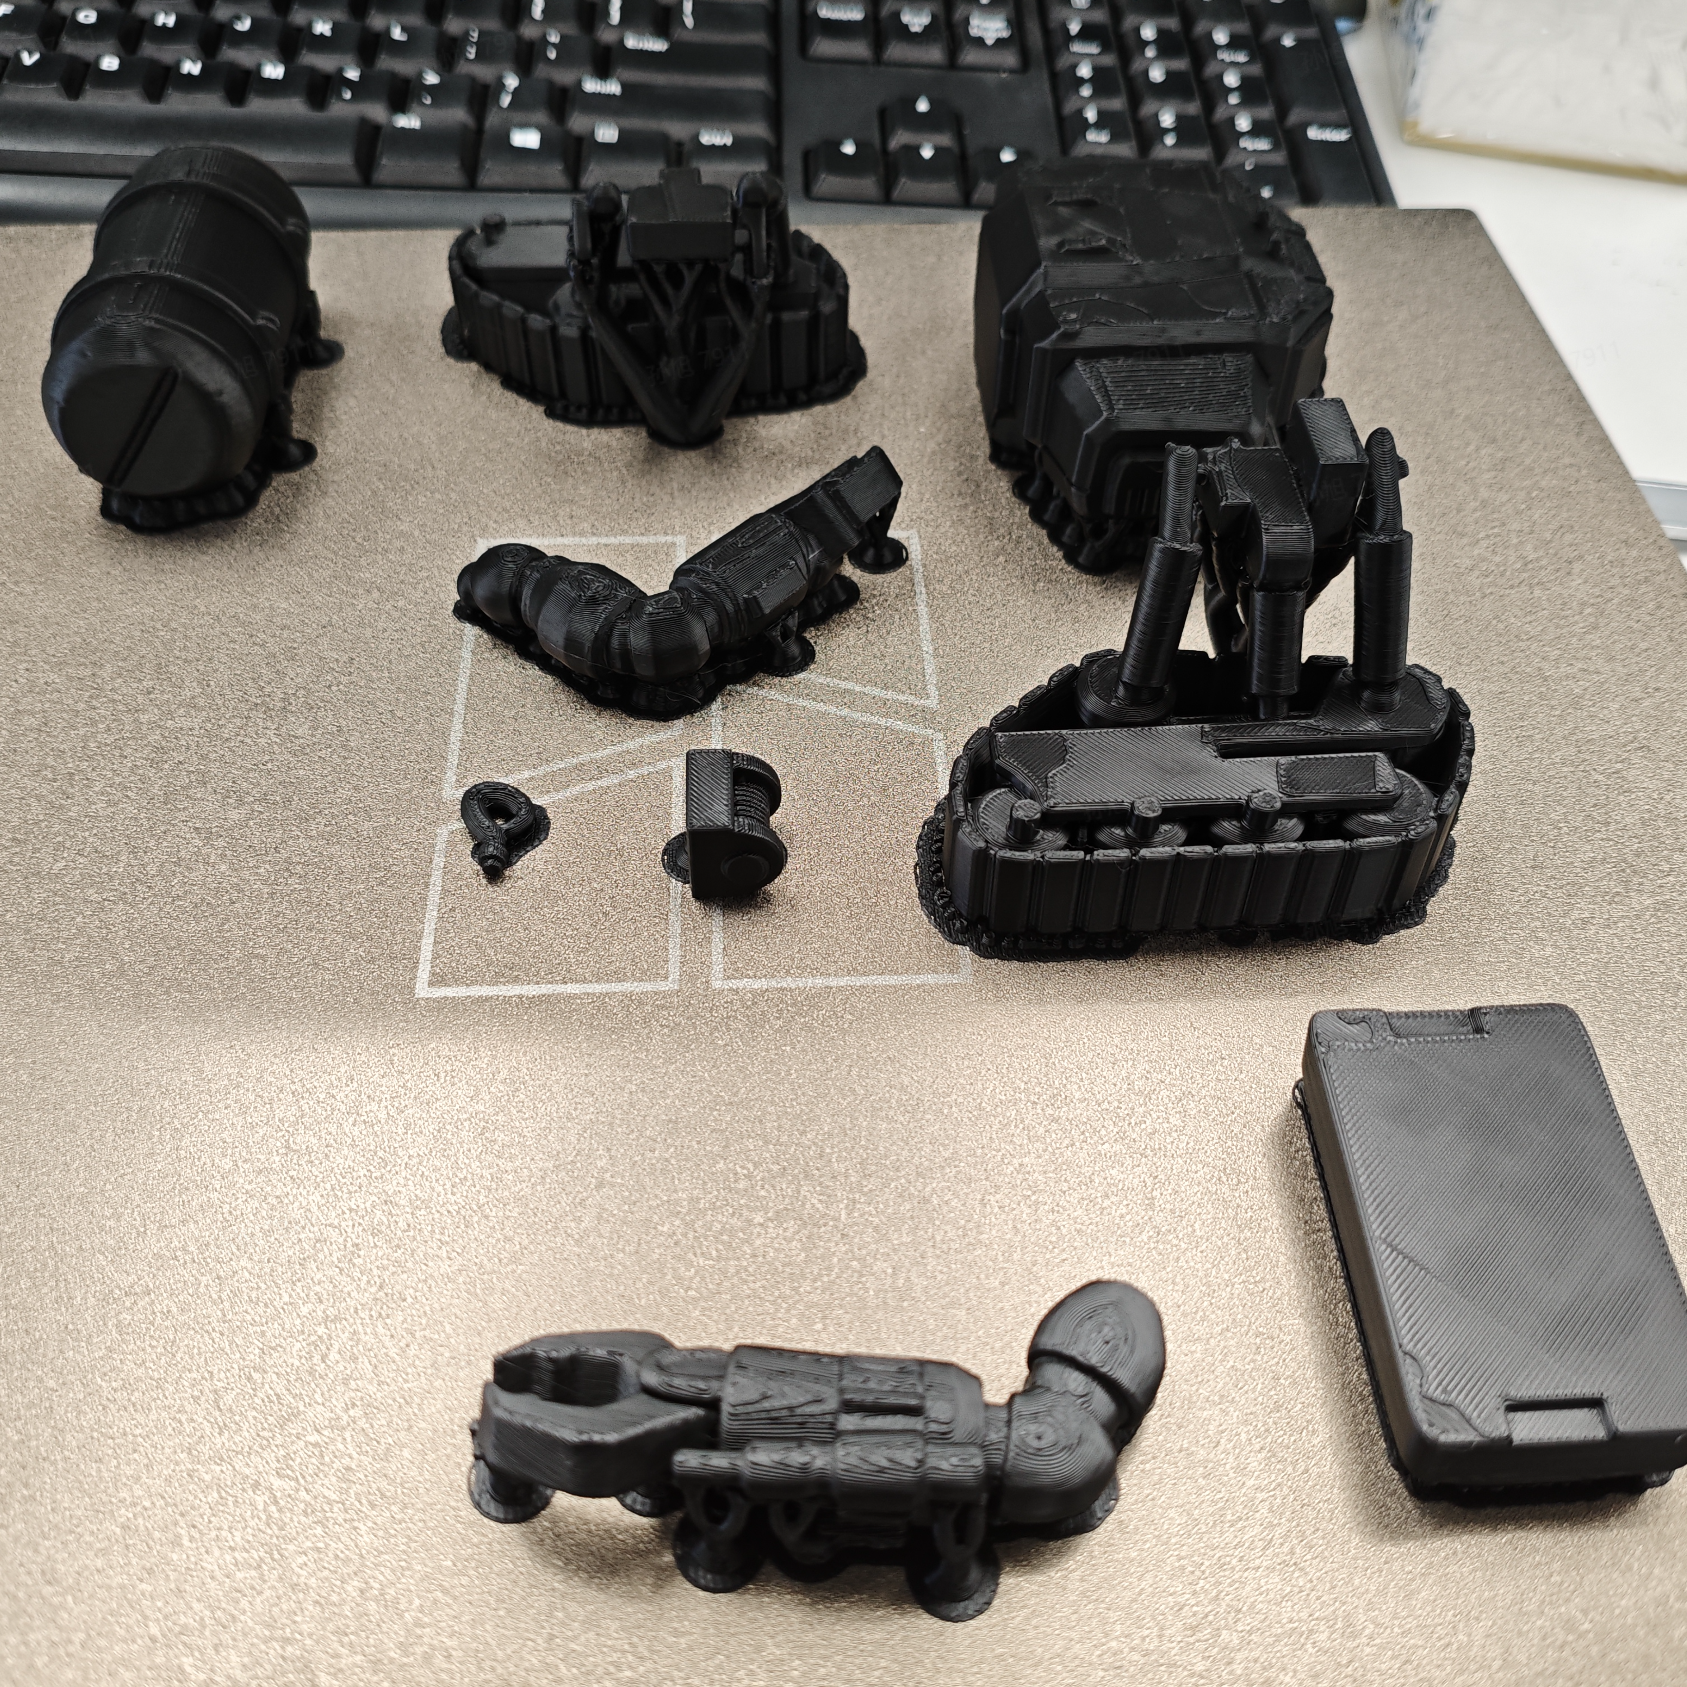
2.4 Aufteilen von Teilen: Manuelle und automatisierte Ansätze
- Manuelles Aufteilen für regelmäßige Abschnitte
Angenommen, Sie möchten die Basis des Modells und den Hauptkörper aufteilen, um sie separat zu drucken.
Extrudieren Sie ein Schneidewerkzeug (Cutter), das eine Seite des Modells vollständig abdeckt, und drücken Sie dann Strg+Umschalt+B → wählen Sie Slice (die unten gezeigte Option ist die Version ohne angewendete Modifikatoren – die Verwendung dieser Slice-Option wird empfohlen).
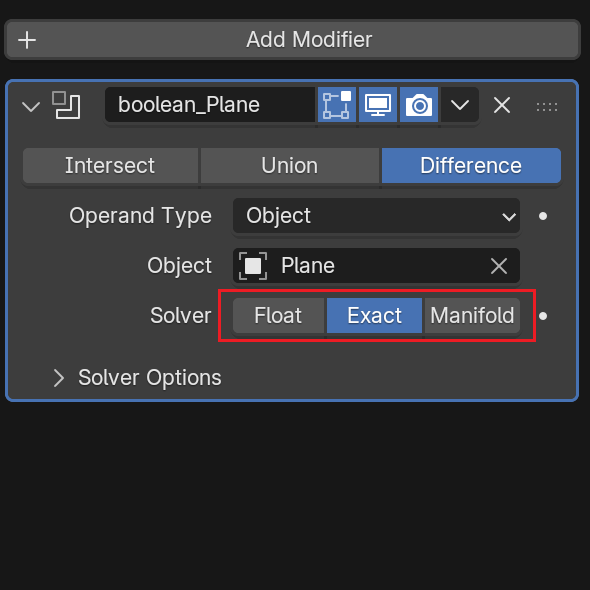
Wenn die boolesche Operation Löcher oder andere Fehler erzeugt, stellen Sie den Solver im Boolean-Modifikator von Blender auf Exact um – dies behebt das Problem in der Regel. (Andere häufige Probleme lassen sich meist auf zwei Dinge zurückführen: Das Modell ist nicht wasserdicht oder die Normalen sind fehlerhaft – überprüfen Sie diese bei Bedarf.)
- Tripo Smart Part Splitting (Intelligente Aufteilung)
Obwohl die intelligente Teilungsfunktion von Tripo noch nicht direkt für den Druck verwendet werden kann (da sie unversiegelte Geometrieprobleme aufweisen kann), kann sie logische Komponenten schnell trennen und den Aufwand für die manuelle Retopologie und Auswahl drastisch reduzieren.
Dieser Abschnitt behandelt den Kern-Workflow. Weiterführende Informationen finden Sie im offiziellen Wiki von Bambu Lab.
3.1 Grundlegende Slicing-Einstellungen und Behebung häufiger Probleme
So konfigurieren Sie die wichtigsten Parameter: Stützen, Infill (Füllung) und Druckausrichtung. (Dieser Abschnitt verwendet den einfarbigen Druck als Beispiel. Für den Mehrfarbendruck siehe Abschnitt 3.2.)
1. Ihr Modell importieren
- Sie können direkt aus der Tripo-Web-App in Bambu Studio importieren oder eine lokal vorverarbeitete Datei aus Blender hochladen.
- Um für den einfarbigen Druck aus der Tripo-Web-App zu importieren, klicken Sie auf die unten gezeigte Schaltfläche.
- Nach dem Import sieht die Benutzeroberfläche wie dargestellt aus. Wenn in der unteren rechten Ecke ein Fehler „non-manifold edges“ (nicht-mannigfaltige Kanten) angezeigt wird, wird empfohlen, auf die Schaltfläche „Fix“ zu klicken. (Dieser Fehler ist häufig und in den meisten Fällen zu erwarten.)
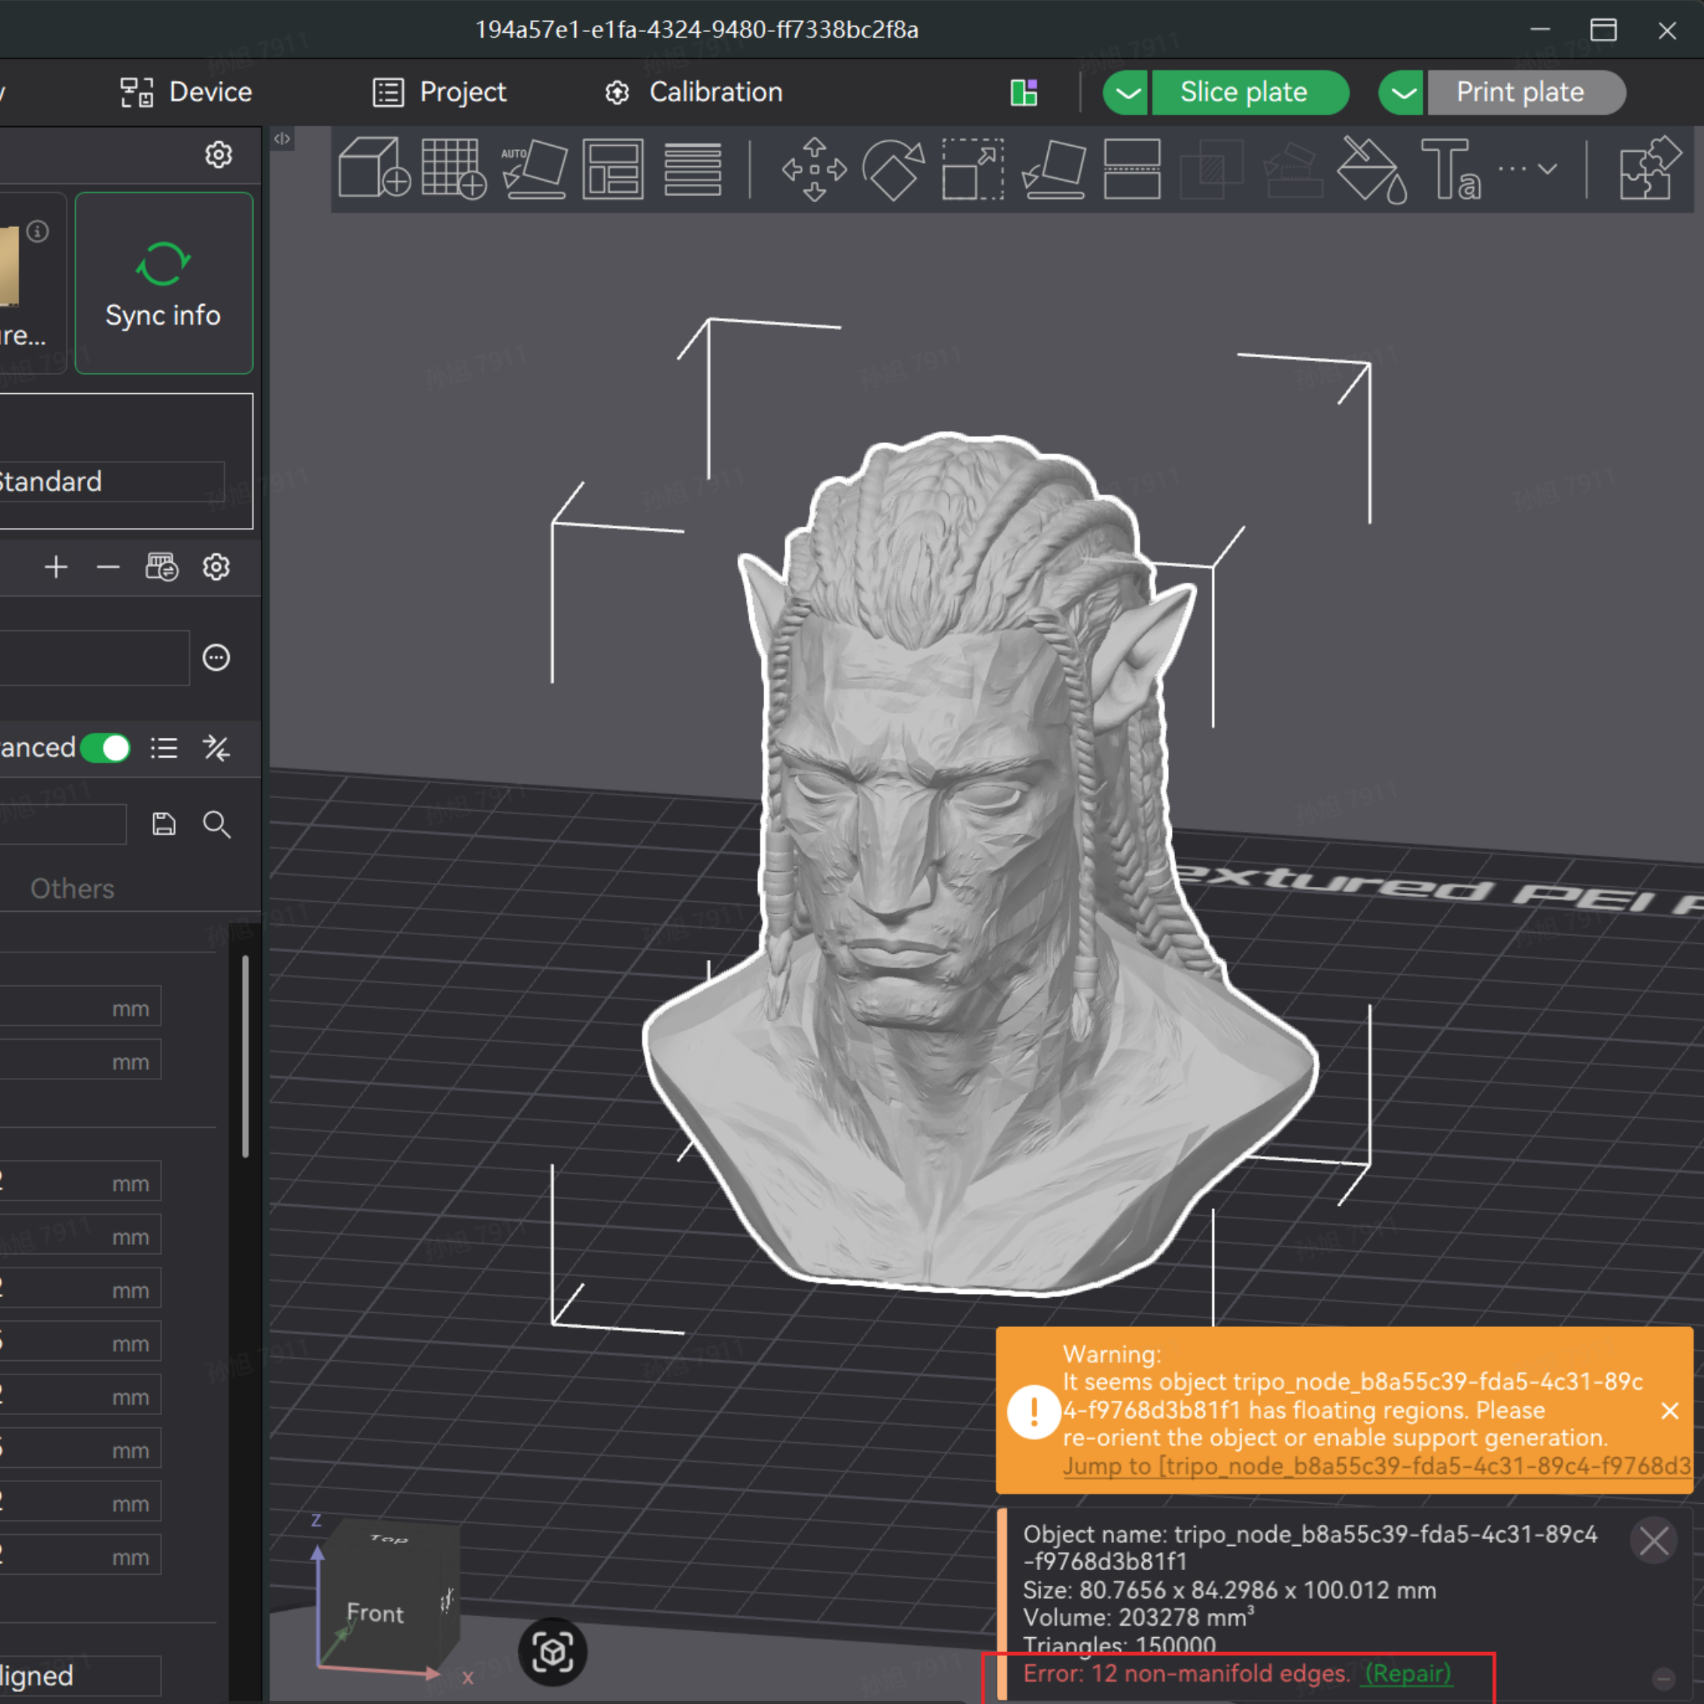
⚠️ Wichtig: Die integrierte Reparaturfunktion löscht die Farbinformationen des Modells. Befolgen Sie immer die Reihenfolge: Zuerst das Modell reparieren, dann die Farben zuweisen. Wenn die Fehleranzahl sehr gering ist (z. B. unter 50) und die Struktur einfach ist, können Sie versuchen, direkt ohne Reparatur zu slicen.
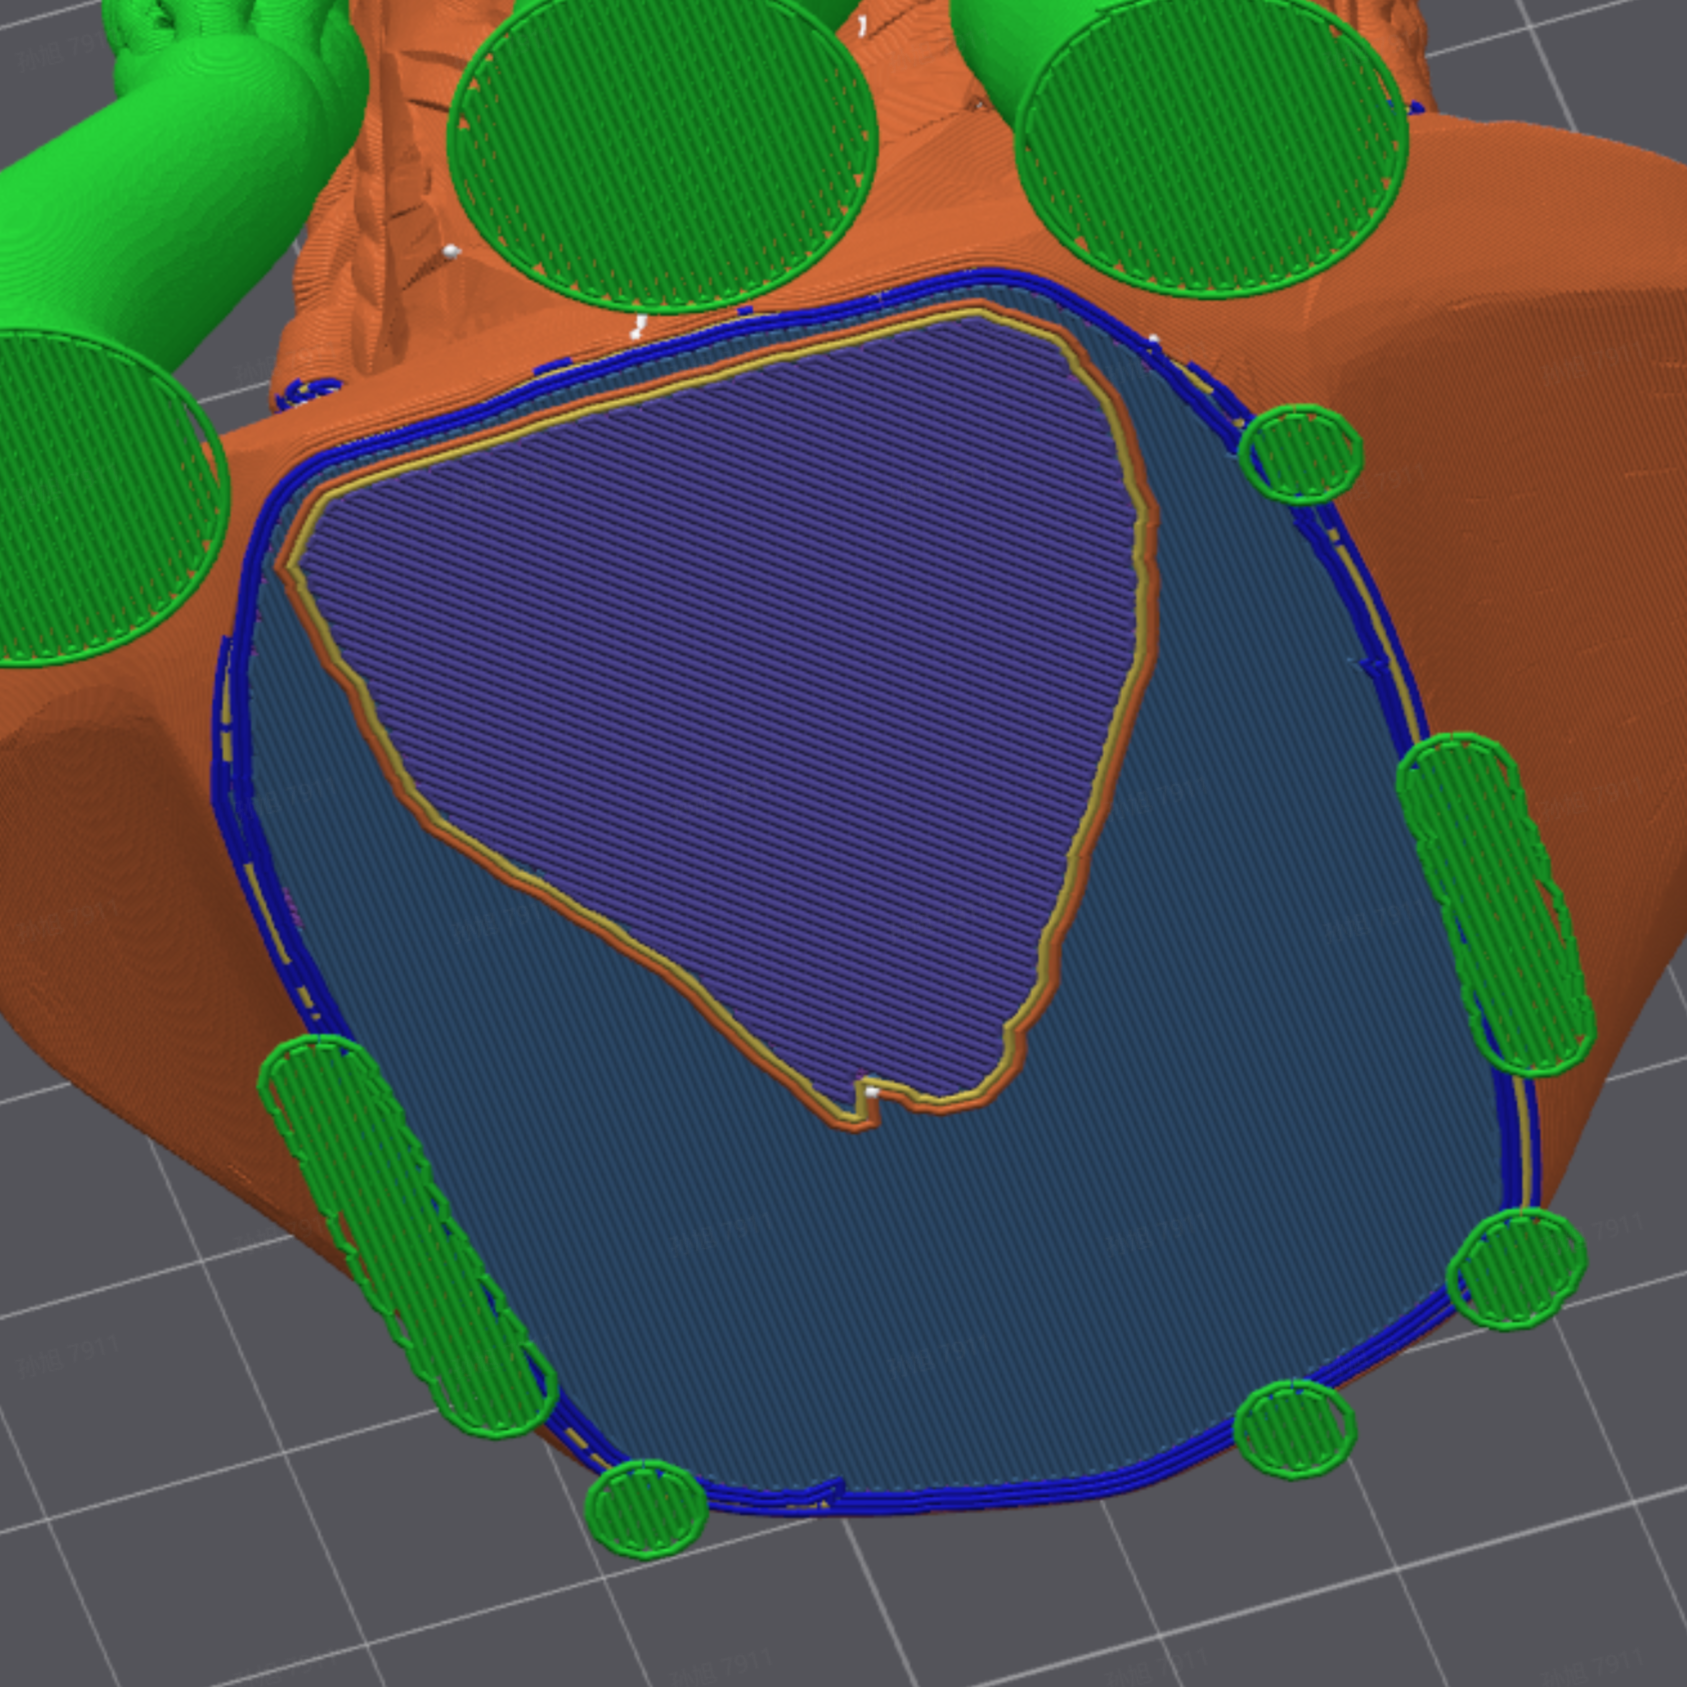
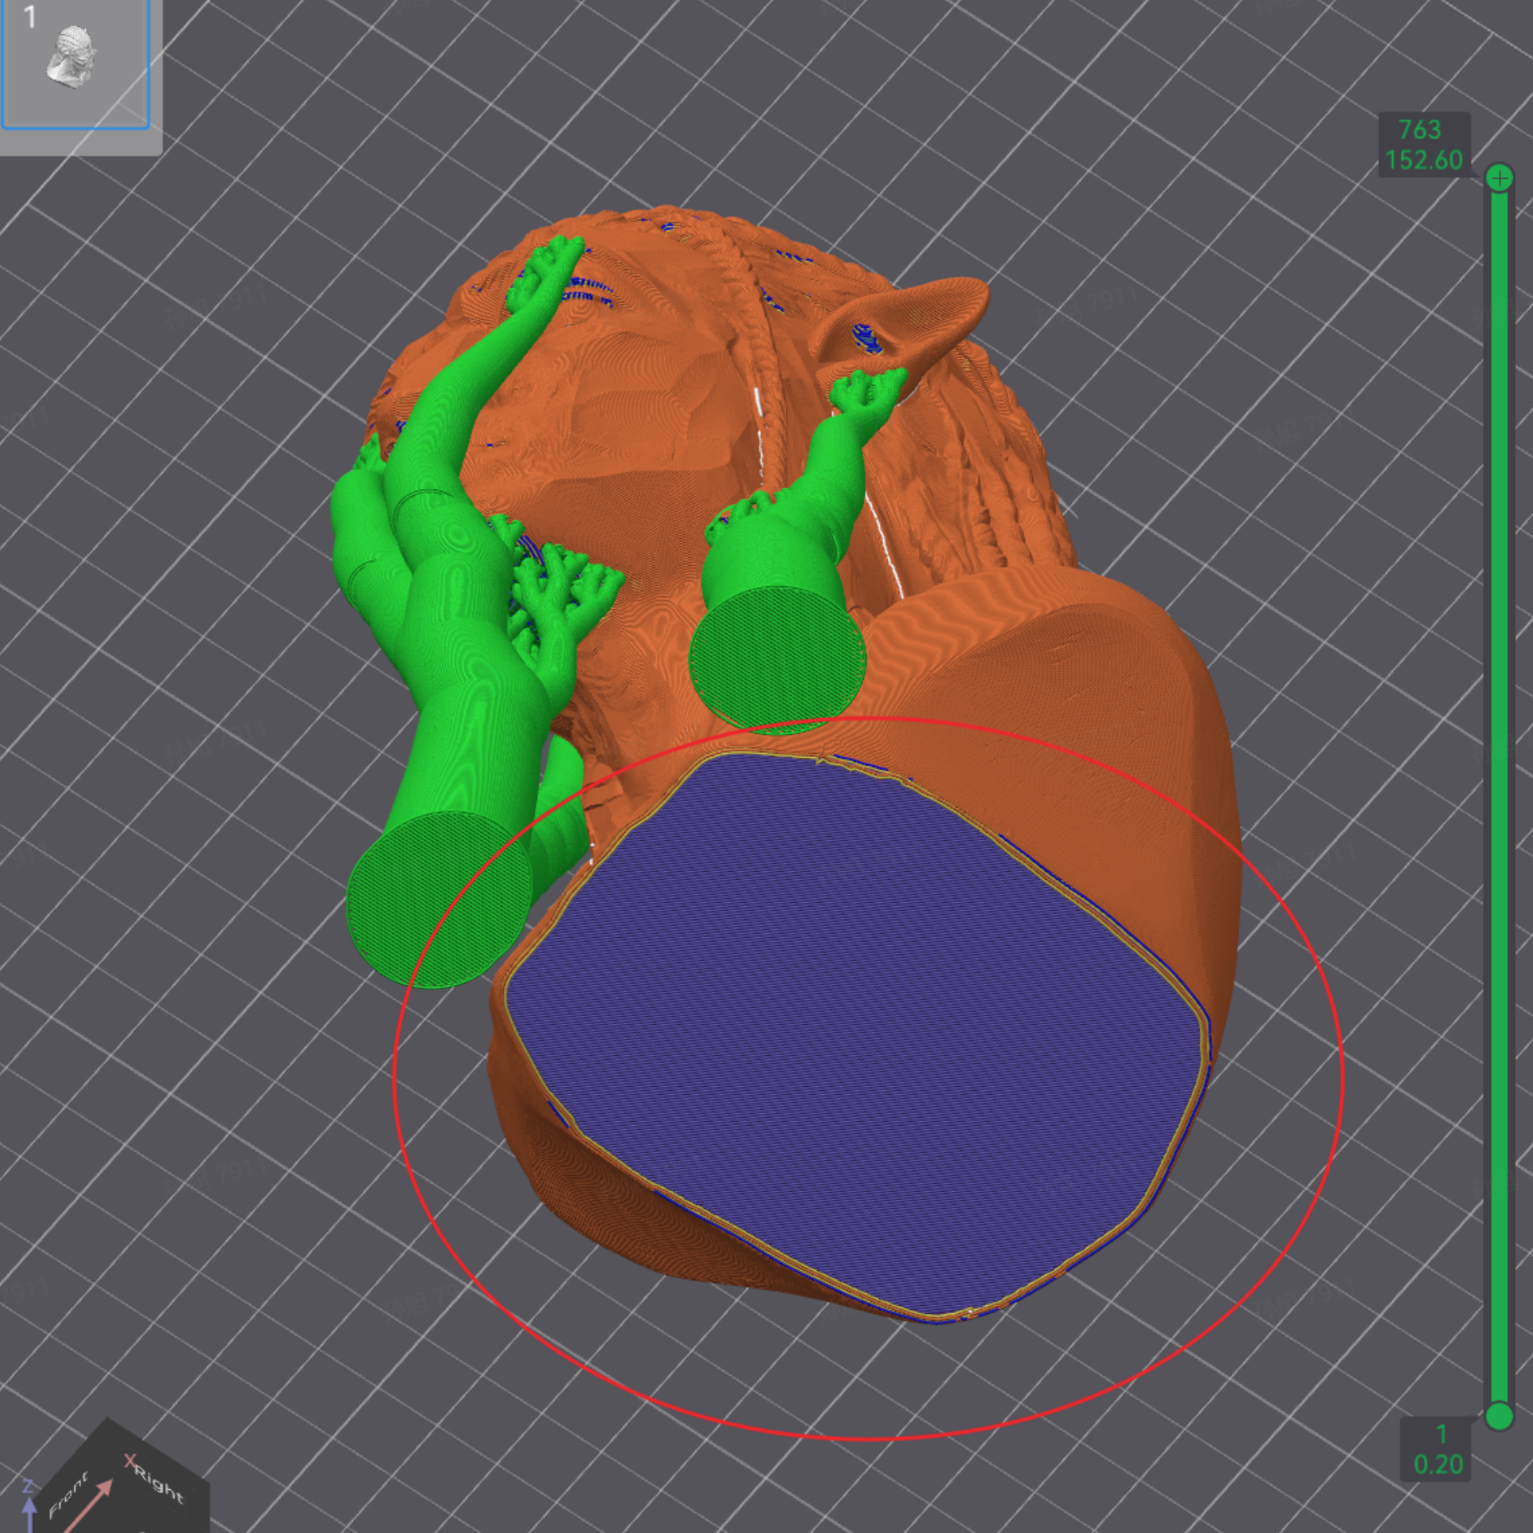
2. Schneiden und Ausrichten der Basis
- Manchmal sieht die Unterseite eines importierten Modells nur flach aus, ist aber tatsächlich uneben. Das Drucken auf einer solchen Oberfläche führt zu einer schlechten Qualität der ersten Schicht und unzureichender Haftung auf dem Druckbett, was zu Druckfehlern führen kann.
- Verwenden Sie das integrierte Schneidewerkzeug (ein praktisches Tool, das Sie oft benutzen werden).
- Dies liefert Ihnen ein Modell mit einer flachen Basis – ein Schritt, der häufig für Charaktermodelle mit einem Sockel verwendet wird.
3. Anpassungen der Kernparameter
Bei den meisten Modellen müssen vor dem Drucken nur 3 Parameter angepasst werden. Andere Einstellungen im Slicer werden nur für Spezialeffekte benötigt.
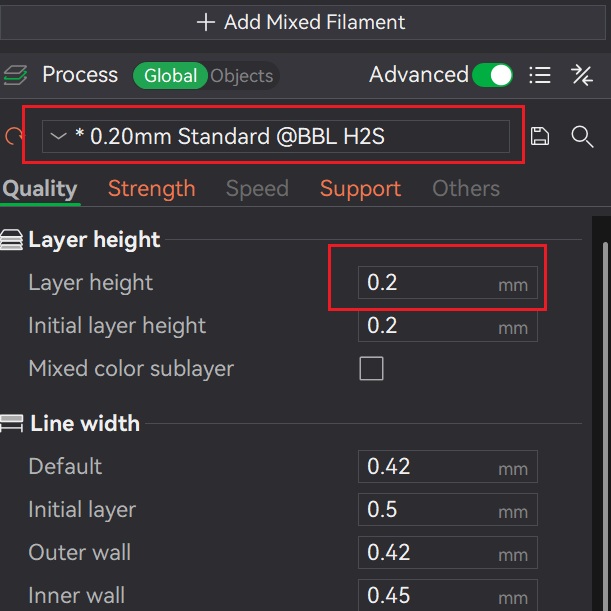
1. Schichthöhe (Layer Height):
Ändern Sie die Voreinstellung im markierten Feld. Die Zahl steht für die Schichthöhe. Eine geringere Schichthöhe bedeutet feinere Details auf der Z-Achse, aber längere Druckzeiten.
2. Stützen (Support):
Stützen müssen aktiviert sein, es sei denn, das Modell hat eine perfekte Pyramidenform (unten breiter) ohne Überhänge.

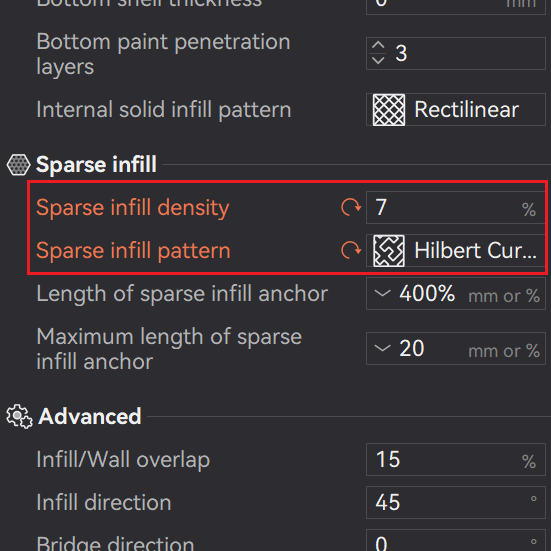
3. Füllung (Sparse Infill):
Bei Display-Modellen spart eine Verringerung der Füllstoffdichte (Infill) Filament, verkürzt die Druckzeit und macht das Modell leichter. Passen Sie den Infill-Prozentsatz basierend auf der benötigten strukturellen Steifigkeit an.
Für maximale Gewichtsreduzierung: Wenn Sie einen Prototyp schnell validieren müssen, stellen Sie das Infill-Muster auf Lightning (Blitz) ein, wodurch eine nahezu hohle Struktur mit gerade genug innerer Stützung erzeugt wird.
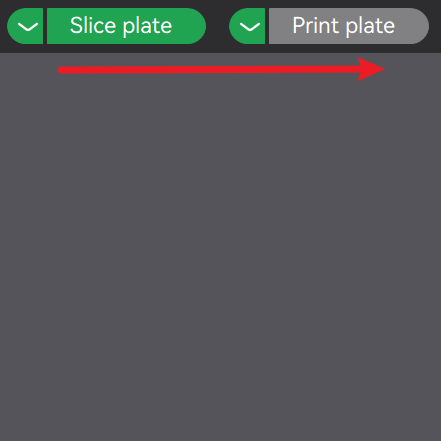
Sobald diese 3 Anpassungen vorgenommen wurden, kliken Sie auf Slice und warten Sie, bis der Vorgang abgeschlossen ist – senden Sie es dann an den Drucker.
Klicken Sie auf diese beiden Schaltflächen und lassen Sie die Maschine den Rest erledigen.
3.2 Mehrfarbendruck: Color Mapping und Tipps zum manuellen Bemalen
Dieser Abschnitt behandelt gängige Arbeitsschritte. Für einen tieferen Einblick lesen Sie den offiziellen Wiki-Leitfaden von Bambu Lab zum Mehrfarbendruck.
1. Automatisierter Ansatz: Direktes Color Mapping von Tripo-Mehrfarbenmodellen
Um eine „Importieren und Loslegen“-Farbgebung zu erreichen, müssen Sie ein Modell exportieren, das Vertex-Farbdaten enthält.
Der Mehrfarben-3D-Druck mit einer einzelnen Düse (z. B. einem AMS-System) erzeugt eine erhebliche Menge an Filamentabfall (Purge Waste). Wenn Ihr Modell sehr feine Farbdetails aufweist und Sie keinen Drucker mit mehreren Düsen (wie den H2C) haben, überlegen Sie genau, bevor Sie komplexe Mehrfarbendrucke versuchen.
Nach dem Import ordnet der Slicer die Farben automatisch zu. Um dies zu aktivieren, exportieren Sie Ihr Modell aus Tripo im .obj-Format mit aktivierten Vertex-Farben.
Sie können in Tripo auch die Option „3D Print — Export Multi-Color Printable File“ verwenden. Beide Methoden funktionieren auf dieselbe Weise; die letztere erfordert lediglich einen zusätzlichen Entpackungsschritt.
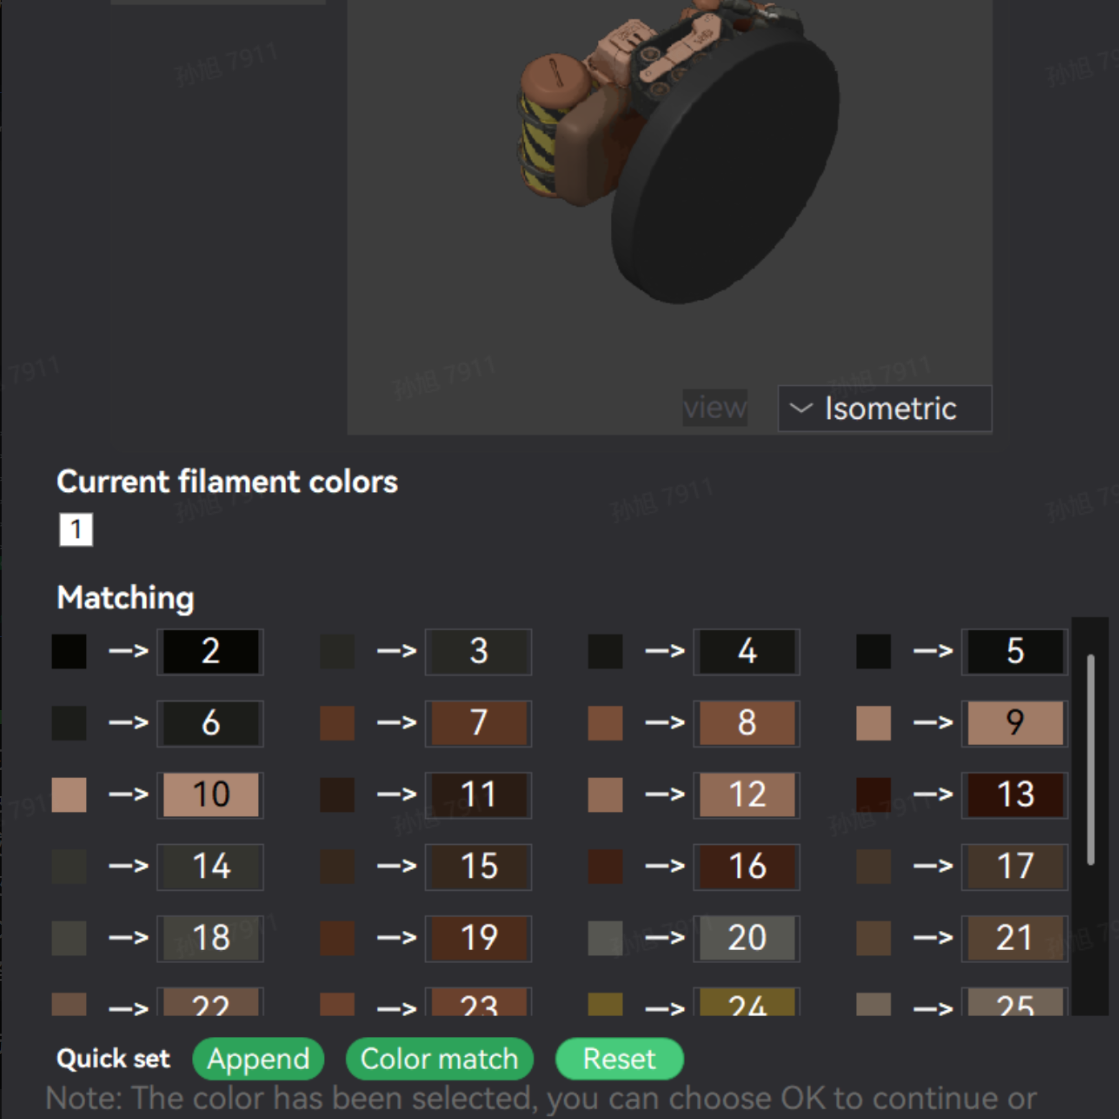
Konfigurationsschritte: Wenn Sie das Modell in Bambu Studio importieren, wird ein Dialogfeld angezeigt. Stellen Sie die Anzahl der Farben oben so ein, dass sie Ihren Anforderungen entspricht. Die meisten AMS-Systeme und andere Mehrfarben-Setups unterstützen 4 Farben. Wenn Sie mit dem H2C drucken, geben Sie 4 ein und klicken Sie dann auf OK.
Die Farben werden beim Import automatisch zugeordnet, und Sie können sie von dort aus anpassen.
Tipp zum Ausrichten der Basis: Da bei Mehrfarbenmodellen das Schneidewerkzeug nicht direkt verwendet werden kann (dies führt zum Verlust von Vertex-Farbdaten), bewegen Sie das Modell bei einer unebenen Basis einfach entlang der Z-Achse nach unten, bis der unebene Teil unter das Druckbett sinkt. Der Slicer ignoriert den versunkenen Teil automatisch und erzeugt einen flachen Boden.
Nach dem Drucken und dem Entfernen der Stützen haben Sie ein vollständig farbiges Mehrfarbenmodell.
2. Manueller Ansatz: Empfohlene Bemalungswerkzeuge
Bei einem Modell wie dem gezeigten ist das Bemalen der gesamten Basis mit dem Pinsel-Werkzeug in Schwarz langsam und mühsam. Bambu Studio bietet zwei schnellere Möglichkeiten zum Bemalen, die jeweils für unterschiedliche Situationen geeignet sind.

- Verwenden Sie „Paint by Layer Height“ (Nach Schichthöhe bemalen), um die Basisfarbe schnell und sauber zu trennen.
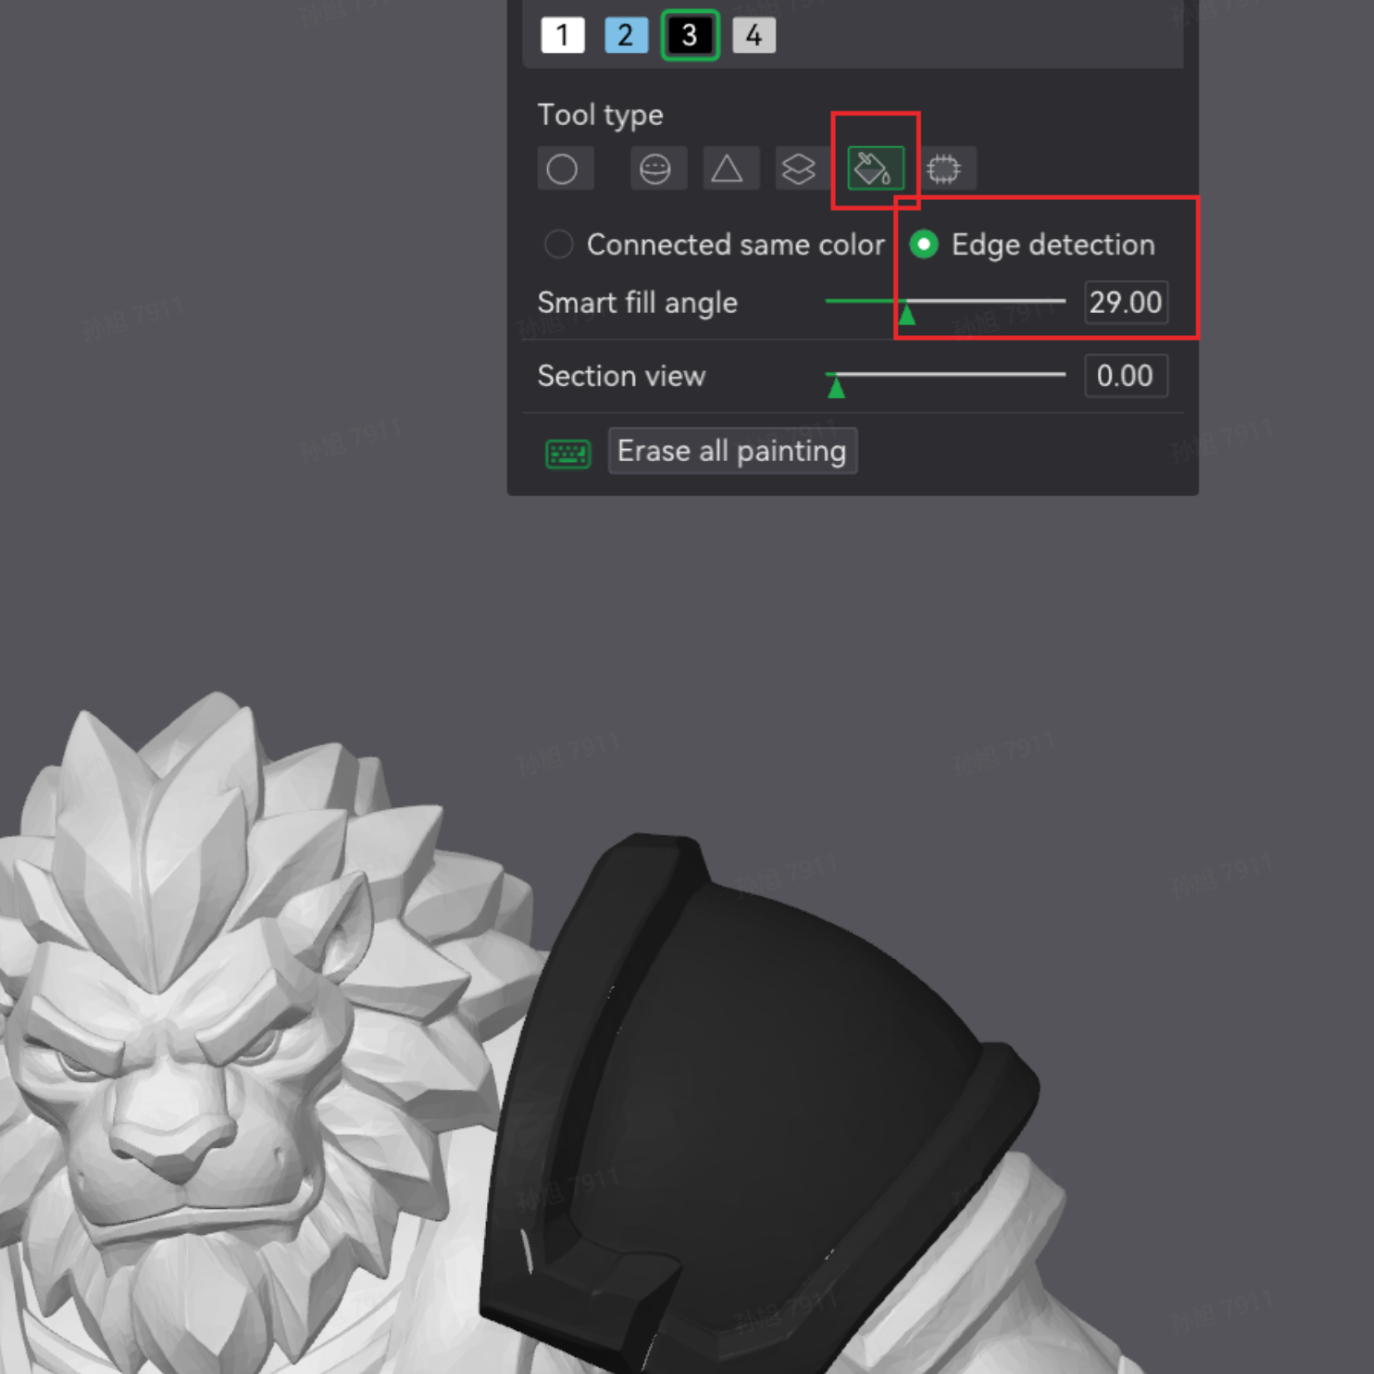
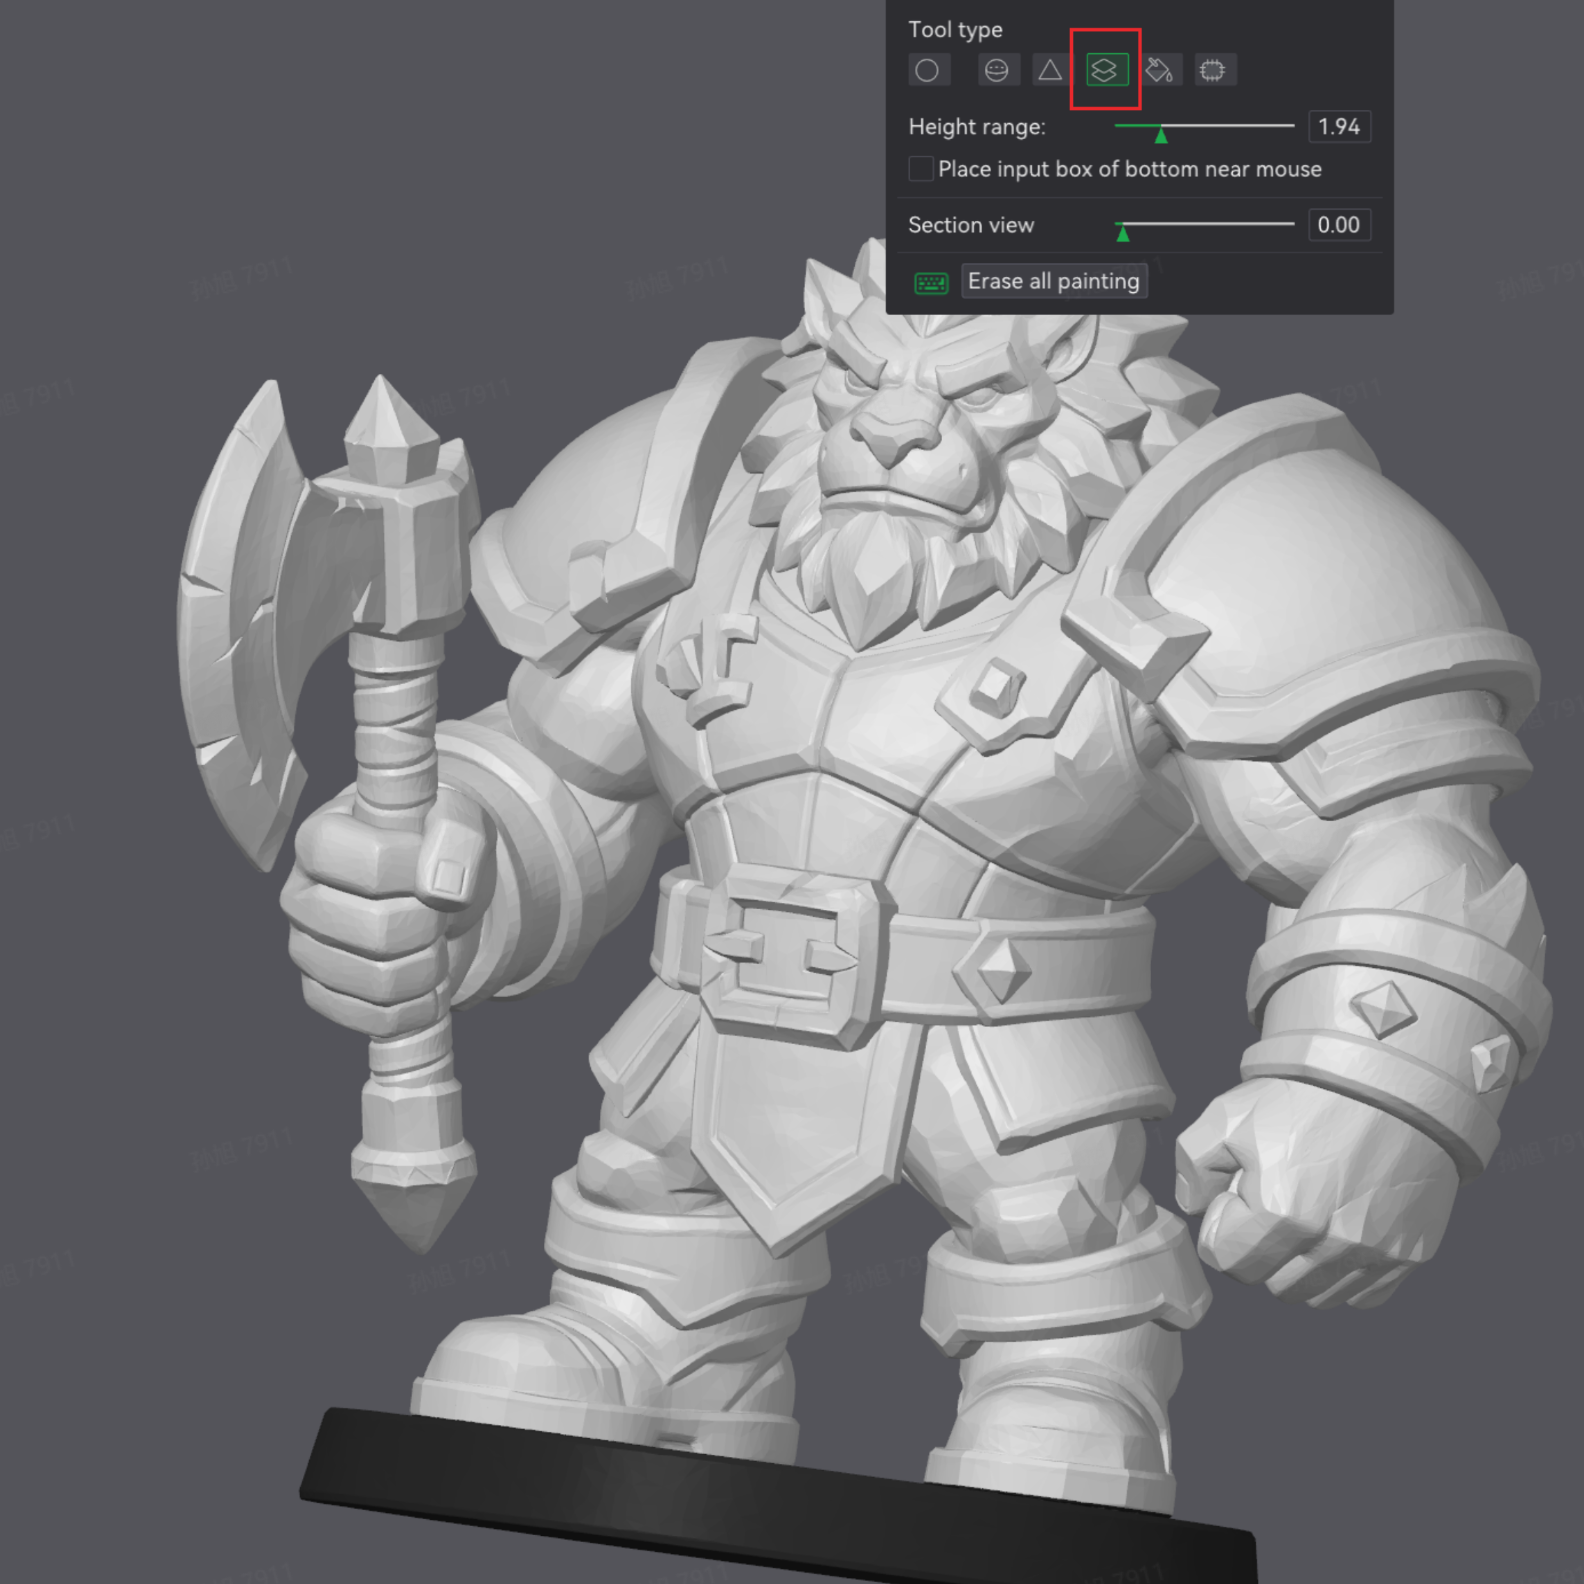
- Alternativ wird das Füllwerkzeug (Eimer) dringend empfohlen: Schalten Sie den Modus auf Edge Detection (Kantenerkennung) um, passen Sie den Winkelschwellenwert nach Bedarf an und klicken Sie einfach auf den Bereich, den Sie bemalen möchten. Es erkennt Füllbereiche automatisch anhand der geometrischen Übergänge des Modells – weitaus präziser als der normale Pinsel und ideal, um Basen und Kleidungskanten schnell zu bemalen.
4. Wir können es kaum erwarten zu sehen, was Sie erschaffen
Tripo arbeitet eng mit führenden 3D-Druckerherstellern und deren Creator-Communitys weltweit zusammen, um eine lückenlose Pipeline von der „KI-Kreativität zur physischen Produktion“ aufzubauen. Wir haben bereits Partnerschaften mit branchenführenden Marken wie Bambu Lab, Anycubic, Creality und Elegoo geschlossen – wir optimieren kontinuierlich die Modellkompatibilität, Slicing-Integration und Druckvalidierung und stehen gleichzeitig im direkten Austausch mit Creator-Communitys auf verschiedenen Plattformen. Dies ermöglicht es Nutzern ohne jegliche Modellierungserfahrung, die Leistung der KI zu nutzen und ihre Ideen schnell in hochwertige, druckfertige 3D-Modelle zu verwandeln.
Dieses Tutorial wurde auf der Grundlage der aktuellen Versionen von Tripo und dem 3D-Druck-Workflow verfasst. Da sich KI-Algorithmen ständig weiterentwickeln, wird Tripo kontinuierlich iterieren – mit dem Ziel, ein intelligenteres Modellierungserlebnis, einen rationalisierteren Exportprozess und ein reichhaltigeres kreatives Ökosystem zu bieten.
Wir glauben, dass jeder zum Schöpfer seiner eigenen Welt werden kann, wenn die Zugänglichkeit der KI-Modellierung auf die Kreativität der 3D-Druck-Community trifft.
Jeder Versuch, den Sie unternehmen, und jedes Feedback, das Sie teilen, treibt uns voran. Wir hoffen aufrichtig, dass durch die Technologie von Tripo jeder Creator die Grenze zwischen Fantasie und Realität überwinden und seine wildesten Ideen in physische Modelle verwandeln kann, die man in den Händen halten kann.
Teilen Sie Ihre Arbeit und gewinnen Sie offizielle Geschenke! 🎁 Egal, ob es sich um Ihren allerersten erfolgreichen Druck oder ein sorgfältig gestaltetes mehrfarbiges Meisterwerk handelt: Teilen Sie es in den sozialen Medien, markieren Sie @Tripo AI und verwenden Sie den Hashtag #Tripo3DPrint.
- Offizielle Interaktion: Zeigen Sie uns Ihre Erfolge, Ihre Fehlschläge und Ihre Lektionen – wir wollen alles sehen! Herausragende Inhalte werden von unserem offiziellen Account geteilt, mit der Chance, exklusive Geschenke zu gewinnen.
- Offline-Treffen: Wenn Sie planen, eine Veranstaltung zu besuchen, auf der Tripo ausstellt, bringen Sie Ihre mit Tripo generierten und gedruckten Kreationen an unseren Stand mit.
- Vorteile vor Ort: Zeigen Sie Ihre Arbeit am Stand und erhalten Sie ein exklusives Geschenk 🎁, plus frühzeitigen Zugriff auf neue Tripo-Funktionen!
Starten Sie noch heute Ihre kreative Reise mit Tripo und erwecken Sie Ihre eigene 3D-gedruckte Kreation zum Leben!
👉 Besuchen Sie Tripo: studio.tripo3d.ai
👉 Support-E-Mail: support@tripo3d.ai