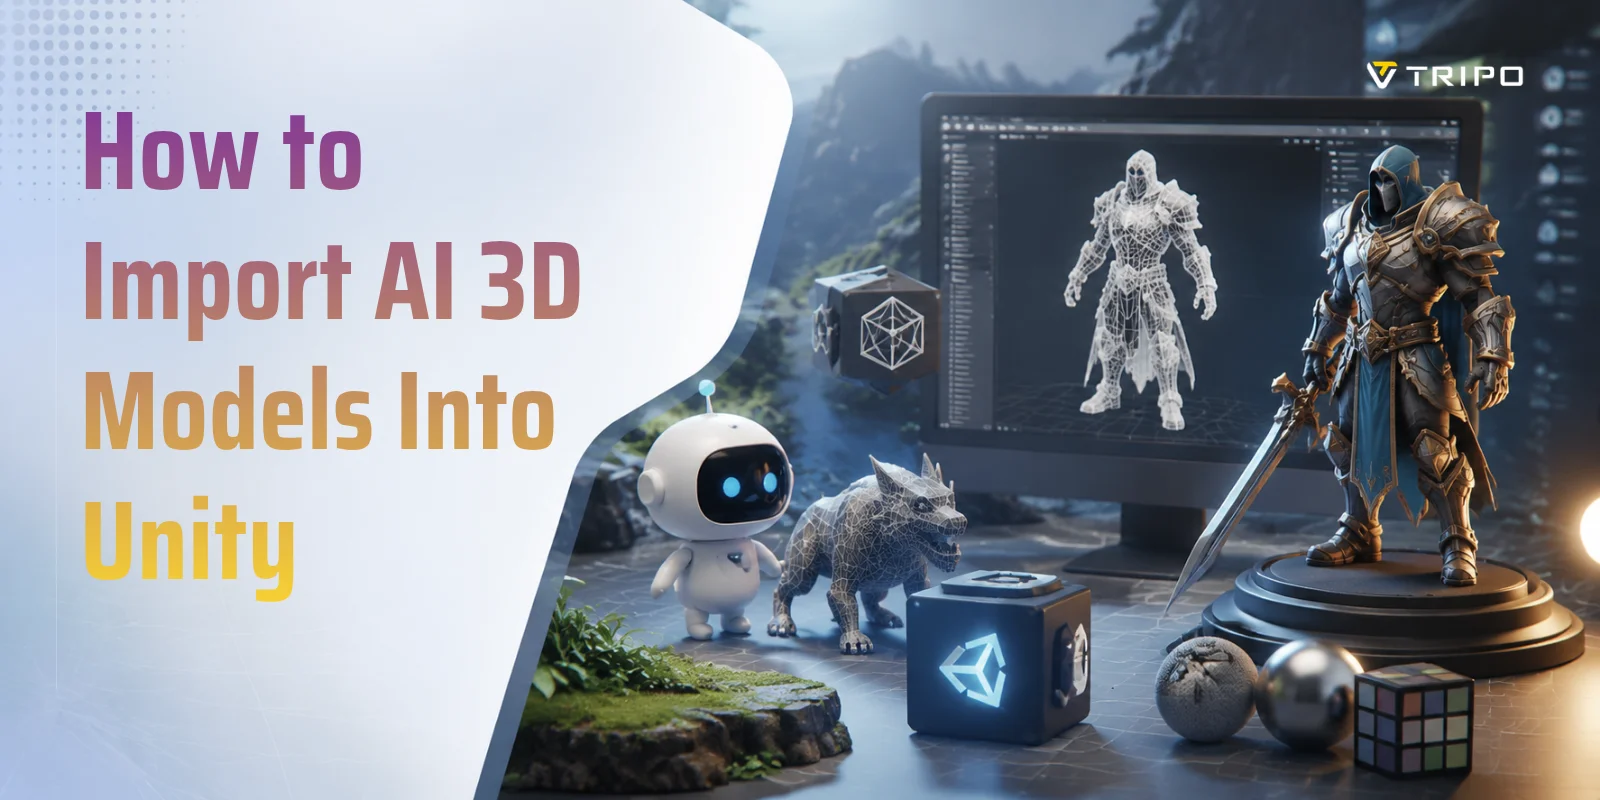
How to Import AI 3D Models Into Unity (GLB & FBX Workflow)
TL;DR
- AI tools (Tripo, Meshy, Luma) export GLB, FBX, or OBJ — your choice decides how smoothly Unity imports.
- FBX drops straight into Unity; GLB/glTF needs a free package (glTFast or UnityGLTF) first.
- Pink/magenta model? It's a shader mismatch — switch the material shader to URP/Lit or HDRP/Lit.
- AI meshes are high-poly: decimate or add LOD groups before shipping a game.
- For a rigged, animated character, export FBX with a humanoid rig and set up an Animator Controller.
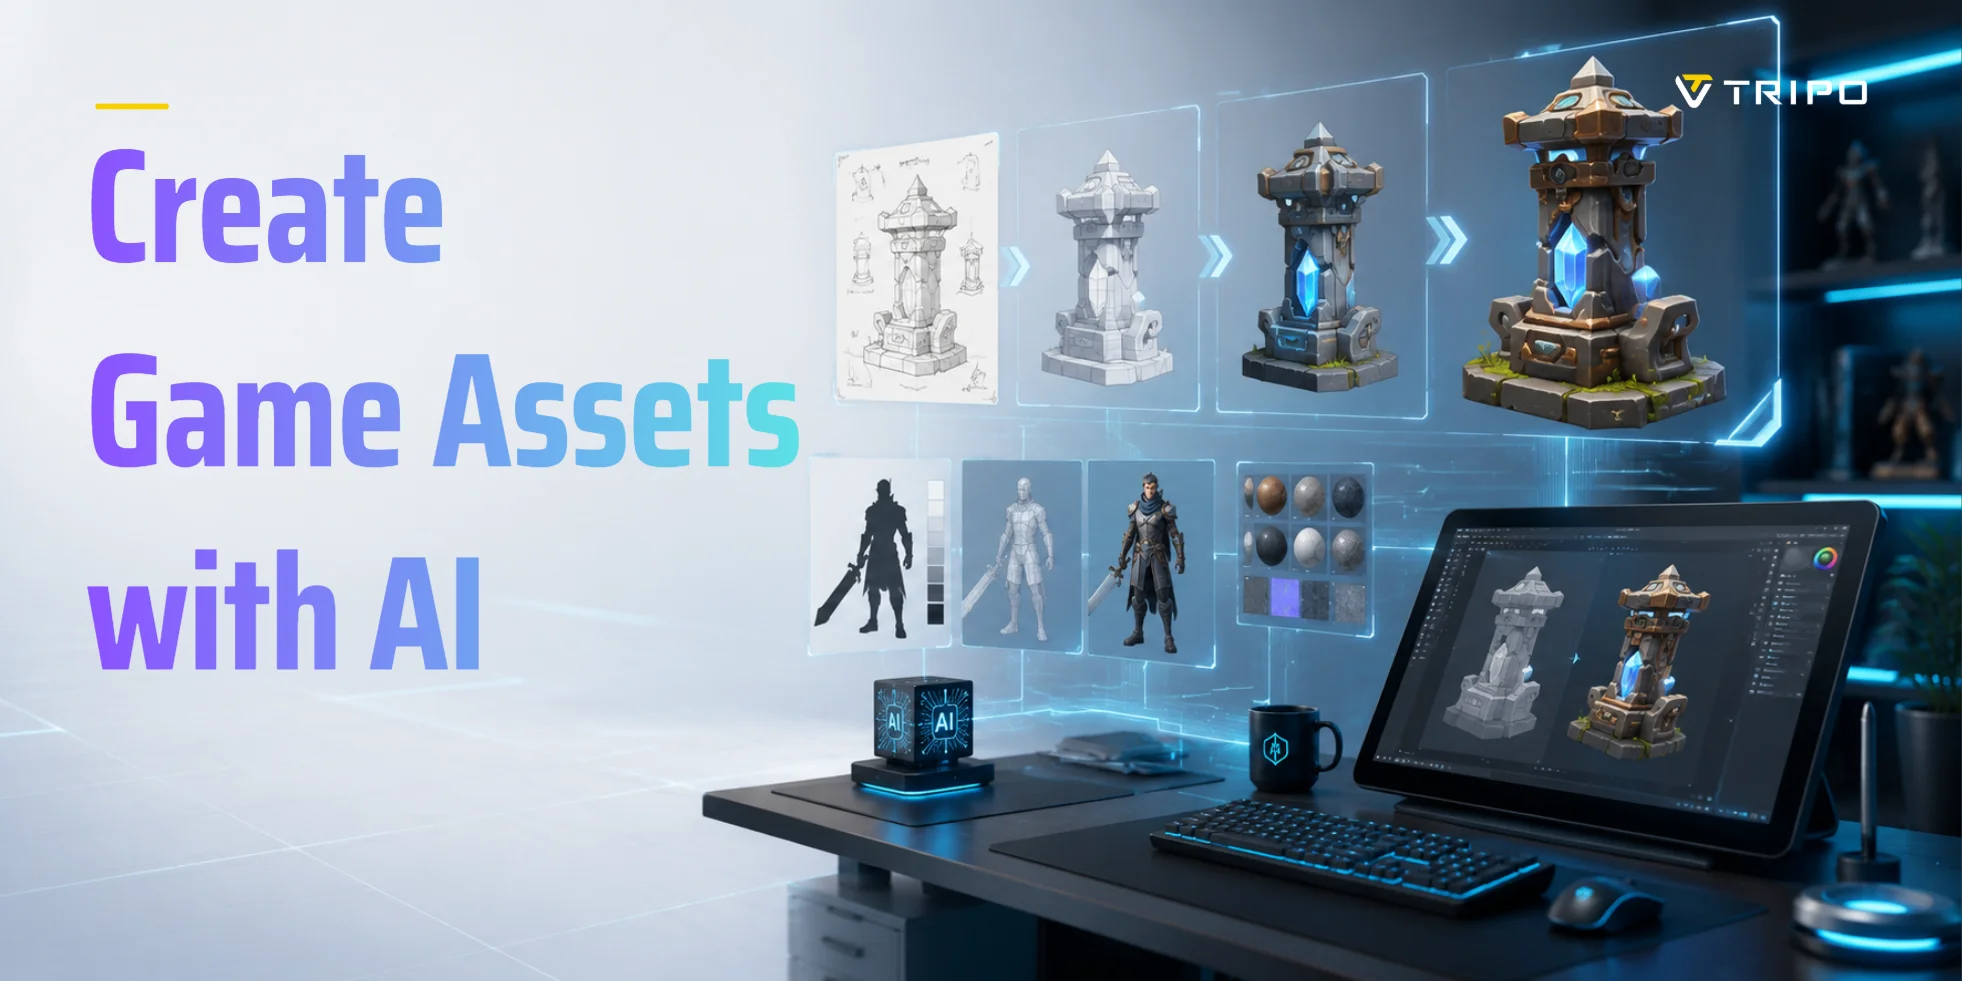
Importing an AI 3D model into Unity comes down to three things: export the right format from your AI generator, get Unity to read it, and fix materials so the model isn't pink. FBX imports natively; GLB needs a quick package install. This guide walks the full workflow — generate, export, import, fix materials, optimize, and animate — for any AI tool, including Tripo AI.
Before You Import — Pick the Right Export Format
A successful Unity import starts with the export format you choose. The right format preserves animations, materials, and textures, while the wrong one can lead to missing assets or extra setup. Tripo AI supports six export formats—GLB, USD, FBX, OBJ, STL, and 3MF—but for Unity, GLB, FBX, and OBJ are the most practical options.
| Format | Animation | Embedded Textures | Native Unity Support |
|---|---|---|---|
| FBX | ✅ Yes | ⚠️ Partial | ✅ Yes |
| GLB / glTF | ✅ Yes | ✅ Yes | ❌ Requires importer |
| OBJ | ❌ No | ❌ No | ✅ Yes |
GLB / glTF — The AI Default
Many AI 3D generators export GLB by default because it bundles the mesh, materials, textures, and animations into a single file. It's ideal for sharing assets and modern 3D workflows. However, Unity doesn't support GLB natively, so you'll need to install a glTF importer before importing the file.
FBX — The Game Engine Standard
FBX is the most reliable choice for Unity projects. It imports natively without extra packages and is the preferred format for characters, skeletal rigs, and animations. If your AI model is intended for a game, FBX is usually the best option.
OBJ — Simple Geometry, No Animation
OBJ stores only basic mesh data and UVs. It doesn't support rigs or animations, and textures are usually saved separately. It's best suited for static props or models that don't require animation.
Quick decision: Choose FBX for animated characters and game assets, GLB for static assets or web-friendly workflows, and OBJ only when you need simple geometry without animation.
Step 1 — Generate (or Get) Your AI Model
Before importing anything into Unity, you need a model that's ready for real-time use. You can either create one with an AI 3D generator using text-to-3D or image-to-3D, or download a compatible model from another source.
With Tripo AI, the process is straightforward:
- Enter a text prompt or upload an image.
- Generate the 3D model (typically in 10 seconds to 2 minutes, depending on the model and settings).
- Review the result and export it with PBR textures in your preferred format, such as FBX or GLB.
Before exporting, check a few key details:
- Polygon count: Keep it appropriate for your target platform.
- Textures: Make sure the model includes all required PBR texture maps.
- Rigging: If you plan to animate a character in Unity, export a rigged model whenever possible.
Finally, make sure your subscription supports the export option you need. Basic plans can export Tripo v2.5 models, while exporting models generated with Tripo v3.0 and v3.1 requires an eligible paid subscription. Choosing the right export settings now will make the Unity import process much smoother in the next step.
Before Export - Quick Checklist

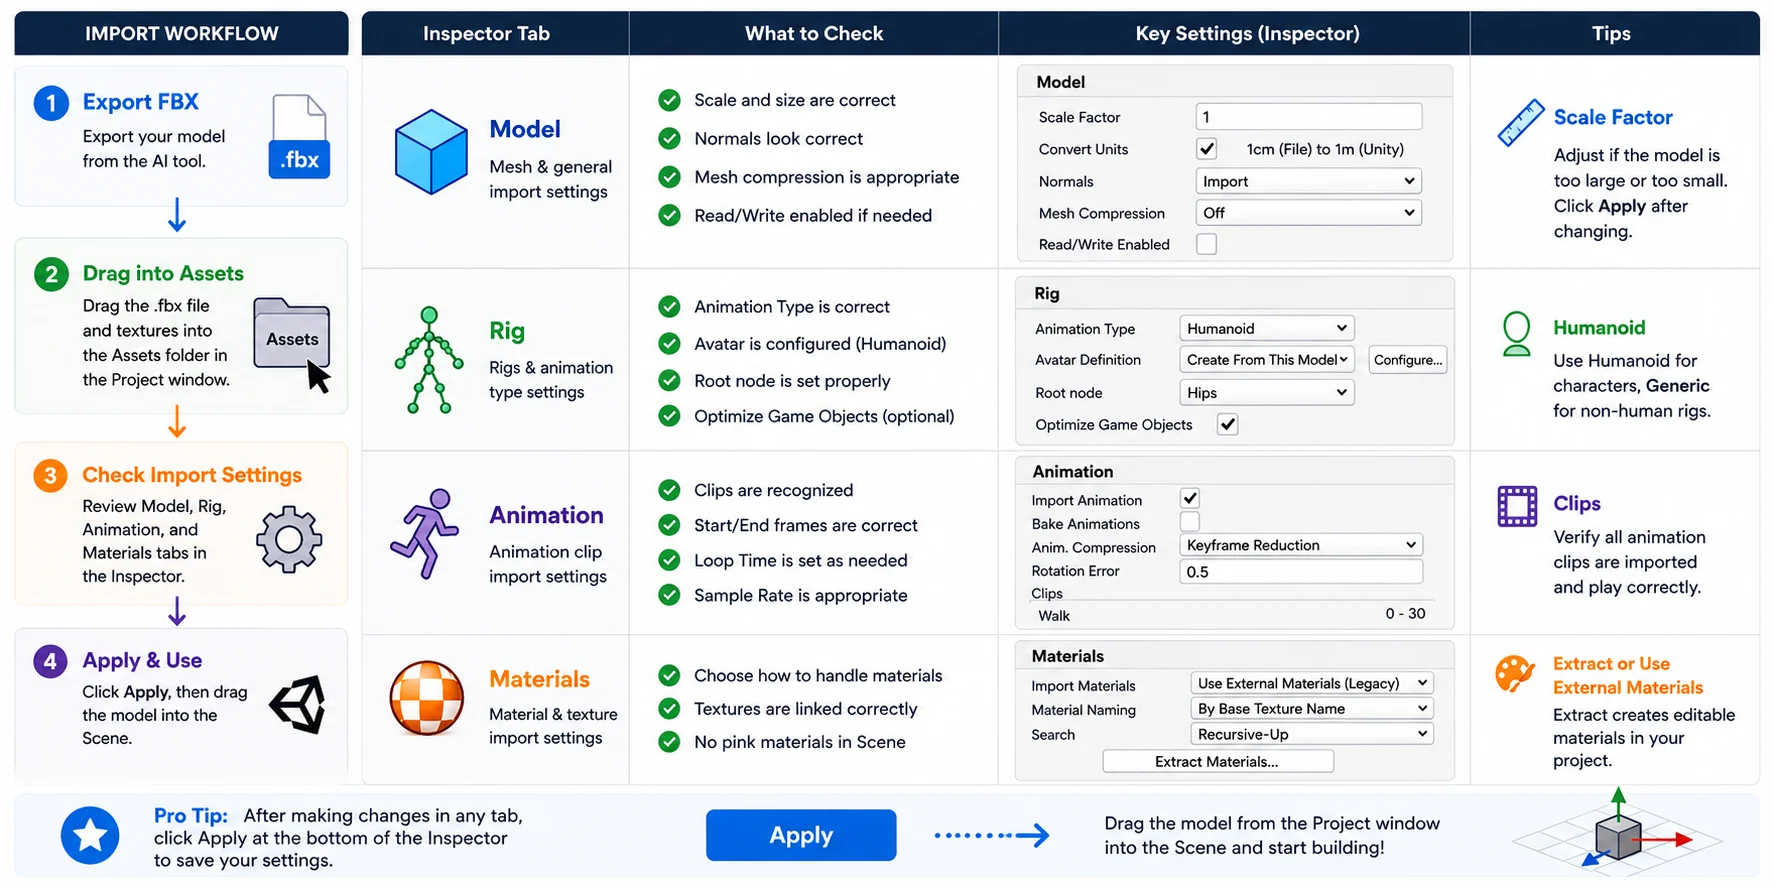
Step 2 — Import an FBX Into Unity (The Native Path)
FBX is the easiest format to use in Unity because it's supported natively—no additional plugins or importers are required. If you've exported your AI model as an FBX, importing it takes only a few steps.
Drag the FBX Into the Assets Folder
Open your Unity project and drag the .fbx file into the Assets folder in the Project window. If your textures were exported separately, drag those files into the same folder as well. Unity will automatically import the model and create the required assets.
Check the Import Settings in the Inspector
Select the imported FBX file to open its Inspector. Review these tabs before using the model:
- Model: Verify the Scale Factor, mesh compression, and normals. If the model appears too large or too small, adjust the Scale Factor and click Apply.
- Rig: For animated characters, set the Animation Type (such as Humanoid or Generic) and confirm the avatar is configured correctly.
- Animation: If the FBX contains animations, make sure the clips are detected and imported.
- Materials: Choose Use External Materials (Legacy) or Extract Materials if you want Unity to create editable material assets. If textures don't appear automatically, reassign them manually after extraction.
Once you've confirmed these settings, drag the model from the Project window into the Scene. If everything imports correctly, you're ready to fine-tune materials and lighting in the next step.
FBX Import in Unity - Inspector Checklist
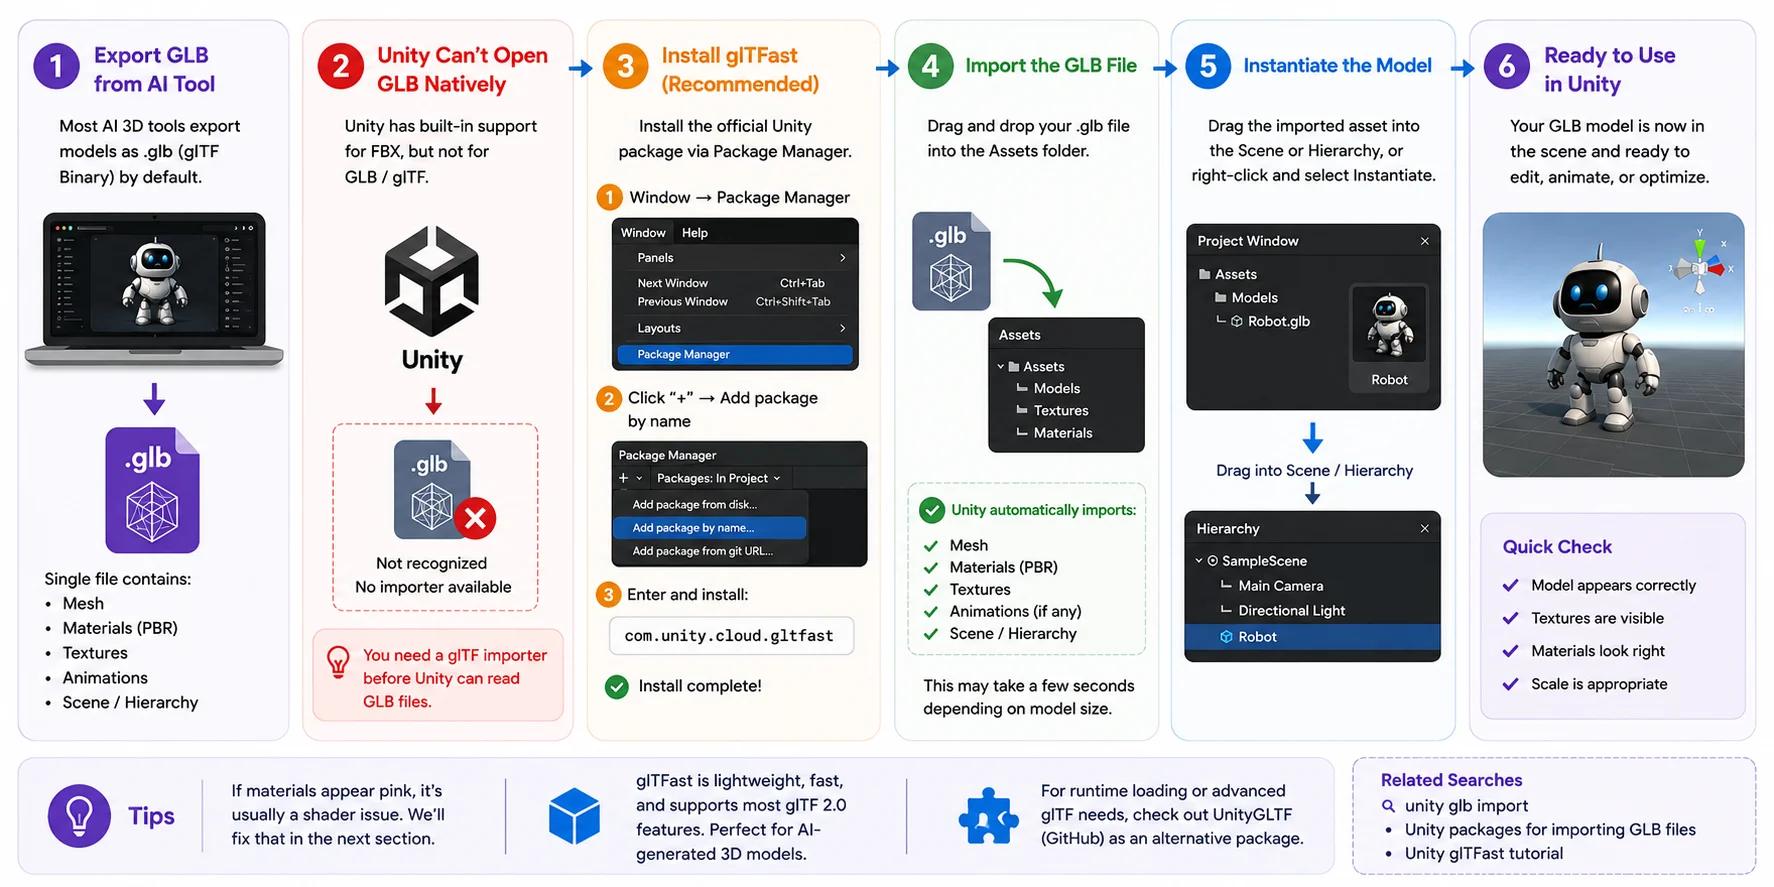
Step 3 — Import a GLB / glTF Into Unity
GLB is the default export format for many AI 3D model generators because it stores the mesh, PBR materials, textures, animations, and scene hierarchy in a single file. This makes it easy to transfer assets between applications without managing multiple texture files. However, while GLB is becoming the industry standard for AI-generated assets, Unity doesn't support it natively like it does FBX. Before you can use a GLB model, you'll need to install a glTF importer.
Why Unity Can't Open GLB Natively
Unity's built-in asset pipeline was originally designed around formats such as FBX, which is why you can drag an FBX directly into the Assets folder without installing anything. In contrast, glTF/GLB isn't included in Unity's default importer. If you import a .glb file into a new project, Unity may not recognize it correctly or create a usable prefab.
This isn't a problem with the model itself—it's simply because Unity requires an additional package to read the glTF specification. Once the correct importer is installed, GLB files can preserve high-quality PBR materials, textures, skeletal animations, and other data generated by AI tools.
Install glTFast (or UnityGLTF)
The easiest solution is glTFast, Unity's official glTF importer.
- Open Window → Package Manager.
- Click + → Add package by name.
- Enter the following package name:
com.unity.cloud.gltfast
- Click Add and wait for the installation to finish.
If your workflow requires runtime model loading or more advanced glTF features, UnityGLTF is another popular option that can be installed from GitHub. For most AI-generated models, however, glTFast is the recommended choice because it's lightweight, actively maintained, and integrates well with recent Unity versions.
Import and Instantiate the GLB
Once the package is installed, drag your .glb file into the Assets folder. The importer will automatically process the mesh, materials, textures, and any supported animations. Depending on the model size, this may take a few seconds.
After the import completes, you'll see the generated asset in the Project window. Drag it into the Hierarchy or Scene view to create an instance, or right-click the imported asset and select Instantiate if your importer provides that option.
Finally, inspect the model in the Scene view. Confirm that the geometry, textures, and materials have loaded correctly and that the model is scaled as expected. If the model appears pink or some materials are missing, don't worry—this is usually caused by shader compatibility rather than a failed import. The next section explains how to fix pink materials and restore the correct appearance.
GLB/glTF Import Workflow in Unity
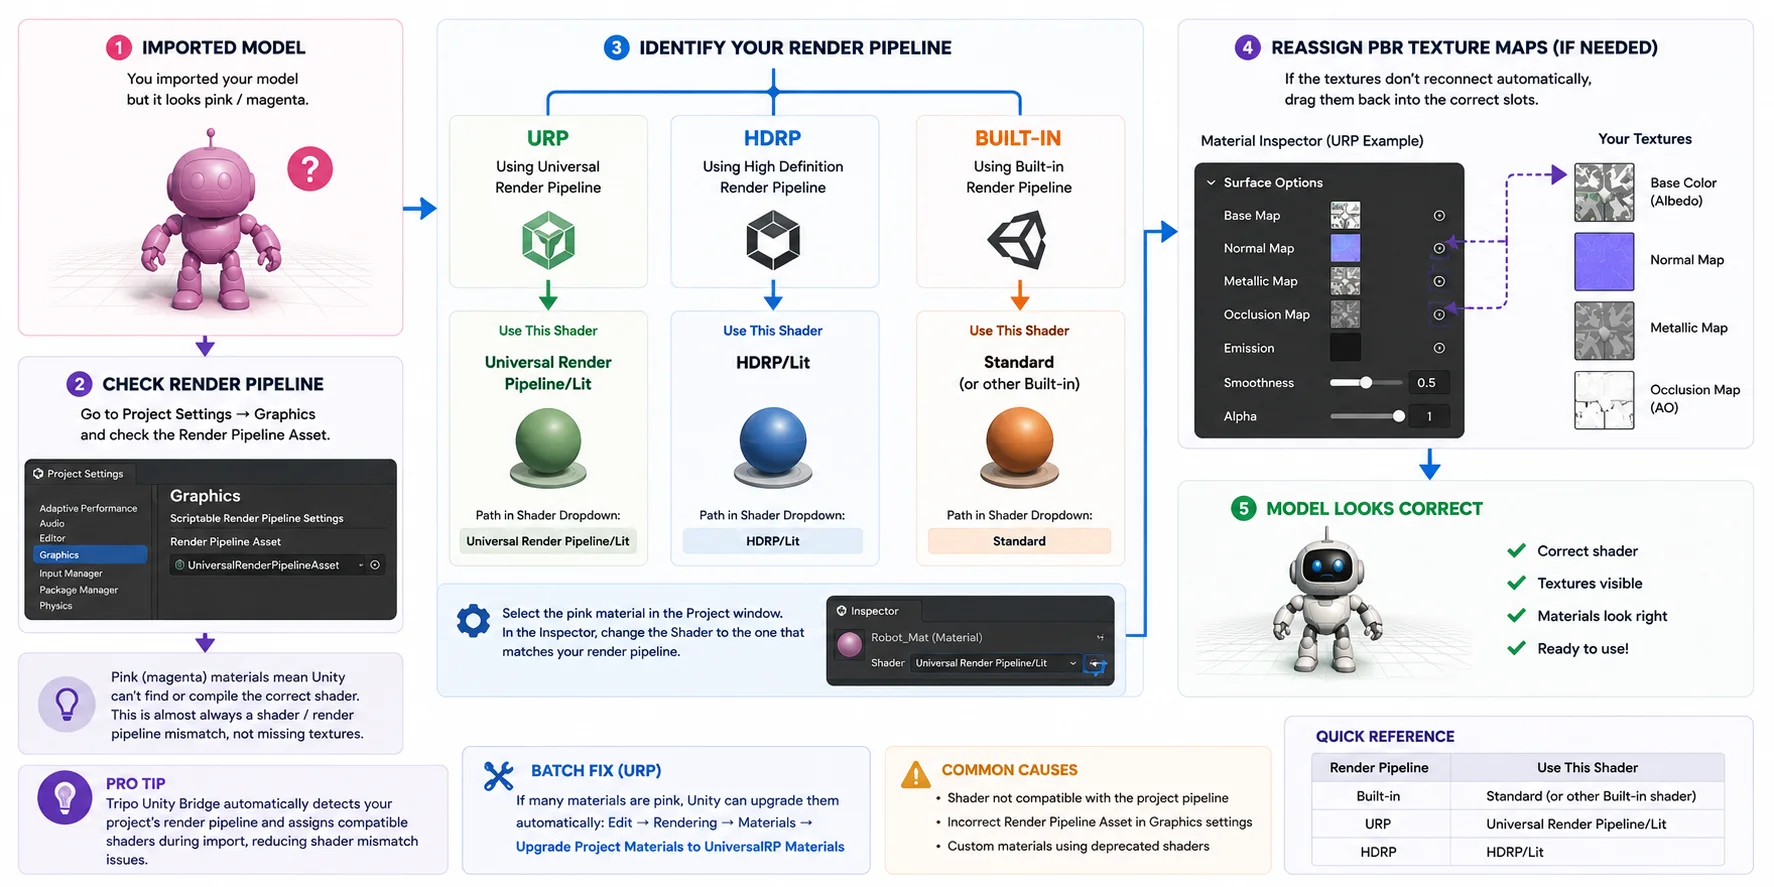
Step 4 — Fix Pink / Magenta Materials
If your imported model appears bright pink or magenta, don't panic. This is one of the most common issues when importing AI-generated 3D models into Unity, and it usually doesn't mean your textures are missing. In most cases, the problem is that the material's shader is incompatible with your project's render pipeline. Fortunately, it's easy to fix once you know where to look.
Why Your Model Turns Pink
Unity displays magenta materials whenever it can't compile or find the correct shader. This commonly happens when a model created for one render pipeline is imported into another—for example, a Built-in shader used in a URP project, or a URP material imported into an HDRP project.
Before changing materials, open Edit → Project Settings → Graphics and check the Render Pipeline Asset. This tells you whether your project is using the Built-in Render Pipeline, Universal Render Pipeline (URP), or High Definition Render Pipeline (HDRP).
Fix It in URP
If you're using URP, select the affected material in the Project window. In the Inspector, change Shader to Universal Render Pipeline/Lit. If the textures don't reconnect automatically, drag the exported PBR maps back into the appropriate slots, including Base Map, Normal Map, Metallic, and Occlusion if available.
If multiple materials are affected, Unity's Edit → Rendering → Materials → Upgrade Project Materials to UniversalRP Materials tool can automatically convert many legacy materials.
Fix It in HDRP or Built-in
For HDRP, assign an HDRP/Lit shader and reconnect the texture maps if needed. If you're using the Built-in Render Pipeline, switch the material back to Standard or another compatible built-in shader.
If you're importing models through Tripo Unity Bridge, the plugin can automatically detect your project's render pipeline and assign compatible shaders during import, reducing the chance of pink materials. Even so, it's still worth checking the assigned shader if a material doesn't display correctly.
Fix Pink Materials in Unity (Shader & Render Pipeline Guide)
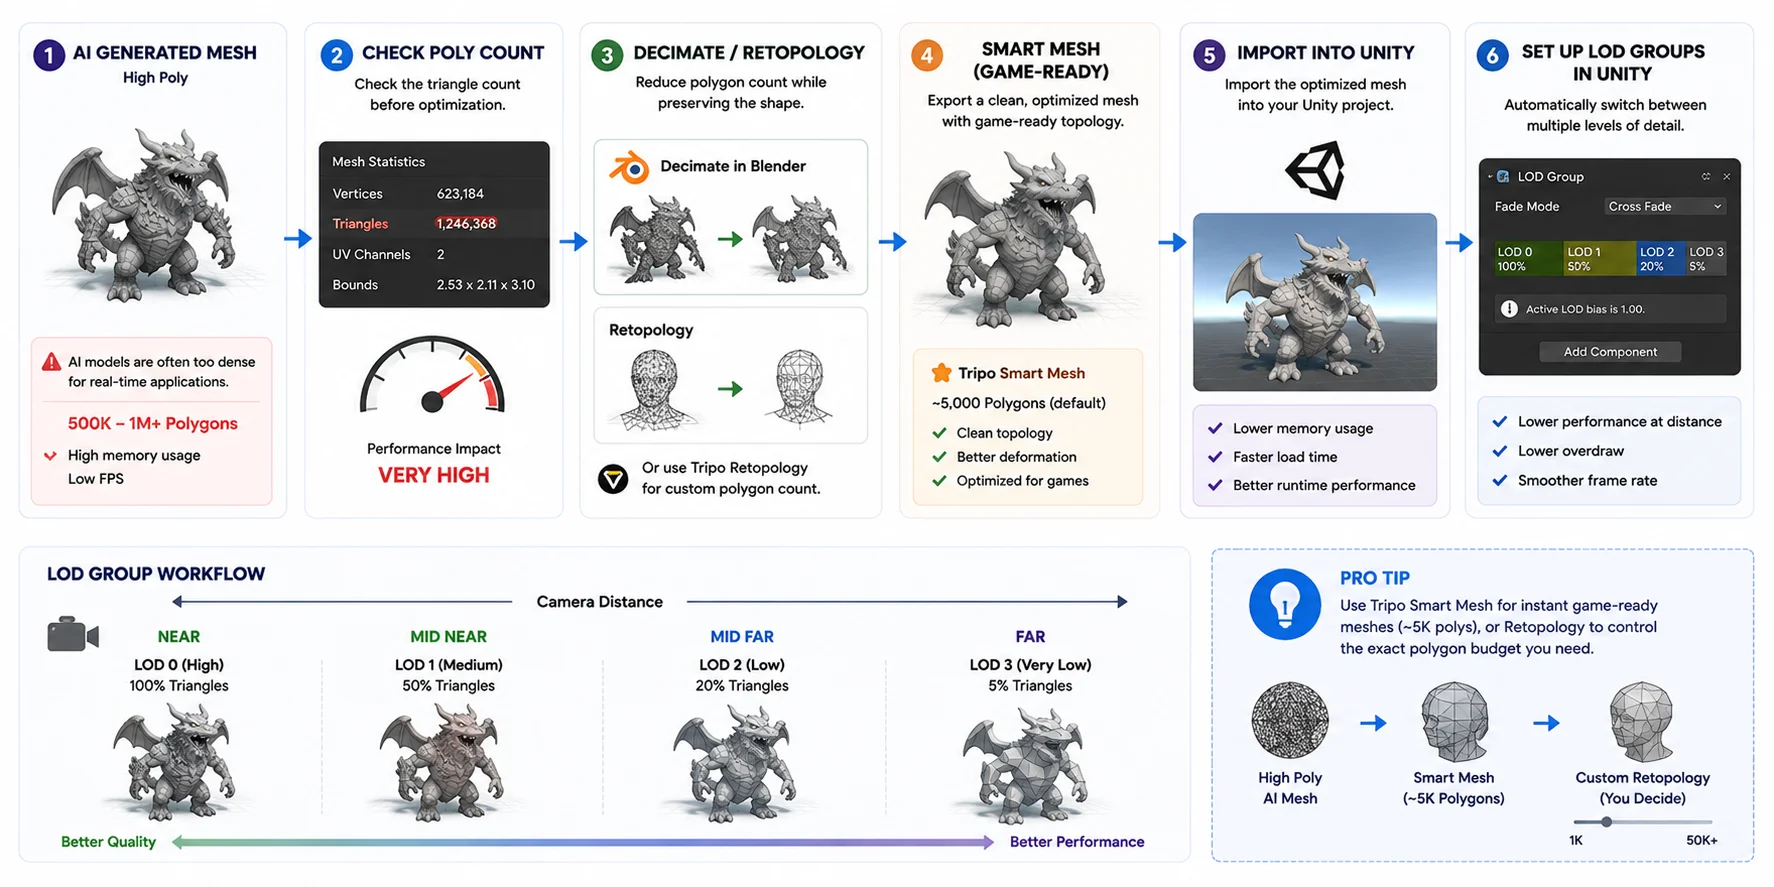
Step 5 — Optimize High-Poly AI Meshes for Performance
AI-generated 3D models often prioritize visual quality over real-time performance. While they may look impressive, many AI meshes contain hundreds of thousands—or even millions—of polygons, making them unsuitable for games, VR, or mobile applications. Before using your model in Unity, it's worth spending a few minutes optimizing it.
Check the Poly Count
Start by checking your model's triangle count. Select the mesh in Unity or inspect it in your 3D editor before import. Large environments and cinematic renders can handle higher polygon counts, but gameplay assets should be much lighter to maintain smooth frame rates. Excessively dense meshes also increase memory usage and loading times.
Decimate or Retopologize the Mesh
If the mesh is too dense, reduce its complexity before importing it into Unity. Blender's Decimate modifier is a quick solution for static objects, while retopology creates a cleaner mesh that preserves the model's overall shape with far fewer polygons.
If you're using Tripo AI, you can simplify this step by exporting a Smart Mesh, which generates game-ready topology with approximately 5,000 polygons by default. For more control, Tripo also supports Retopology, allowing you to specify a custom polygon count based on your project's performance target.
Set Up LOD Groups in Unity
For detailed models that need to look good both up close and at a distance, configure LOD (Level of Detail) Groups in Unity. Create multiple versions of the same model with different polygon counts, then add an LOD Group component to switch between them automatically based on camera distance. This reduces rendering cost while maintaining visual quality, making it one of the most effective optimization techniques for AI-generated assets used in games.
How to Optimize AI High-Poly 3D Models for Unity (LOD Workflow)
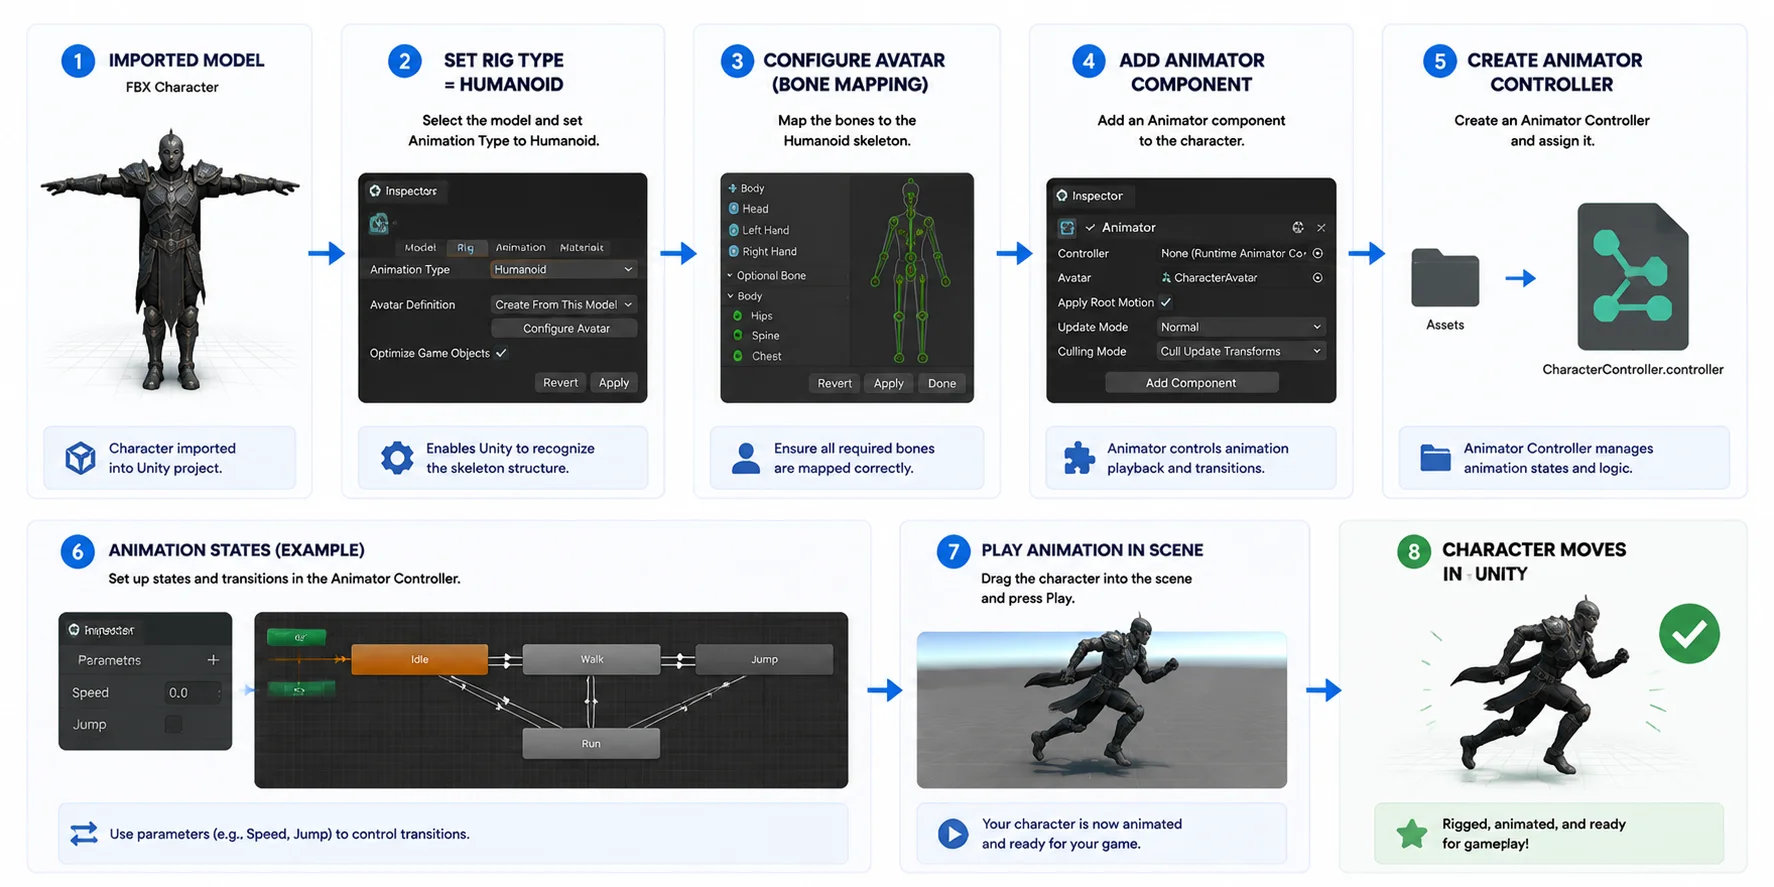
Step 6 — Rig & Animate Imported Characters
After importing and optimizing your model in Unity, the final step is to make it move. Rigging and animation turn a static AI-generated mesh into a usable game character.
Set Rig Type to Humanoid (FBX)
Select your FBX character in the Project window and open the Inspector. In the Rig tab, set Animation Type to Humanoid. This enables Unity's animation system to recognize the skeleton and retarget animations correctly.
Click Apply, then open Configure Avatar to verify bone mapping. If everything is correct, Unity will confirm the rig is ready for animation reuse from built-in or external animation libraries.
Drag into Scene + Create an Animator Controller
Drag the character into the Scene or Hierarchy to instantiate it. Then add an Animator component if it's not already included. Next, create an Animator Controller to manage animation states like idle, walk, and run.
Assign the controller to the Animator component, and your character can now respond to gameplay logic and switch between animations.
For AI-generated assets, Tripo Auto Rig can simplify this step by automatically generating a usable skeleton. It supports common structures like humanoid T-poses and standard quadrupeds, and can export FBX or GLB with multiple animation tracks preserved in a single file.
How to Rig and Animate Characters in Unity (FBX Workflow Guide)
The Fastest Way — Send Models Straight Into Unity (No Manual Import)
If you want to skip FBX/GLB export and manual importing, Tripo3D's Unity Bridge lets you send models directly into Unity.
In the Tripo workspace, click "Send to Unity", and the plugin will push the model straight into your Unity Editor—no downloads or folder setup needed.
It also automates key steps:
- Detects URP / HDRP / Built-in pipeline
- Auto-creates materials and assigns shaders
- Imports textures and PBR maps correctly
- Sets pivot to center-bottom for easy placement
This is especially useful for fast iteration with AI-generated assets.
Requirements: Unity 2021.3 LTS+ and a modern browser (Chrome, Edge, Opera 116+). Works in Editor mode only.
Compared to traditional imports, this removes almost all manual setup—your model is ready as soon as it's generated.
When This Workflow Doesn't Work (Limits)
While AI-generated 3D models can be quickly imported into Unity, this workflow has some important limitations.
First, very high-poly AI models can significantly impact performance. Assets with hundreds of thousands of polygons may cause frame drops, so they should always be optimized before use in real-time projects.
Second, auto-rigging is not universal. Tools like Tripo Auto Rig work best with clear T-pose humanoids or standard quadruped structures. Unusual characters, stylized proportions, or complex monster designs may produce inaccurate bone mapping and require manual rigging adjustments in Blender or Unity.
Third, GLB imports can be inconsistent in complex scenes. Models with multiple materials or heavy texture sets may occasionally lose assignments during import, requiring manual re-linking of textures inside Unity.
Understanding these limits helps you avoid unexpected issues and ensures a more stable pipeline when working with AI-generated assets.
Frequently Asked Questions
How do I import a custom 3D model into Unity?
Export your model as FBX or GLB, then drag it into the Assets folder in Unity. Unity will auto-import it. Finally, drag it into the Scene to use it.
What 3D model formats can Unity import?
Unity supports FBX, OBJ, and GLB (with importer). FBX is best for animation, OBJ is for static models, and GLB needs a glTF importer like glTFast.
Can Unity AI generate 3D models?
Unity does not generate 3D models natively. You need external AI tools like text-to-3D or image-to-3D generators, then import the results into Unity.
How do I import a GLB file into Unity?
Install glTFast via Package Manager, then drag the GLB file into Assets. Unity will import geometry, materials, and textures automatically.
Why is my imported model pink in Unity?
Pink means a shader or render pipeline mismatch. Fix it by changing the material shader to URP/Lit, HDRP/Lit, or Standard depending on your project.
How do I add AI into Unity?
Use external AI tools for asset generation or Unity ML-Agents / Sentis for runtime AI features. Import AI-generated assets into Unity for use in projects.
Conclusion
That is the complete workflow for importing AI-generated 3D models into Unity—choose the right format, import, fix materials, optimize, and animate.
You can generate your next game-ready asset in Tripo AI Studio and bring it into Unity in minutes.