How to Rig an AI-Generated Character (Step-by-Step)
TL;DR
- Rigging adds a skeleton, bones, and skin weights so a static character can move.
- AI-generated characters need prep first: fix bad hands or fused limbs, then separate layers for 2D or convert to a 3D mesh.
- For 3D characters, AI auto-rigging can place bones and apply skin weights in minutes.
- Auto-rigging works best when the model has a clear, readable body structure and a neutral pose.
- Export rigged characters as FBX or GLB to animate in Blender, Maya, Unity, Unreal Engine, Mixamo, or another 3D workflow.
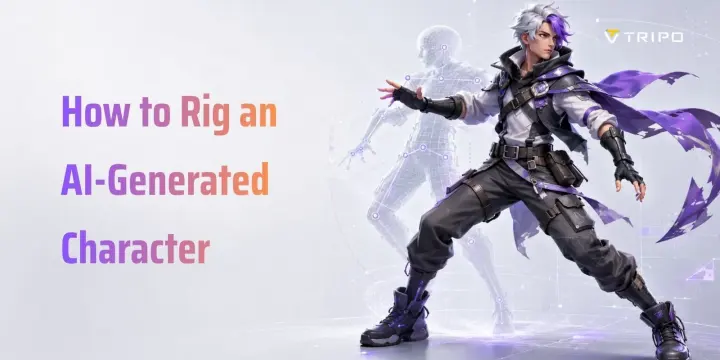
To rig an AI-generated character, first clean the source art, fix broken hands or limbs, and get the character into a riggable form. Then add a skeleton and bind it to the mesh. For a 3D model, an AI auto-rigging tool can place bones and skin the character quickly, so you can export it to Blender, Unity, Mixamo, or another animation workflow, from choosing between 2D and 3D rigging to preparing AI-generated art, using auto-rigging, testing animation, exporting files, and avoiding common rigging pitfalls.
What Does It Mean to Rig a Character?
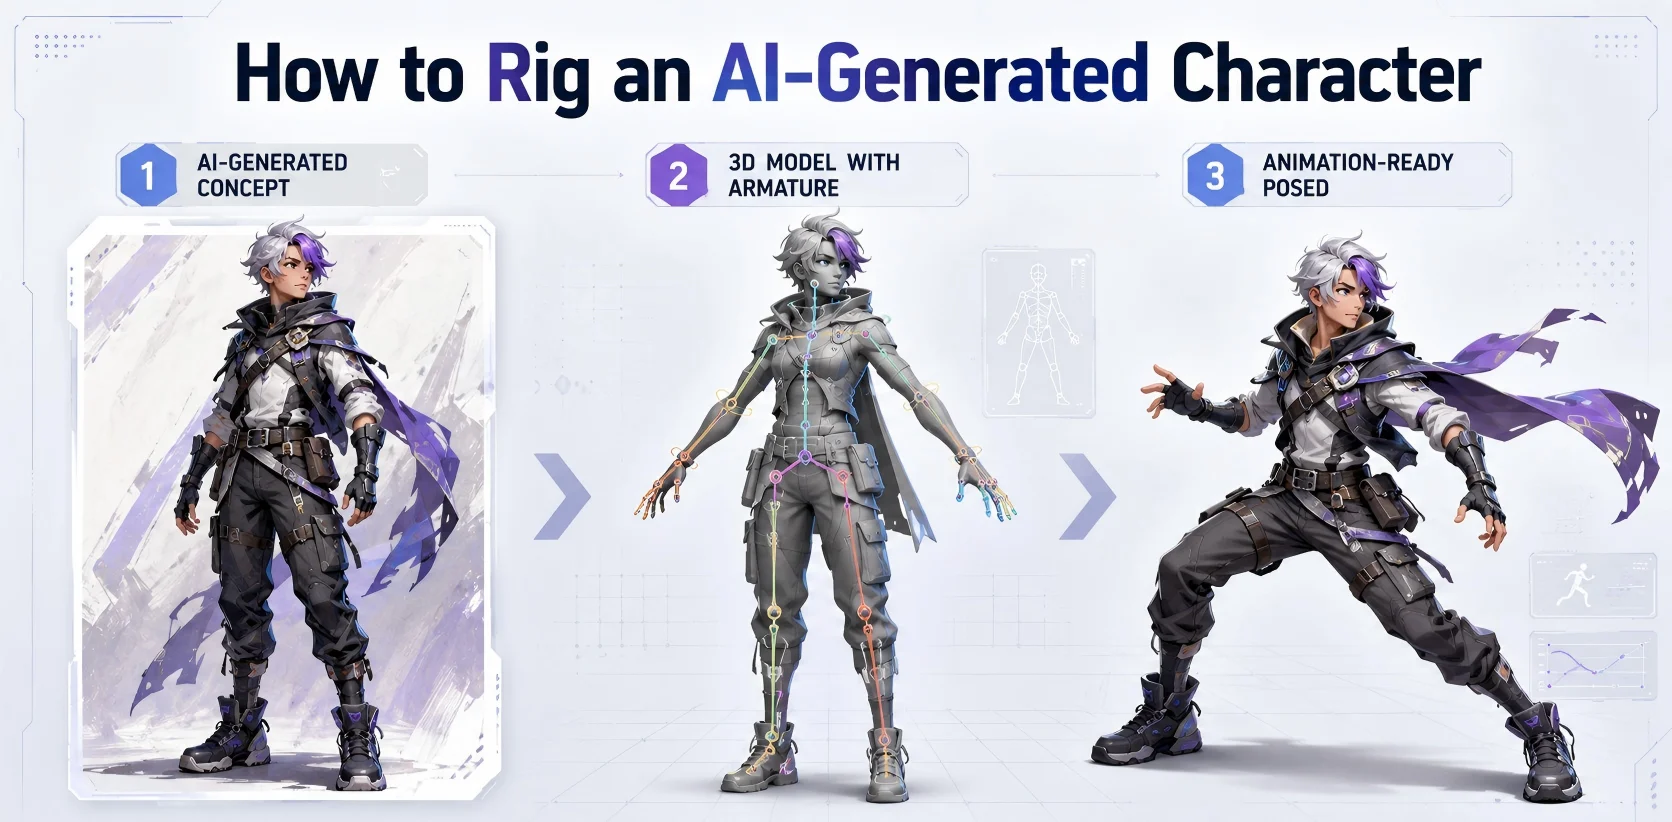
Rigging is the process of giving a static character an internal control system. A character cannot walk, raise an arm, turn its head, blink, or hold an animation pose until you add bones and connect the surface of the model to those bones.
A basic character rig has three parts. The first is the skeleton, or armature. For a humanoid character, this usually includes bones for the spine, neck, head, shoulders, arms, hands, hips, legs, and feet. The second is skinning, which binds the mesh to the skeleton. Skin weights decide how much each part of the mesh follows each bone. Good weights create smooth bending around elbows, knees, shoulders, and hips. Bad weights create stretching, collapsing, or rubbery motion.
Why AI-generated characters are a special case
AI-generated characters often start in a messy technical state. You may have a beautiful flat image, but it is not yet a layered 2D puppet or a 3D mesh. Or you may have a generated 3D model without bones, clean topology, or a neutral pose.
AI art can also contain problems that become rigging problems later: extra fingers, fused limbs, hidden elbows, asymmetrical legs, unclear joints, or accessories that melt into the body. That is why AI character rigging is not only "upload and rig." The workflow starts with choosing the right path and preparing the character.
First, Decide Your Path — 2D or 3D Rigging
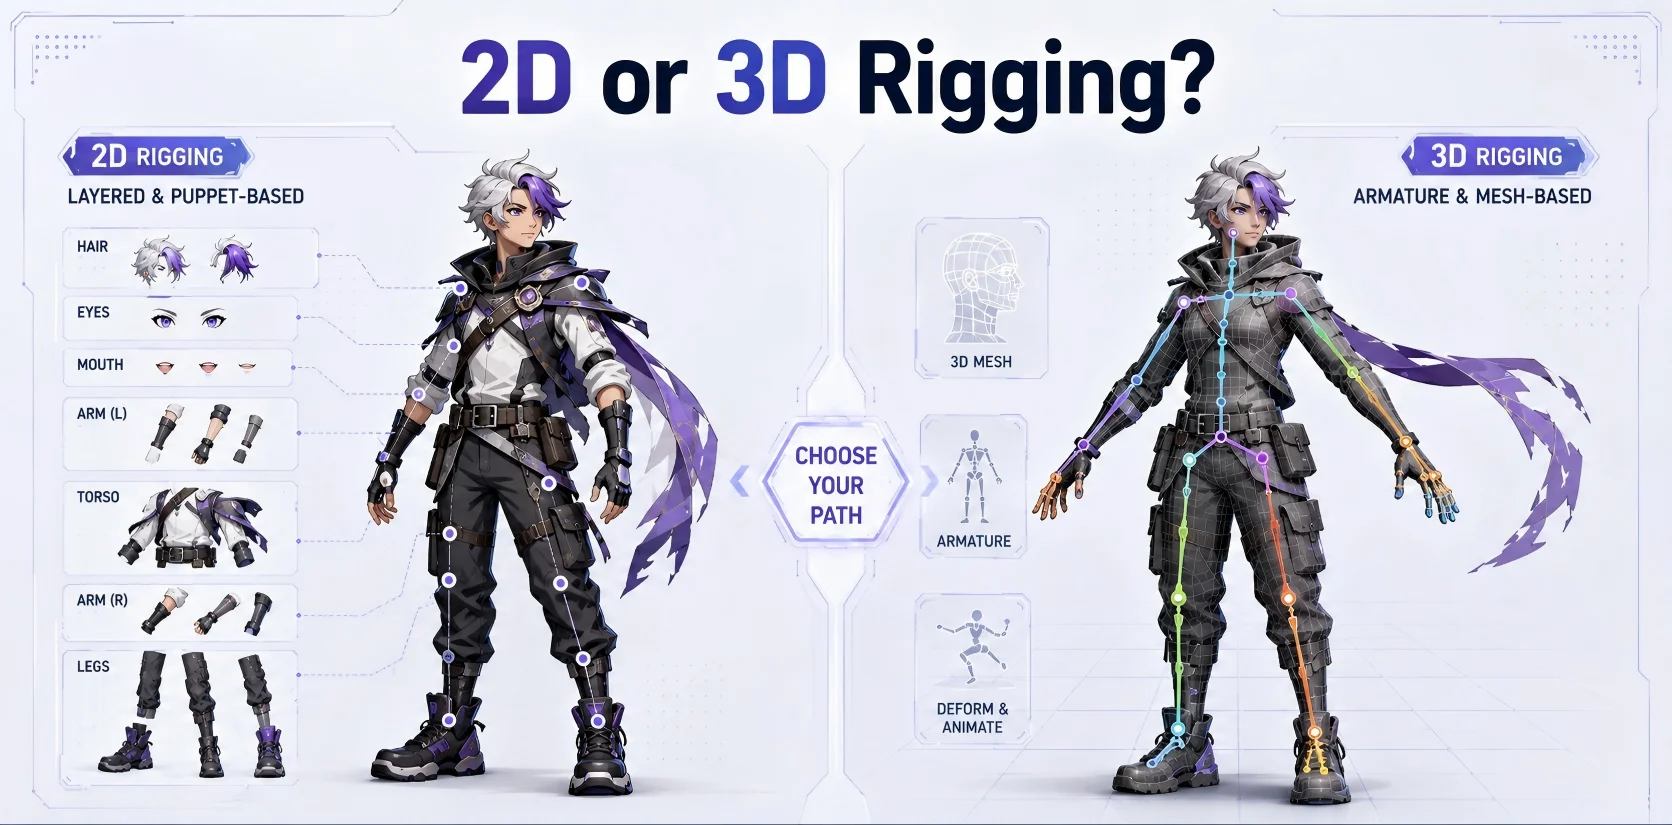
Before you start, decide whether your character should be rigged as 2D or 3D.
Path A — 2D rig for flat art, VTubers, and cutout animation
Choose a 2D rig if your AI character is a single illustration, anime avatar, mascot, VTuber portrait, or game sprite. You separate the drawing into layers and animate those layers with deformers, joints, or puppet controls.
For example, you may separate the head, hair, eyes, mouth, torso, upper arms, forearms, hands, thighs, calves, feet, clothing, and accessories. Tools such as Live2D, Spine 2D, and Adobe Character Animator can then bend, rotate, or warp those parts.
This path is best for livestream avatars, visual novels, stickers, 2D mobile games, and social content. It is fast, but less flexible for camera angles and full body rotation.
Path B — 3D rig for games, film, and real-time characters
Choose a 3D rig if you want the character to move in Blender, Maya, Unity, Unreal Engine, Mixamo, VR, or a game engine. In this workflow, you need a 3D mesh first. This path is better for walk cycles, combat animation, cinematic shots, interactive avatars, and reusable game characters.
If you only have a flat AI image but want a 3D character, convert the image into a 3D mesh first. If you already have a generated 3D model, move directly into cleanup and rigging.
A simple rule: use 2D rigging when your final output is flat or cutout-style animation. Use 3D rigging when your character must move through a 3D scene, accept game animations, or be exported to a real-time engine.
Step 1 — Prep Your AI-Generated Art
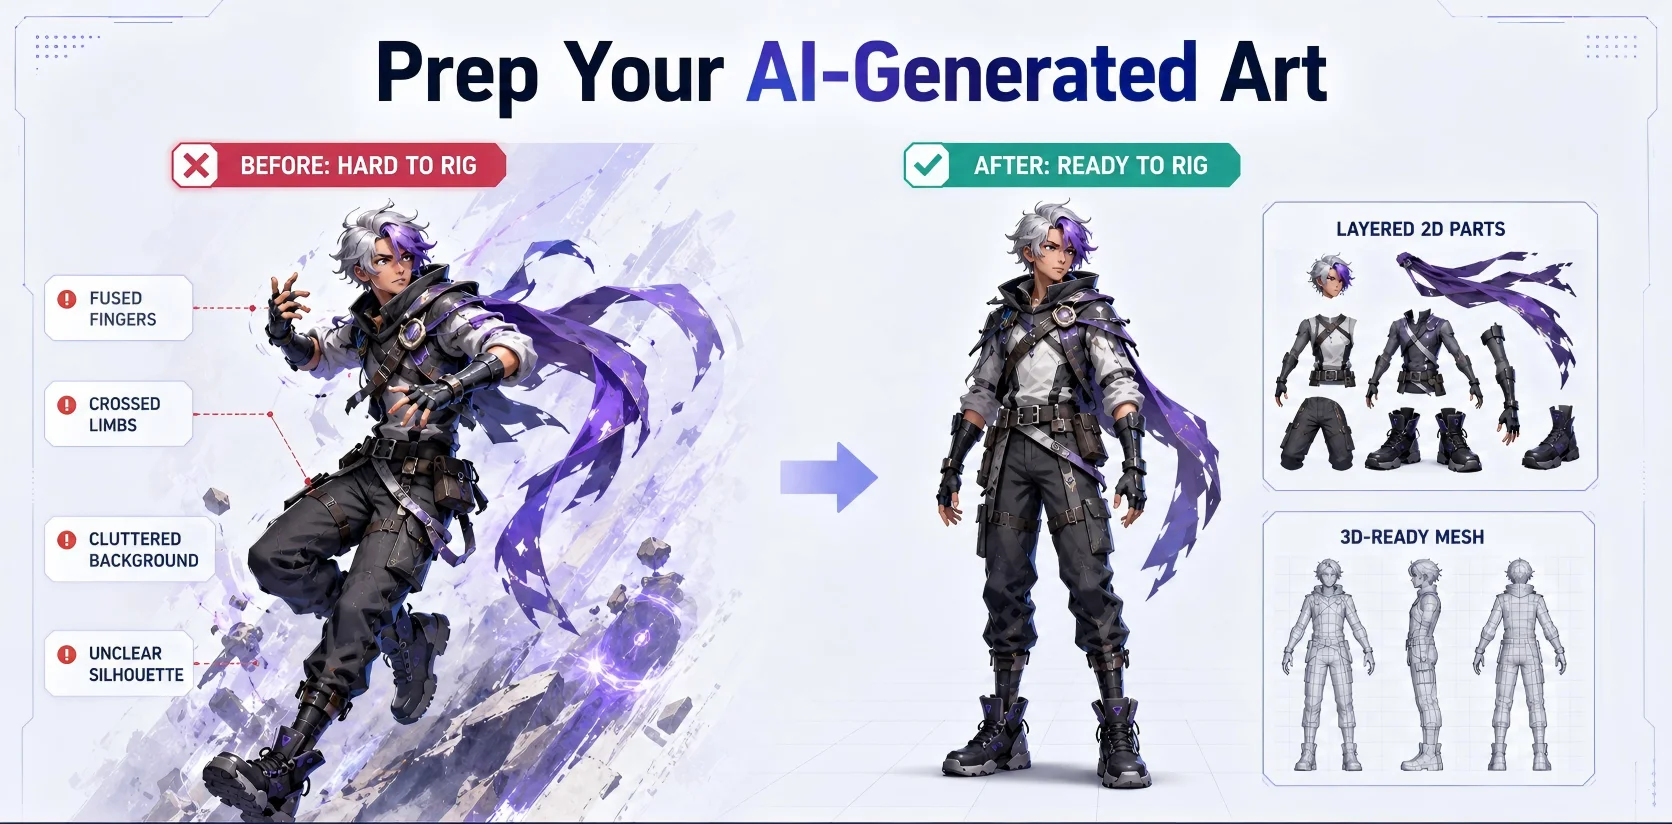
Auto-rigging can save time, but it cannot fully fix unclear anatomy, hidden joints, fused geometry, or a bad silhouette. A cleaner input gives you a more reliable rig.
Fix bad hands, fingers, and fused limbs
Hands are one of the most common weak points in AI-generated art. Check for extra fingers, missing fingers, twisted thumbs, fused palms, or hands that blend into sleeves. These errors become much more visible once the character starts moving.
Also inspect the arms and legs. Look for elbows hidden behind the torso, crossed arms, merged knees, legs stuck together, or accessories fused to the body. A rigging tool needs to understand where joints should be. If the joint is invisible, the skeleton may be placed incorrectly.
Fix hands before rigging if the character needs gestures, props, or close-up shots. If the character will only appear far from the camera, you may simplify the hand shape instead of building a detailed finger rig.
Get a clean, separable subject
Use a single character with a clear silhouette. Avoid source art where the body blends into the background or where long hair, capes, weapons, wings, or props hide the arms and legs.
For 3D rigging, the best input is a character standing upright in a neutral pose. A T-pose or A-pose is usually easier to read than a dynamic action pose. Sitting poses, crossed arms, twisted bodies, and heavy props can make skeleton detection less reliable.
For 2D — separate into layers
For 2D rigging, cut the AI image into clean layers. At minimum, separate the head, torso, upper arms, forearms, hands, upper legs, lower legs, feet, eyes, brows, mouth, hair, and major clothing pieces. Leave slight overlap at the joints so gaps do not appear when parts bend.
For VTuber-style rigs, separate more facial parts: pupils, eye highlights, eyelids, brows, mouth shapes, front hair, side hair, back hair, and accessories. The more expression you want, the more carefully you need to prepare the layers.
For 3D — convert to a mesh and aim for a neutral pose
If you want 3D animation, the character must become a 3D mesh before it can be rigged. A tool such as Image to 3D can help turn image-based art into a mesh. Then prepare the mesh for AI Auto-Rigging.
Remove floating pieces, background geometry, duplicate parts, and broken fragments. Check that the shoulders, elbows, knees, hips, hands, and feet are readable. For humanoids, a clean T-pose or A-pose is usually the safest starting point. For animals or stylized characters, keep the limbs visible and the body structure easy to identify.
Step 2 — Auto-Rig Your 3D Character
Once you have a clean 3D mesh in a neutral pose, auto-rigging can place bones, define the skeleton hierarchy, and bind the mesh to those bones. What used to take hours of manual work in Blender or Maya can often be reduced to a few minutes.
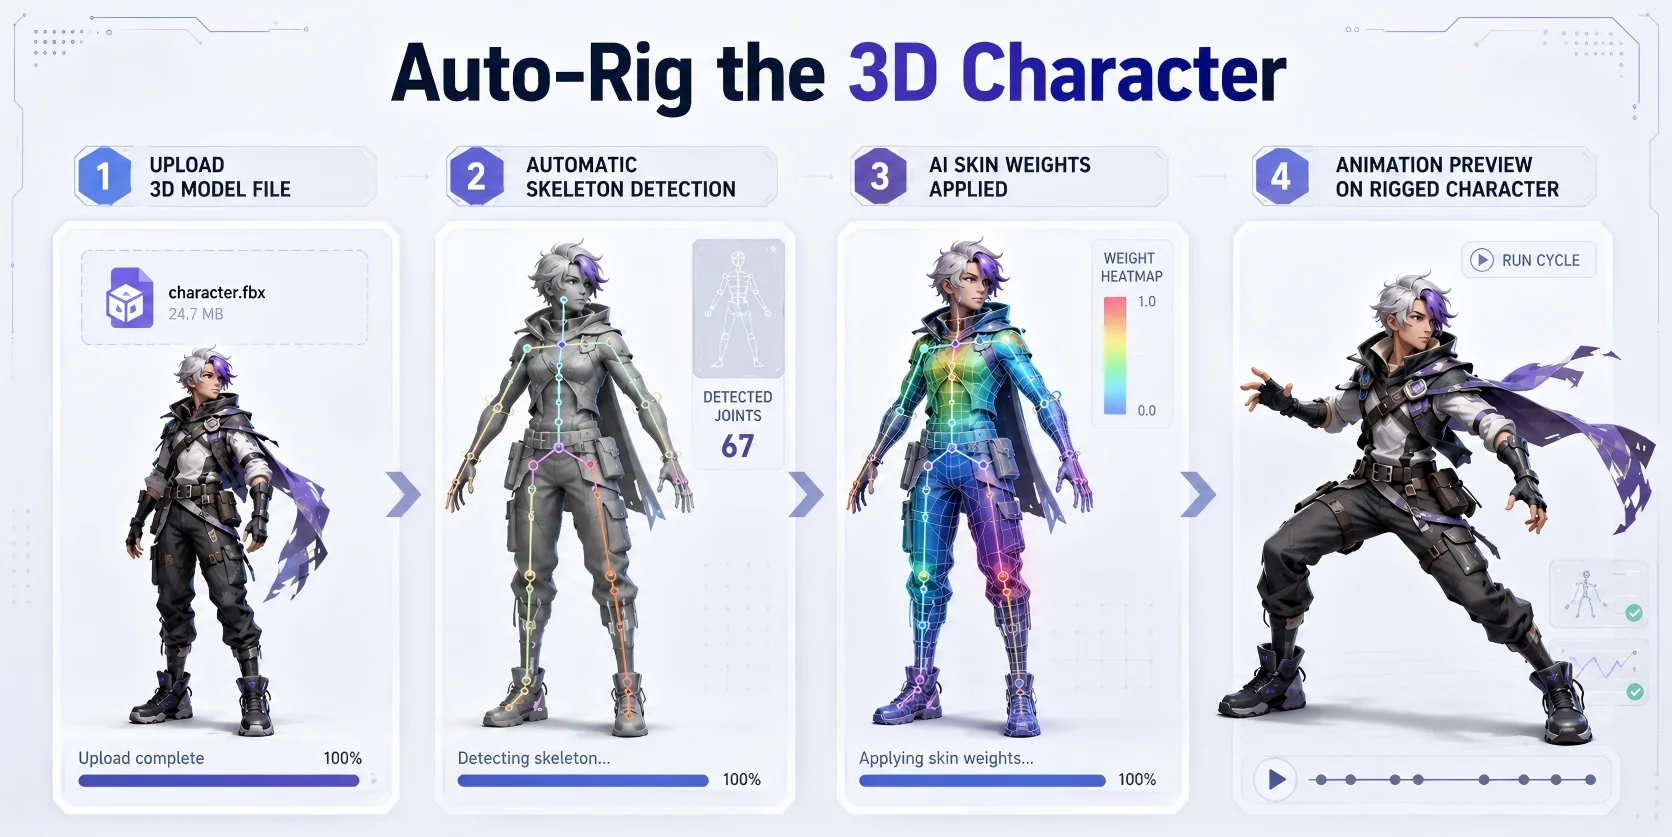
In Tripo Studio, open your model in the Animate panel. The tool detects the character's body structure and places a skeleton automatically. For a standard humanoid, this includes the spine, neck, head, clavicles, upper arms, forearms, hands, hips, thighs, calves, and feet. Once the skeleton is placed, the tool binds the mesh and applies skin weights.
The auto-rig workflow in Tripo Studio follows five stages:
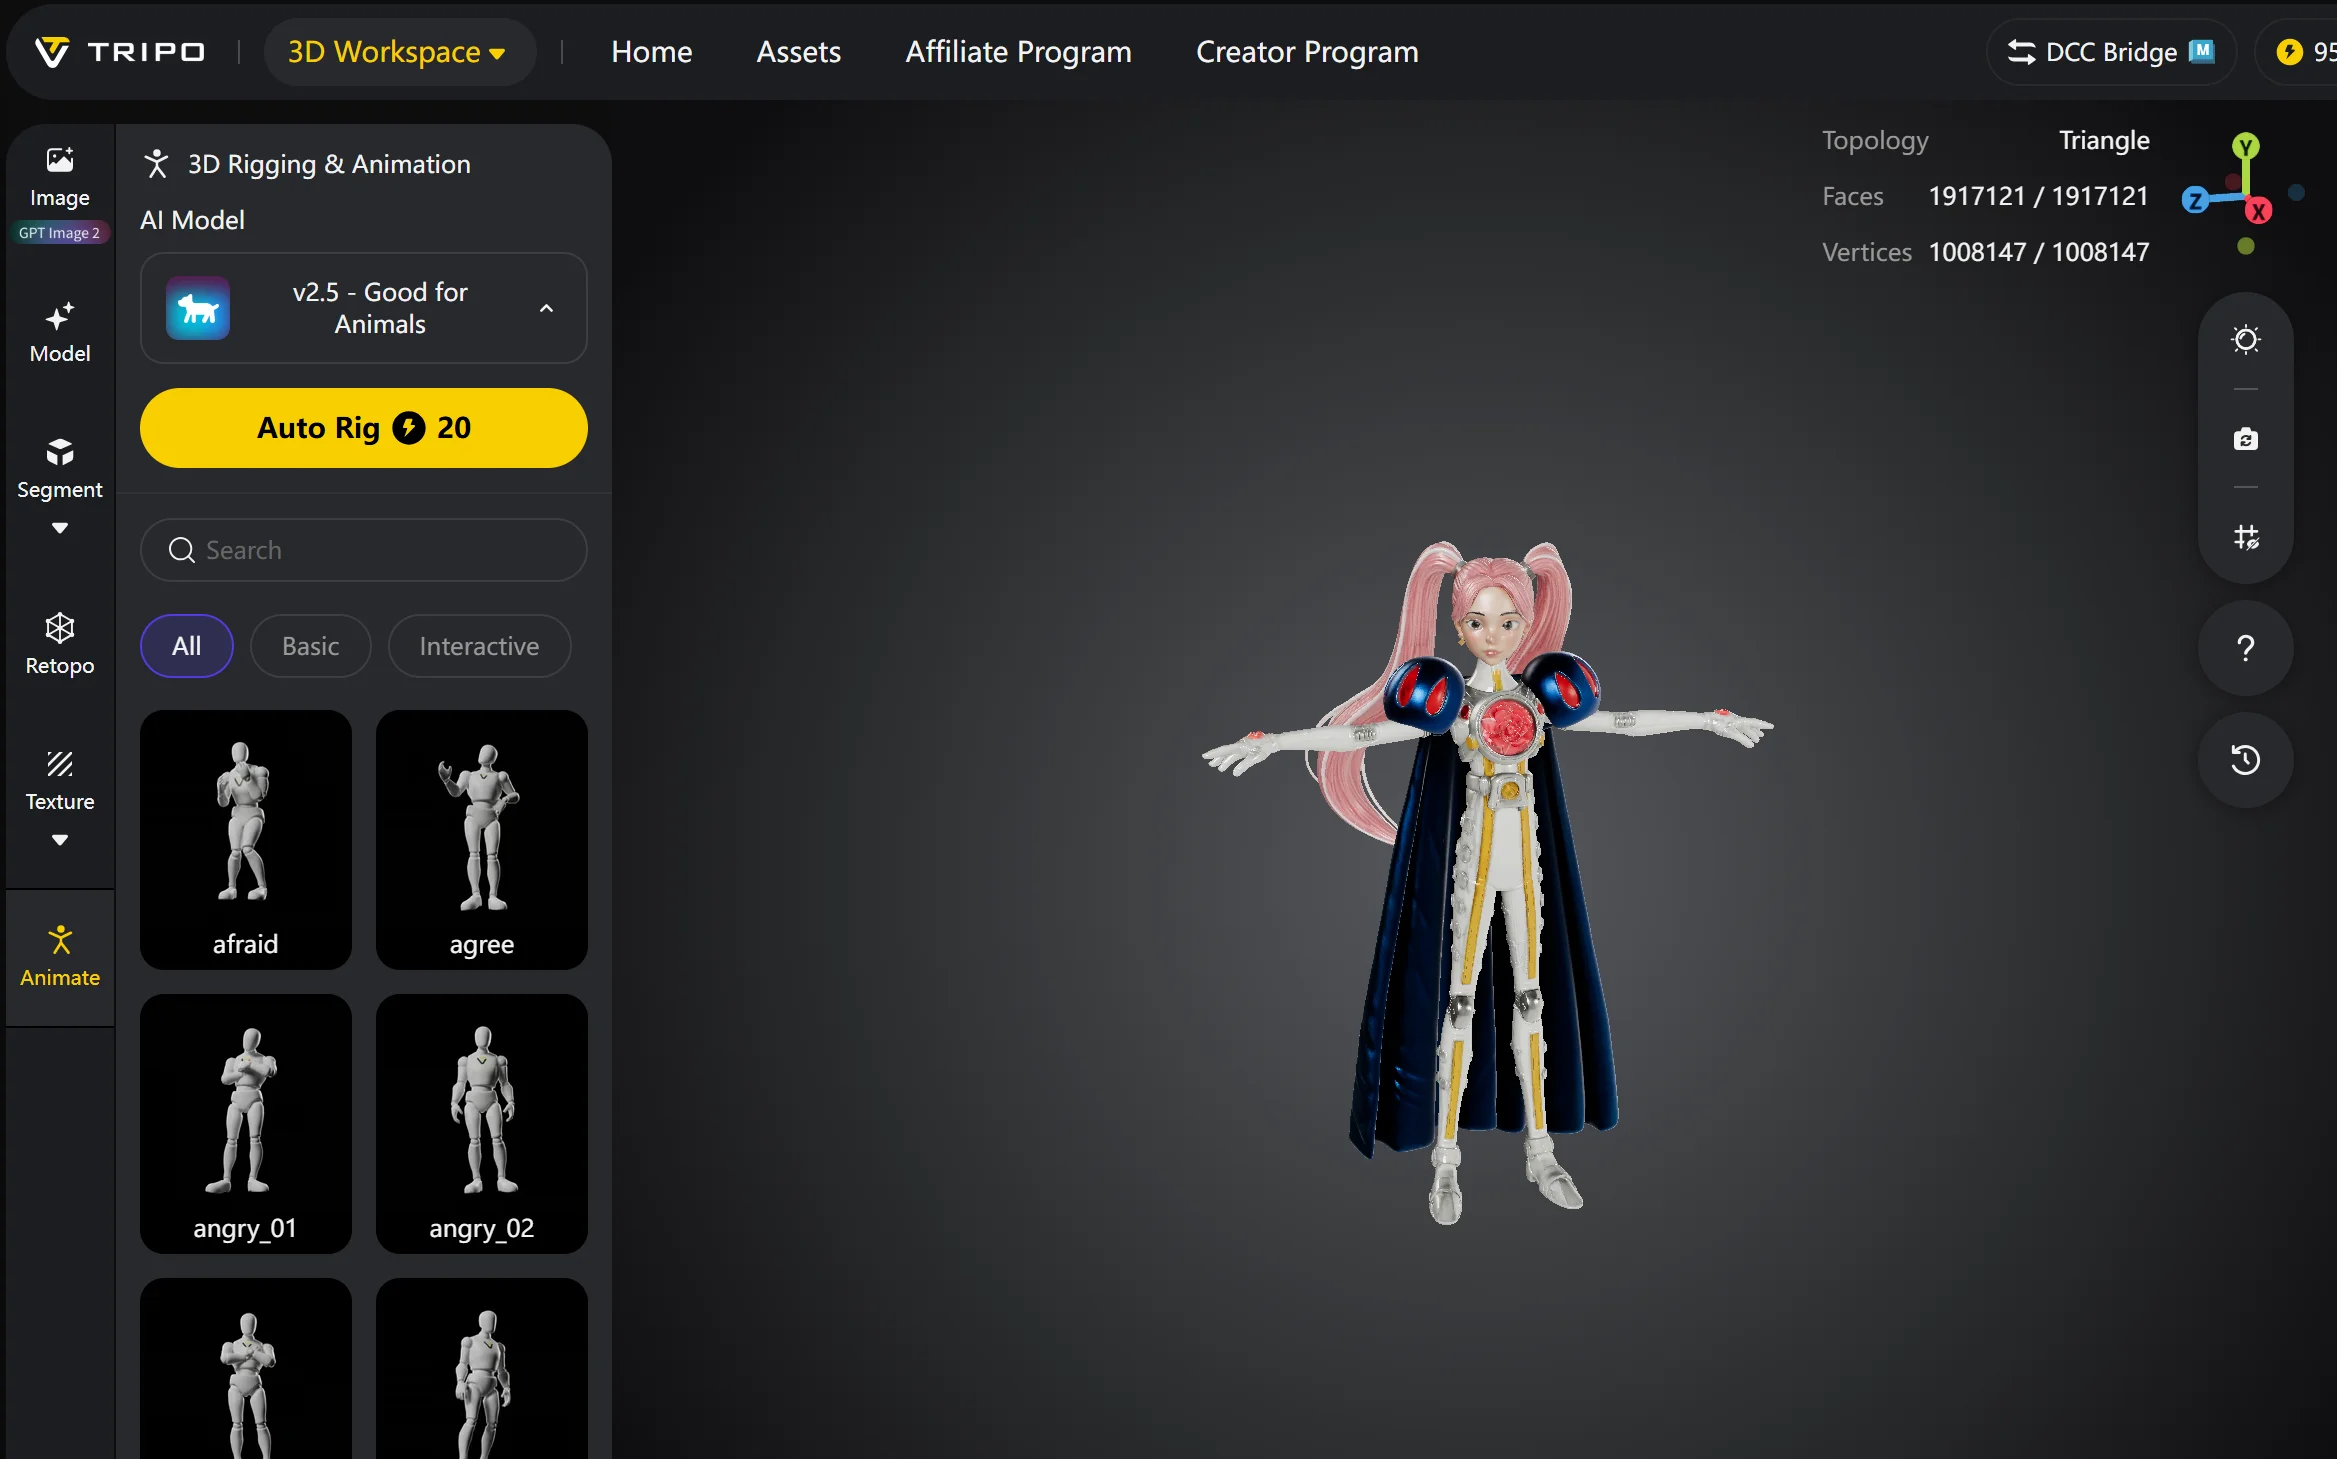
- Get the model — import or generate a 3D character. The model should be a clean mesh in a neutral pose.
- Open the Animate panel — select the character and switch to the Animate view.
- Run auto-rig — the tool detects body joints, places a skeleton, and applies skin weights automatically.
- Preview the animation — test the rig by applying a sample animation clip. Check bending at elbows, knees, shoulders, and hips.
- Export — download the rigged model as FBX or GLB, ready for Blender, Unity, Unreal Engine, Mixamo, or another animation workflow.
What automatic rigging actually does
Auto-rigging tools use shape analysis and machine learning to detect where joints should be. The tool looks at the overall silhouette, identifies limbs and segments, and estimates a skeleton structure that fits the mesh.
Skin weighting is computed automatically. The tool assigns influence values so each part of the mesh follows the nearest relevant bones. For most readable humanoid bodies, these weights are good enough for game characters, cinematic previews, indie projects, and prototypes.
You can also refine the rig after export. In Blender or Maya, you can adjust bone positions, repaint weights on problem areas, add custom bones for accessories or facial features, and layer in control handles for animation.
Auto-Rigging vs. Manual Rigging
Both approaches produce a working rig. The difference is speed, control, and the learning curve involved.
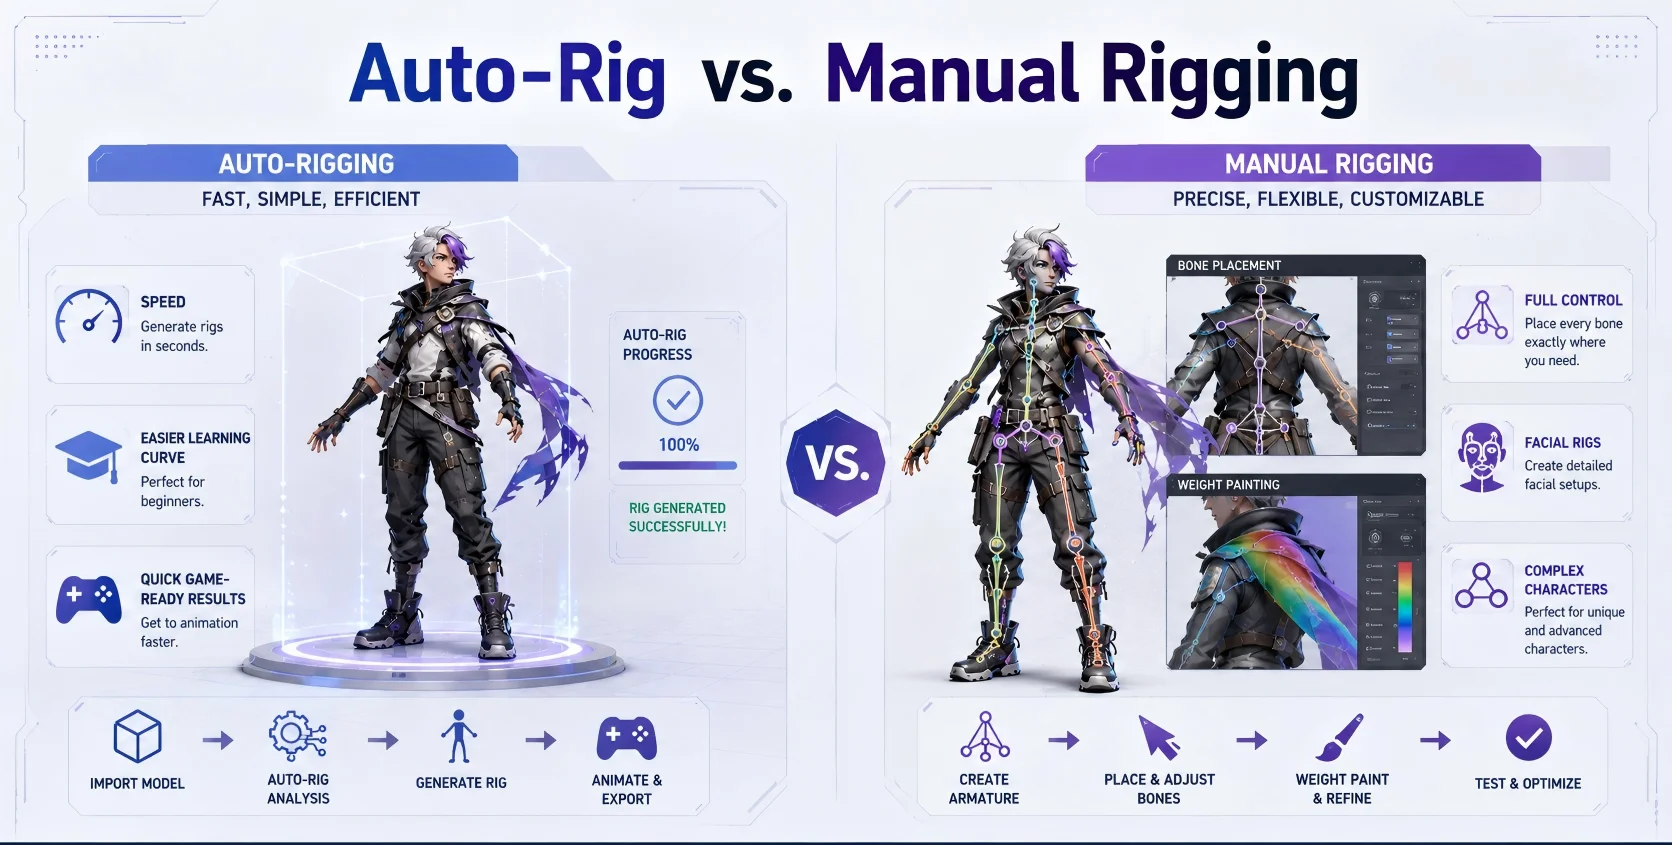
| Factor | Auto-Rigging | Manual Rigging |
|---|---|---|
| Speed | Fast; often minutes from mesh to rig | Slow; can take hours or days |
| Learning curve | Beginner-friendly | Requires rigging, skinning, and topology knowledge |
| Control | Good for standard or readable bodies | Highest control over bones, weights, and controls |
| Skin weights | AI-generated weights reduce manual painting | Artist paints and adjusts weights by hand |
| Best for | Prototypes, indie games, NPCs, quick tests, generated characters | Hero characters, cinematic rigs, complex creatures, facial rigs |
| Weak point | Can fail on messy meshes, hidden joints, or extreme poses | Time-consuming and harder to learn |
For AI-generated characters, auto-rigging is the practical starting point. Most generated models benefit from a fast rig you can test and refine, rather than spending hours on a manual setup before you even know if the character works in motion.
Manual rigging remains the better choice when you need a hero character, a production-ready facial rig, a complex creature with unusual anatomy, or a rig that must hold up across a full cinematic production. In those cases, the control that comes from hand-painting weights and placing each bone deliberately is worth the extra time.
Step 3 — Add Animation and Export
A rig without animation is just bones. Once the rig is ready, you can apply animations in several ways.
The simplest option is motion capture retargeting. Animation libraries like Mixamo, Rokoko, or the Unreal Engine animation store include thousands of ready-made clips. You upload the rigged character, map the bones, and the animation is applied to the skeleton. Walk cycles, run cycles, combat attacks, idle loops, and facial expressions are all available.
You can also animate directly in Blender or Maya using keyframes. Set the character's pose at key frames, and the software interpolates the motion between them. This gives you the most control over timing, spacing, and character expression.
For game characters, export animations as FBX or GLB alongside the rig. Most game engines (Unity, Unreal Engine, Godot) accept these formats and allow you to add animation controllers, blend trees, and state machines directly.
Exporting multiple animations
If you need more than one clip — for example, idle, walk, run, jump, and attack — you can bake each animation into the FBX on export. In Blender, use the NLA Editor to manage animation actions, then export with the "All Actions" option checked. In Unity, the imported FBX can be split into named clips in the Animation import settings.
For GLB export, the file can embed multiple animation clips using the glTF animation system. Three.js, Babylon.js, and most WebGL runtimes support multi-clip GLB playback, which is useful for interactive avatars and web-based character experiences.
Common Pitfalls and How to Fix Them
The skeleton is placed in the wrong position. This usually means the mesh has hidden joints, crossed limbs, or an unusual pose. Fix the mesh pose before rigging, or manually adjust the bone positions in the rigging tool after the auto-rig runs.
Skin weights look wrong — parts of the mesh deform incorrectly. The most common cause is a messy mesh near a joint. Extra geometry, overlapping faces, or smoothing errors confuse the weight solver. Clean the mesh in Blender or your modeling tool, then re-rig.
Fingers rig as a single blob instead of individual digits. Auto-rigging tools sometimes merge fingers if they are fused, too close together, or covered by a sleeve. Fix the hand in your modeling tool: separate the fingers, add spacing, and make each digit distinguishable.
The rig imports correctly but animation looks broken. Check bone axis orientation. FBX files from different tools use different bone axis conventions. In Blender, apply the correct "Armature FBX type" on export. In Unity and Unreal, check the rotation offsets in the import settings.
The character deforms correctly in T-pose but breaks in extreme poses. This usually means the skin weights need refinement around the shoulder, elbow, knee, or hip. Use Blender's weight paint mode to manually adjust problem areas. Shoulders and hips are the most common culprits.
When Auto-Rigging Won't Work
Auto-rigging produces good results for clear, upright, humanoid characters. It is less reliable in certain situations.
Unusual or non-humanoid anatomy. Very long necks, four legs, extra arms, wings attached at unusual positions, or tentacles are harder for auto-rig systems to interpret correctly. You may need to manually place bones for non-standard body parts.
Extreme or action poses. A character in a crouching, jumping, or fighting pose has hidden joints and crossed limbs. Auto-rigging works best on neutral or spread-limb poses. If your source model is in an action pose, you may need to retopologize into a T-pose first.
Very low-poly or stylized meshes. A model with very few polygons around the elbow or knee will not deform smoothly regardless of how accurate the skin weights are. You may need to add edge loops at major joints before rigging.
Accessories fused to the body. Capes, armor, long hair, and large weapons that are attached to the mesh instead of floating above it will deform with the body. Detach accessories and rig them separately if you want them to move independently.
Frequently Asked Questions
Can I rig an AI-generated character without knowing how to use Blender?
Yes. AI auto-rigging tools like the one in Tripo Studio handle skeleton placement and skin weighting automatically. You upload a 3D model, the tool rigs it, and you export a file ready to use in your animation software or game engine. No Blender experience is needed to get a working rig.
What file format should I use to export a rigged character?
FBX is the most widely supported format across game engines and animation tools. GLB (or glTF) is a better choice for web-based projects, Three.js, Babylon.js, and tools that support the open glTF standard. Both formats carry the skeleton, skin weights, and animations in a single file.
Does the AI-generated character need a T-pose before rigging?
A T-pose or A-pose gives auto-rigging tools the best chance of placing bones correctly. Limbs that are extended and separated are easier to detect than crossed arms, bent knees, or action poses. If your character is in a non-neutral pose, the rig may still work, but joint placement is less reliable.
Can I use Mixamo on an AI-generated character?
Yes. If your character has been rigged and exported as FBX or OBJ, you can upload it to Mixamo, auto-rig it there, and then apply animation clips from the Mixamo library. The result can be downloaded as FBX and imported into Blender, Unity, or Unreal Engine.
What is the difference between a skeleton and skin weights?
The skeleton is the hierarchy of bones placed inside or around the mesh. Skin weights are values that determine how much each bone influences each part of the mesh surface. Together they allow the mesh to move with the bones. A skeleton with poor skin weights produces unnatural deformation even if the bones are placed correctly.
How long does it take to rig an AI-generated 3D character with auto-rigging?
With a clean mesh in a neutral pose, auto-rigging typically takes one to five minutes from upload to export. That includes skeleton placement, skin weight computation, and export processing. Manual cleanup in Blender afterward depends on how much refinement you need, but most prototypes and game-ready characters can be ready in under an hour.
Conclusion
Rigging an AI-generated character follows the same core steps as rigging any character: choose your path, prepare the source art, add a skeleton, bind the mesh, test animation, and export. The main difference is that AI-generated art often needs extra preparation — fixing bad hands, cleaning fused geometry, or converting a flat image into a 3D mesh — before the rig can go in.
For 3D characters, AI auto-rigging removes most of the technical barrier. You do not need to understand bone hierarchies or weight painting to get a character moving. The tool reads the mesh, places the skeleton, and produces an export-ready rig. From there, you can refine, animate, and deploy to any workflow that accepts FBX or GLB.
The key is starting with a clean character. Fix the anatomy issues before you rig, aim for a readable neutral pose, and the rest of the process is straightforward.