How to Use AI 3D Models in Godot (Full Workflow)
TL;DR
- AI 3D tools generate standard meshes that Godot imports like other 3D assets.
- Use GLB when possible to keep geometry, PBR materials, textures, skeletons, and animations together.
- Copy the GLB into the project, then drag the imported scene from FileSystem into the 3D viewport.
- Check missing textures, scale, orientation, and collision needs before using the asset in gameplay.
- For real-time projects, start with Smart Mesh or another low-poly workflow instead of a 2M-polygon HD model.
- Rigged GLB or FBX files can carry skeletons and animation clips into Godot.
To use an AI 3D model in Godot, create it with an AI image-to-3D or text-to-3D tool, export it as GLB, copy it into your project, and drag the imported scene into the 3D viewport. The steps below cover generation, import, materials, optimization, and optional animation.
The AI-to-Godot Workflow at a Glance
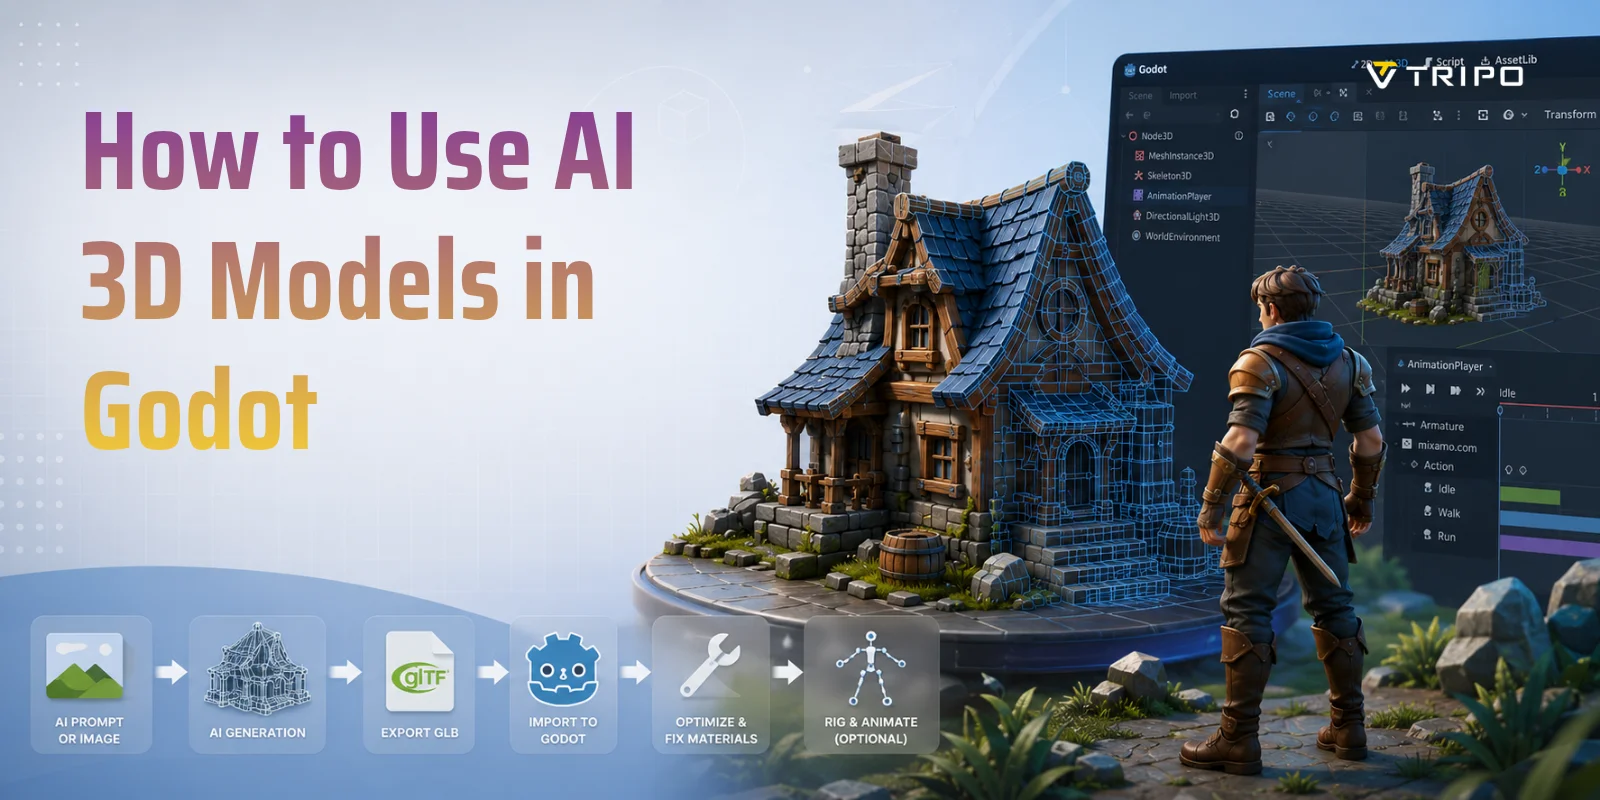
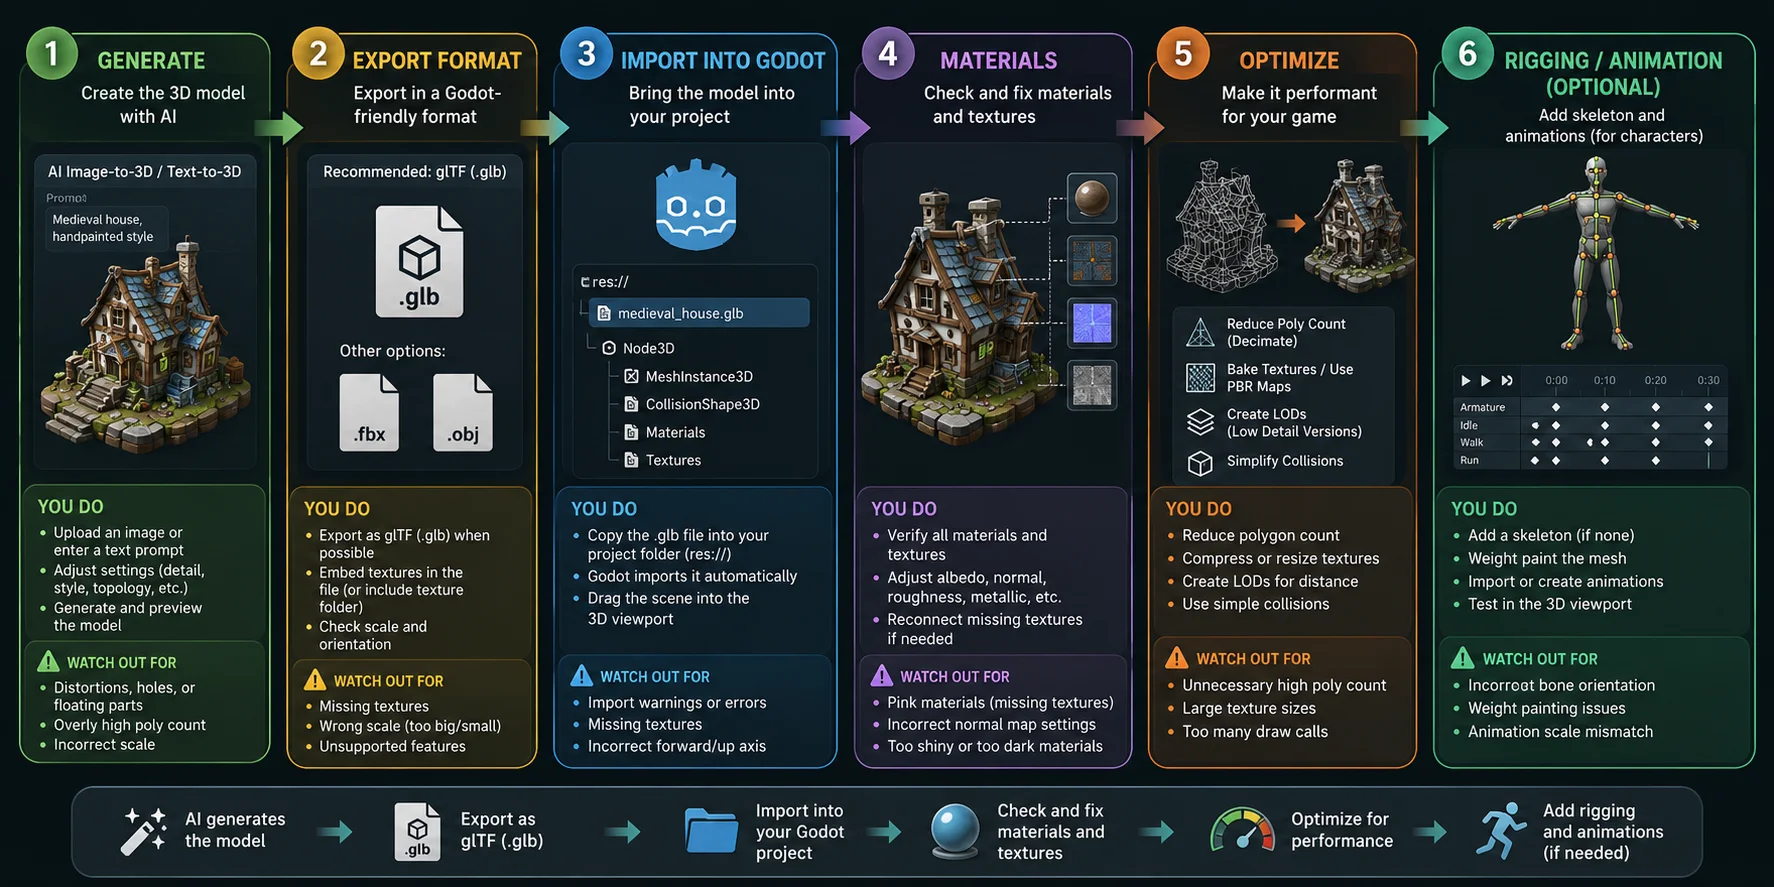
An AI-to-Godot workflow has six stages: generate the mesh, export it, import it, verify materials, optimize it for the target platform, and add rigging or animation when needed. Seeing the full pipeline first makes import problems easier to diagnose.
What "AI 3D Model" Actually Means Here
An AI 3D model is a standard mesh created by a generator rather than modeled by hand. Godot imports its GLB, FBX, or OBJ file like any other 3D asset; there is no separate AI file format.
The 6 Stages of the Pipeline
The pipeline can be summarized in six steps:
- Generate the model with an AI tool.
- Export it as glTF (.glb).
- Import the file into your Godot project.
- Check materials and textures.
- Optimize the mesh and texture sizes for better performance.
- Add rigging and animations if the model is a character.
AI-to-Godot 3D Asset Workflow
Step 1 — Generate Your AI 3D Model
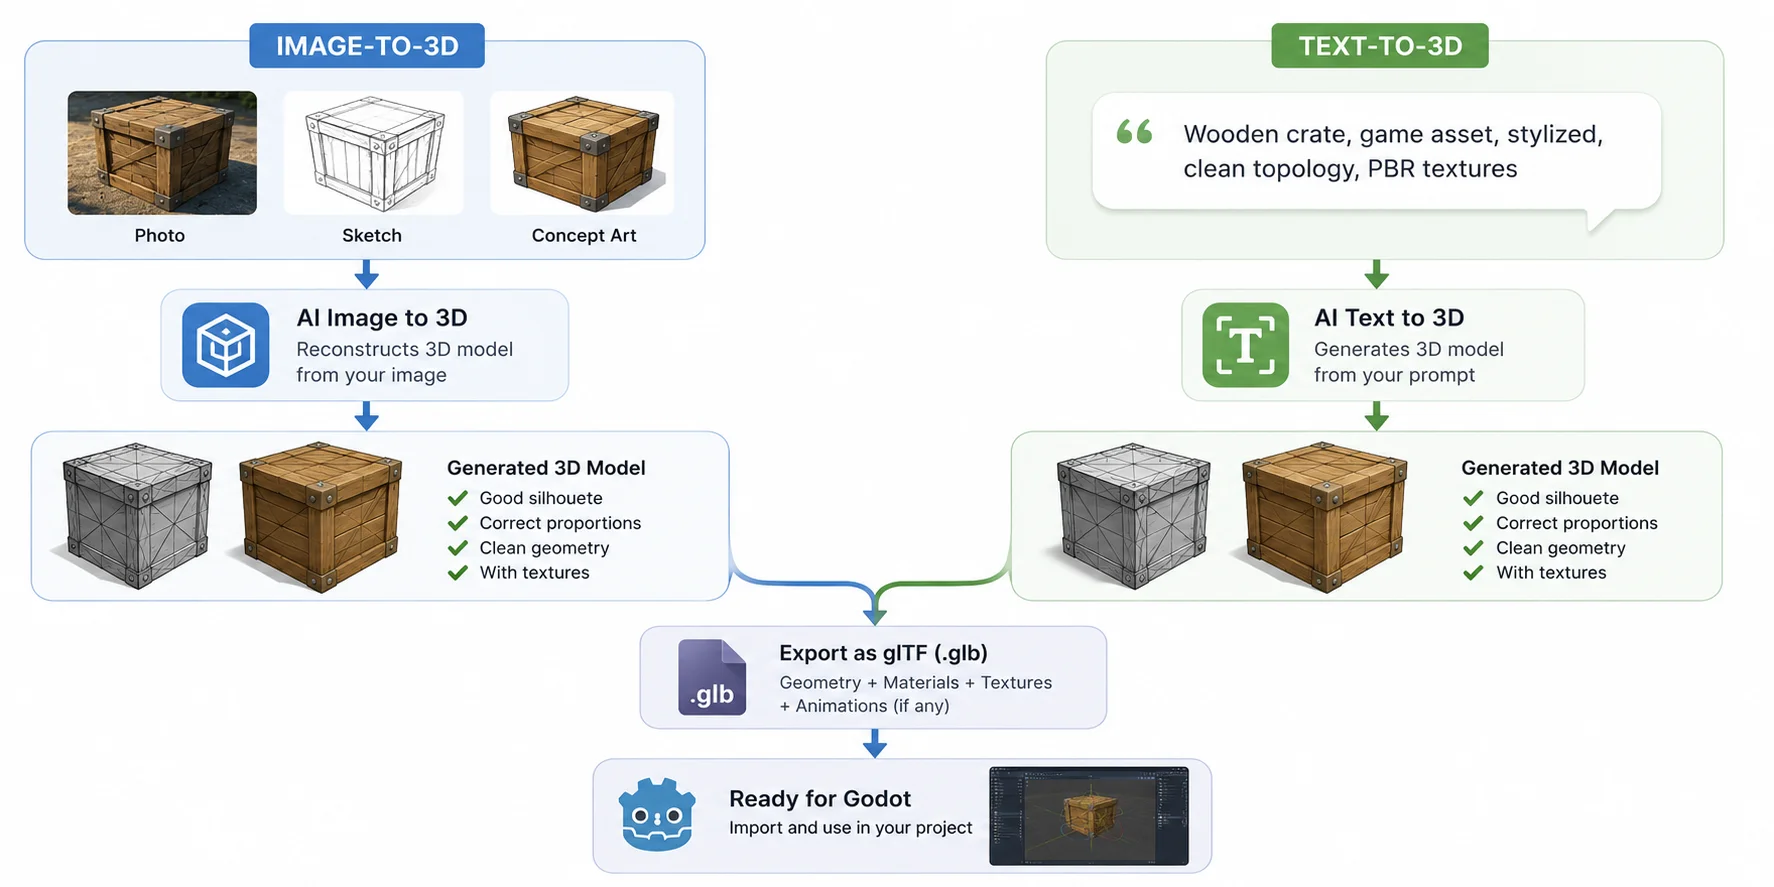
Start with image-to-3D when you have a photo, sketch, or concept image, and use text-to-3D when you want to explore an idea from a prompt. A clean reference with a readable silhouette, limited occlusion, and neutral lighting usually gives the generator clearer shape information. For a game asset, judge the result by its silhouette, proportions, topology, and textures rather than the preview alone. Keep the original input and generation settings so you can compare retries instead of guessing which change improved the result.
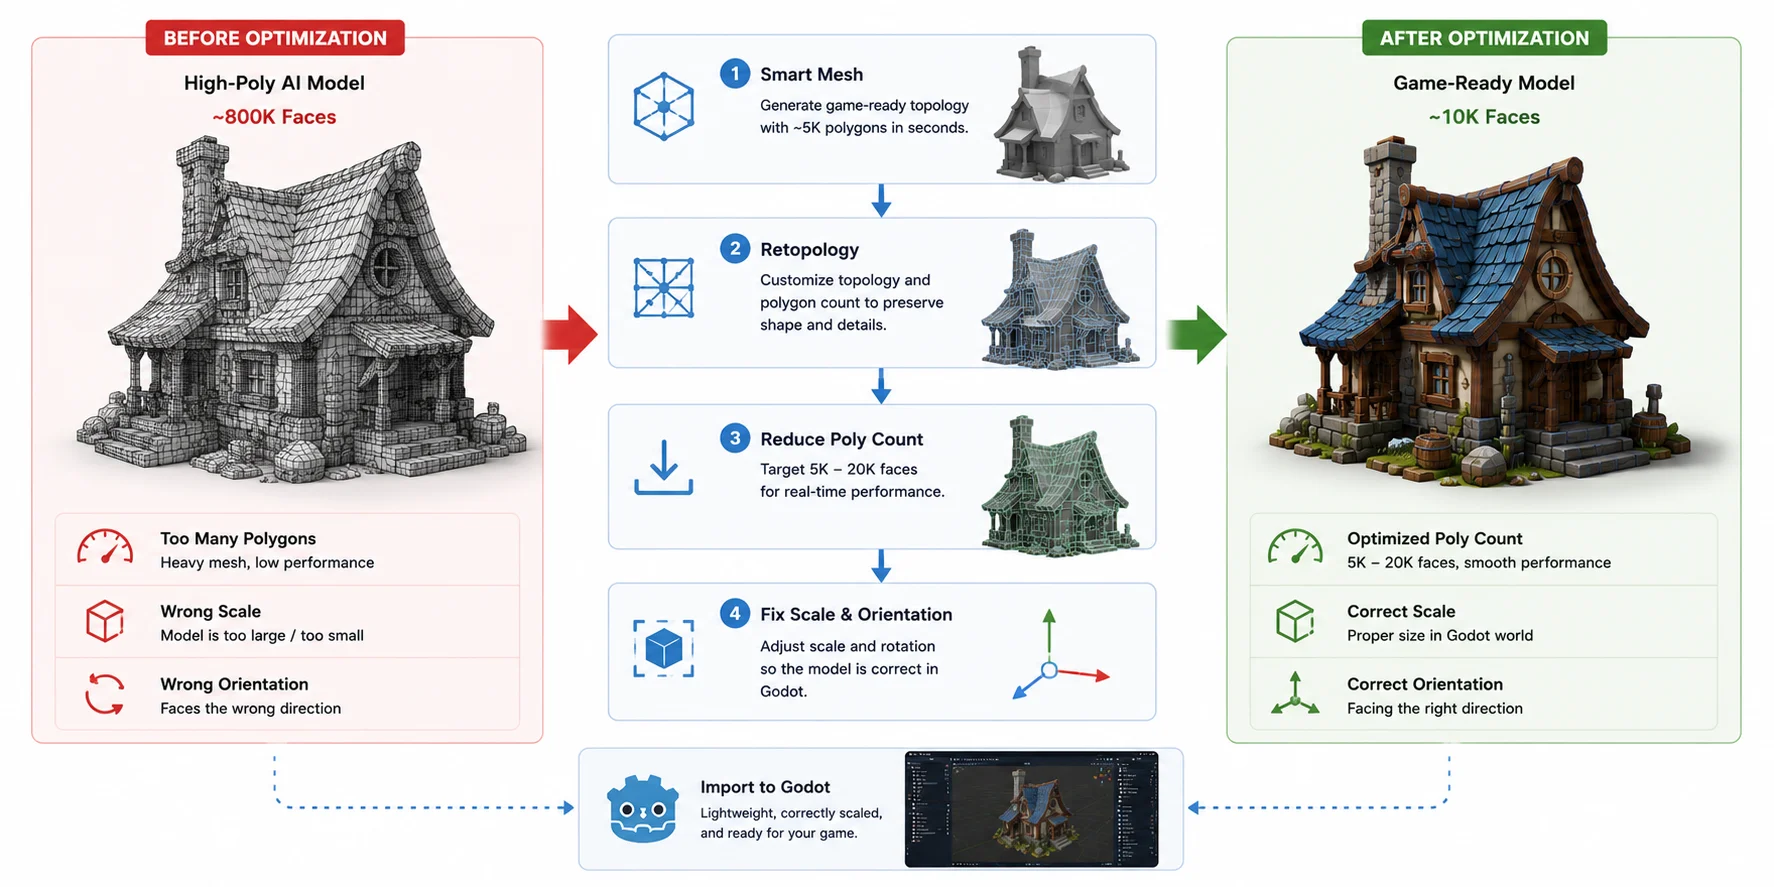
Choose a game-ready or low-poly mode whenever possible. High-detail generation can produce hundreds of thousands or millions of polygons, which is usually unnecessary for real-time scenes and creates more optimization work later.
Rotate the model and check for stretched parts, holes, extra geometry, and incorrect proportions. If the overall shape is wrong, regenerating is often faster than repairing it manually.
Confirm that the export includes textures when they are required. For Tripo assets, Smart Mesh provides cleaner real-time topology; export the finished asset as GLB to keep its mesh and PBR data together.
Image-to-3D vs. Text-to-3D Workflow
Step 2 — Export in the Right Format (glTF / GLB)
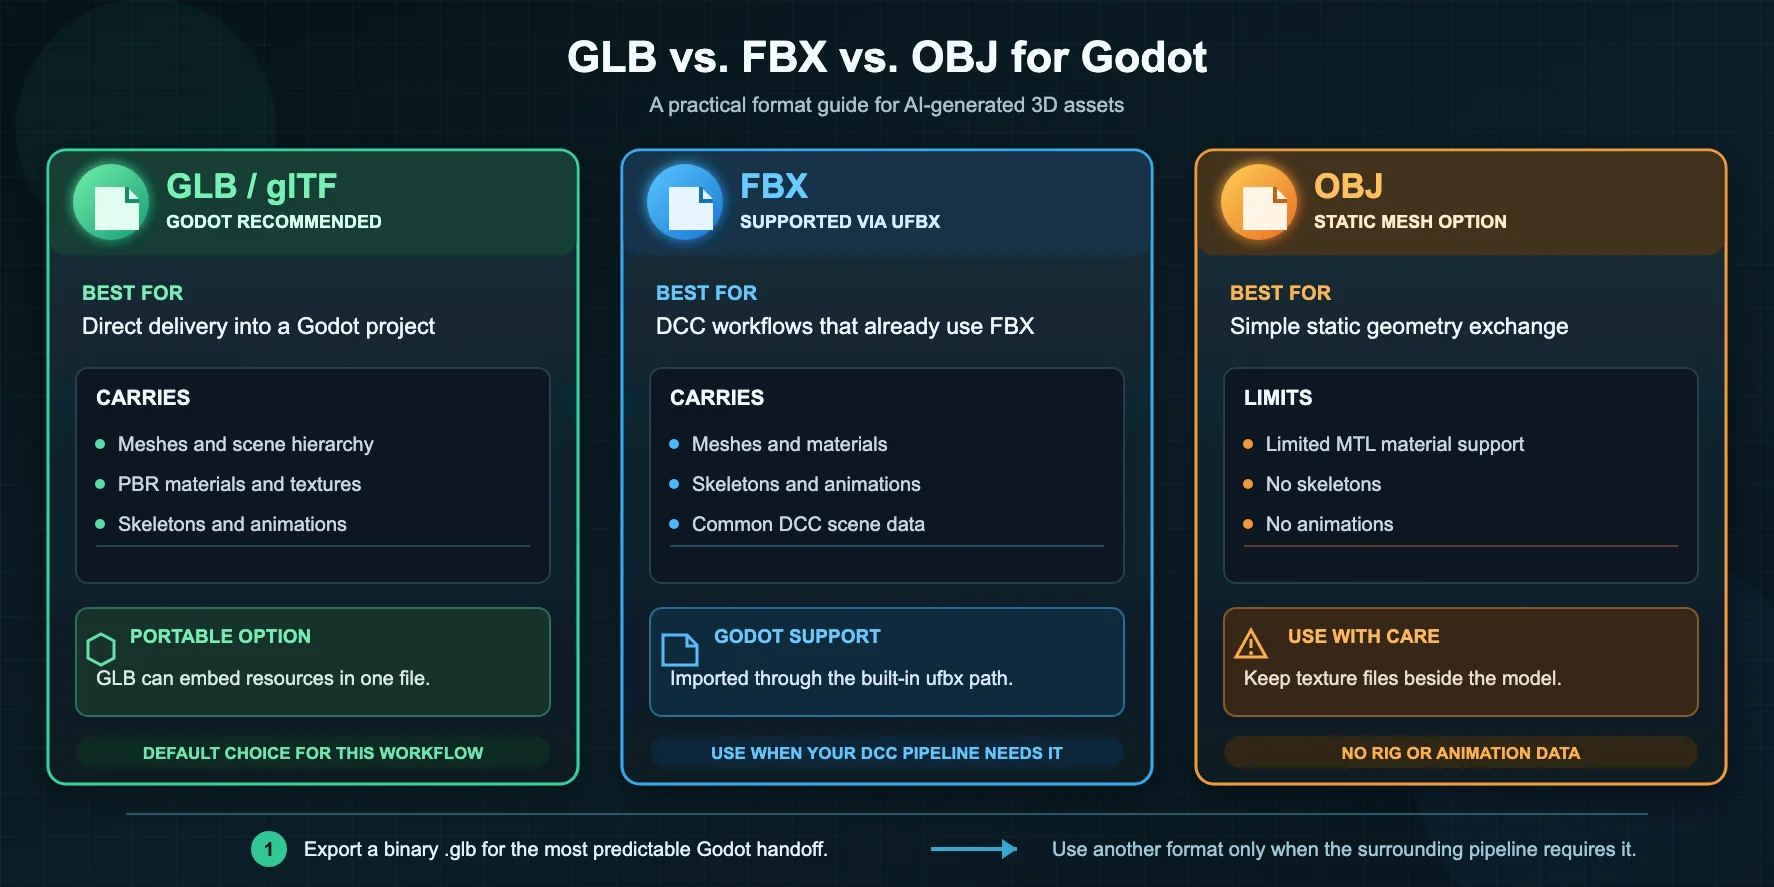
For most Godot projects, GLB is the simplest delivery format because one file can contain the mesh, materials, textures, skeleton, and animations. It also avoids managing separate texture files during import.
Why glTF/GLB Is Godot's Recommended Format
Godot recommends glTF 2.0 for 3D scenes and supports both .gltf and binary .glb files. Use GLB when you want a compact, portable asset with embedded resources.
Tripo exports GLB, USD, FBX, OBJ, STL, and 3MF. GLB is the best fit here; STL and 3MF target 3D-printing workflows, while FBX and OBJ are useful when another DCC step is required.
glTF vs. FBX vs. OBJ for Godot
| Format | Best For | Godot Support | Notes |
|---|---|---|---|
| GLB / glTF | Games, animation, PBR assets | Native (recommended) | Single file with mesh, materials, textures, skeleton, and animations. |
| FBX | DCC workflows (Blender, Maya, Unity) | Supported via ufbx | Useful for DCC workflows; glTF remains Godot's recommended interchange format. |
| OBJ | Static meshes | Limited | Geometry plus limited MTL materials; no skeletons or animations. |
Choose GLB by default, then use FBX or OBJ only when a specific editing pipeline requires them.
GLB vs. FBX vs. OBJ for Godot
Step 3 — Import the Model into Godot
After exporting the asset, import it manually through the FileSystem dock or send it from Tripo Studio with the Godot Bridge.
The Drag-and-Drop Method
Copy or drag the .glb file into the project folder. Godot imports it automatically; when processing finishes, drag the generated scene from the FileSystem dock into the 3D viewport or Scene tree. Keep the imported file as the source asset and make project-specific changes through inherited scenes, external resources, or import settings so a later reimport does not overwrite your work.
Using the Tripo Godot Bridge (One-Click)
The official Tripo Godot Bridge sends generated models from Tripo Studio directly into an open Godot project. Install and enable the plugin in a supported Godot version, keep its Bridge service running, then use the DCC Bridge export flow in the browser. Check the current Bridge documentation for supported engine and browser versions before configuring a production workflow.
The Bridge uses a Center Bottom pivot, creates materials, and places the asset automatically. Transfers occur while Godot is in Editor mode; confirm current browser and operating-system support in the Bridge documentation before rollout.
Key Import Settings
Select the imported scene and review these settings in the Import dock or Advanced Import Settings:
- Root Type and Root Scale – Choose the root node and set a consistent scene scale.
- Collision – Add collision through Advanced Import Settings, import suffixes, or a separate collision-generation step; it is not a universal one-click Import option.
- External materials – In Advanced Import Settings, use Actions → Extract Materials when you need editable material resources.
Reimport after changing settings, then test the asset under the project's lighting and physics setup. For a reusable prop, confirm the origin, scale, collision shape, material overrides, and any generated LODs before placing many instances in the level.
Importing AI 3D Models into Godot
Step 4 — Fix Materials & Textures
GLB assets commonly use glTF 2.0 PBR materials, so their textures often import without extra setup. Inspect the result under representative scene lighting before editing anything.
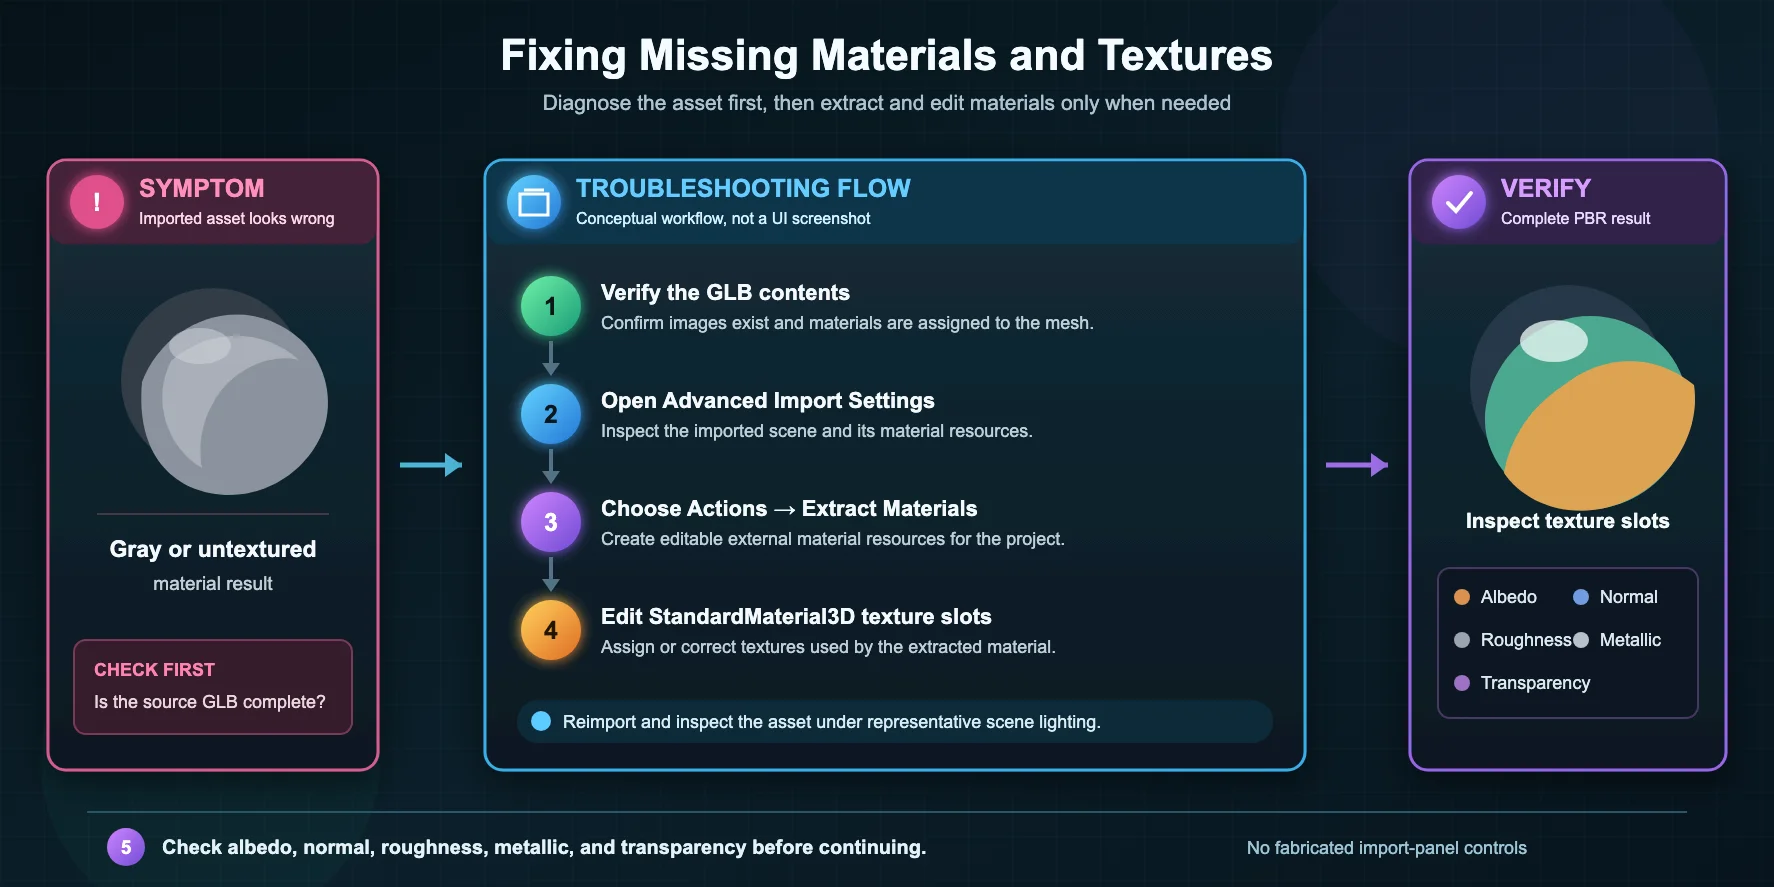
If an asset is gray or untextured, first confirm that the GLB contains the expected images and material assignments. To edit imported materials, open Advanced Import Settings and use Actions → Extract Materials. You can then adjust the resulting StandardMaterial3D resources or assign albedo, normal, roughness, and metallic textures manually. Also check whether transparency, normal-map orientation, or an unsupported glTF extension is causing the apparent material error instead of a missing image.
Godot offers two main material types for most projects:
| Material Type | Best For | Notes |
|---|---|---|
| StandardMaterial3D | Everyday game assets | Uses the built-in PBR workflow. Easy to assign albedo, normal, metallic, and roughness textures. |
| ShaderMaterial | Custom visual effects | Uses custom shaders for effects such as dissolves, outlines, animated UVs, or stylized rendering. |
StandardMaterial3D covers most props and environments; use ShaderMaterial only for custom rendering effects.
Rotate the model under scene lighting and verify texture alignment, normal-map direction, reflections, and transparency before continuing.
Fixing Missing Textures in Godot
Step 5 — Optimize for Real-Time (Poly Count & Scale)
AI meshes are not automatically game-ready. Optimize them for the target platform, camera distance, number of instances, material count, and animation needs; critical characters may still require manual retopology, skinning, collision, and art-direction work. Test representative scenes rather than judging one model in an empty viewport, because draw calls, texture memory, overdraw, and repeated skeletons may become the real bottleneck before raw polygon count does.
Why AI Models Are Often Too Heavy
Dense generation can spend polygons on flat surfaces and details that are invisible in gameplay. That cost grows quickly when the scene contains many copies of the asset.
Reduce Poly Count
Start with Smart Mesh or another low-poly workflow, then use Tripo Retopology to choose a budget that fits the target platform. Existing dense meshes can also be simplified with a retopology tool or Blender's Decimate modifier.
A range such as 5K–20K polygons is a useful starting point for many props, not a universal rule. Profile the asset on the target hardware and adjust for screen size, instance count, materials, and rig complexity.
Fix Scale & Orientation
Check scale and orientation after import. Correct them with the scene's import scale or node Transform, then test collisions and animations at the final scale.
From High-Poly to Game-Ready
Step 6 — Rig & Animate AI Characters (Optional)
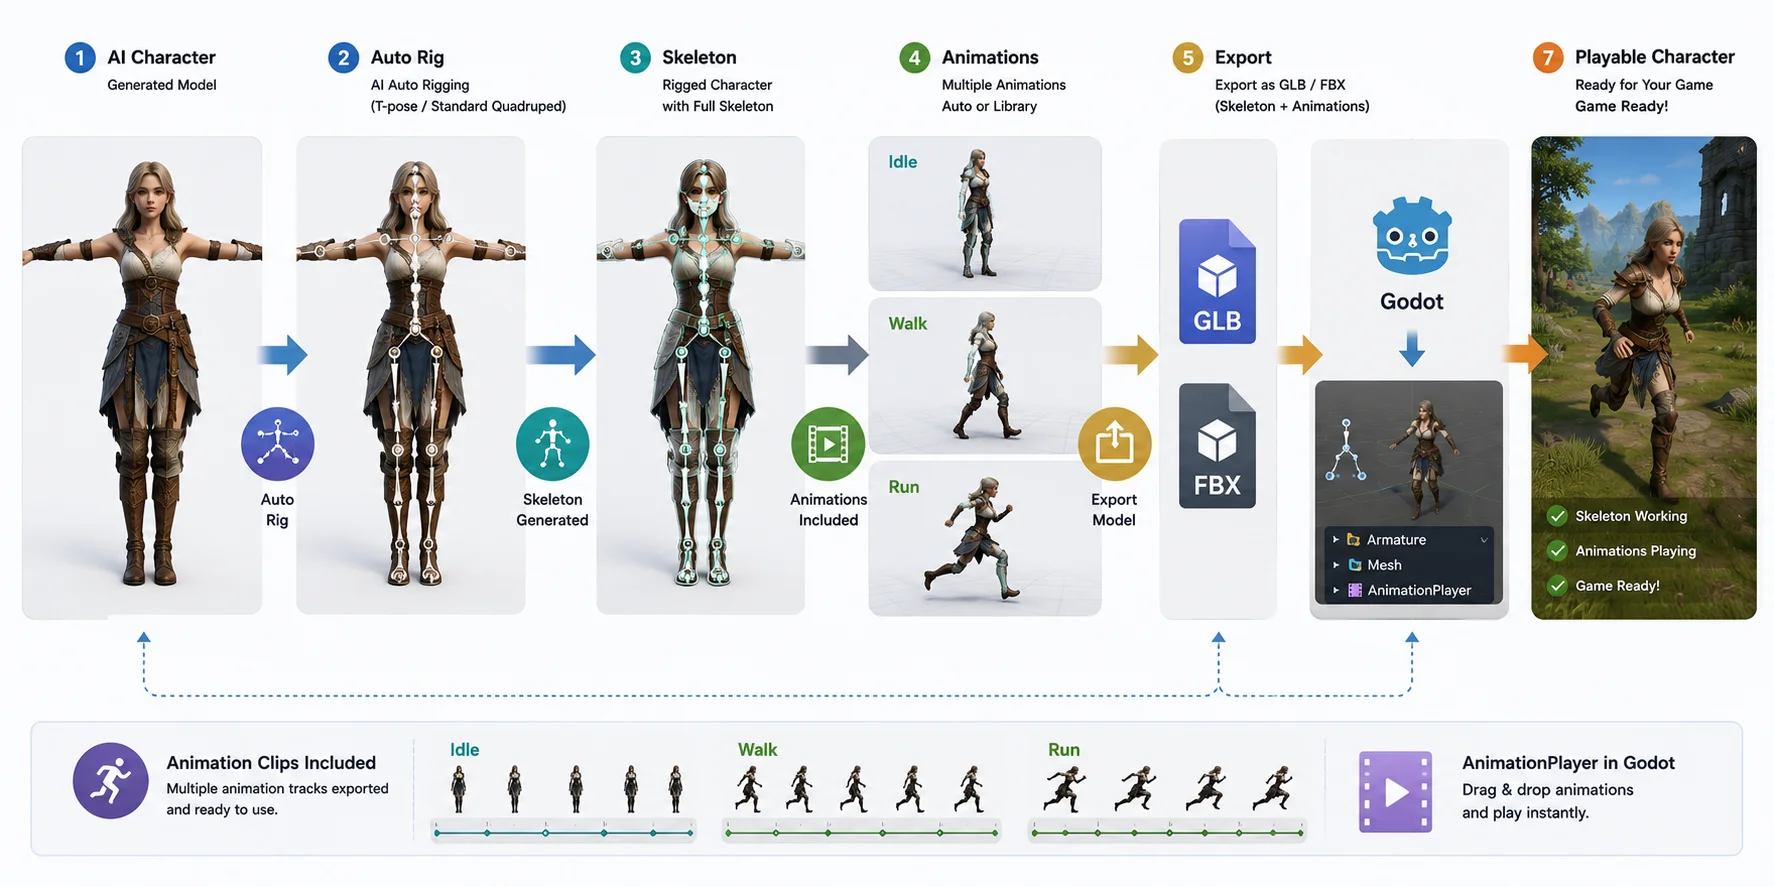
A character needs a skeleton and skin weights before it can use animation clips. Static props and environment assets can skip this stage.
Tripo Auto Rig supports T-pose humanoids and standard standing quadrupeds. After rigging, export GLB or FBX with animations enabled; non-standard poses, abstract forms, and unusual creatures may need manual rigging. Check shoulders, hips, paws, and facial areas through the full motion range, since a successful skeleton generation does not guarantee production-ready deformation.
You can also upload an existing GLB or OBJ file for Auto Rig. Check the current upload limits and supported inputs before preparing a large source file, then inspect bone placement and deformation before relying on the result in gameplay.
Imported clips are exposed through the scene's animation resources and AnimationPlayer workflow. Preview idle, walk, and run clips, then connect them to an AnimationTree, controller, or state machine.
From AI Character to Playable Character
Common Problems & How to Fix Them
When an import looks wrong, isolate the file, material, transform, and geometry issues in that order.
Textures Are Missing or the Model Is Grey
Confirm that textures are embedded or located beside the source file. If you need to edit the imported materials, open Advanced Import Settings and choose Actions → Extract Materials, then inspect the generated StandardMaterial3D resources and texture slots.
The Model Is Huge or Tiny
Different tools may export different unit scales. Adjust Root Scale in the Import dock or the instance's Transform → Scale, then verify physics and animation at that scale. A Center Bottom pivot is a Tripo Bridge default, not a guarantee for every AI asset.
The Model Faces the Wrong Way
Rotate the instance with Transform → Rotation. For reusable assets, correct the source orientation before export so every instance starts consistently.
Import Failed or the Mesh Looks Broken
Re-export as GLB and check the Godot import error before regenerating the asset. If the file opens in another glTF viewer but fails in Godot, test a clean export without unsupported extensions; if the geometry is broken everywhere, return to the generator or DCC tool. A minimal test project can separate an asset problem from a project plugin, renderer, or import-cache issue.
Frequently Asked Questions
How do I use AI on Godot?
Generate a mesh with an AI 3D tool and export it as GLB. Copy the file into the Godot project and wait for the FileSystem dock to finish importing it. Drag the imported scene into the 3D viewport, then verify materials, scale, collision, and performance before using it in gameplay. Keep a small test scene for this check so lighting, camera distance, and physics settings stay consistent across assets.
How can I use AI to create 3D models?
Use image-to-3D when you have a visual reference, or text-to-3D when you are exploring a prompt. Inspect the silhouette, geometry, topology, and textures before export. For Godot, choose a game-ready mesh and export it as GLB when possible.
How do AI-generated 3D models work?
AI generators infer geometry and appearance from text or reference images, then export a standard mesh with materials and textures. The result is not a special AI format, so it can be edited in a DCC tool or imported into Godot. Production use still requires checking topology, scale, materials, and deformation.
Can ChatGPT do 3D modeling?
For this workflow, use a dedicated 3D generation tool to produce the actual mesh. A general-purpose assistant can still help write prompts, generate scripts, explain Godot settings, and troubleshoot errors. Always inspect the exported asset in a 3D tool or engine before using it.
What file format should AI 3D models use for Godot?
Use glTF 2.0, preferably a binary .glb file, for most Godot projects. GLB can package geometry, PBR materials, textures, skeletons, and animations in one file. FBX is supported through ufbx, but glTF remains Godot's recommended interchange format.
How do I reduce the poly count of an AI 3D model for Godot?
Choose Smart Mesh or another low-poly mode at generation time when possible. For an existing dense asset, use retopology, mesh decimation, or Blender's Decimate modifier, then inspect the silhouette and UVs. Treat 5K–20K polygons as a starting range and profile the final asset on the target hardware.
Conclusion
The practical path is simple: generate the asset, export GLB, import it, verify materials and transforms, optimize it for the target hardware, and add rigging only when the asset needs animation.
Start with a game-ready model in Tripo AI Studio, then test the exported GLB in a small Godot scene before building it into the full project.