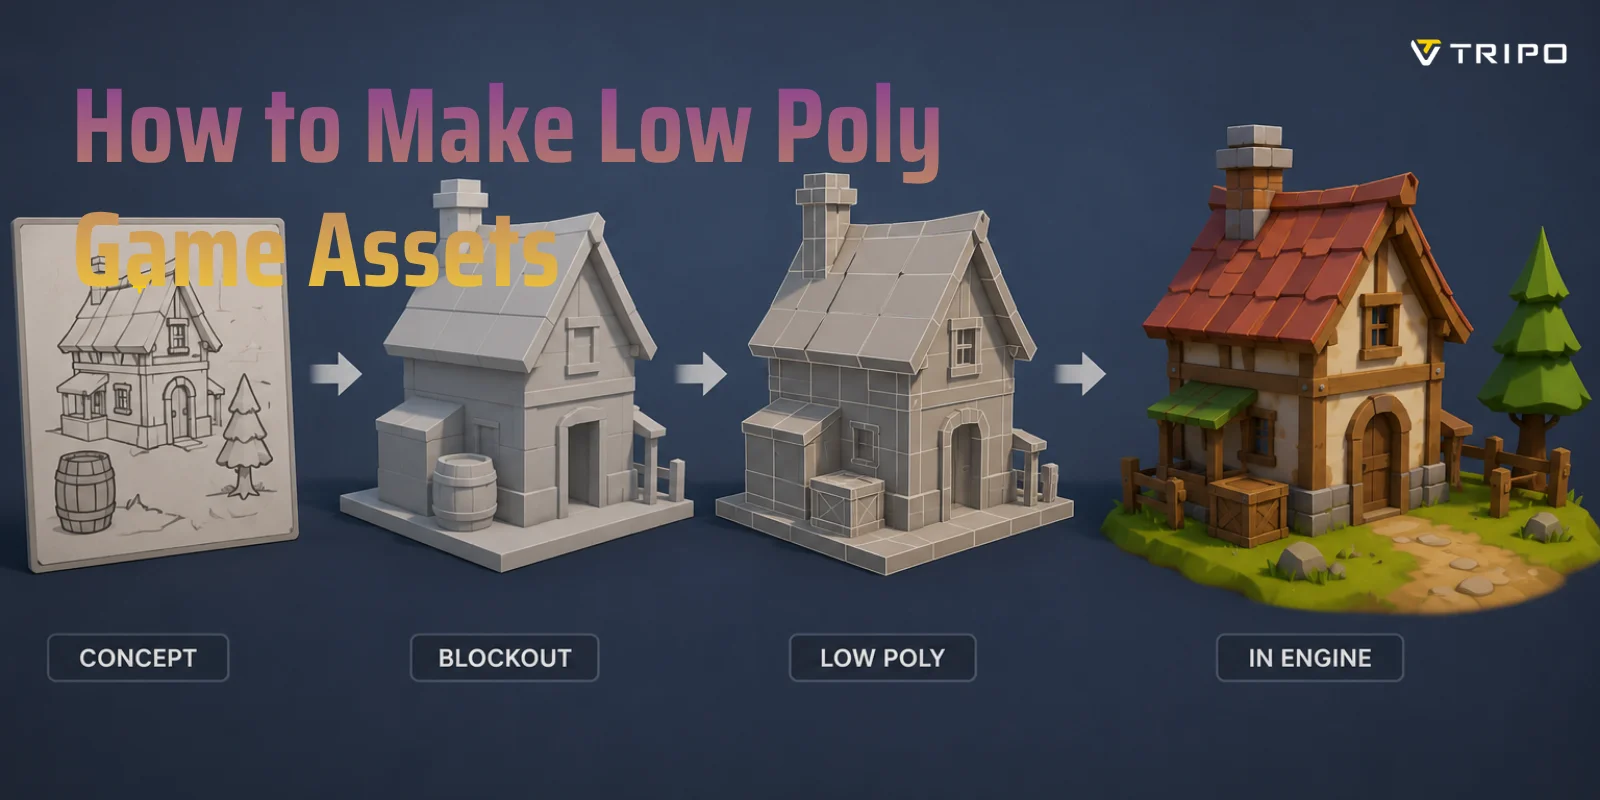
How to Make Low Poly Game Assets (Step-by-Step + AI Workflow)
TL;DR
- Low poly = stylized 3D built with the fewest polygons that still reads clearly—great for indie and mobile games.
- Core manual workflow: reference → block out → optimize topology → UV unwrap → flat/palette texture → export.
- Set a poly budget up front: simple props ~300–1.5K tris, hero props ~2–5K, stylized characters ~3–10K, mobile even lower.
- The fastest route now: generate a base mesh with AI, then auto-retopo to a clean, game-ready low poly mesh.
- Always finish the job—export FBX/GLB into Unity or Unreal and test in-engine, don't stop at the model.
To make low poly game assets: pick a reference, block out the basic shapes, keep the polygon count low with clean topology, UV unwrap and texture with flat colors or a palette, then export to your game engine. You can model by hand in Blender, or speed things up by generating a base mesh with an AI image-to-3D tool and auto-retopologizing it into a game-ready low poly mesh.
What Are Low Poly Game Assets?
Low poly game assets are stylized 3D models built with a relatively small number of polygons. Rather than aiming for photorealism, they use simplified geometry, flat shading, and clear silhouettes to create objects that are easy to recognize and visually appealing. This distinctive look has become a popular art style in its own right and is widely used in indie games, mobile games, VR projects, and stylized open-world environments.
Importantly, low poly design is not just about saving time or reducing hardware requirements. It is a deliberate artistic choice. Many developers prefer low poly aesthetics because simple forms and limited details create a clean, cohesive visual language. Strong silhouettes make objects readable from a distance, while flat colors or small color palettes help maintain a consistent style across an entire game. This combination of visual clarity and efficiency is one of the reasons low poly 3D modeling for games remains popular even as modern hardware becomes more powerful.
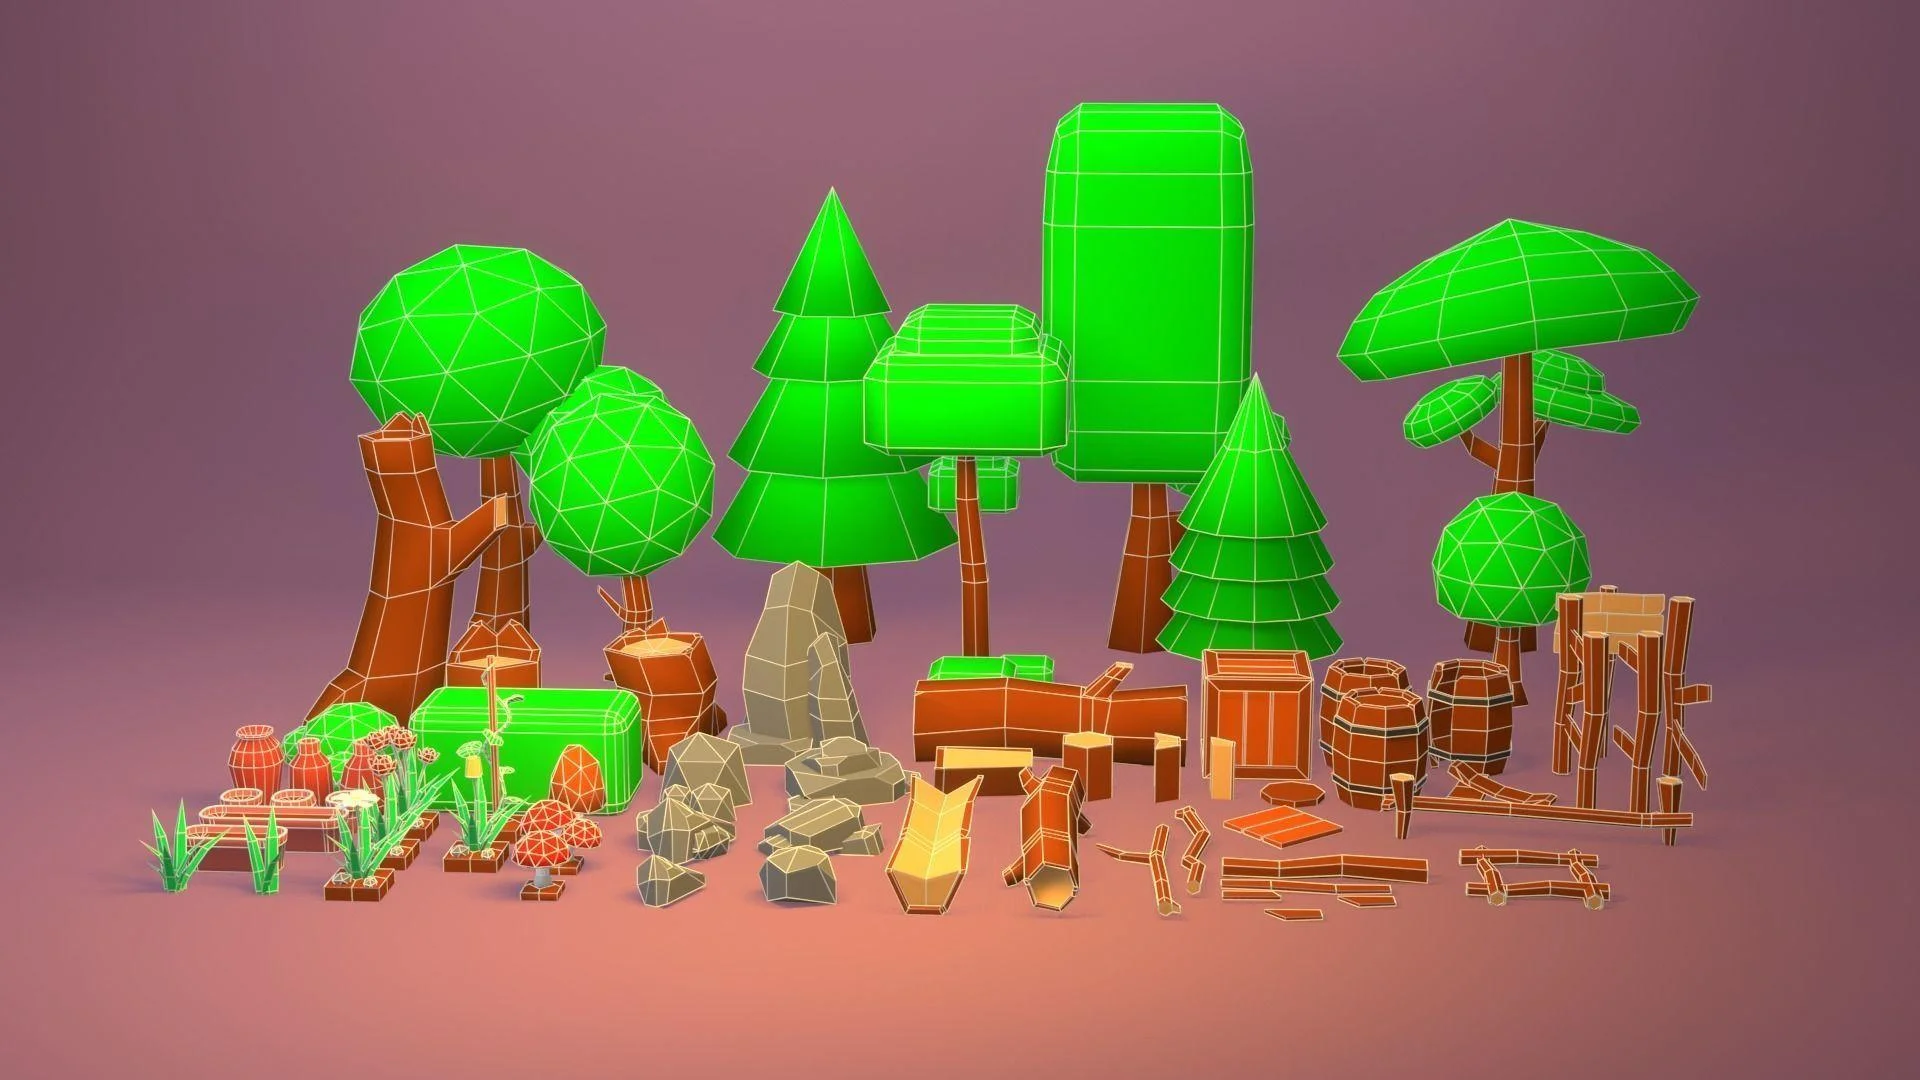
Game assets are usually divided into three categories. Low poly props are individual objects that populate a world, such as barrels, rocks, trees, furniture, weapons, signs, or treasure chests. They are often modular and reused throughout a level. Character assets are more complex because they need proper topology and proportions for animation and rigging. Environment assets, meanwhile, include larger pieces like buildings, cliffs, roads, terrain elements, and architectural structures that define the overall scene.
Although these categories serve different purposes, successful low poly assets share several characteristics. They keep polygon counts relatively low, use clean topology, avoid unnecessary details, and rely on strong silhouettes to communicate shape. Whether you create them manually in Blender or use AI-assisted tools as part of a modern workflow, these principles remain the foundation of effective low poly game asset creation.
Why Make Low Poly Assets for Your Game?
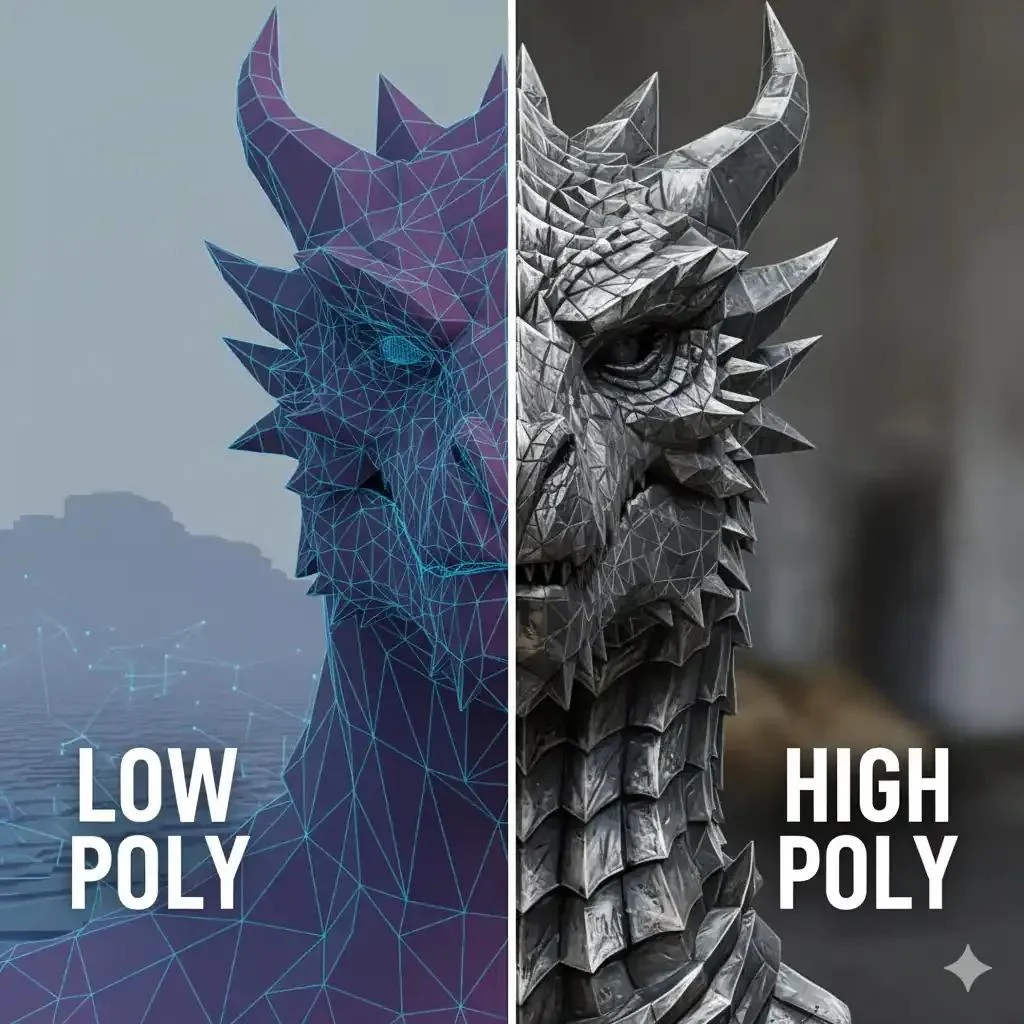
Low Poly vs High Poly
Low poly assets remain one of the most practical choices for game developers, especially solo creators and small indie teams. Besides being visually appealing, they offer major advantages in performance, production speed, and artistic consistency.
Performance & Smaller File Sizes
Because low poly models use fewer vertices and simpler textures, they require less memory and processing power than highly detailed assets. Smaller file sizes mean faster loading times and better performance across platforms, including mobile devices, VR headsets, and lower-end PCs. Lightweight assets also make it easier to populate large scenes without overwhelming the game engine.
Faster Production (Perfect for Solo and Indie Developers)
Creating realistic assets can take days or even weeks, but low poly models are much quicker to build. A simple prop like a barrel, tree, crate, or sword can often be completed in a single session. This makes low poly workflows ideal for solo developers who need to create dozens—or even hundreds—of assets without a dedicated art team.
For many indie creators, speed matters more than absolute realism. Simple geometry, reusable textures, and modular designs allow one person to build an entire environment alone. Combined with modern AI tools and auto-retopology, creating easy low poly assets for solo indie developers has become faster than ever.
A Distinctive, Timeless Art Style
Low poly visuals have remained popular for decades because they prioritize shape and color over tiny details. Games with stylized low poly graphics often age better than hyper-realistic titles whose visuals can quickly become outdated. From cozy farming games to survival adventures and open-world exploration titles, low poly art creates a recognizable aesthetic that feels both modern and timeless.
In short, low poly assets are not merely a compromise—they're a smart production strategy and a powerful artistic choice for developers who want to build more with less.
A small library of reusable low poly props can quickly become an entire game world.
Before You Start — Set a Poly Budget
One of the biggest mistakes beginners make is modeling first and worrying about optimization later. In reality, successful low poly game asset workflows start with a polygon budget. Deciding how many triangles an asset should use before you model it helps maintain consistent performance and prevents unnecessary details from creeping into your scene.
What Is a Poly (Triangle) Budget?
A poly budget is the maximum number of polygons—or more commonly, triangles—that an asset is allowed to contain. Since game engines ultimately render triangles, artists usually think in terms of triangle counts rather than quads.
There is no universal "correct" number. The right budget depends on the platform, camera distance, and the role of the asset. A hero weapon seen up close can justify more geometry than a rock sitting in the background. The goal isn't to use the fewest polygons possible—it's to spend polygons where players will actually notice them.
Rough Triangle Targets by Asset Type
As a starting point, these ranges work well for most stylized projects:
| Asset Type | Triangle Budget |
|---|---|
| Simple background props (rocks, debris) | 100–500 tris |
| Standard props (barrels, crates, trees) | 300–1,500 tris |
| Hero props (weapons, key interactables) | 2,000–5,000 tris |
| Stylized characters | 3,000–10,000 tris |
| Mobile games | Use the lower end of each range |
Think of these numbers as guidelines, not hard rules. Visibility and gameplay importance should always determine where extra geometry goes.
Why Budgets Matter Even More on Mobile
Mobile devices have limited memory and GPU power, so optimization becomes critical. Hundreds of assets may be rendered simultaneously, and inefficient models can quickly hurt frame rates.
When optimizing 3D models for mobile games, follow this checklist:
- Keep silhouettes clean and avoid tiny details.
- Use triangles where players will notice them most.
- Reuse modular assets whenever possible.
- Share texture atlases to reduce draw calls.
- Create LODs (Level of Detail) for larger objects.
- Remove hidden faces and unnecessary geometry.
- Test performance regularly inside your game engine, not just in Blender.
A well-planned poly budget saves time, improves performance, and makes it much easier to scale your game as your asset library grows.
The Manual Workflow — 5 Steps to Model a Low Poly Asset
If you want full control over the shape, topology, and final style, the manual workflow is still the best way to learn how to make low poly game assets. Blender is ideal for this because it is free, lightweight, and powerful enough for a complete low poly game asset workflow.
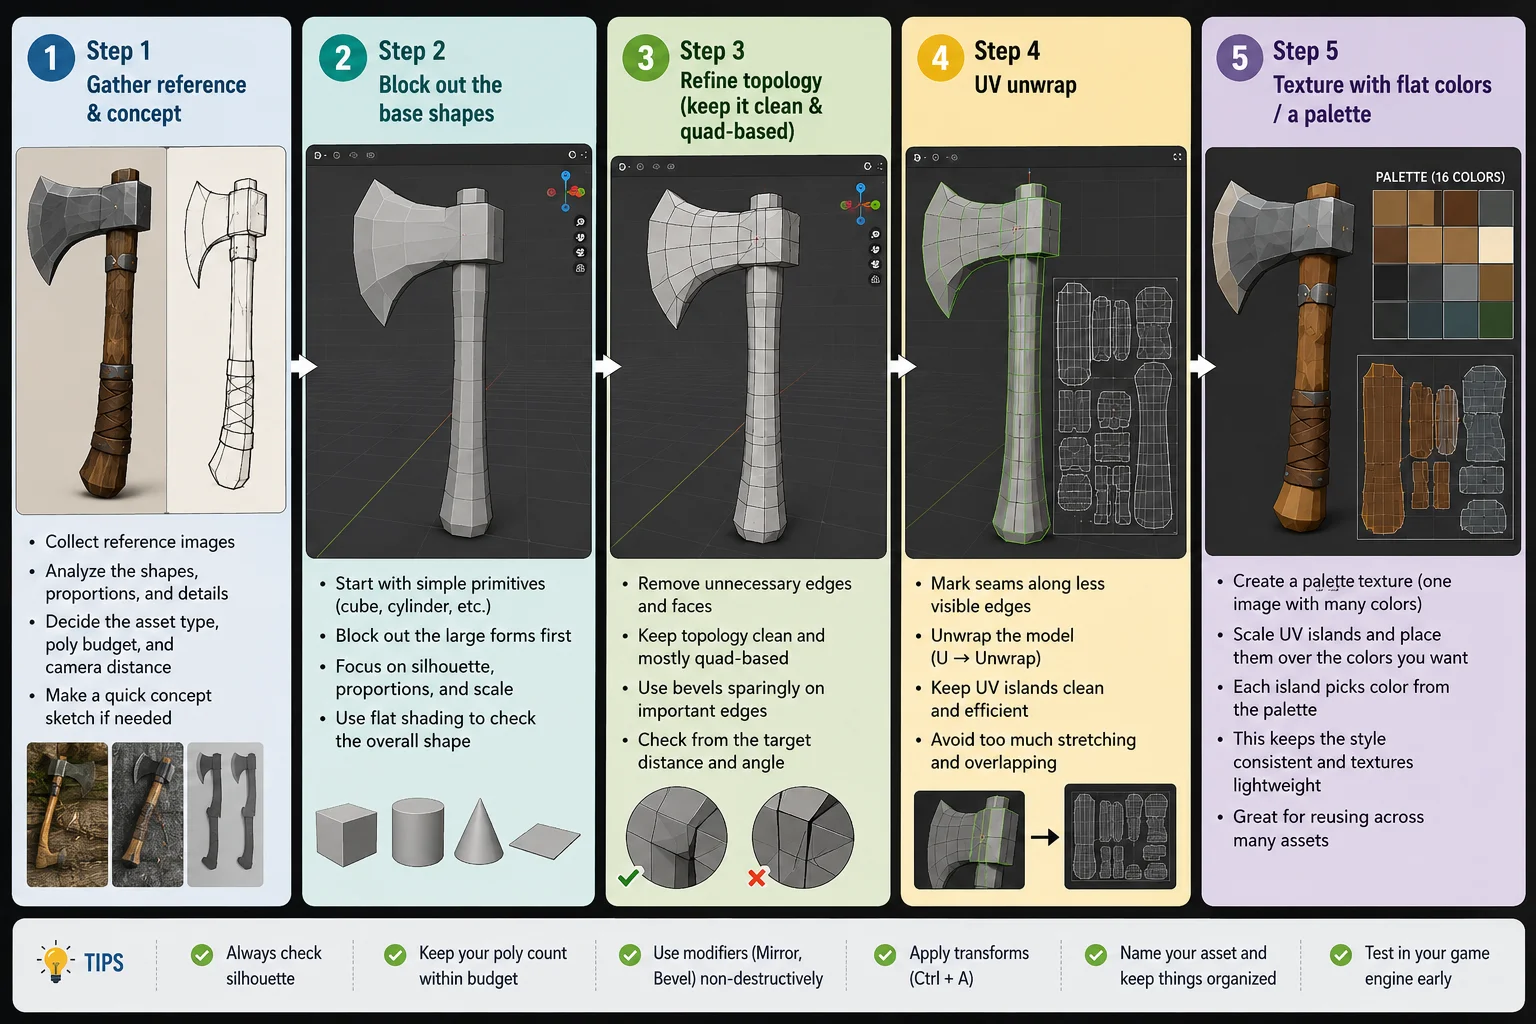
Step 1 — Gather Reference & Concept
Start with one clear reference image instead of trying to invent everything from memory. For example, if you are making a low poly axe, collect references for the blade shape, handle length, proportions, and decorative details. You do not need to copy the reference exactly. The goal is to understand the object's main forms.
Before opening Blender, decide three things: the asset type, the target poly budget, and the camera distance. A background crate can be extremely simple, while a hero weapon seen up close needs a cleaner silhouette and more readable details. This keeps the model focused from the beginning.
Step 2 — Block Out the Base Shapes
In Blender, begin with simple primitives such as cubes, cylinders, cones, and planes. Use them to block out the large forms first. For a barrel, this might mean a cylinder for the body, thin rings for the metal bands, and a few simple planks suggested with geometry or texture.
At this stage, avoid small details. Focus on scale, proportion, and silhouette. Switch to flat shading early so you can judge whether the model already feels low poly. If the asset reads clearly as a small grey blockout, it will usually work once textured.
Step 3 — Refine Topology
Once the main shape works, clean up the geometry. Remove unnecessary loops, hidden faces, and tiny bevels that do not improve the silhouette. Keep the topology mostly quad-based while modeling because quads are easier to edit, unwrap, and deform if the asset will be animated.
For static props, triangles are not a problem at export, but messy topology can still cause shading issues and UV problems. Use bevels sparingly on important edges, merge duplicate vertices, and check the model from the distance players will actually see it.
Step 4 — UV Unwrap
Next, unwrap the model so textures can be applied correctly. In Blender, mark seams along hidden or less visible edges, then use Unwrap or Smart UV Project for simple props. Keep UV islands clean and avoid excessive stretching.
For low poly props, UVs do not need to be overly complex. The goal is to make each visible surface easy to color and control. If you are using flat colors, prioritize readable color placement over high-resolution texture detail.
Step 5 — Texture With Flat Colors or a Palette
Low poly texturing is often much simpler than realistic texturing. Instead of painting detailed scratches, pores, or roughness maps, many artists use flat colors, gradients, or a limited palette. This keeps the asset clean and helps all models in the game feel consistent.
A useful technique is the color palette UV method. Create a small texture image that contains rows or blocks of colors, such as wood browns, metal greys, grass greens, and highlight tones. Then, in the UV editor, scale each UV island down and place it over the color you want that part of the model to use. For example, the axe handle UVs sit on a brown swatch, the blade UVs sit on a grey swatch, and the edge highlight sits on a lighter grey.
This method is fast, memory-efficient, and perfect for low poly 3D modeling for games. One palette texture can be reused across dozens of low poly props, characters, and environment pieces, making your project easier to manage and visually more cohesive.
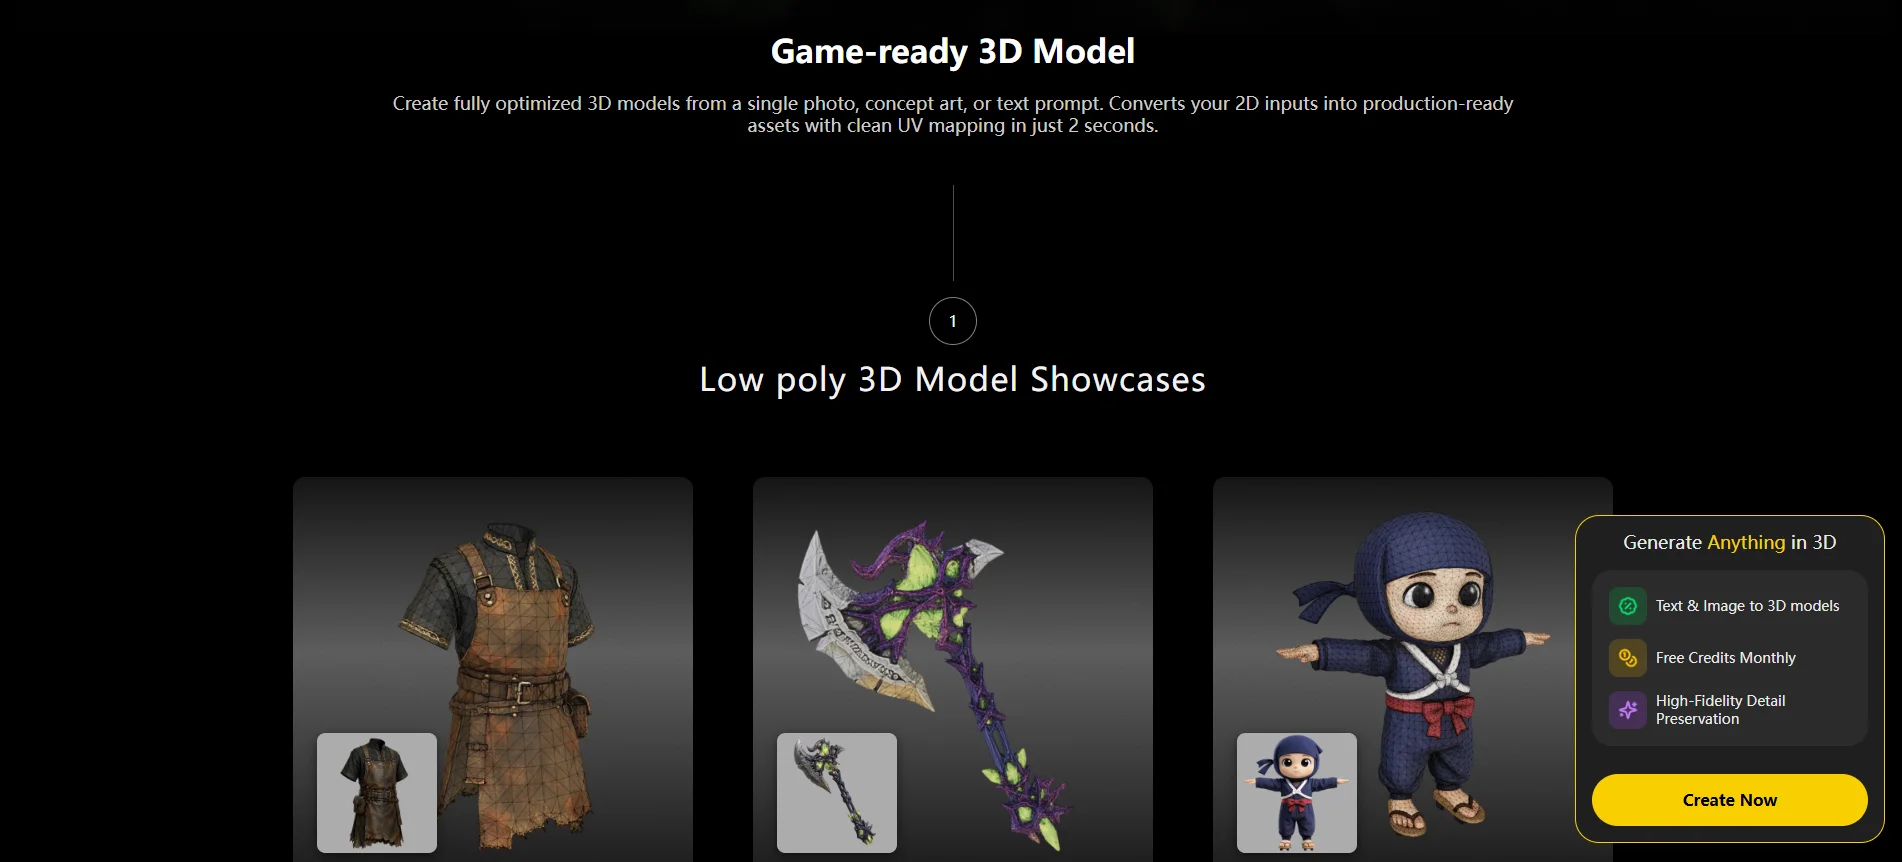
5 Steps To Model A Low Poly Asset
The AI Workflow — Generate Low Poly Assets Faster
Creating low poly assets manually gives you maximum control, but it can also become a bottleneck when you need dozens or hundreds of props. Modern AI tools make it possible to generate a base mesh in minutes, then refine it into a game-ready asset with proper topology and a controlled poly count. Instead of replacing artists, AI works best as an accelerator inside a modern low poly game asset workflow.
When Does AI Make Sense?
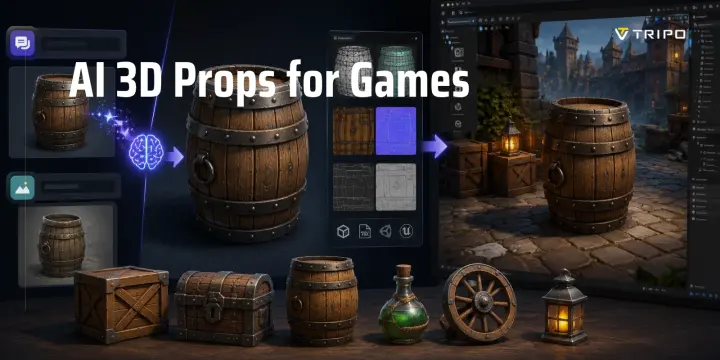
AI is especially useful for solo developers, game jams, prototypes, and projects with large numbers of props. If you need a stylized sword, tree, barrel, or treasure chest, generating a base model is often faster than starting from an empty Blender scene.
However, AI should not be treated as a one-click solution. Raw AI models often contain excessive geometry, uneven topology, or unnecessary details. The best results come from combining AI generation with manual cleanup.
Image/Text → 3D → Game-Ready Mesh
Most AI workflows follow three stages:
- Start with a text prompt or concept image.
- Generate a 3D model using an Image-to-3D or Text-to-3D tool.
- Convert the result into a clean, editable mesh.
For example, with Tripo, the process can be completed in just a few steps:
Tripo Quick Steps
- Upload an image or enter a text prompt.
- Generate the initial 3D model.
- Use Smart Mesh to generate a game-ready mesh with cleaner topology and better edge flow.
- Download the model in common formats such as GLB, FBX, OBJ, STL, or USD.
- Import the mesh into Blender, Unity, or Unreal Engine for further editing.
This stage is ideal for quickly generating a game-ready mesh before optimization.
Auto-Retopology to Hit Your Poly Budget
AI-generated meshes are usually much denser than they need to be. A simple prop might contain tens of thousands of triangles when only a few hundred are required.
After creating the base model, use Smart Lowpoly or auto-retopology tools to reduce the triangle count while preserving the silhouette. This makes it easier to stay within your target poly budget.
For example:
- Barrel: 20,000 tris → 300 tris
- Sword: 15,000 tris → 800 tris
- Stylized tree: 40,000 tris → 2,000 tris
By controlling topology after generation, you can optimize 3D models for mobile games and maintain consistent performance across platforms.
AI as a Base, Then Hand-Finish
The most effective workflow is to treat AI as a starting point, not the final product. Once the model has been retopologized, import it into Blender and spend a few minutes refining the silhouette, fixing proportions, cleaning UVs, and applying your color palette.
Think of AI as a fast concept artist and rough modeler. The final polish—topology decisions, textures, and artistic consistency—still comes from you.
This hybrid workflow dramatically reduces production time while preserving creative control. For solo indie developers, it can turn a process that once took hours into one that takes minutes.
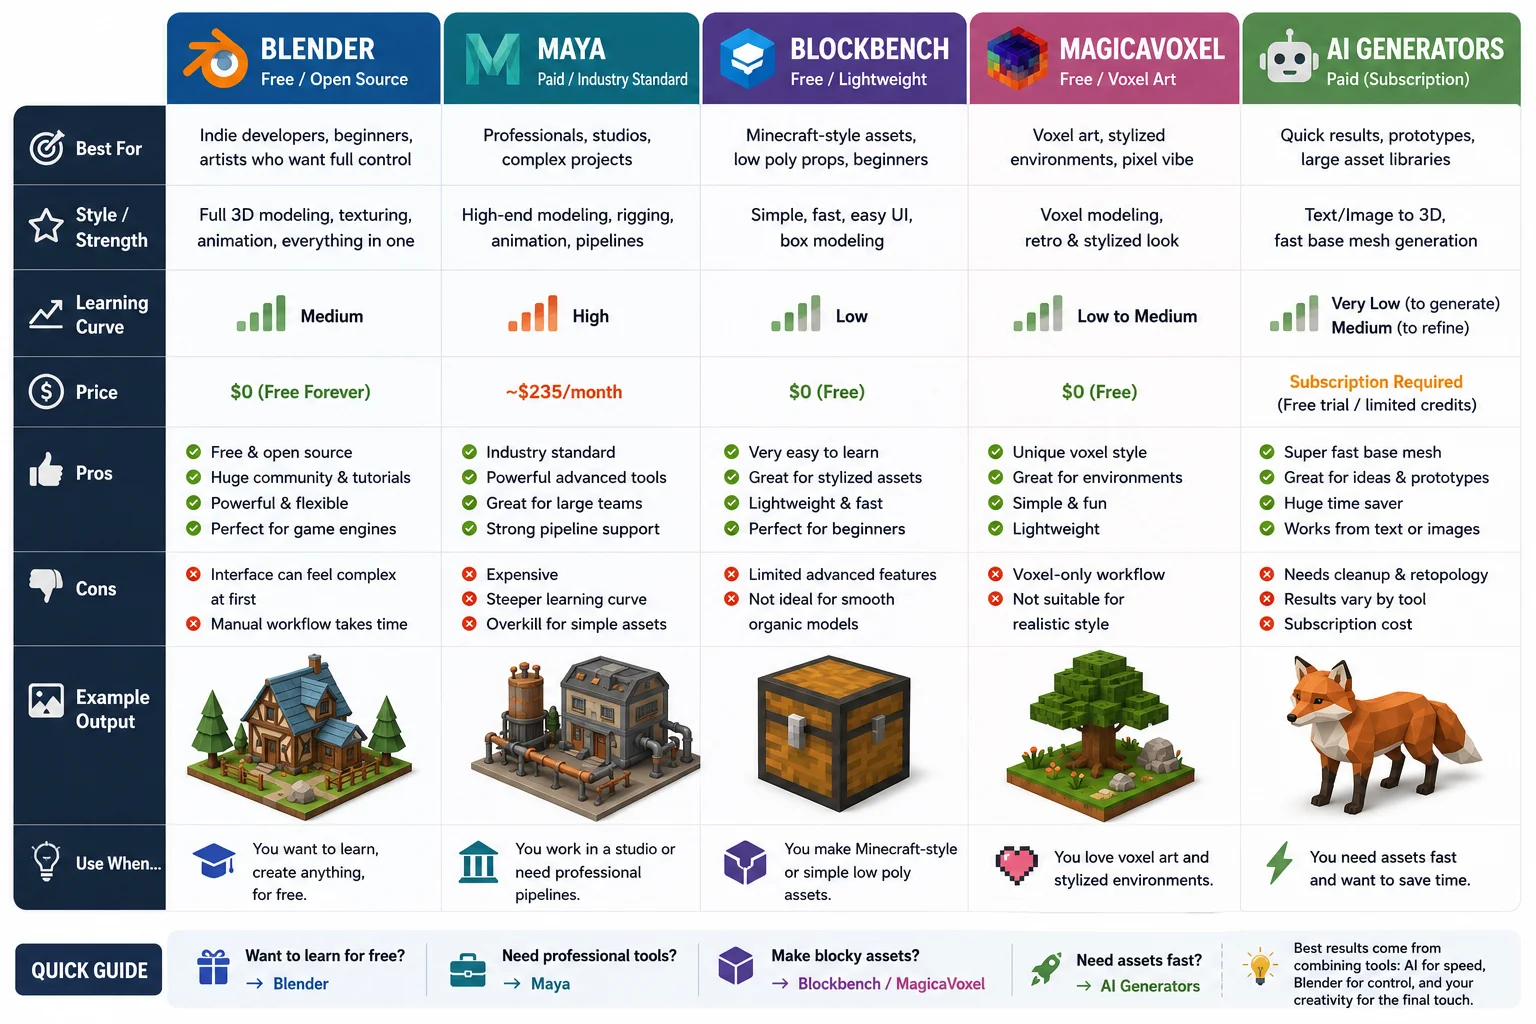
Choosing Your Tools (Free vs Paid, Manual vs AI)
There are more 3D tools available than ever, and the "best" option depends on your priorities. Some developers want maximum control, while others want to build assets as quickly as possible. Fortunately, low poly workflows are flexible enough to support both manual modeling and AI-assisted creation.
Blender — The Free Standard
For most beginners and indie developers, Blender is the easiest recommendation. It is completely free, actively maintained, and powerful enough for the entire asset pipeline—from modeling and UV unwrapping to texturing and exporting.
Blender also has a massive community, thousands of tutorials, and native support for Unity and Unreal workflows. If you're learning how to make low poly game assets from scratch, Blender is usually the best place to start.
Other Modeling Tools
Although Blender dominates the indie scene, other software has its own strengths:
- Maya — The industry standard used by many AAA studios. Powerful, but expensive and more complex for beginners.
- Blockbench — Lightweight and beginner-friendly. Great for Minecraft-style assets and simple low poly props.
- MagicaVoxel — Ideal for voxel art and stylized environments. Perfect if you prefer a block-based workflow.
- Cinema 4D — Popular among motion designers and artists who value ease of use and procedural tools.
These tools can all produce excellent low poly assets, but their learning curves and pricing vary considerably.
AI Generators for Low Poly Assets
AI tools are becoming an increasingly useful part of the pipeline. Instead of starting from an empty scene, you can generate a base model from a text prompt or reference image, then optimize and refine it manually.
If your goal is speed, AI generators are hard to beat. They are especially useful for creating props, prototypes, and large asset libraries. Combined with auto-retopology and manual cleanup in Blender, they can dramatically reduce production time.
As a simple rule:
- Want to learn for free? → Use Blender.
- Need professional studio tools? → Maya.
- Making blocky or voxel art? → Blockbench or MagicaVoxel.
- Need assets fast? → AI generators + Blender cleanup.
Ultimately, manual modeling and AI are not competing workflows. Most developers get the best results by combining both: use AI for speed, then use Blender for artistic control and final polish.
Low Poly Game Asset Tools Comparison
Exporting Your Asset to a Game Engine
Modeling is only half the job. The real goal is getting your asset into a game engine where it renders correctly, scales properly, and performs well. Surprisingly, many tutorials stop at Blender, but exporting and importing are where most beginners run into problems.
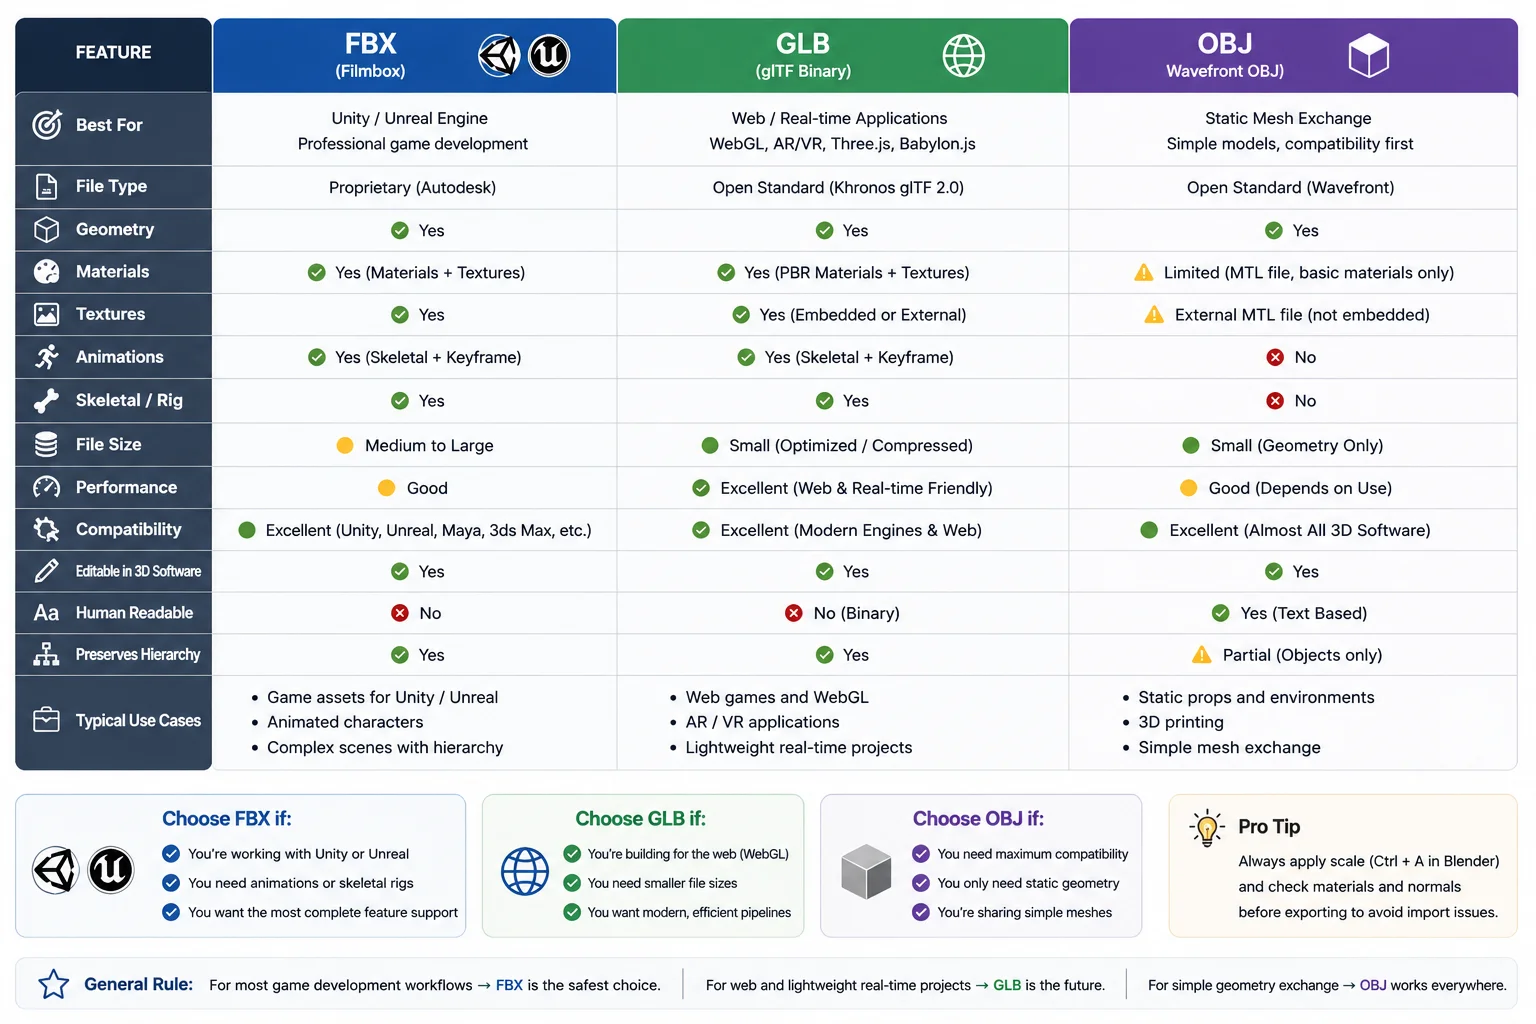
Pick a Format — FBX vs GLB vs OBJ
Different formats serve different purposes:
- FBX — The most common format for Unity and Unreal. Supports meshes, materials, animations, and skeletal rigs. If you're building game assets, FBX is usually the safest choice.
- GLB (glTF Binary) — Modern, lightweight, and excellent at preserving materials and textures. Increasingly popular for real-time applications and WebGL projects.
- OBJ — Simple and widely supported, but stores geometry only. Good for static models, but it doesn't preserve animations or advanced material settings.
As a rule:
- Unity / Unreal → FBX
- Web projects → GLB
- Static mesh exchange → OBJ
Many AI tools, including Tripo, support exporting in FBX, GLB, OBJ, STL, and USD formats. Tripo's DCC Bridge also allows one-click transfer to Blender, Unity, Unreal Engine, and Godot, although availability depends on browser support and compatible software versions.
Which Format Should You Export?
Import into Unity or Unreal
After exporting, import the asset into your engine and check three things first:
Scale
Scale mismatches are common. Blender uses meters, while engines may interpret units differently. If your sword appears the size of a building, verify unit settings and apply transforms (Ctrl+A → Scale) before export.
Materials
Check that textures and color palettes imported correctly. Reassign materials if necessary.
Colliders
Game engines don't automatically know where collisions should occur. Add Box Colliders, Mesh Colliders, or custom collision shapes depending on the object.
Common Import Problems & Fixes
| Problem | Fix |
|---|---|
| Wrong scale | Apply transforms (Ctrl+A → Scale) before export; match Blender units to engine units |
| Missing textures | Pack textures into the file before export; reassign materials after import |
| Inverted normals | Recalculate normals in Blender (Mesh → Normals → Recalculate Outside) before export |
| No collision | Add a Box Collider or Mesh Collider inside the game engine |
| Broken animations | Check bone hierarchy; apply all transforms before export |
Before shipping your game, always test assets inside the engine rather than relying on how they look in Blender. A model that appears perfect in the viewport may reveal scale, material, or performance problems once placed in an actual scene.
In other words, a low poly asset isn't truly finished until it runs correctly inside Unity, Unreal, or your target engine.
Optimization Tips for Better Performance
Low poly assets are naturally efficient, but a few simple techniques can improve performance even further—especially for mobile games and large scenes.
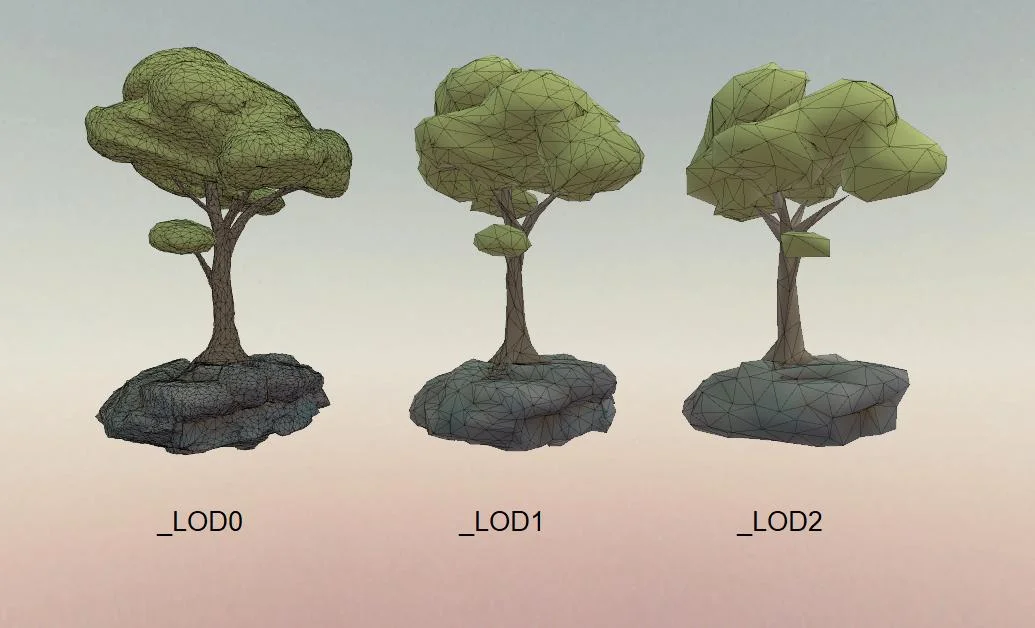
Use LODs for Distant Objects
Large objects don't need full detail at every distance. Create several versions of important assets:
- LOD0 – High detail
- LOD1 – Medium detail
- LOD2 – Low detail
Unity and Unreal can automatically switch between them to reduce GPU load.
Use Texture Atlases to Reduce Draw Calls
Too many materials can hurt performance. Instead of giving each object its own texture, combine multiple assets into a single texture atlas so they can share one material.
This is one of the easiest ways to optimize 3D models for mobile games.
Remove Hidden Geometry
Delete polygons players will never see, including:
- Hidden interior faces
- Duplicate meshes or vertices
- Unnecessary edge loops
- Unused materials
Less geometry means better performance.
Reuse and Merge Assets
Reuse props whenever possible. One barrel, rock, or tree can appear many times in a scene. Merging repeated objects and using instancing also helps reduce rendering costs.
Quick Optimization Checklist
Before exporting, make sure you:
✅ Use LODs for large assets
✅ Share texture atlases and materials
✅ Remove unseen faces
✅ Merge repeated assets
✅ Test performance inside the game engine
Small optimizations add up. A well-organized low poly scene can contain hundreds of assets while still running smoothly on PC, console, and mobile devices.
When Low Poly Isn't the Right Choice (Limits)
Low poly art is versatile, but it isn't the perfect solution for every project. Choosing it simply because it's easier can lead to a visual style that doesn't fit your game.
First, low poly may not be ideal if you're aiming for highly realistic AAA visuals. Games that rely on cinematic environments, realistic characters, or detailed materials often need much higher polygon counts and advanced textures to achieve their look.
Second, some assets naturally require more geometry. Complex mechanical parts, vehicles, or organic surfaces with intricate curves may lose important details if simplified too aggressively. In these cases, extra polygons are necessary to preserve shape and readability.
Finally, low poly works best when it matches the overall art direction. If your game already uses realistic characters or high-resolution environments, adding stylized low poly assets can make the visuals feel inconsistent.
The good news is that you don't have to choose one approach for everything. Many games combine low poly environments with higher-detail hero assets, characters, or props. The best style is the one that supports your gameplay, target platform, and artistic vision—not simply the one with the fewest polygons.
Frequently Asked Questions
How do you make any game look low poly?
Use simple geometry, flat shading, and limited textures. A shared color palette and clean silhouettes help create a stylized low poly look. Avoid overly detailed materials and effects.
Can ChatGPT (or AI) actually create game assets?
Yes. AI can generate concepts and base 3D models from text or images. However, most assets still need retopology, UVs, and manual cleanup before they are game-ready.
How do I make my own game assets from scratch?
Start with references and a poly budget. In Blender, block out the shape, refine the topology, unwrap the UVs, and apply simple colors or textures. Then export the asset to Unity or Unreal.
What polygon count counts as "low poly" for games?
Simple props are usually 100–500 triangles, hero props 500–2,000, and stylized characters 2,000–8,000. Mobile games typically use lower counts. The ideal number depends on the platform and viewing distance.
Is it legal to use AI-generated low poly models in a commercial game?
Usually yes, but you should always check the license terms of the tool you use. Some services provide commercial rights only under certain plans. Reviewing the current terms before release is recommended.
What is the best free software to make low poly assets?
Blender is the most popular free option. It supports modeling, UV unwrapping, texturing, and exporting to Unity and Unreal. Its large community also makes it beginner-friendly.
Conclusion
Making low poly game assets no longer requires years of 3D experience. Start by modeling a few simple props by hand to learn the fundamentals, then use AI tools to speed up asset creation and generate game-ready meshes for larger scenes.
No matter which workflow you choose, focus on clean topology, sensible poly budgets, and testing assets inside your engine. If you want to create assets faster, you can explore Tripo AI Studio to generate, optimize, and export models for Blender, Unity, Unreal Engine, and other 3D workflows.