2D Concept Art to 3D Model: A Workflow for Artists
TL;DR
- Two paths: the classic manual pipeline (model → retopo → texture → render) and the AI-accelerated path (generate → clean up → export).
- Good references decide everything—lock front/side orthographic views before you touch a mesh.
- AI gets you to a 3D base in seconds; retopology and topology are still what make an asset usable.
- Texture with PBR maps, then export GLB/FBX/OBJ straight into Blender, Unity, or Unreal.
- Pick your path by goal: speed and prototyping (AI), or full production control (manual)—most artists blend both.
To take 2D concept art to a 3D model: lock clean front/side references, build or AI-generate a 3D base mesh, retopologize it into clean geometry, texture it with PBR materials, then export to your engine. You can model it by hand or let an AI image-to-3D tool do the heavy lifting—this guide walks both paths end to end.
The Two Paths from 2D to 3D (and How Artists Blend Them)
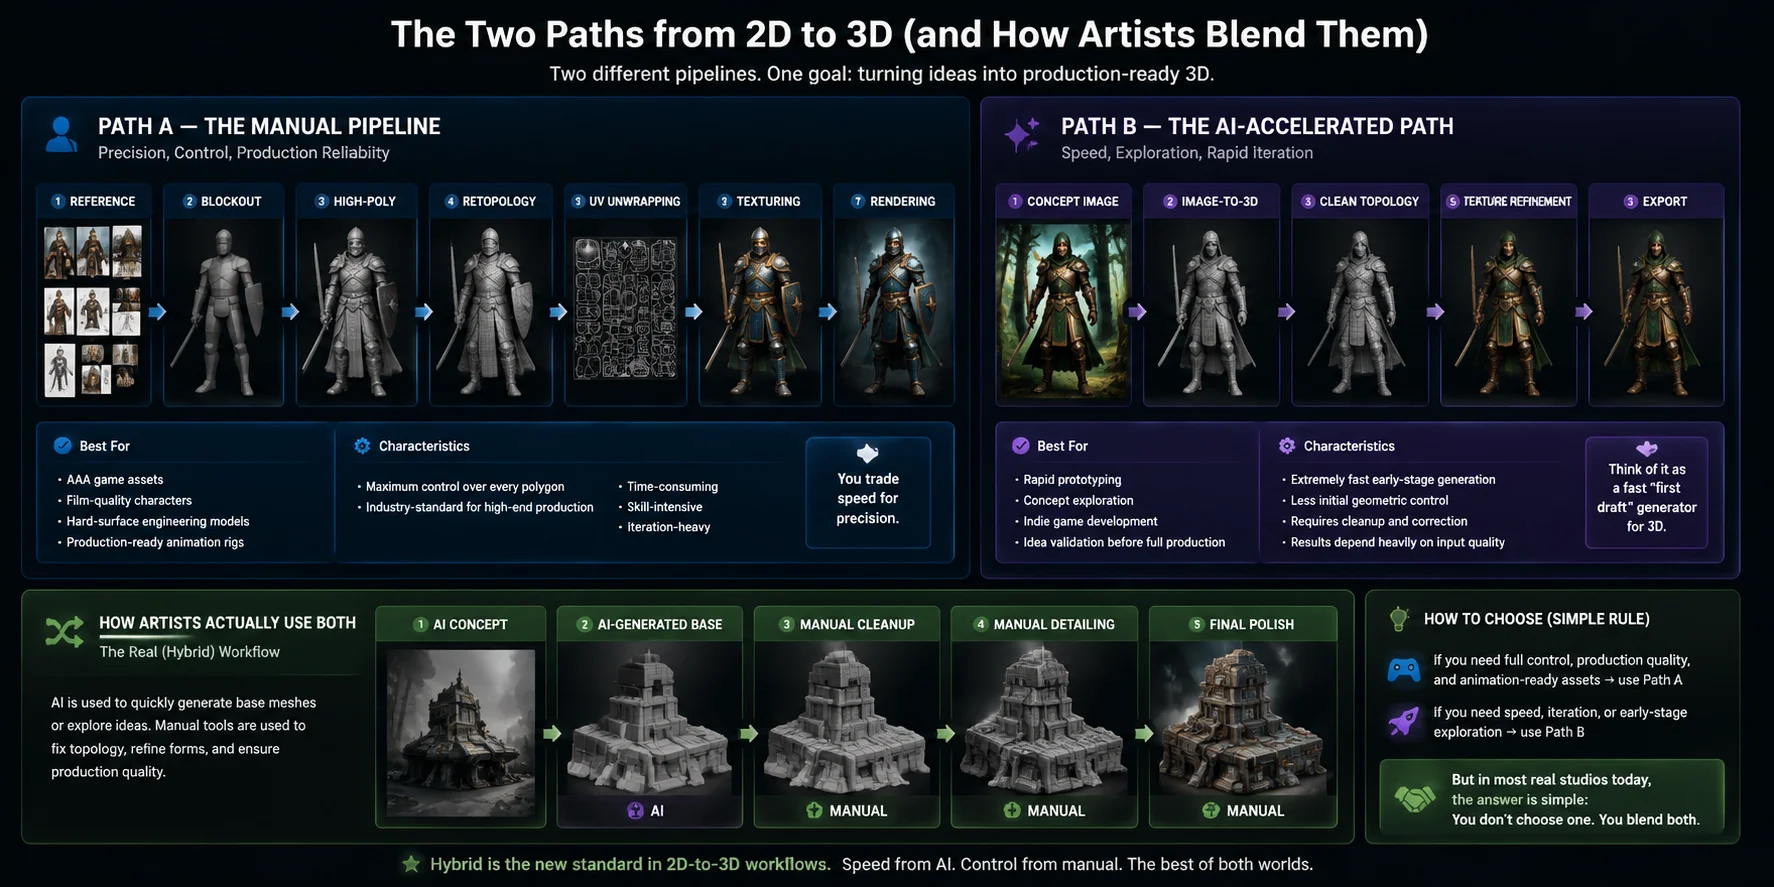
When artists move from 2D concepts into 3D models, there isn’t just one “correct” workflow. In practice, there are two dominant pipelines that shape almost everything in modern 3D production: the traditional manual pipeline and the AI-accelerated pipeline. Most professionals don’t strictly choose one—they combine both depending on the project, deadline, and level of control needed.
Path A — The Manual Pipeline
The manual pipeline is the classic industry-standard workflow used in games, film, and VFX. It prioritizes precision, artistic control, and production reliability.
Typical steps include:
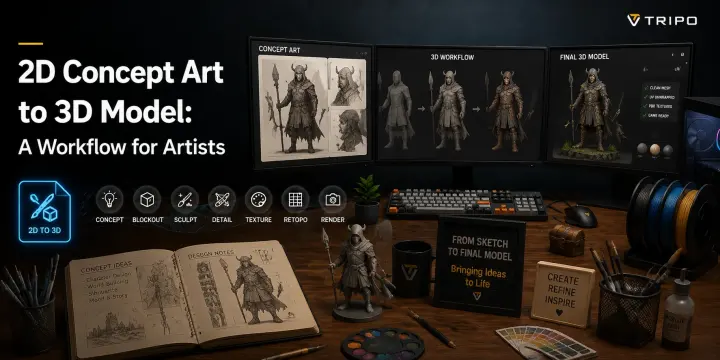
reference → blockout → high-poly → retopology → UV unwrapping → texturing → rendering
Each stage is intentional. Artists start from pure references, build rough shapes (blockouts), refine them into high-detail sculpted models, then rebuild clean topology for animation or simulation. UV mapping and texturing follow, allowing full control over materials and surface detail.
Path B — The AI-Accelerated Path
The AI-accelerated pipeline is a newer workflow driven by image-to-3D and text-to-3D tools. It compresses early production stages into seconds or minutes.
Typical steps:
concept image → image-to-3D → clean topology → texture refinement → export
Instead of manually building geometry, AI generates a base mesh directly from a sketch, illustration, or prompt. Artists then clean up topology, adjust proportions, fix artifacts, and prepare the model for downstream use.
A common hybrid workflow is concept image → AI base mesh → manual cleanup → final detailing. Use AI when you need speed or several directions to test; use manual modeling when the asset needs exact forms, controlled topology, or demanding deformation.
How to Choose
- If you need full control, production quality, and animation-ready assets → use Path A
- If you need speed, iteration, or early-stage exploration → use Path B
Step 1 — Set Up Your Concept Art as References
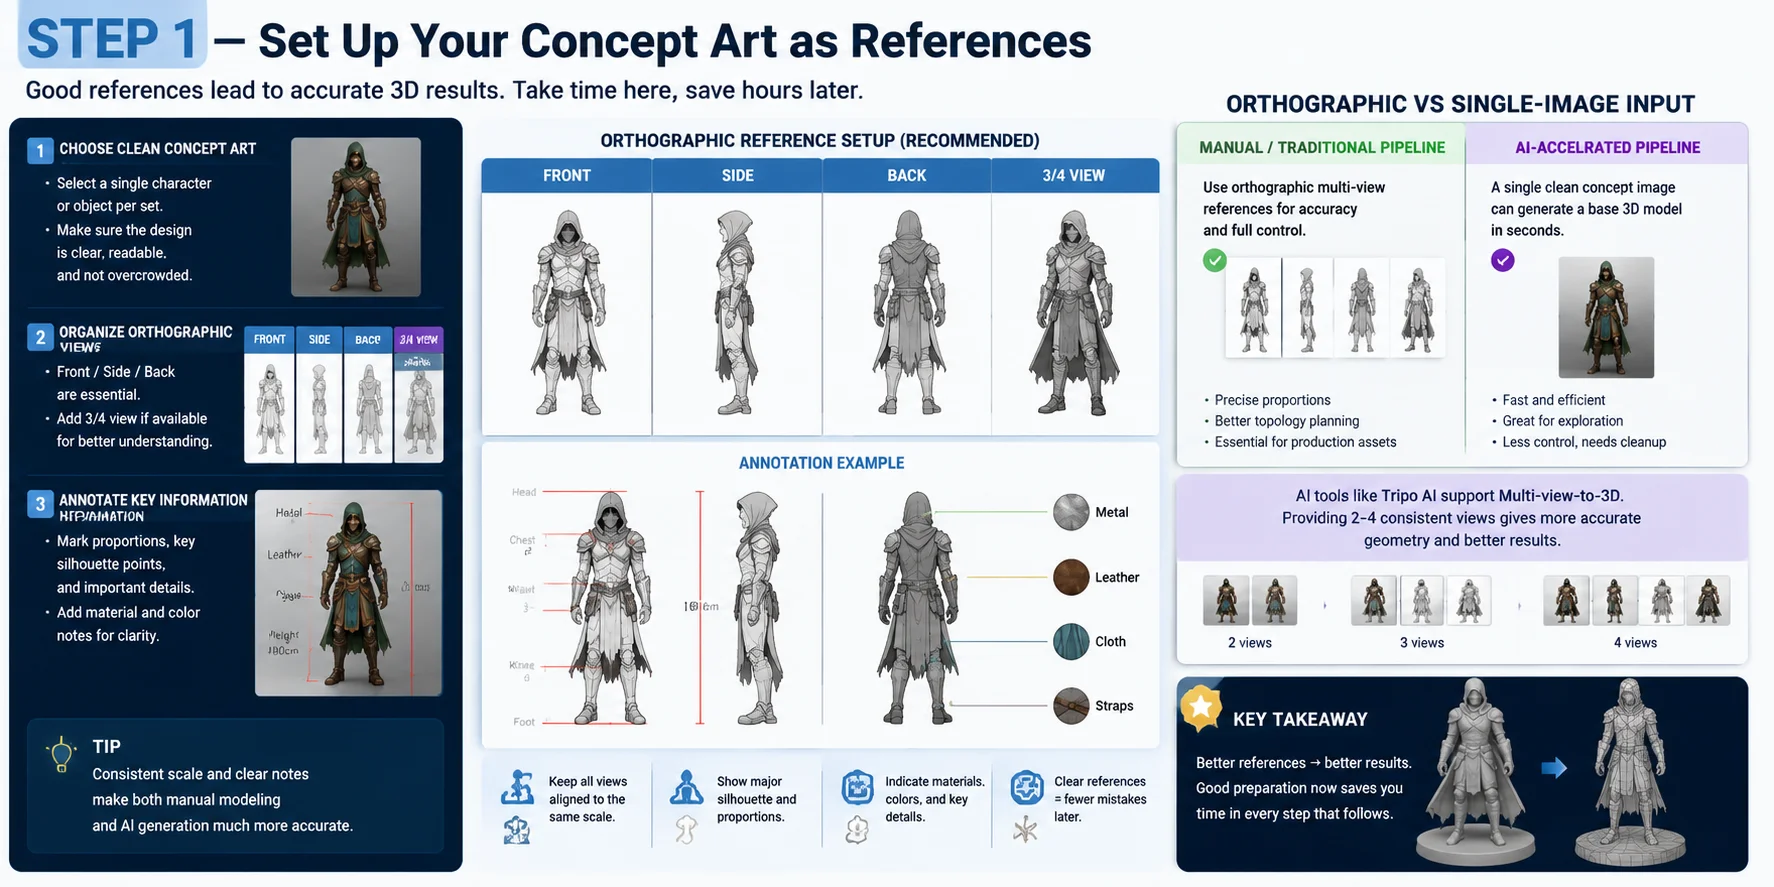
Before any 3D work begins, the quality of your reference setup largely determines how accurate and production-ready your final model will be. This step is not just about collecting images—it’s about structuring information so both manual artists and AI tools can interpret the design consistently.
Start by selecting clean, well-defined concept art. Ideally, focus on a single character or single object per set to avoid mixed proportions or unclear silhouettes. The concept should clearly communicate the overall shape, major forms, and key material intent (metal, cloth, plastic, etc.). If details are unclear in the concept stage, they will almost always become errors in 3D.
Next, organize orthographic references. A standard setup includes:
- Front view
- Side view
- Back view (when available)
- Optional 3/4 perspective for readability
All views should be properly aligned in scale so proportions remain consistent across angles. Even small mismatches between front and side views can lead to distorted 3D reconstruction later.
Orthographic vs Single-Image Input
Traditional manual pipelines rely heavily on orthographic multi-view references, because artists need precise spatial information to build accurate topology and proportions from scratch. Every angle reduces guesswork and improves production reliability.
In contrast, AI-based pipelines can start from a single strong concept image, using generative models to infer missing geometry. This is much faster but less deterministic, especially in occluded or complex regions.
In practice, tools like multi-view generation systems (including platforms such as Tripo AI) perform best when given 2–4 consistent views, bridging the gap between manual precision and AI speed.
Step 2 — Build or Generate the 3D Base Mesh
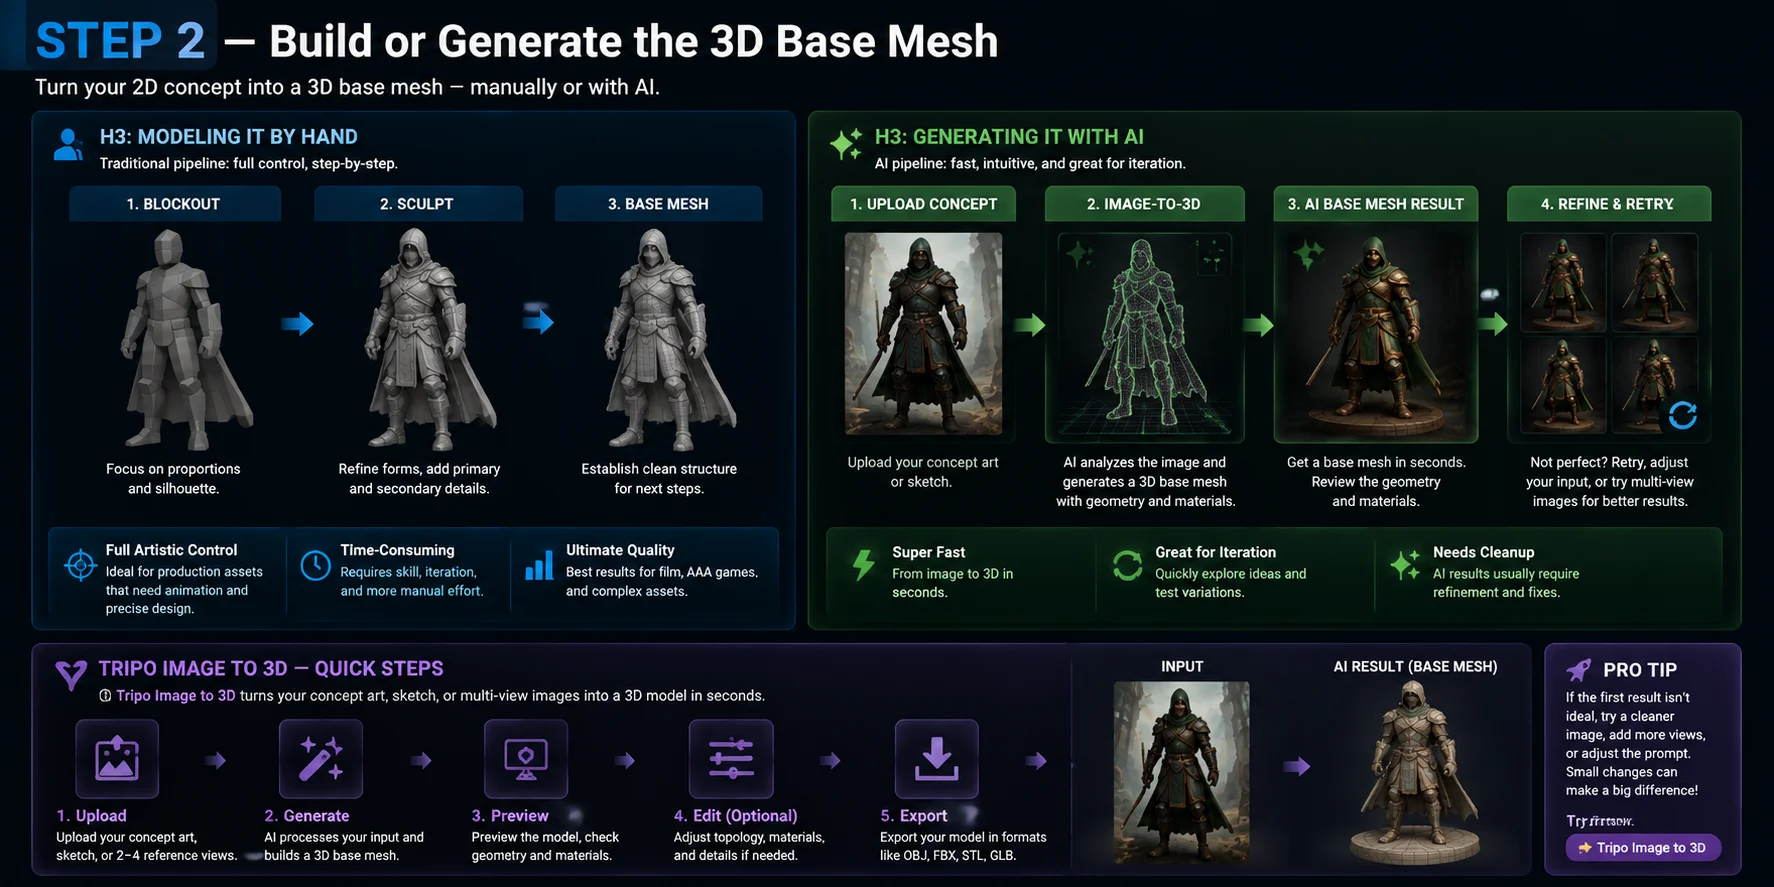
Once your reference setup is ready, the next stage is turning those 2D inputs into a usable 3D base mesh. This is where the asset first becomes spatially “real”—either constructed manually or generated by AI as a starting point for refinement.
Modeling it by Hand
In the traditional pipeline, artists begin with a blockout, focusing only on large proportions and silhouette. This stage is intentionally simple—no detail, no textures, just clean volume definition.
From there, the model is gradually refined into a sculpt, often in tools like Blender or ZBrush workflows. The goal is to establish:
- Correct proportions
- Clean primary and secondary forms
- Readable silhouette from all angles
At this stage, topology and polish are not the priority. Instead, artists are “sculpting thinking,” shaping form iteratively until the model matches the concept art and orthographic references.
This method is slower, but it provides full artistic control, making it essential for production assets that need animation, deformation, or precise design constraints.
Generating it with AI
In the AI-accelerated workflow, the base mesh can be created almost instantly.
You simply:
- Upload a concept image (or sketch)
- Run image-to-3D generation
- Receive a base mesh with geometry + materials in seconds
Modern systems, including tools like Tripo Image to 3D, can also support multi-view or sketch-based inputs, improving accuracy when multiple references are provided.
A typical quick workflow looks like:
Concept image → Upload → Generate → Preview → Refine → Export
If the first output is not ideal, artists usually:
- Retry with adjusted prompts or cleaner input images
- Switch to multi-view inputs (2–4 angles)
- Refine after generation in a DCC tool (Blender, etc.)
This approach is extremely useful for:
- Rapid prototyping
- Early concept exploration
- Fast iteration before committing to manual modeling
However, AI-generated meshes often require cleanup—especially in edge flow, symmetry, and hidden geometry.
Step 3 — Retopology: Why Clean Topology Matters
Once you have a high-poly sculpt or an AI-generated base mesh, the next critical step is retopology—and this is where raw geometry becomes something usable in real production. Without it, even a visually correct model can fail in animation, simulation, or game engines.
What retopology actually is
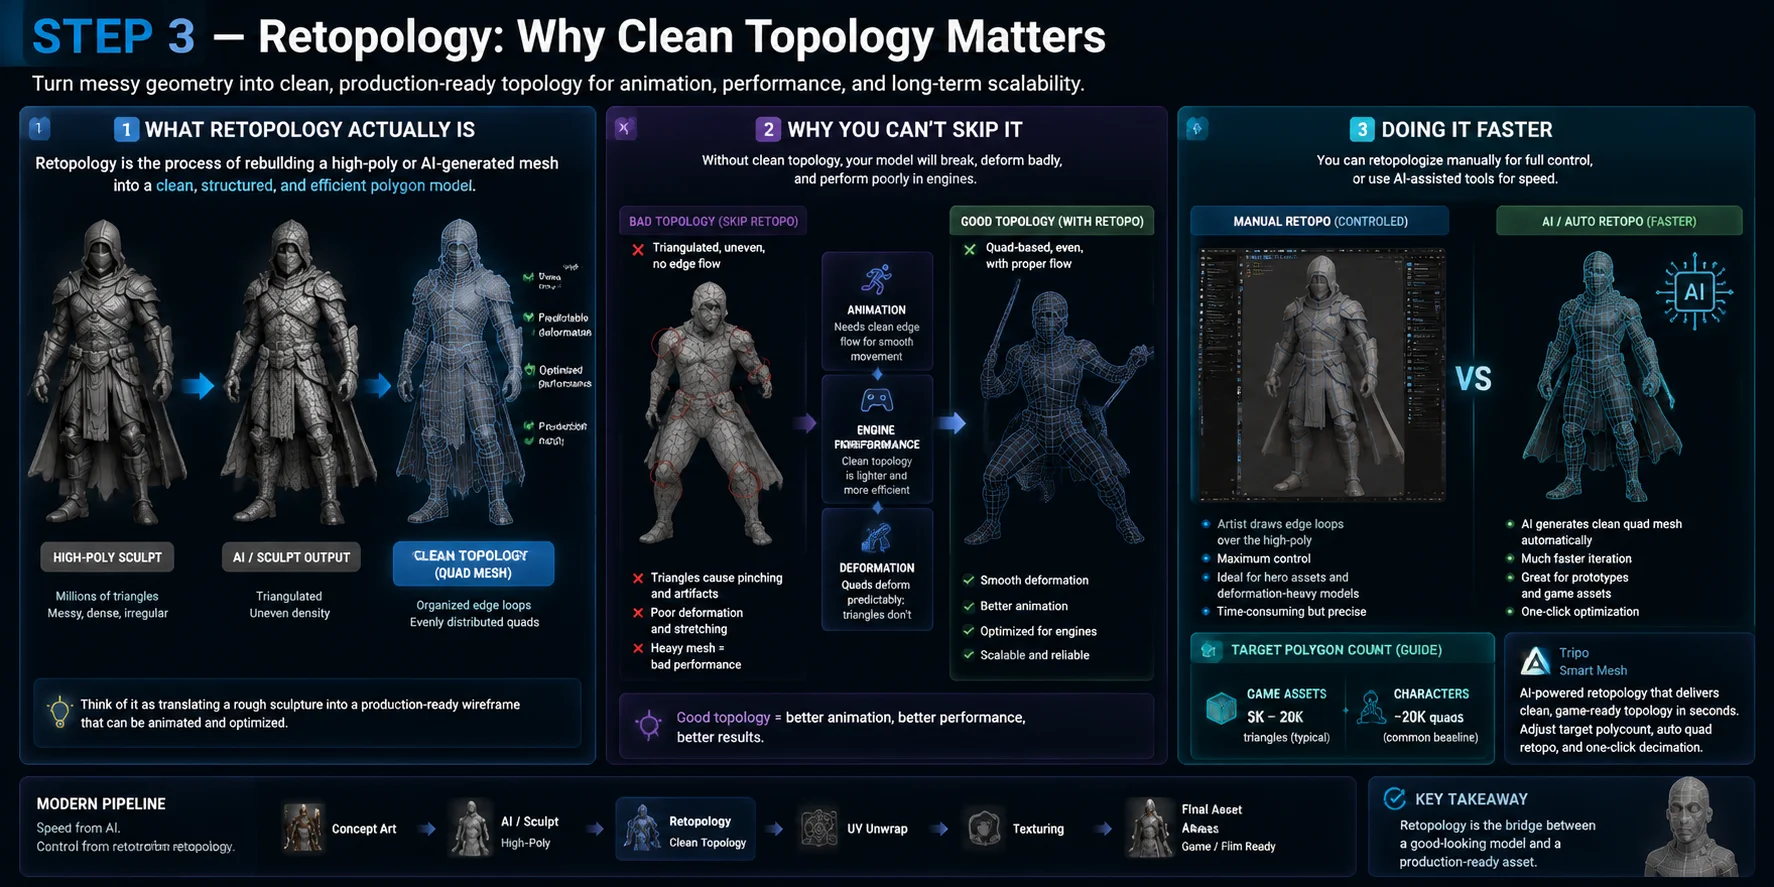
Retopology is the process of rebuilding a messy high-poly mesh into a clean, structured polygon model. In practice, this means taking dense sculpt geometry (or AI-generated triangles) and recreating it with organized quad-based topology.
Instead of millions of irregular faces, you create:
- Clean edge loops
- Evenly distributed quads
- Predictable deformation flow
Think of it as translating a “rough sculpture” into a production-ready wireframe that can actually be animated or optimized.
Why you can’t skip it
Skipping retopology is one of the most common beginner mistakes, especially when working with AI-generated or sculpted models.
Here’s why it matters:
- Animation needs structure → joints and facial movement depend on clean edge flow
- Game engines need performance → messy meshes are too heavy and inefficient
- Deformation needs intentional edge flow → poorly placed triangles and uneven topology can create artifacts around joints, while well-planned mixed topology can still work.
Most AI-generated meshes and sculpt outputs are:
- Triangulated
- Uneven in density
- Structurally inconsistent
So even if the model “looks right,” it often behaves incorrectly in production.
Doing it faster
Traditionally, retopology is done manually by tracing edge loops over a high-poly surface. This gives maximum control but can be slow and repetitive.
Modern workflows introduce two faster approaches:
1. Manual retopo (controlled)
- Artists rebuild topology in Blender/ZBrush-style tools
- Ideal for hero assets and deformation-heavy characters
- Target budgets:
- Game assets: ~5K–20K polygons
- Characters: ~20K quads (typical baseline)
2. Automated / AI-assisted retopo
- Generates clean quad-based mesh from high-poly input
- Reduces manual tracing time significantly
- Best for rapid iteration and non-hero assets
Tools such as Tripo Smart Mesh can generate cleaner topology with adjustable polygon targets and quad-mesh options, reducing the amount of manual rebuilding needed.
Practical takeaway. Retopology turns a visual result into geometry that can be optimized, animated, and handed off reliably.
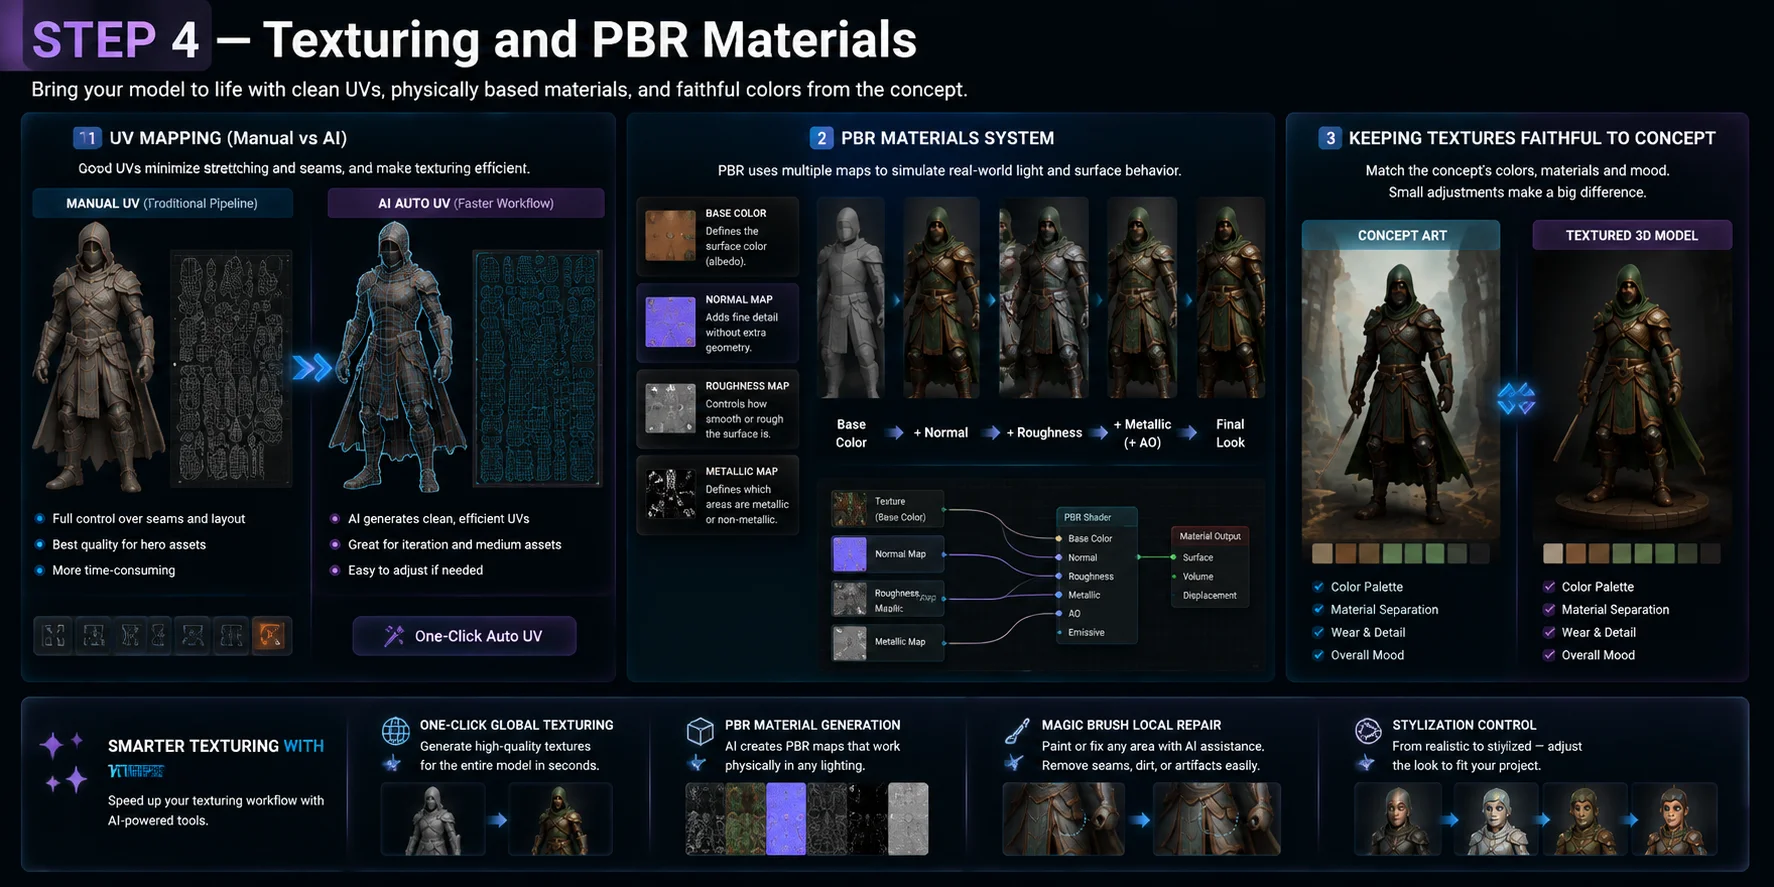
Step 4 — Texturing and PBR Materials
Texturing is the stage where a clean 3D model starts to feel real. After modeling and retopology, geometry alone is not enough—what sells the surface is how it reacts to light, color, and material properties. This step connects artistic intent from the concept art to physically based rendering (PBR) systems used in modern engines.
The workflow usually begins with UV mapping. In traditional pipelines, artists manually unwrap UVs to control how textures are laid out across the model. This ensures that important details—like faces, armor edges, or logos—don’t stretch or break. In AI-assisted workflows, UVs can be generated automatically, allowing faster iteration, though manual adjustments are often still needed for precision.
Once UVs are ready, PBR materials are applied. Instead of a single texture, modern shading uses multiple maps working together:
- Base Color → defines the albedo or surface color
- Normal Map → fakes surface detail like bumps and scratches
- Roughness Map → controls how glossy or matte a surface looks
- (Optional) Metallic / AO maps for advanced realism
Together, these maps simulate how light interacts with real-world materials. The goal is not just “painting” the model, but building a physically consistent surface response.
Keeping textures faithful to the concept
Use the original palette, material boundaries, wear patterns, and stylization as the visual contract. Check the model under neutral lighting, then correct seams, roughness, and local details that drift from the design.
Step 5 — Rig, Pose, and Render (or Export to Engine)
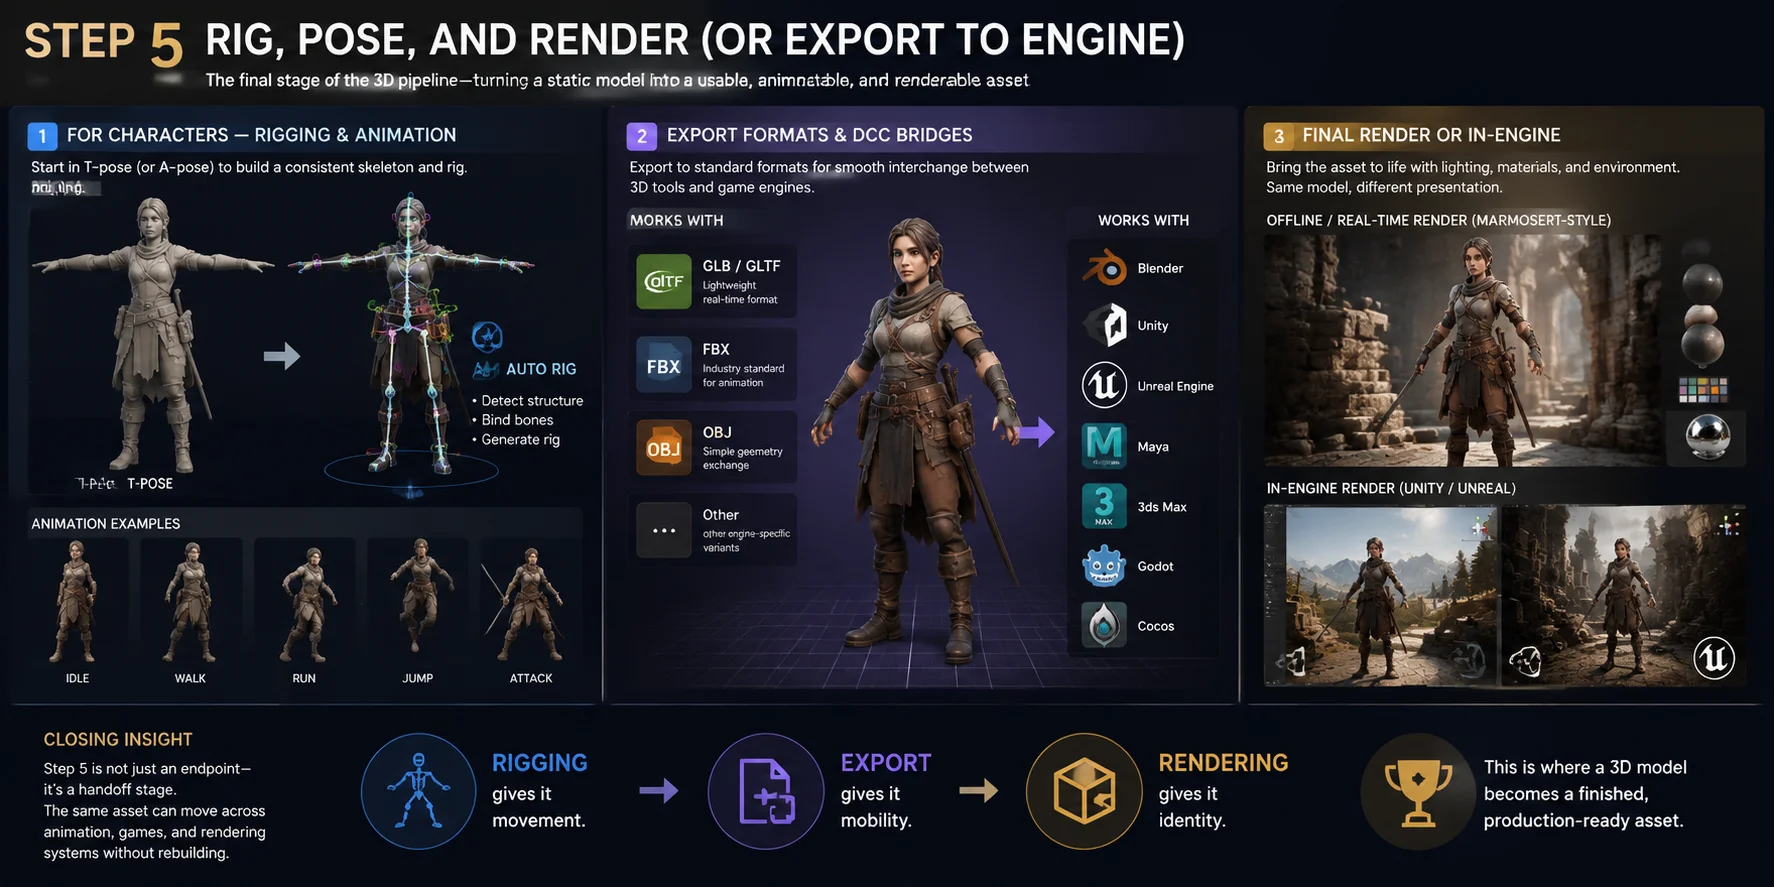
For characters — rigging & animation
For character assets, the first step is rigging. The model is usually placed in a T-pose (or A-pose) so that a skeleton can be applied consistently. From there, a rig is created either manually or through automated systems.
Modern workflows often use auto-rigging tools (e.g., systems like Tripo Auto Rig) to:
- Detect humanoid or quadruped structure
- Automatically bind bones to the mesh
- Generate a deformation-ready skeleton
Once rigged, the character can be animated—walking cycles, facial expressions, or full motion sequences. At this stage, the asset becomes fully usable in production pipelines.
Export formats & DCC bridges
After rigging or final adjustments, the model is exported into standard interchange formats. The most common formats include:
- GLB / GLTF — lightweight real-time format
- FBX — industry standard for animation pipelines
- OBJ — simple geometry exchange
- (and other engine-specific variants depending on workflow)
These formats act as bridges between tools and engines such as:
Blender, Unity, Unreal Engine, Maya, 3ds Max, Godot, and Cocos
This interoperability is essential—each platform handles rendering, animation, or physics differently, so clean export ensures consistency across systems.
Final render or in-engine
The last step is presentation and rendering. There are two main paths:
- Offline / real-time rendering tools (e.g., Marmoset-style workflows) for high-quality still images
- In-engine rendering (Unity / Unreal) for interactive scenes, lighting tests, and gameplay-ready visuals
Here, lighting setup becomes critical. The same model can look dramatically different depending on HDRI, shadows, and material response.
AI Path vs Manual Path — Which Should You Use?
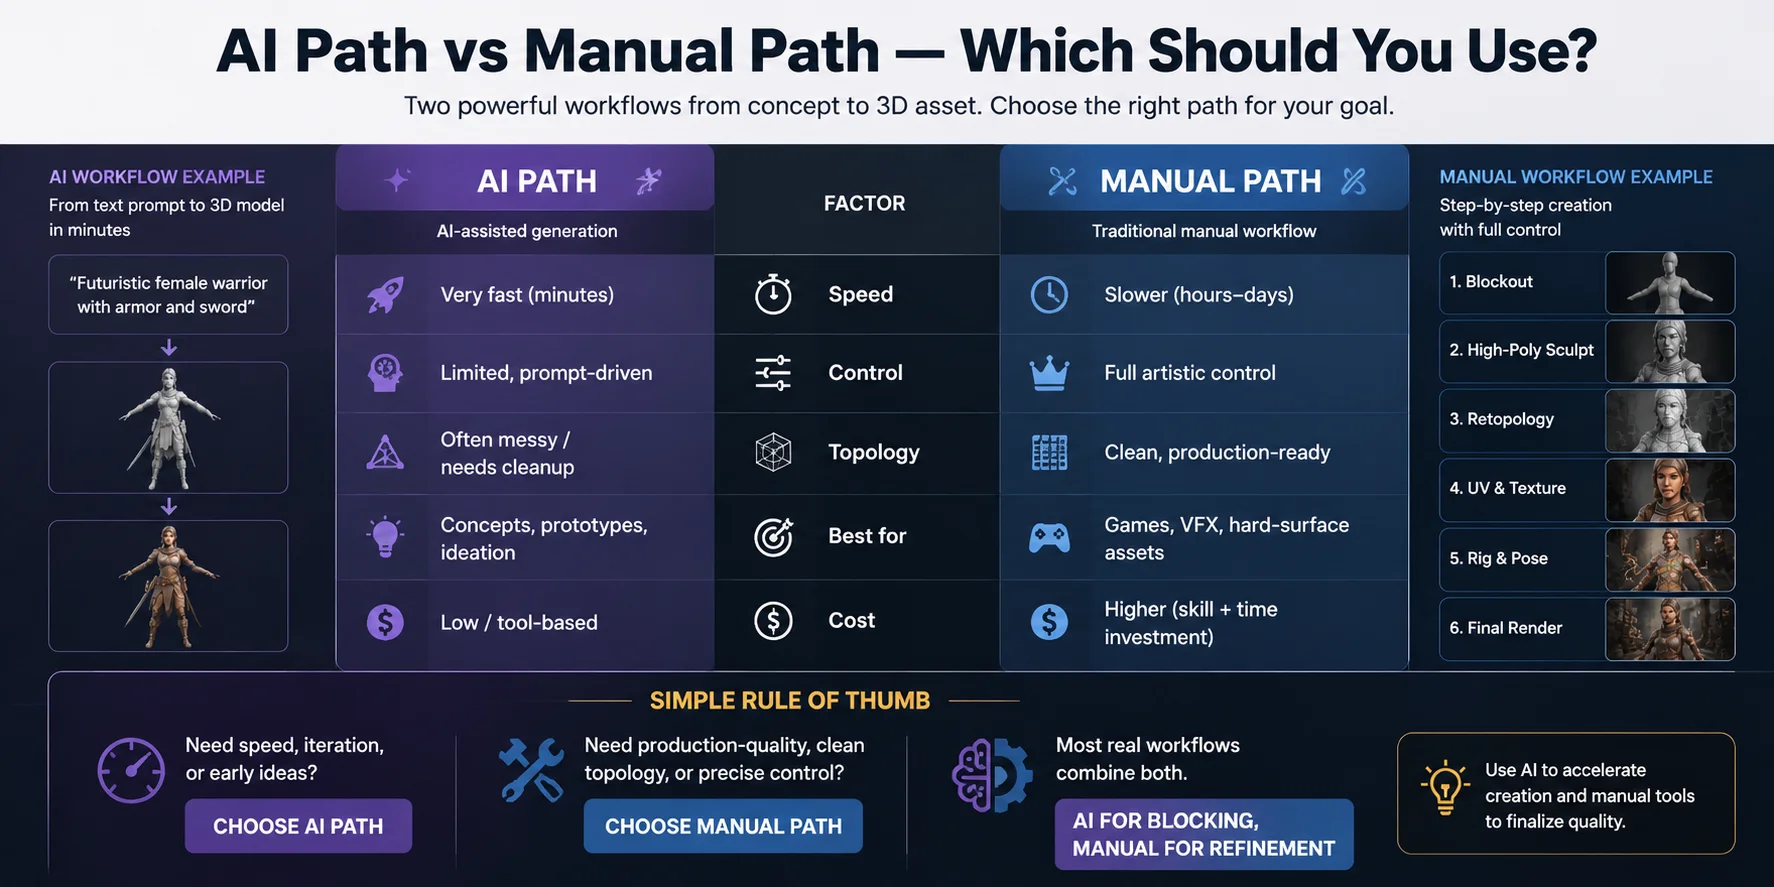
When moving from concept to 3D asset, there are two dominant workflows: AI-assisted generation and manual modeling. The right choice depends on speed, control, and production needs.
AI Path vs Manual Path (Quick Comparison)
| Factor | AI Path | Manual Path |
|---|---|---|
| Speed | Very fast (minutes) | Slower (hours-days) |
| Control | Limited, prompt-driven | Full artistic control |
| Topology | Often messy; needs cleanup | Clean, production-ready |
| Best for | Concepts, prototypes, ideation | Games, VFX, hard-surface assets |
| Cost | Low; tool-based | Higher; requires more skill and time |
AI tools are strong at generating a first draft quickly, especially for characters or props where you only need direction. However, topology and deformation quality often require cleanup in tools like Blender or sculpt refinement in ZBrush.
Manual workflows give artists more direct control over geometry, UVs, and rigging, which makes them preferable when an asset has strict production or deformation requirements.
If you need speed, iteration, or early ideas → AI path.
If you need production-quality, clean topology, or precise control → manual path.
Most real workflows combine both: AI for blocking, manual for refinement.
When AI Isn't Enough (Limits & Honest Caveats)
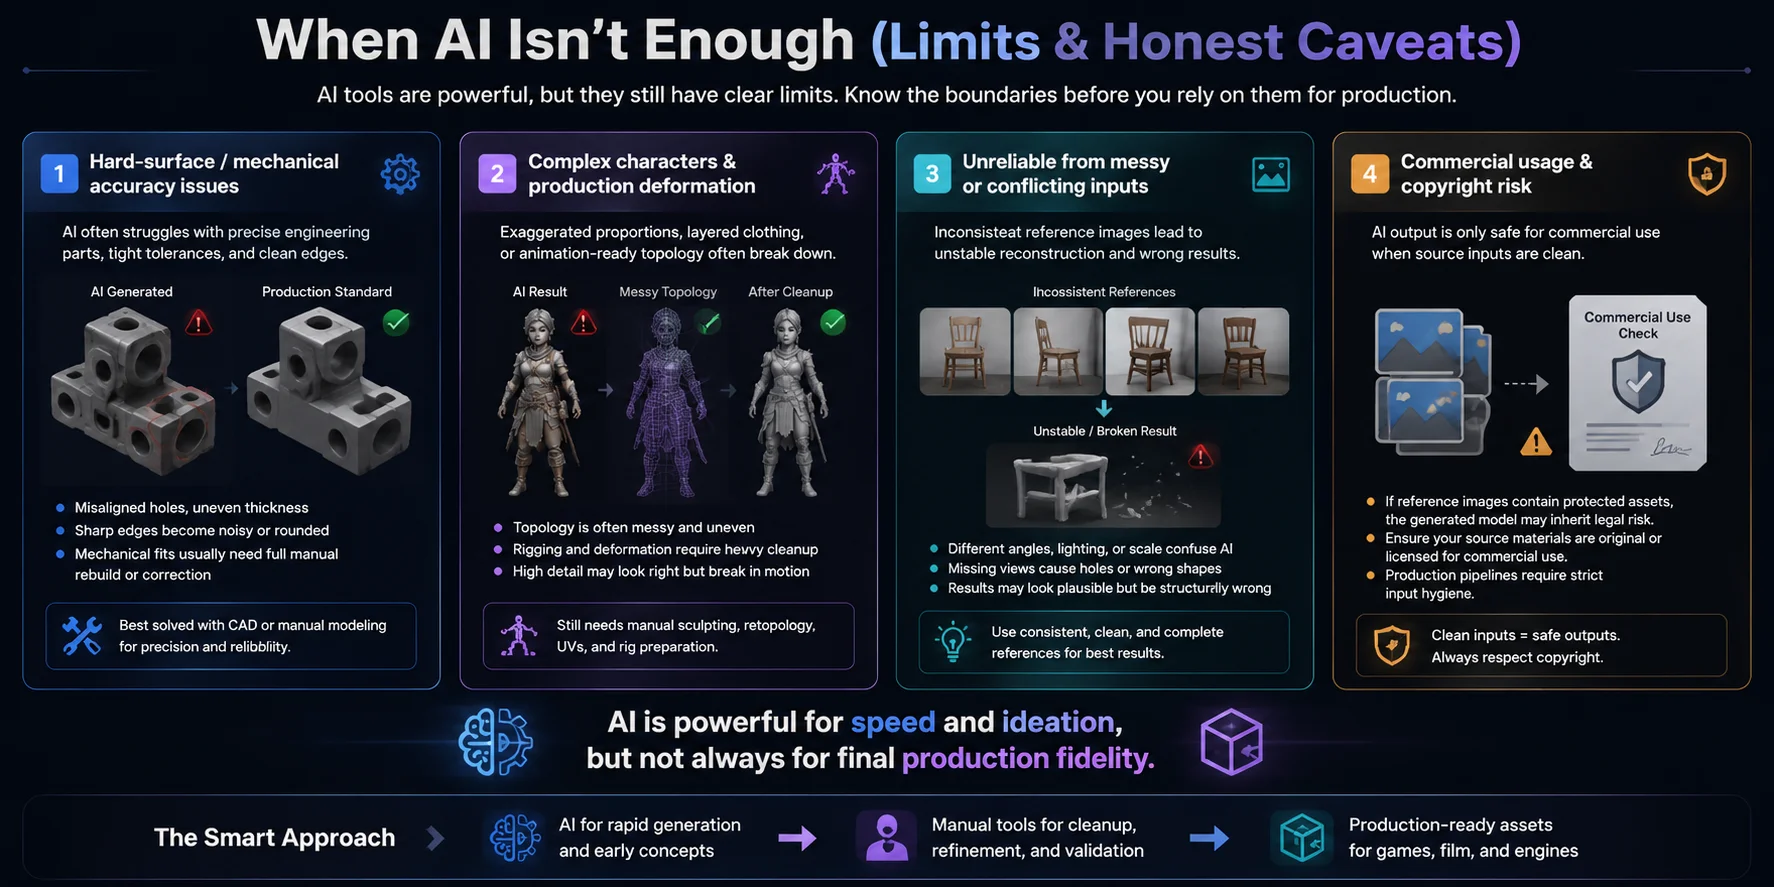
AI tools are powerful for rapid 3D generation, but they still have clear boundaries. In real production pipelines, understanding these limits is just as important as knowing what AI can do.
Key limitations of AI-generated 3D
- Hard-surface & mechanical accuracy issues
AI often struggles with precise engineering parts, tight tolerances, and clean edges. Mechanical assets usually require manual correction or full rebuilding. - Complex characters & production deformation
Exaggerated proportions, layered clothing, or animation-ready topology often break down. Even if the shape looks correct, rigging and deformation usually need heavy cleanup in tools like Blender. - Unreliable from messy inputs
If reference images are inconsistent (wrong angles, mixed lighting, or conflicting proportions), AI reconstruction becomes unstable. The result may look plausible but structurally incorrect. - Commercial usage and copyright
Commercial use depends on the rights attached to the source artwork, the tool’s current license, and the rules that apply to the project. Use material you own or have permission to use, and check the platform terms before distribution.
Bottom line. AI is strongest for fast generation and exploration; human review and cleanup remain essential when accuracy and production reliability matter.
Frequently Asked Questions
How do you turn 2D concept art into a 3D model?
Start with aligned references, then create a blockout or AI-generated base mesh. Refine the forms, rebuild or optimize the topology, unwrap UVs, apply textures and materials, and export the finished asset to a renderer or game engine.
Can AI turn concept art into a 3D model?
Yes. Image-to-3D tools can infer a base mesh from concept art, making them useful for blockouts and rapid exploration. Hidden geometry, proportions, and topology may still need manual correction before animation or final production.
What is the 2D to 3D pipeline, and what does the 3D artist need from the concept artist?
The pipeline usually runs from concept analysis → blockout → modeling or generation → retopology and UVs → texturing → rigging → rendering or engine export. A 3D artist benefits most from aligned front, side, and back views, plus consistent proportions, material notes, and scale cues.
Do I need orthographic (front/side) views, or is one image enough?
One strong image can be enough for a quick AI base or simple blockout. For characters, mechanical objects, and assets that must match the design closely, aligned front, side, and back views reduce guesswork and improve consistency.
What is retopology and why is it needed for 3D characters?
Retopology rebuilds a dense or irregular mesh into organized geometry with useful edge flow and an appropriate polygon budget. For characters, that structure helps joints and facial areas deform predictably while keeping the asset practical to animate and render.
Is AI-generated 3D good enough for production game assets?
AI-generated assets can work for blockouts, concept validation, and some static props, but they are not automatically game-ready. Check topology, polygon count, UVs, materials, scale, and deformation, then clean or rebuild the parts that do not meet the project’s requirements.
Can I use a 2D-to-3D model commercially?
Potentially, but commercial use depends on both the rights in the input artwork and the tool’s current license. Use references you own or are authorized to use, review the platform terms for your account and output, and obtain legal advice when the project carries meaningful IP risk.
Conclusion
From a flat concept to a fully usable 3D asset, the workflow is simple: generate a base mesh, refine the topology, add textures, and optimize it for export. This turns early ideas into something ready for animation, games, or real-time engines.
If you want to speed up the process, you can start directly with AI tools like Tripo AI Studio, then clean and finalize the model in your 3D pipeline.