How to Use Multiple Reference Images for Better 3D Generation
TL;DR
- For how to use multiple reference images for 3D generation, multiple angles usually give the model more evidence for hidden surfaces and proportions than a single image.
- For Tripo's multi-view-to-3D workflow, use 2–4 reference images; other tools may accept different counts.
- Shoot the same object from front, sides, and back with consistent lighting and distance.
- Submit the selected views as one set when your tool supports multi-image input, then follow its upload guidance.
- If the result looks distorted, first check angle coverage, lighting, blur, reflections, and whether the subject moved.
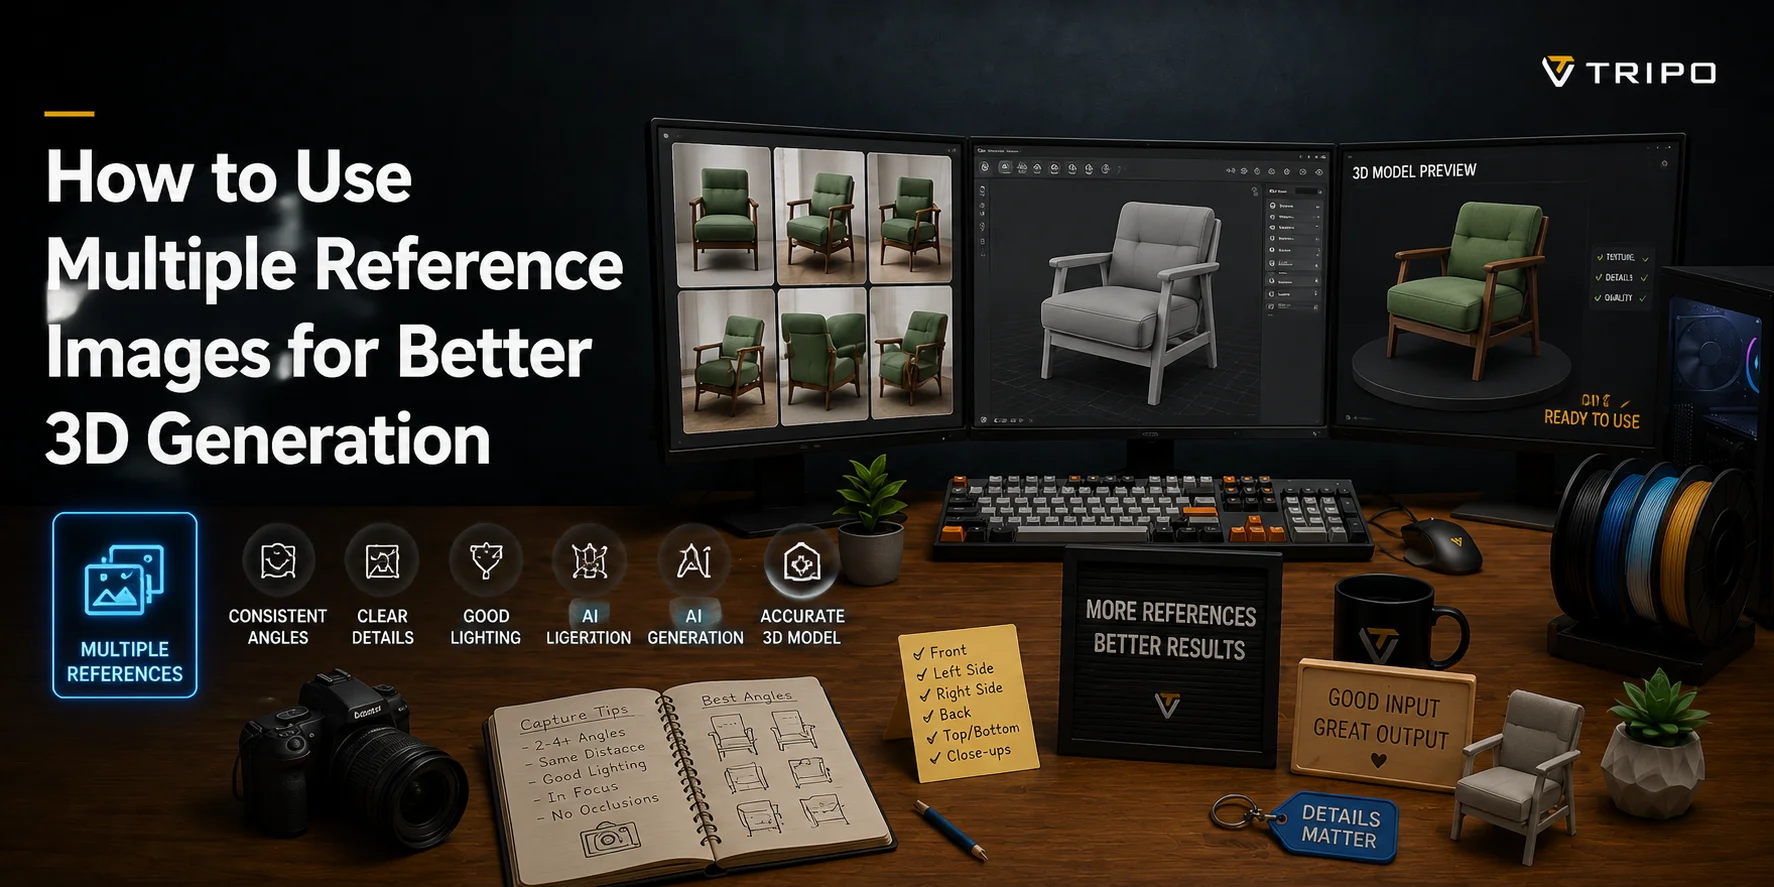
To use multiple reference images for 3D generation, photograph the same object from consistent angles—front, sides, and back—then submit the set to a multi-view image-to-3D tool. Extra views can reveal surfaces a single image leaves unseen, giving the generator more evidence for geometry and proportion. Here is a practical workflow.
Why Multiple Reference Images Beat a Single Photo
A single photo only captures one side of an object. Everything hidden behind it—the back, underside, and partially occluded details—must be guessed by the AI. Even the best image-to-3D models rely on learned patterns to predict missing geometry, which can lead to incorrect proportions, distorted shapes, or invented details.
By contrast, multiple reference images provide real visual evidence from different angles. Instead of imagining what's missing, the AI can compare overlapping features across views and reconstruct the object's actual form. The result is a model that is both more accurate and more faithful to the original subject, especially for products, characters, sculptures, and other complex shapes.
What the AI Actually Does with Extra Views
When you provide multiple reference images, a multi-view system can compare recurring features across the views and use that evidence to infer a more coherent 3D shape. Exact processing varies by tool, but the goal is the same: reduce ambiguity around surfaces that are hidden in any single image.
How Much Accuracy You Gain
The improvement can be meaningful, but there is no universal accuracy percentage for image-to-3D results. Output quality depends on the object, the model, the input coverage, and how accuracy is measured. Treat additional views as a way to reduce guesswork, not as a guarantee of a fixed score.
How Many Reference Images Do You Need?
For most objects, the sweet spot is 3–5 reference images. That's usually enough to capture the front, sides, back, and important details without overwhelming the reconstruction process. In practice, this range provides the best balance between accuracy, speed, and ease of capture.
Many AI multi-view generation tools accept 2–4 images as their standard workflow, while others support additional reference views. The exact limit depends on the platform, so it's better to follow each tool's recommendations instead of assuming that every AI model works the same way.
Capturing the Right Reference Images
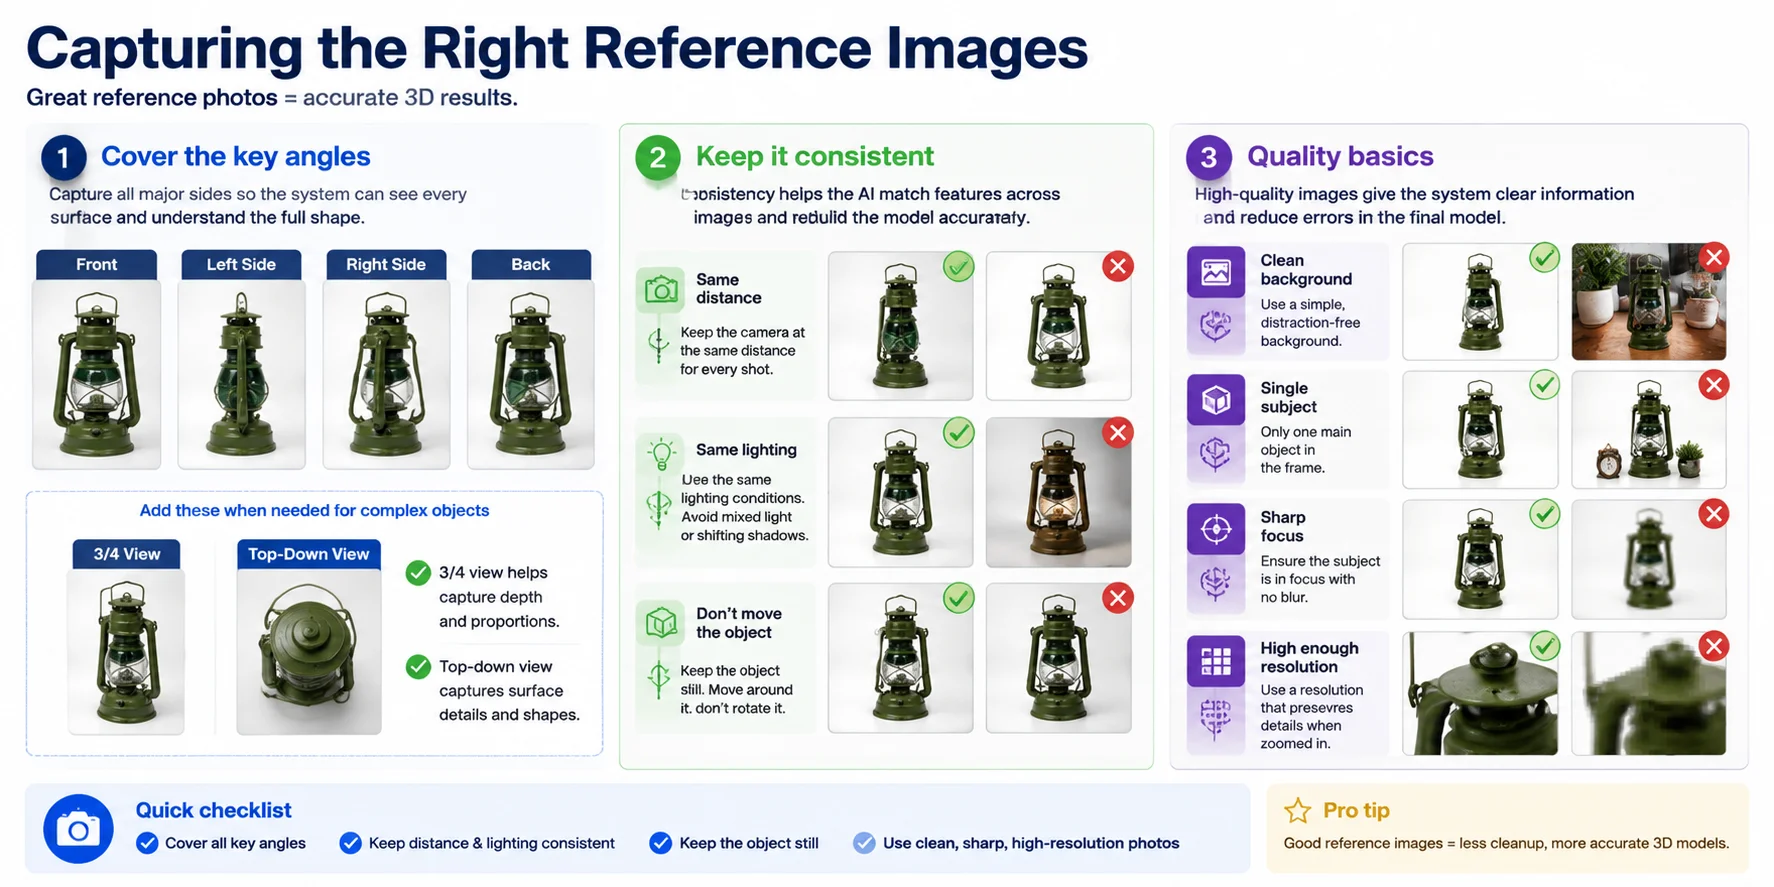
Capturing good reference images is less about having advanced equipment and more about following a structured, repeatable process. The goal is to give AI or photogrammetry tools complete visual information while avoiding confusion caused by inconsistent shots.
Cover the key angles
Start by capturing the essential viewpoints: front, left side, right side, and back. These four angles form the core coverage needed for most objects. If the shape is complex, add a three-quarter view to help bridge depth perception and a slightly top-down shot when surface details matter. The idea is simple: every important surface should appear in at least one image so the system doesn’t have to guess missing geometry.
Keep it consistent
Consistency matters more than a rigid capture setup. Keep the subject, lighting, framing, and apparent scale as stable as you can, and avoid blur, large exposure shifts, or views that hide important surfaces. Whether you move the camera or rotate the object depends on the tool and setup; the goal is a coherent, well-covered set of references.
Quality basics
Even perfect angles and consistency fail if image quality is poor. Use a clean, distraction-free background so edges are easy to detect. Always keep a single subject per frame—no clutter or overlapping objects. Make sure the subject is crisply focused, with no motion blur or soft edges. Finally, ensure the resolution is high enough that fine details (textures, edges, and contours) remain visible when zoomed in.
Step-by-Step — Turning Multiple Images Into a 3D Model
Turning multiple reference images into a 3D model is a simple workflow: choose a coherent set of views, submit them to a tool that supports multi-image input, generate, then inspect the result before exporting.
1. Select 2–4 consistent reference images
Start by choosing 2–4 images of the same object. They should clearly cover different angles (front, side, back, and optional 3/4 view). Consistency matters more than quantity: same lighting, same scale, and no changes to object position.
2. Open a multi-view image-to-3D tool
Open a tool that supports multi-image input, such as Tripo Image to 3D. Check its current input limits before you begin.
3. Upload all images at once
Add the selected views as one reference set when the tool provides multi-image input. Do not assume every platform uses the same upload flow or accepts the same number of images.
4. Generate and wait for reconstruction
Start generation, then let the tool process the reference set. The exact reconstruction method and controls differ by platform, so use the tool's guidance for retries or input adjustments.
5. Preview and evaluate results
Check the output carefully. Look at silhouette accuracy, symmetry, and proportions. If something feels off, rerun with adjusted or cleaner inputs.
6. Edit and export
Refine the model if needed—clean up the mesh, correct normals, or adjust textures—then export the format that fits your next step. Tripo supports GLB, USD, FBX, OBJ, STL, and 3MF; export availability can depend on the model version and subscription.
Single Image vs. Multiple Images — Is It Worth the Effort?
Using a single image for 3D reconstruction is fast and convenient, but it forces the model to “guess” hidden geometry. Multiple reference images significantly reduce ambiguity by providing consistent views from different angles. The trade-off is always between speed and accuracy.
Comparison Table
| Factor | Single Image | Multiple Images |
|---|---|---|
| Practical outcome | More hidden geometry must be inferred | Extra views can reduce ambiguity when they are consistent |
| Detail coverage | Visible surfaces may be detailed; unseen areas are inferred | More surfaces may be represented when the set has useful coverage |
| Backside reconstruction | Often inferred from the visible side | Can be more informed when the back is included |
| Input effort | Fast: one image and minimal setup | More preparation; image count and upload flow are tool-dependent |
| Best use cases | Simple objects, concept sketches, fast iteration | Objects with important hidden surfaces or complex silhouettes |
If you need speed or basic shapes, a single image is usually enough; if you care about accuracy, structural completeness, or 3D printing readiness, multiple images are worth the extra effort.
Troubleshooting — When Your 3D Model Comes Out Wrong
When an image-to-3D result looks wrong, inconsistent input is a common cause, but model limitations and difficult materials can contribute too. Start by checking geometry distortion, missing coverage, and texture mismatch, then retry with a cleaner reference set.
Distorted or Warped Geometry
Symptoms:
The model looks stretched, twisted, or uneven—edges don’t align with the real object shape.
Cause:
Inconsistent viewpoints, subject movement, blur, reflections, or large lighting changes can make the references harder to interpret. Some shapes and materials are also challenging for current models.
Fix:
Re-capture the missing or weak views with steadier framing, clearer focus, and more even lighting. Keep important surfaces visible across the set, then retry with the tool's recommended number of images.
Wrong Proportions or Scale
Symptoms:
The model looks “off”—too tall, too wide, or missing structural balance.
Cause:
This often comes from uneven coverage of views or missing key reference angles (especially top and bottom). The system guesses proportions when data is incomplete.
Fix:
Add views that reveal the missing surfaces, especially areas the current set barely shows. Keep the object similarly framed across shots to reduce perspective surprises, and follow the input range recommended by your chosen tool.
Blurry or Mismatched Texture
Symptoms:
Surface detail looks smeared, low-quality, or inconsistent across different parts of the model.
Cause:
Lighting changes, low-resolution images, or mixed illumination conditions confuse texture mapping.
Fix:
Re-shoot under uniform lighting (no harsh shadows or mixed color temperature). Use higher-resolution images and avoid reflections or motion blur. For AI workflows, regenerate textures separately if supported.
Better-controlled inputs often improve a retry, but they cannot remove every limitation. Prioritize clear coverage, stable lighting, and sharp images before spending time on more references.
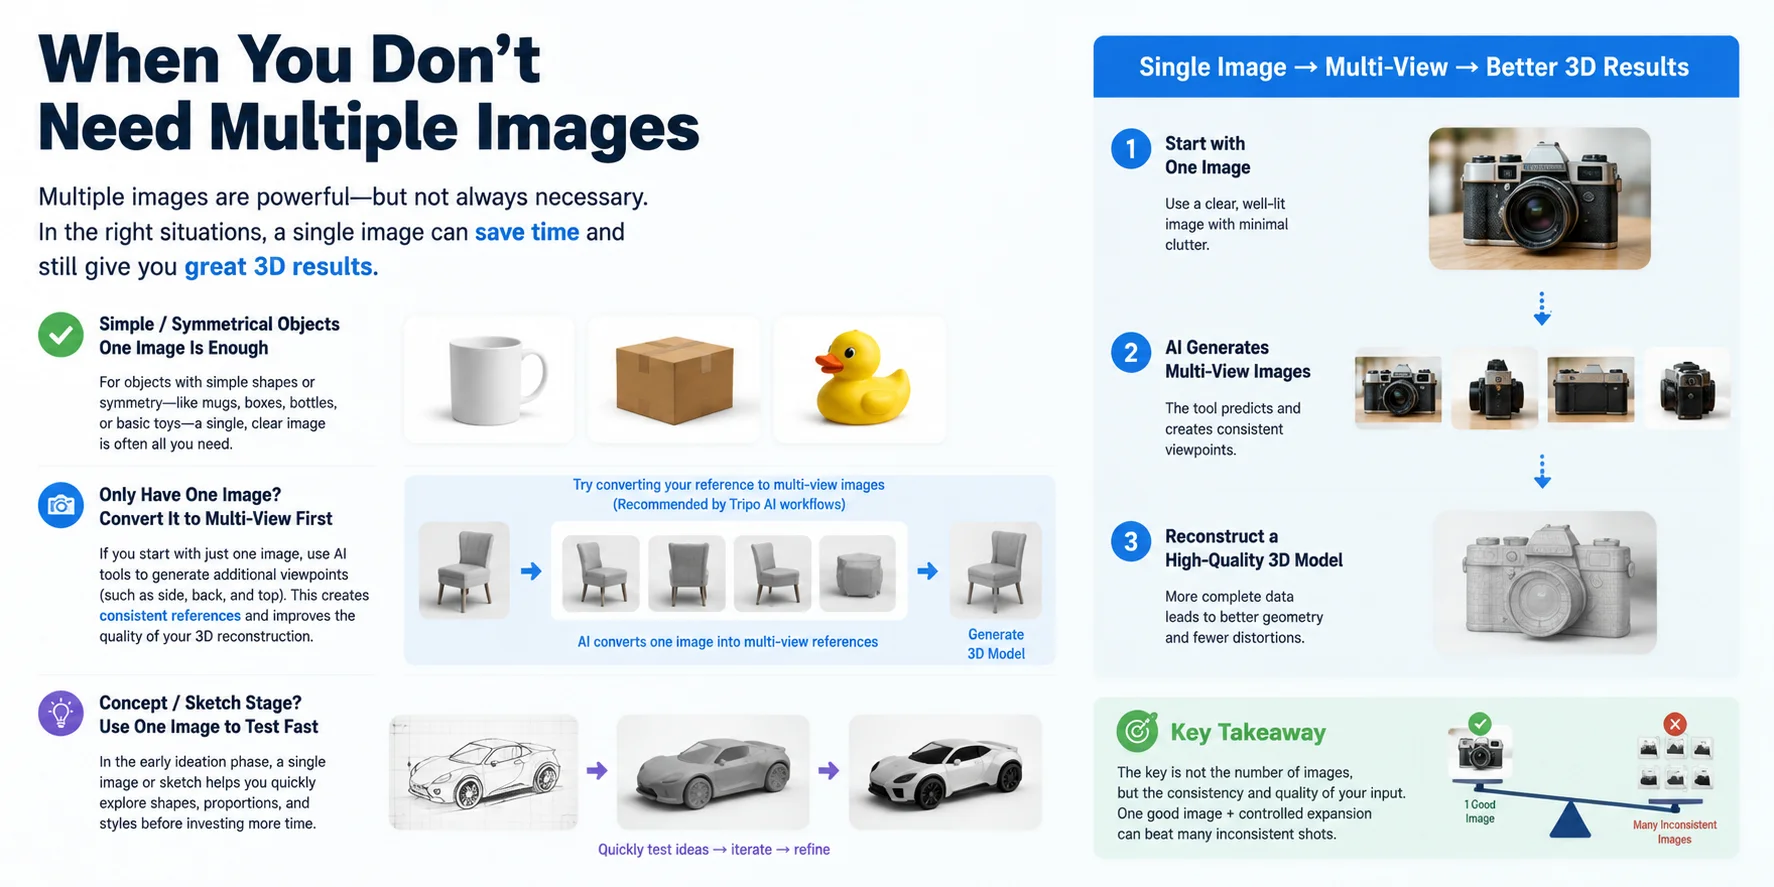
When You Don't Need Multiple Images
Not every 3D reconstruction workflow benefits from taking multiple reference images. In fact, over-collecting inconsistent data can sometimes hurt more than help. For simple or symmetrical objects—like a mug, box, or basic toy—one clean, well-lit image is often enough for modern AI tools to generate a usable model. If the shape is predictable, the system can infer missing geometry without needing full multi-view coverage.
If you only have a single image, a better strategy is to first convert it into multi-view references using AI tools before running reconstruction. Many pipelines (including guidance from tools like Tripo AI workflows) suggest generating synthetic side and back views from one strong input image, rather than capturing inconsistent real photos. This helps maintain coherence across angles while still expanding coverage.
For early-stage ideation, such as concept sketches or rough product ideas, a single image is also preferable. It allows you to quickly test shape, proportion, and style direction without investing time in full capture setups.
Frequently Asked Questions
How do you create a 3D model from multiple images?
For an AI multi-view workflow, choose the number of images your tool supports, keep the subject consistent across the set, and make sure the key surfaces are visible. For example, Tripo's multi-view-to-3D workflow uses 2–4 reference images. Traditional photogrammetry is a separate process and often uses a much larger, overlapping photo set. After generation, inspect the mesh and texture before exporting.
How many reference images do I need for 3D generation?
The answer depends on the method. Tripo's multi-view-to-3D workflow uses 2–4 reference images, while other AI tools may accept different limits. Traditional photogrammetry commonly needs many more overlapping photos because it reconstructs the object through a different capture process. In either case, coverage and consistency matter more than adding redundant images.
How do I make good reference images for 3D modeling?
Use clear, sharp images with even lighting and useful angle coverage. Keep the subject, framing, apparent scale, and exposure reasonably consistent, and avoid reflections or motion blur. AI multi-view tools use a small tool-defined set, while traditional photogrammetry needs a denser sequence of overlapping photos.
Is multi-view image-to-3D better than single image?
Multi-view image-to-3D can be more reliable when the extra views are consistent and reveal surfaces hidden in the first image. A single image remains faster for concepts and simple shapes, while multi-view is more useful when structural completeness matters. More images are not automatically better; judge the output and retry with cleaner inputs when needed.
Why does my 3D model look distorted from my reference images?
Distortion often comes from missing coverage, inconsistent framing or lighting, blur, reflections, or subject movement. Re-shoot the weakest views and keep important surfaces visible across the set. Difficult materials, shapes, and model limitations can also affect the result, so cleaner inputs do not guarantee a perfect reconstruction.
Can I turn multiple photos of a person into a 3D model?
Yes. Photogrammetry or multi-view AI tools can reconstruct a person when the subject remains still, evenly lit, and consistently framed, although subtle movement and expression changes make people harder than rigid objects. Use a controlled setup and obtain the person's clear consent before creating or sharing a digital likeness.
Conclusion
Multiple reference images can improve a 3D result when they reveal missing surfaces and stay visually consistent. Choose the image count your tool supports, prioritize clear coverage over redundant shots, and inspect the output before export.
Ready to try it with your own images? You can start experimenting in Tripo AI Studio and see how quickly your references turn into a 3D model.