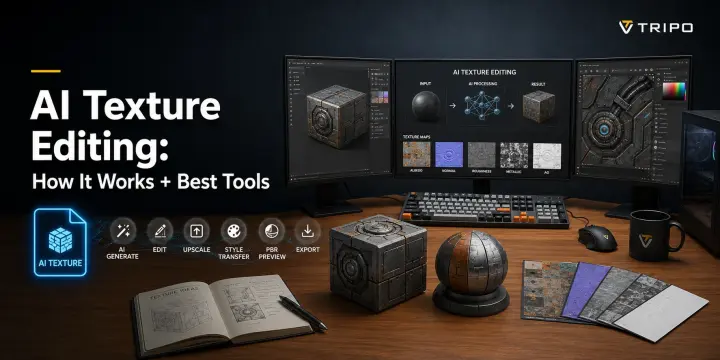
AI Texture Editing: How It Works + Best Tools (2026)
TL;DR
- AI texture editing uses prompts, reference images, or brush strokes to generate and refine 3D textures much faster than manual painting.
- For production workflows, the key output is usually a PBR material set: Base Color, Normal, Roughness, Metallic, Height, and AO maps.
- The most useful AI texturing features are one-click full-surface texturing, HD upscaling, local brush fixes, Generate/Paint modes, and PBR export.
- Games, color-capable 3D printing, architecture, product visualization, and solo creator workflows all benefit from faster texture iteration.
AI texture editing uses artificial intelligence to create, change, or refine the surface look of a 3D model or image—colors, patterns, and materials—from a text prompt, a reference image, or a brush stroke. Instead of hand-painting texture maps, AI generates PBR materials (Base Color, Normal, Roughness) in seconds, ready for games, 3D printing, and visualization.
What Is AI Texture Editing?
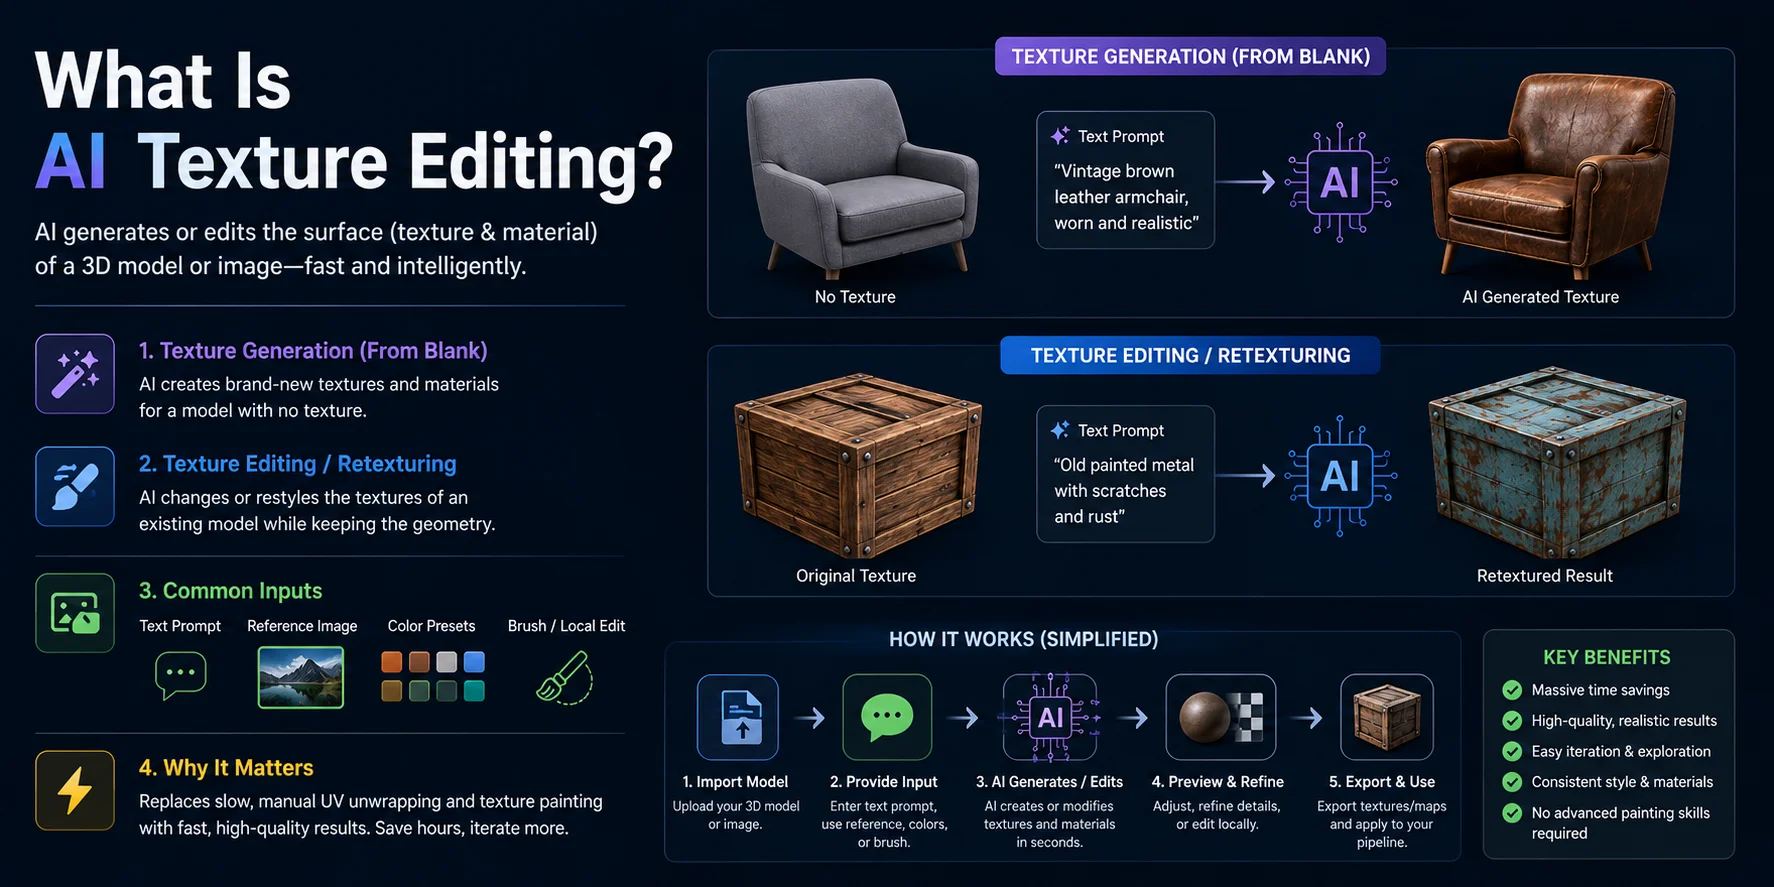
AI texture editing is the process of using artificial intelligence to generate, modify, or replace the surface appearance of a 3D model or image. Instead of manually painting textures or editing material maps, AI can automatically create realistic colors, patterns, and materials from simple inputs, dramatically reducing the time needed to texture a model.
It's helpful to distinguish between texture generation and texture editing (or retexturing). Texture generation starts from a blank model and creates entirely new textures, while texture editing changes the appearance of an existing textured model—for example, turning painted wood into polished metal or replacing worn fabric with leather without changing the underlying geometry.
Most AI texture editing tools support multiple input methods, including text prompts, reference images, color presets, and even brush-based editing for local adjustments. This gives artists the flexibility to quickly explore different looks while maintaining creative control.
The biggest advantage is speed. Traditional UV unwrapping and texture painting can take hours of manual work, whereas AI can produce high-quality texture variations in minutes. This makes AI texture editing especially useful for rapid concept development, game assets, product visualization, and 3D content creation where fast iteration is essential.
How Does AI Texture Editing Work? (PBR Maps Explained)
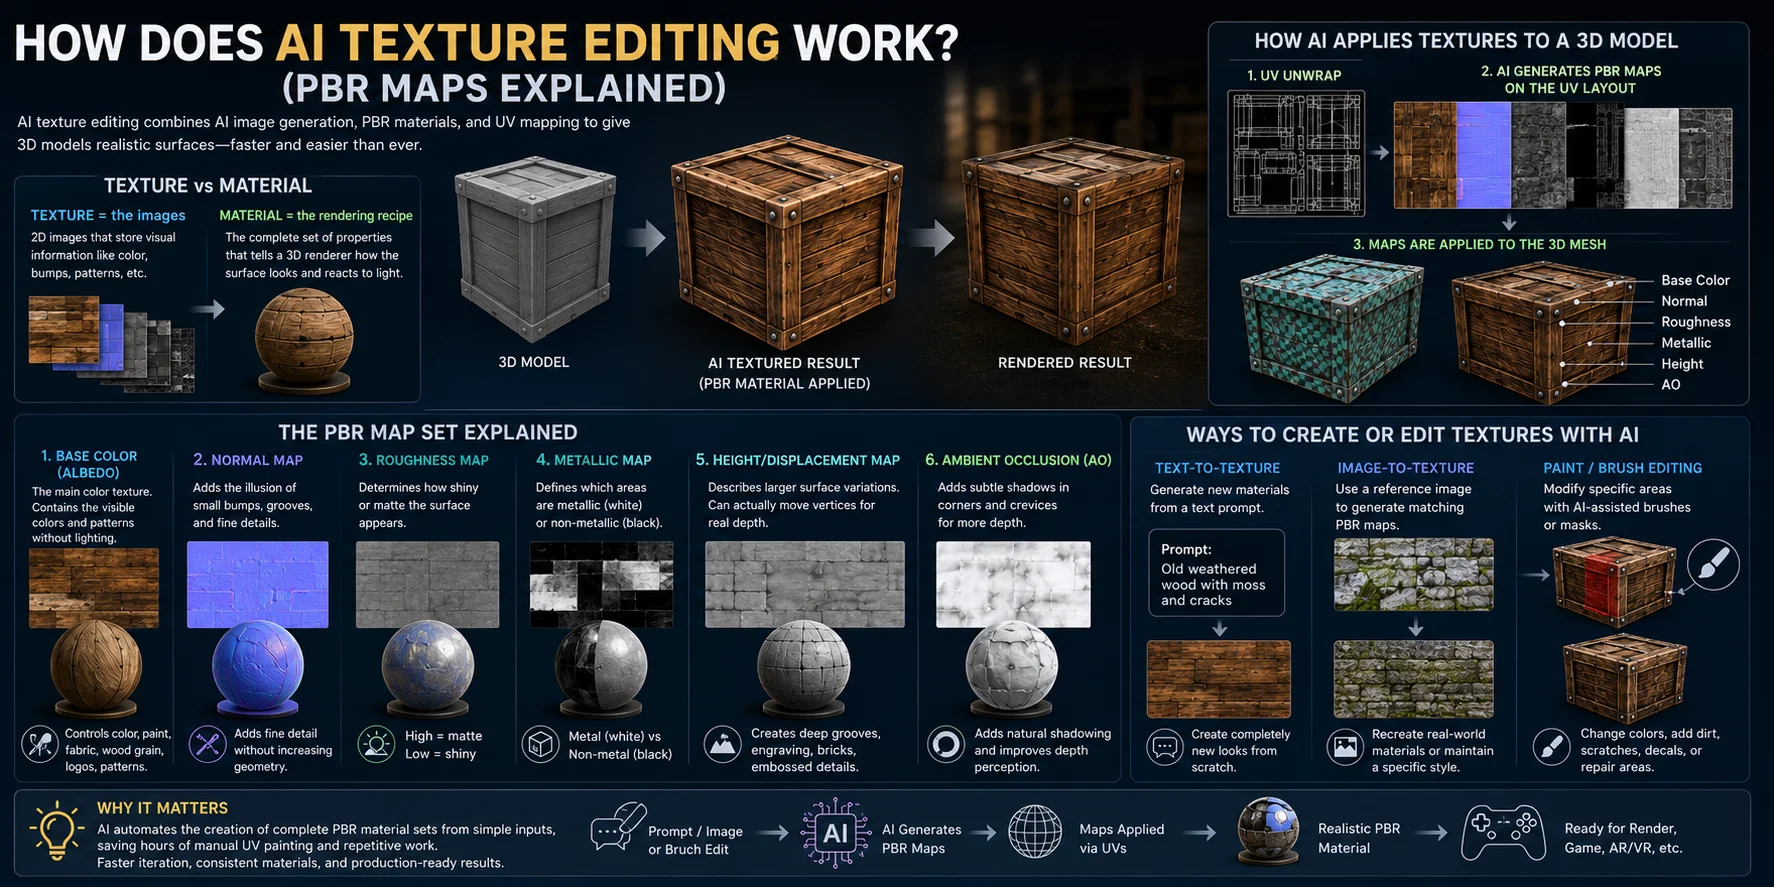
At its core, AI texture editing combines AI image generation, PBR (Physically Based Rendering) materials, and UV mapping to give a 3D model a realistic surface. Instead of manually painting every detail, AI generates or edits texture maps that are wrapped onto a model, dramatically reducing the time needed to create production-quality assets.
Texture vs. Material: What's the Difference?
Although the terms are often used interchangeably, they describe different things.
- Texture is a 2D image that stores visual information, such as color, bumps, scratches, or patterns.
- Material is the complete set of properties that tells a 3D renderer how the surface should look and react to light. A material usually combines multiple texture maps—known as a PBR map set—along with shader settings.
Think of it this way:
- Texture = the images
- Material = the rendering recipe that uses those images
For example, two objects can share the same wood texture but use different material settings to appear glossy, matte, old, or freshly polished.
The PBR Map Set Explained
Modern AI texture editors usually generate multiple maps instead of just a single color image. Together, these maps create realistic lighting and surface detail.
1. Base Color (Albedo)
This is the main color texture. It contains the object's visible colors and patterns without any lighting or shadows baked in.
Controls: Paint color, fabric pattern, wood grain, logos, labels, and surface graphics.
2. Normal Map
A normal map creates the illusion of small bumps, grooves, stitching, or engraved details without adding extra geometry.
Controls: Fine surface detail while keeping the model lightweight.
3. Roughness Map
The roughness map determines how shiny or matte a surface appears.
- High roughness: Chalk, concrete, fabric, unfinished wood
- Low roughness: Glass, polished plastic, glossy paint
This map has a huge impact on realism because it controls how light scatters across the surface.
4. Metallic Map
The metallic map tells the renderer which parts behave like metal.
- White: Metallic
- Black: Non-metallic
It helps distinguish materials such as steel, aluminum, gold, plastic, rubber, or ceramic.
5. Height (Displacement) Map
Height maps describe larger surface variations.
Unlike normal maps, displacement can actually move vertices during rendering or subdivision, creating deeper grooves, bricks, carved stone, or embossed patterns.
6. Ambient Occlusion (AO)
AO adds subtle shadows into corners, cracks, and recessed areas where light naturally reaches less easily.
It increases depth perception and helps models appear more grounded and realistic.
How AI Applies Textures to a 3D Model
Generating a texture is only part of the process. The AI also needs to place that texture correctly on the model.
This is done using UV mapping, where the 3D surface is "unwrapped" into a flat 2D layout. AI generates texture maps based on this UV layout so every pixel corresponds to the correct location on the mesh. Once the maps are applied, the renderer combines the Base Color, Normal, Roughness, Metallic, Height, and AO maps into a single PBR material that wraps seamlessly around the 3D object.
Some modern AI tools can also improve UV seams, reduce stretching, and generate textures that remain visually consistent across complex geometry.
Text-to-Texture vs. Image-to-Texture vs. Paint Editing
Different AI texture workflows serve different creative needs:
- Text-to-Texture
- Generate a brand-new material from a text prompt.
- Example: "Old weathered oak wood with moss and cracks."
- Best for creating entirely new looks from scratch.
- Image-to-Texture
- Use a reference photo or artwork to generate matching texture maps.
- Best for recreating real-world materials or maintaining a specific visual style.
- Paint / Brush Editing
- Modify only selected areas of an existing texture using AI-assisted brushes or masks.
- Ideal for changing colors, adding dirt, scratches, decals, or repairing small regions without affecting the rest of the material.
Why This Matters
Traditional PBR texturing often requires UV unwrapping, manual texture painting, and creating multiple maps individually—a process that can take hours for a single asset. AI automates much of this work by generating complete PBR material sets from simple prompts or reference images, allowing artists to focus on creative direction instead of repetitive manual painting. The result is faster iteration, consistent materials, and production-ready textures for games, product visualization, AR/VR, and 3D content creation.
AI Texturing Capabilities & Tool Landscape
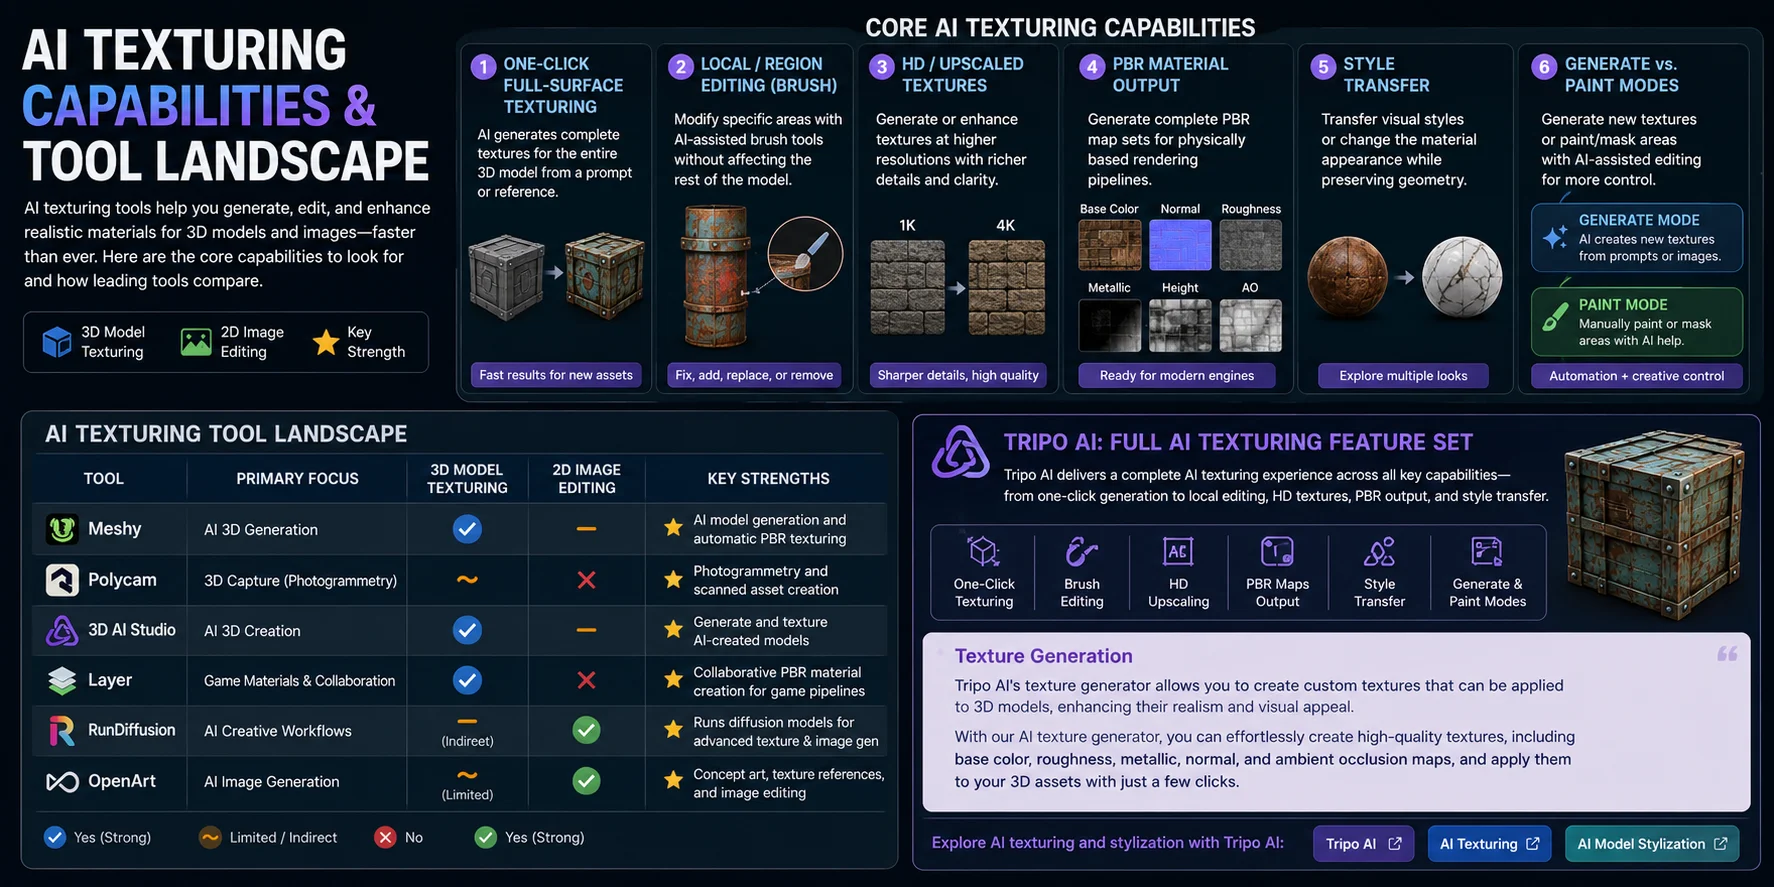
AI texturing tools have evolved far beyond simple texture generation. Modern platforms can generate complete PBR materials, edit existing textures, repair local regions, upscale texture resolution, and even transfer artistic styles between assets. Rather than comparing tools by brand alone, it's more useful to compare them by what they can actually do. The best AI texturing solution depends on your workflow—whether you're texturing a 3D model, editing a 2D image, or preparing assets for games, AR/VR, or product visualization.
Core AI Texturing Capabilities
When evaluating an AI texturing tool, these are the most important features to look for:
1. One-Click Full-Surface Texturing
The AI automatically generates textures for an entire 3D model from a text prompt or reference image. Instead of painting individual UV islands, the model receives a complete, consistent material in one step.
Best for: New assets, concept art, rapid prototyping, and game-ready models.
2. Local or Region-Based Editing (Brush)
Rather than changing the whole object, brush-based editing lets you modify only selected areas.
Examples include:
- Add rust to metal edges
- Paint dirt onto shoes
- Replace fabric with leather
- Remove scratches
- Repair texture artifacts
This combines AI generation with manual artistic control.
3. HD / Upscaled Texture Generation
Many AI tools can generate or enhance textures at higher resolutions, improving sharpness while preserving fine details.
High-resolution textures are especially useful for:
- Close-up renders
- Cinematics
- Product visualization
- VR experiences
- Modern game assets
4. PBR Material Output
Professional workflows require more than a color map.
The best AI tools generate complete PBR texture sets, including:
- Base Color (Albedo)
- Normal
- Roughness
- Metallic
- Height / Displacement
- Ambient Occlusion
This allows assets to render consistently across modern engines such as Unreal Engine, Unity, Blender, and other physically based rendering pipelines.
5. Style Transfer
Instead of creating a completely new material, style transfer changes the visual style while preserving the model's geometry.
Examples include:
- Plastic → polished metal
- Wood → marble
- Stone → moss-covered rock
- Realistic → stylized
- Sci-fi → medieval
This capability is valuable when exploring multiple art directions quickly.
6. Generate vs. Paint Modes
Many modern tools provide two complementary workflows:
- Generate Mode – AI creates an entirely new texture from prompts or images.
- Paint Mode – Artists manually paint or mask selected regions while AI assists with realistic material generation.
Using both modes together provides the best balance between automation and creative control.
AI Texturing Tool Landscape
Different platforms focus on different parts of the workflow. Some specialize in texturing 3D models, while others primarily generate or edit 2D images.
| Tool | Primary Focus | 3D Model Texturing | Image / Texture Editing | Key Strengths |
|---|---|---|---|---|
| Meshy | AI 3D generation | Yes | Limited | AI model generation plus AI texture generation and editing for 3D assets. |
| Polycam | 3D capture + AI texture tools | Limited / asset-adjacent | Yes | 2D Texture Generator and AI Texture Generator workflows for material references and scanned-asset use cases. |
| 3D AI Studio | AI 3D creation | Yes | Limited | Generate and texture AI-created 3D models in one creation workflow. |
| Layer | Game art, textures, and materials | Pipeline support | Yes | Creates game-ready textures, materials, concept art, UI assets, and reference images for Unity / Unreal workflows. |
| RunDiffusion | AI creative workflows | Indirect | Yes | Runs diffusion models for advanced texture, image-generation, and render retexturing workflows. |
| OpenArt | AI image generation | Limited | Yes | Concept art, texture references, and image editing for visual exploration. |
Where Tripo AI Fits
For users looking for an end-to-end AI texturing workflow, Tripo AI is the most natural fit in this article because its texture tools cover full-surface generation, local fixes, PBR materials, and style changes in one 3D creation pipeline.
Yes. Tripo provides AI-powered texturing tools to create, enhance, and edit textures for production-ready 3D assets.
- One-Click Global Texturing: Transform blank models into fully textured 3D assets with consistent color, style, and material across the entire surface.
- HD Textures with AI Upscaling: Generate ultra-high-resolution 3D textures with AI-powered upscaling. Preserve sharp edges, fine surface details, and material accuracy for demanding production pipelines.
- Magic Brush for Local Fixes: Correct flaws, enhance details, or repaint small areas with a simple brush stroke—AI-powered and seamless.
- PBR Materials, Ready for Render: Generate physically based textures instantly—Base Color, Normal, Roughness, and more—for real-time engines and offline renders.
- Texture Editing Modes: Generate Mode inputs text descriptions to generate texture previews for the model; Paint Mode lets users directly pick colors and paint on the model surface for precise, controllable local edits.
- Additional Capabilities: Upgrade Texture enhances existing texture clarity, detail, and overall quality; Stylization applies preset styles or custom style references to transform the texture appearance.
If you want to apply this workflow in a 3D creation pipeline, start with Tripo's AI texturing workflow for texture generation and editing, then use model stylization when the goal is to explore a stronger visual direction.
Which Capabilities Matter Most?
If you're creating new assets, prioritize one-click texturing and complete PBR output. If you're refining existing models, local brush editing and style transfer become more important. For production-quality assets, high-resolution textures and physically based material maps are essential. Rather than choosing the platform with the longest feature list, choose the one that best matches your workflow—from rapid concept generation to production-ready 3D assets.
The AI Texture Editing Workflow (Step by Step)
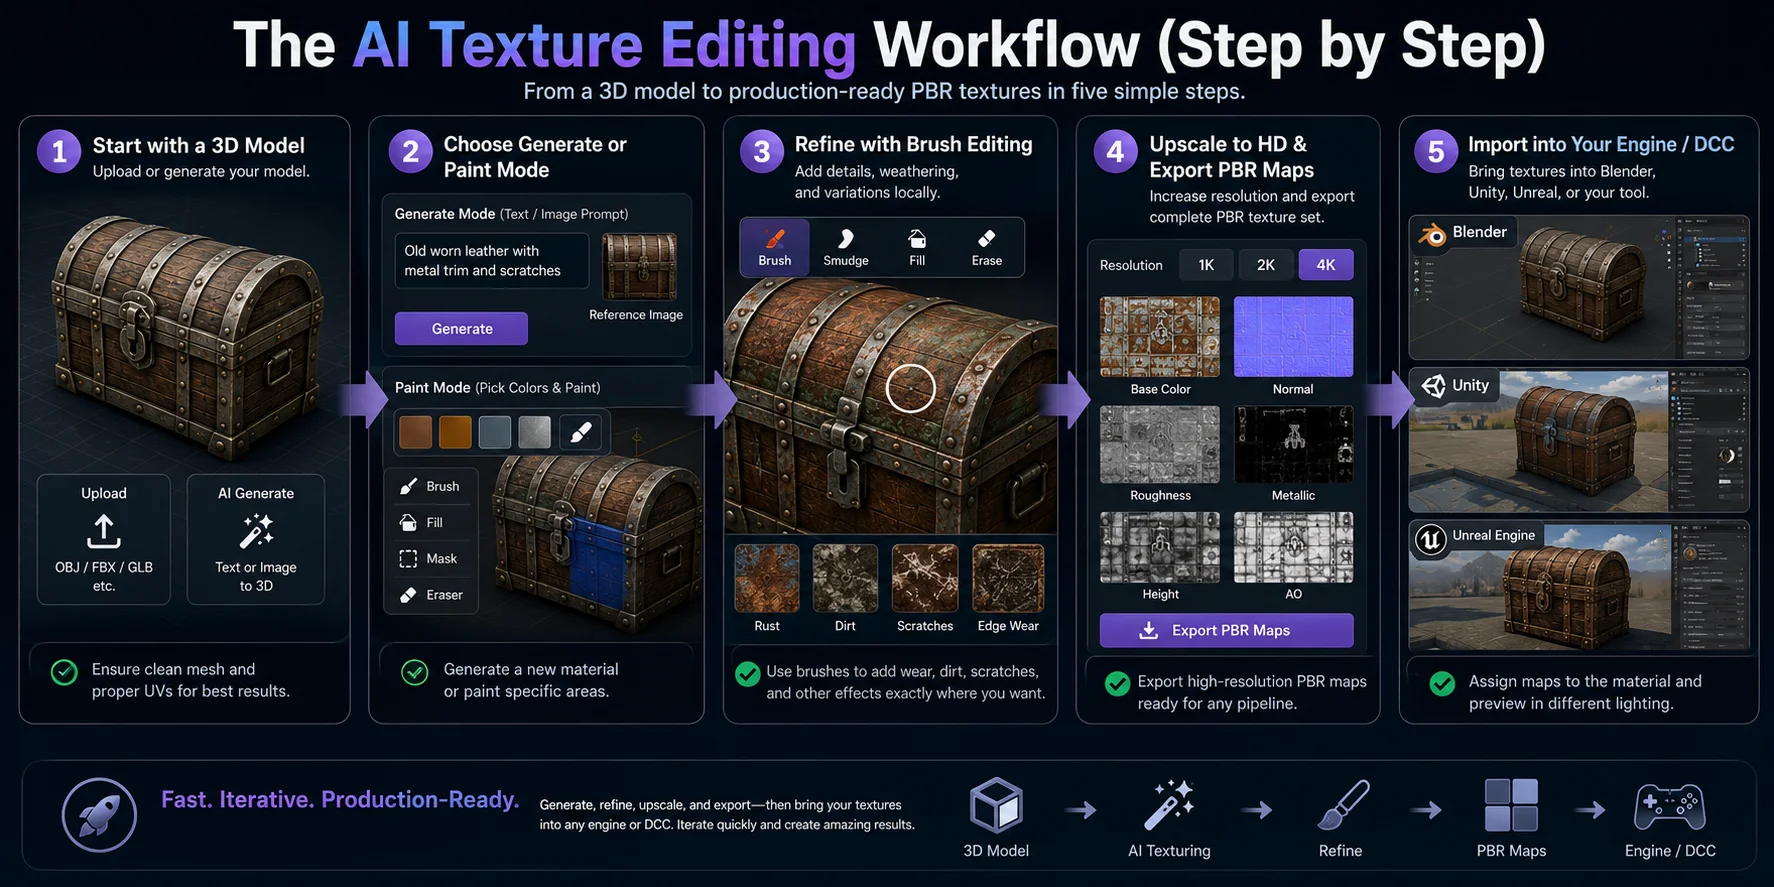
Modern AI texture editing is designed to be fast and iterative. Instead of manually painting every texture map, you can generate materials with AI, refine specific areas, and export production-ready assets in just a few steps. While the interface varies between tools, the overall workflow is largely the same.
Step 1 — Start with a 3D Model
Begin by importing an existing 3D model or generating one with an AI 3D tool. Most platforms support common formats such as OBJ, FBX, GLB, or GLTF.
Before texturing, make sure the model has a clean mesh and proper UVs. Good UV mapping helps AI apply textures consistently and minimizes visible seams or stretching.
Step 2 — Choose Generate Mode or Paint Mode
Next, decide how you want to create the texture.
Generate Mode creates an entirely new material using either:
- A text prompt (for example, "aged oak wood with moss and cracks")
- A reference image that defines the desired appearance
This is the fastest option when creating textures from scratch.
Paint Mode gives you more direct control. Instead of replacing the whole material, you can paint or mask selected areas while AI generates textures only where you need them. Many tools also let you choose colors or material presets before applying changes.
Step 3 — Refine with Local Brush Editing
Once the base material is generated, use the brush tool for targeted improvements.
Common edits include:
- Adding rust to metal edges
- Painting dirt or dust onto surfaces
- Creating scratches and wear
- Introducing color variation
- Repairing texture artifacts
- Blending materials between regions
Local editing makes it easy to create realistic weathering without regenerating the entire texture.
Step 4 — Upscale and Export PBR Maps
After you're satisfied with the appearance, increase the texture resolution for production use. Many AI texturing tools include HD or upscaling options that improve detail while preserving the generated style.
Export the complete PBR material set, typically including:
- Base Color (Albedo)
- Normal
- Roughness
- Metallic
- Height / Displacement (if available)
- Ambient Occlusion (AO)
These maps are compatible with modern rendering and game pipelines.
Step 5 — Import into Your DCC or Game Engine
Finally, import the exported textures into your preferred 3D software or engine, such as:
- Blender
- Unity
- Unreal Engine
Assign the exported PBR maps to the corresponding material channels, then preview the asset under different lighting conditions. At this stage, you can make final adjustments or return to the AI editor if further refinements are needed.
A Fast, Iterative Workflow
The biggest advantage of AI texture editing is how quickly you can iterate. Generate a complete material, refine specific regions with brush tools, upscale the result, and export production-ready PBR maps—all without the hours of manual UV painting required by traditional workflows. This rapid cycle makes AI texturing ideal for games, product visualization, AR/VR, and other 3D content pipelines.
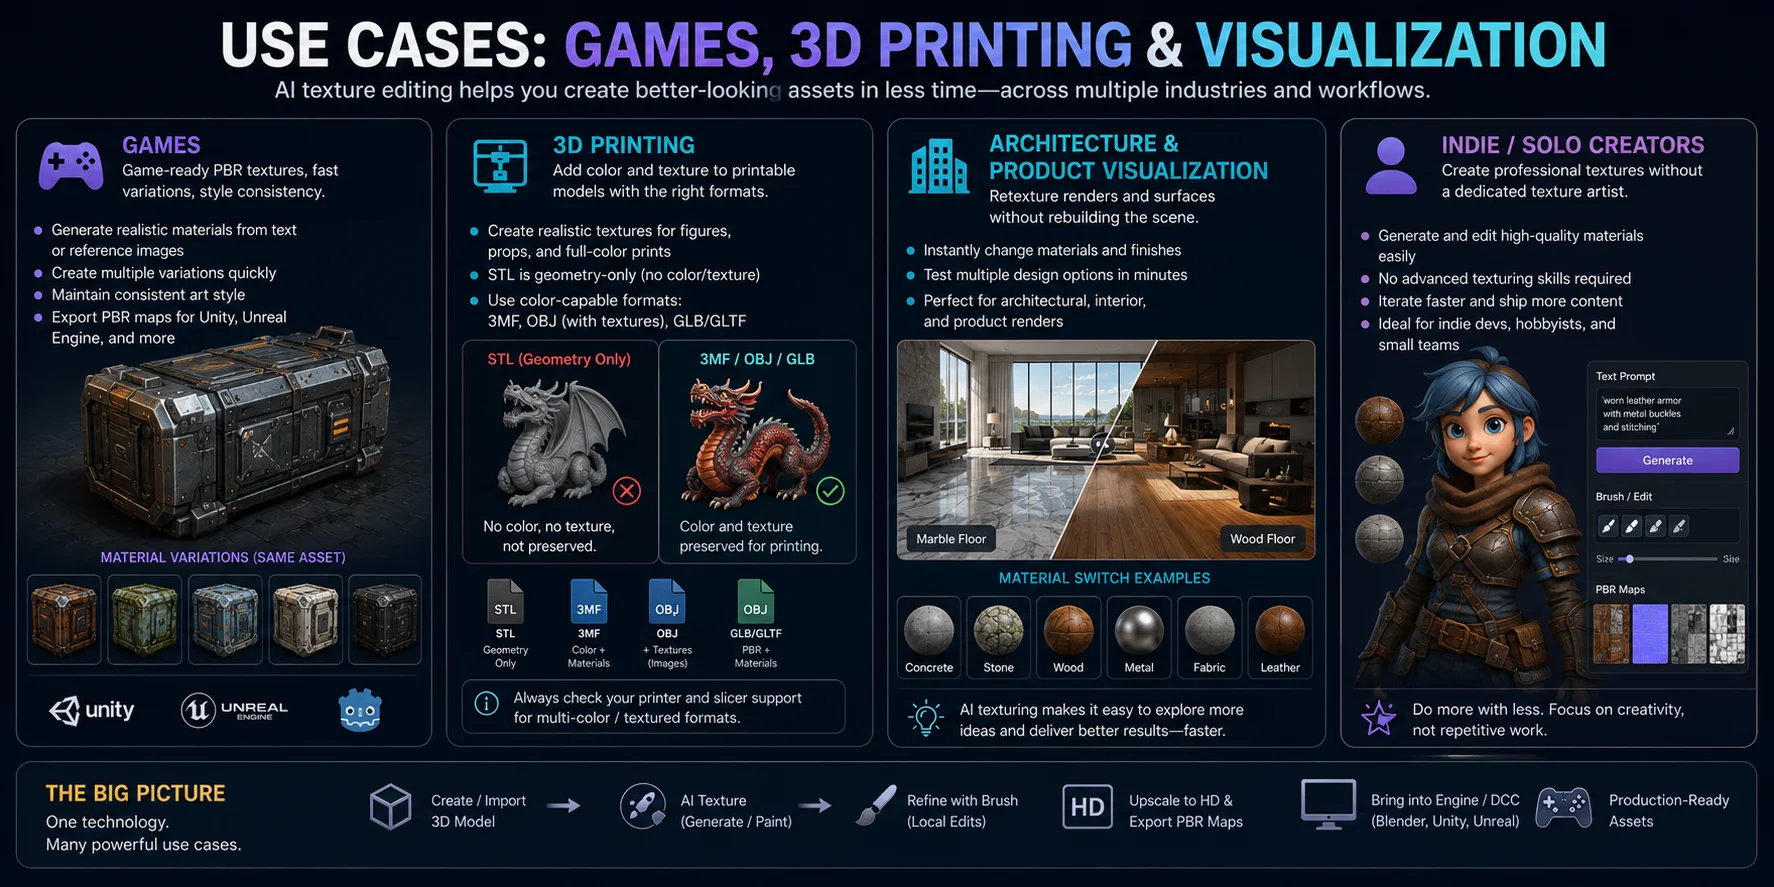
Use Cases: Games, 3D Printing & Visualization
AI texture editing is valuable wherever high-quality 3D assets need to be created quickly. By automating much of the texturing process, it helps artists, designers, and developers produce realistic materials, explore multiple visual styles, and iterate far faster than traditional manual workflows. From game development to product visualization, AI texturing is becoming a standard part of modern 3D pipelines.
Games
Game development is one of the biggest use cases for AI texture editing. Instead of hand-painting every material, artists can generate game-ready PBR textures from text prompts or reference images, then quickly refine them with local brush editing.
Common uses include:
- Creating realistic wood, metal, stone, leather, or fabric materials
- Generating multiple visual variations of the same asset
- Maintaining a consistent art style across an entire game
- Producing production-ready PBR maps for Unity, Unreal Engine, and other modern engines
For indie teams and large studios alike, AI significantly reduces repetitive texturing work while speeding up asset production.
3D Printing
AI texturing also benefits color-capable 3D printing workflows by making it easier to create realistic surface finishes for presentation models, figurines, and full-color prototypes.
However, it's important to understand the file format limitations:
- STL stores geometry only and does not contain colors, textures, or materials.
- To preserve textured or colored models, export using color-capable formats such as 3MF, OBJ (with accompanying texture files), or GLB/GLTF, depending on your printer and software workflow.
If your goal is a full-color 3D print, always verify that both your printer and slicer support textured or multi-color formats before exporting.
Architecture & Product Visualization
Architectural visualization and product rendering often require experimenting with different materials before a design is finalized. AI texture editing makes this much faster by allowing designers to replace surface materials without rebuilding the scene.
For example, you can instantly:
- Change concrete into natural stone
- Replace oak flooring with marble
- Swap brushed aluminum for polished steel
- Test different fabric or leather finishes on furniture
- Compare multiple material options for product renders
This rapid retexturing workflow helps architects, industrial designers, and visualization artists evaluate design options in minutes instead of manually recreating materials.
Indie Developers & Solo Creators
Independent creators often work without a dedicated material or texture artist. AI texturing helps bridge that gap by allowing a single person to generate, edit, and refine high-quality materials with minimal manual effort.
For solo developers, content creators, and small studios, AI can:
- Produce professional-looking textures without advanced material authoring skills
- Create multiple style variations for rapid iteration
- Speed up asset creation for games, animations, and AR/VR experiences
- Reduce production time while maintaining visual consistency
Why These Workflows Matter
Although each industry uses AI texture editing differently, the goal is the same: create better-looking assets in less time. Whether you're building game environments, preparing color 3D prints, visualizing architectural concepts, or producing marketing renders, AI helps automate repetitive texturing tasks so you can focus on design decisions and creative direction rather than manual material creation.
AI Texture Editing: Free vs Paid
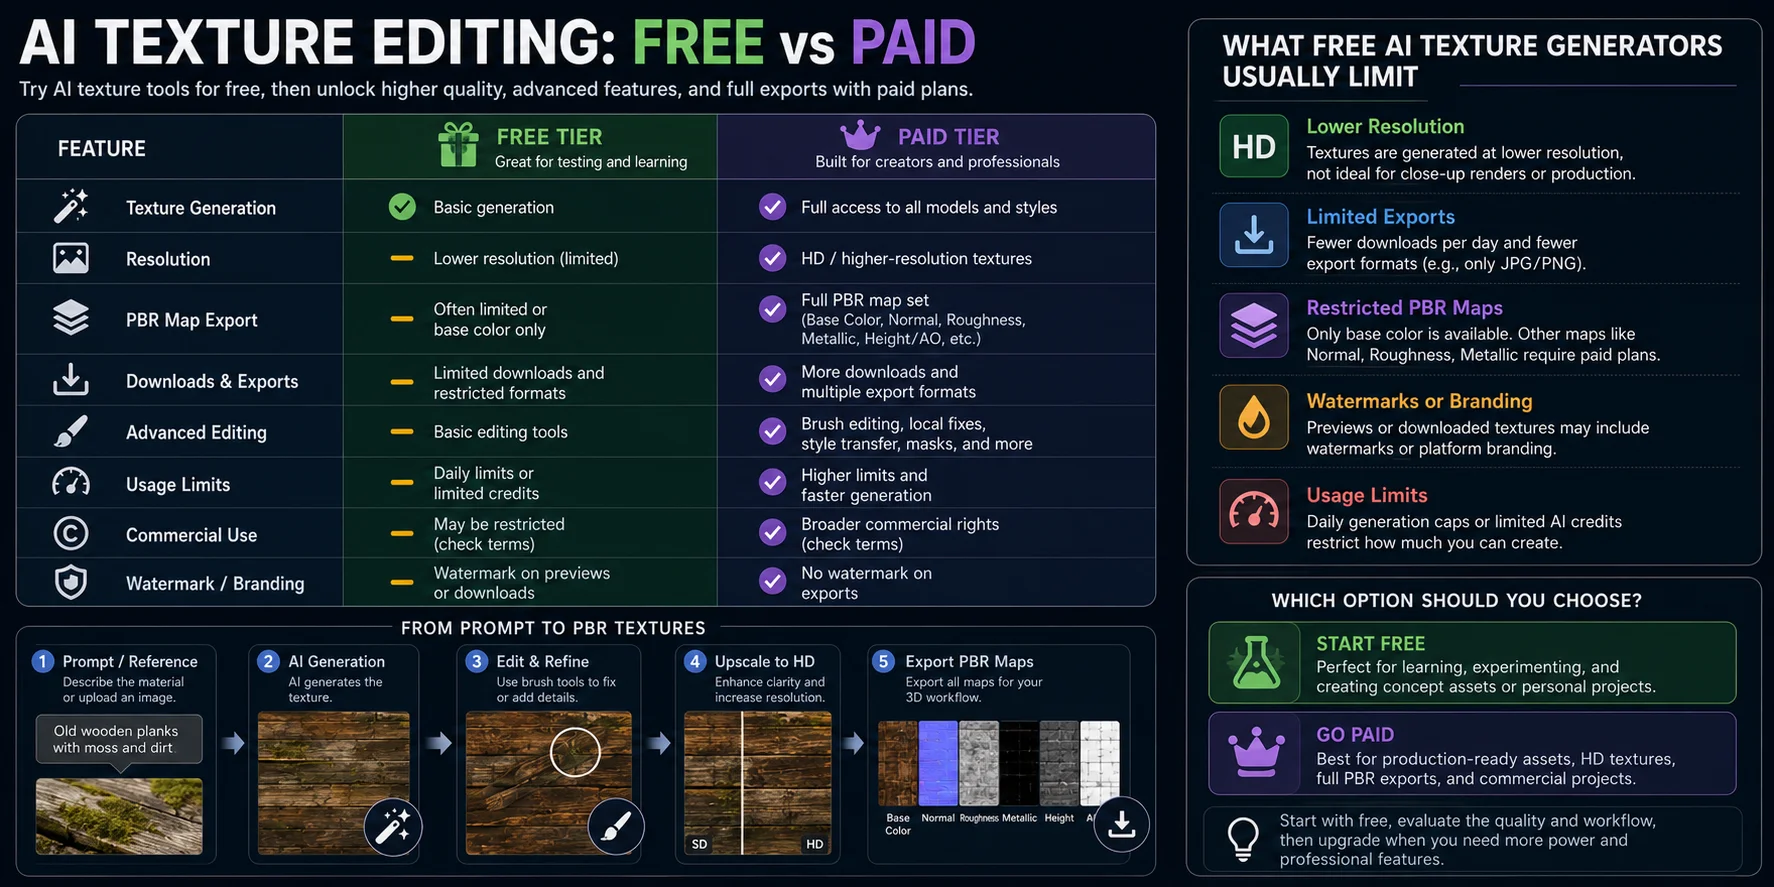
Many AI texture editing platforms offer free tiers, making it easy to experiment with AI-generated materials before committing to a subscription. These free plans are ideal for learning the workflow, testing prompts, and evaluating output quality. However, they usually come with limitations that make them less suitable for professional production work.
Paid plans typically unlock higher-quality outputs, additional editing features, and export options needed for game development, product visualization, and commercial projects. While the exact pricing and feature sets vary between platforms, the overall differences are similar across most AI texture generators.
Free vs. Paid at a Glance
| Feature | Free Tier | Paid Tier |
|---|---|---|
| Texture Generation | Basic generation or trial credits | Fuller access to generation and editing workflows |
| Resolution | Usually limited | HD or higher-resolution texture output |
| PBR Map Export | Often limited or unavailable | Fuller PBR map sets such as Base Color, Normal, and Roughness |
| Downloads | Limited number or restricted formats | More exports and format options |
| Advanced Editing | Basic tools | Local brush editing, style transfer, HD upscaling, and additional controls |
| Commercial Use | May be restricted depending on the platform | Often broader usage rights, but each service's terms still need checking |
What Free AI Texture Generators Usually Limit
Although every platform is different, free plans commonly restrict one or more of the following:
- Lower output resolution, making textures less suitable for close-up renders or production assets.
- Limited exports, such as a cap on the number of downloadable textures or supported file formats.
- Restricted PBR maps, where only the base color is available while Normal, Roughness, or other maps require a paid plan.
- Watermarks or branding on preview images or downloads.
- Usage limits, such as daily generation caps or limited AI credits.
These restrictions are designed to let users evaluate the technology while reserving professional features for paid subscribers.
Which Option Should You Choose?
A free AI texture generator is a great starting point if you want to learn the workflow, create concept assets, or compare different tools before making a decision.
A paid plan is usually worthwhile if you need:
- High-resolution production textures
- Complete PBR material exports
- Faster iteration with advanced editing tools
- Assets for commercial games, visualization, or client projects
- Higher generation limits for regular production work
For many creators, the best approach is to start with a free tier, evaluate the quality and workflow, and upgrade only when you need HD textures, full PBR exports, or more advanced texturing capabilities. This lets you choose a tool based on your actual production needs rather than feature lists alone.
Frequently Asked Questions
Is there a free AI texture editing tool?
Yes. Many AI texture editing platforms offer free tiers or trial credits for testing prompts, learning the workflow, and creating concept assets. For HD textures, complete PBR exports, commercial usage, or advanced brush edits, you usually need a paid plan.
Can AI generate PBR textures for 3D models?
Yes. Many modern AI texturing tools can generate PBR texture maps for 3D models, not just a single color image. Available maps vary by platform, but common outputs include Base Color, Normal, Roughness, Metallic, Height, and Ambient Occlusion.
How do I replace a texture in an image with AI?
Upload the image to an AI image editor or texture tool, select the area you want to change with a brush or mask, and describe the new material in a prompt. The AI then replaces that region while trying to preserve lighting, perspective, and the overall composition.
Can I add texture to a render without a texture image?
Yes. You can describe a material, such as weathered oak wood or brushed aluminum, and let AI generate the texture from text instead of starting with an existing texture image. For 3D work, choose a tool that can also export the PBR maps your renderer or engine needs.
Is there an AI texture editing app?
Yes. AI texture editing apps and web tools can generate, edit, or retexture materials from prompts, reference images, and brush-based selections. The best choice depends on whether you need 3D model texturing, 2D image editing, PBR export, or quick concept exploration.
Conclusion
AI texture editing dramatically shortens one of the most time-consuming parts of the 3D pipeline, turning hours of manual texture painting into a workflow that can take just minutes—or even seconds for an initial result. With AI handling the repetitive work, you can spend more time refining the look and iterating on your ideas.
Ready to texture your 3D models with AI? Use one-click global texturing, HD upscaling, and Magic Brush local fixes in Tripo AI Studio.