Creating a 3D Printed Glock Model: Expert Workflow & Tips
Designing a 3D printed Glock model requires a blend of technical skill, legal awareness, and efficient workflow. In my experience, leveraging AI-powered tools like Tripo has dramatically accelerated my modeling process and reduced manual labor, especially for complex forms and print-ready geometry. However, legal and ethical considerations are paramount, and print optimization is non-negotiable for safety and quality. This article is for 3D artists, prop designers, and hobbyists looking to streamline their pipeline and avoid common pitfalls.
Key takeaways
- Always verify the legal status of firearm replicas in your jurisdiction before starting.
- AI-powered tools can cut modeling time drastically, but manual checks are still essential.
- Proper retopology and mesh optimization are critical for print success and durability.
- Realistic texturing adds value, but focus first on structural integrity.
- Final pre-print checks save time, material, and frustration.
Overview of 3D Printed Glock Models
What is a 3D Printed Glock Model?
A 3D printed Glock model is a digital replica of a Glock handgun, typically used for prop-making, visualization, or educational purposes. In my workflow, these models are often non-functional and intended for display, simulation, or as part of a larger project. The goal is to create a visually accurate representation while ensuring the model is safe and suitable for 3D printing.
Legal and Ethical Considerations
Before starting, I always research local laws regarding firearm replicas and 3D printing. In many regions, producing or distributing realistic gun models—even as props—can be restricted or illegal. Ethically, I avoid sharing functional models or anything that could be misconstrued as a real weapon. When in doubt, I consult legal counsel or focus on stylized, unmistakably non-functional designs.
Mini-checklist:
- Check national/local laws on replica firearms and 3D prints.
- Use clear disclaimers for non-functional props.
- Avoid sharing files that could be misused.
My Step-by-Step Workflow for 3D Modeling
Gathering References and Planning
Accurate modeling starts with solid references. I collect high-res photos, blueprints, and exploded diagrams of the Glock model I want to replicate. Planning the model’s purpose (prop, display, animation) informs the level of detail and segmentation needed.
Reference checklist:
- Front, side, and top photos
- Technical drawings or blueprints
- Details of moving parts (if relevant)
- Example 3D prints for comparison
Using AI Tools for Efficient Model Creation
I use Tripo AI to quickly generate a base mesh from text prompts, sketches, or reference images. This accelerates the initial blockout phase, allowing me to focus on refinement rather than starting from scratch. After AI generation, I review and adjust the model—fixing proportions, cleaning up geometry, and prepping for print.
Practical steps:
- Input clear prompts or sketches into Tripo.
- Review the AI-generated mesh for accuracy.
- Manually refine areas that need more detail or correction.
Best Practices for Preparing Models for 3D Printing
Optimizing Geometry and Retopology
A clean, efficient mesh is essential for 3D printing. I use built-in retopology tools to reduce poly count and eliminate non-manifold edges. Overlapping faces or internal geometry can cause print failures, so I always inspect and clean up the mesh before export.
Geometry checklist:
- Remove hidden/internal faces.
- Ensure watertight (closed) geometry.
- Limit overhangs and thin walls.
Ensuring Printability and Structural Integrity
Beyond aesthetics, the model must be structurally sound. I check wall thickness, avoid unsupported features, and reinforce weak points. For moving parts or assemblies, I design with tolerances in mind to ensure parts fit together post-print.
Pitfalls to avoid:
- Too-thin walls that break during printing.
- Ignoring material shrinkage or tolerance needs.
- Overly complex geometries that are hard to print.
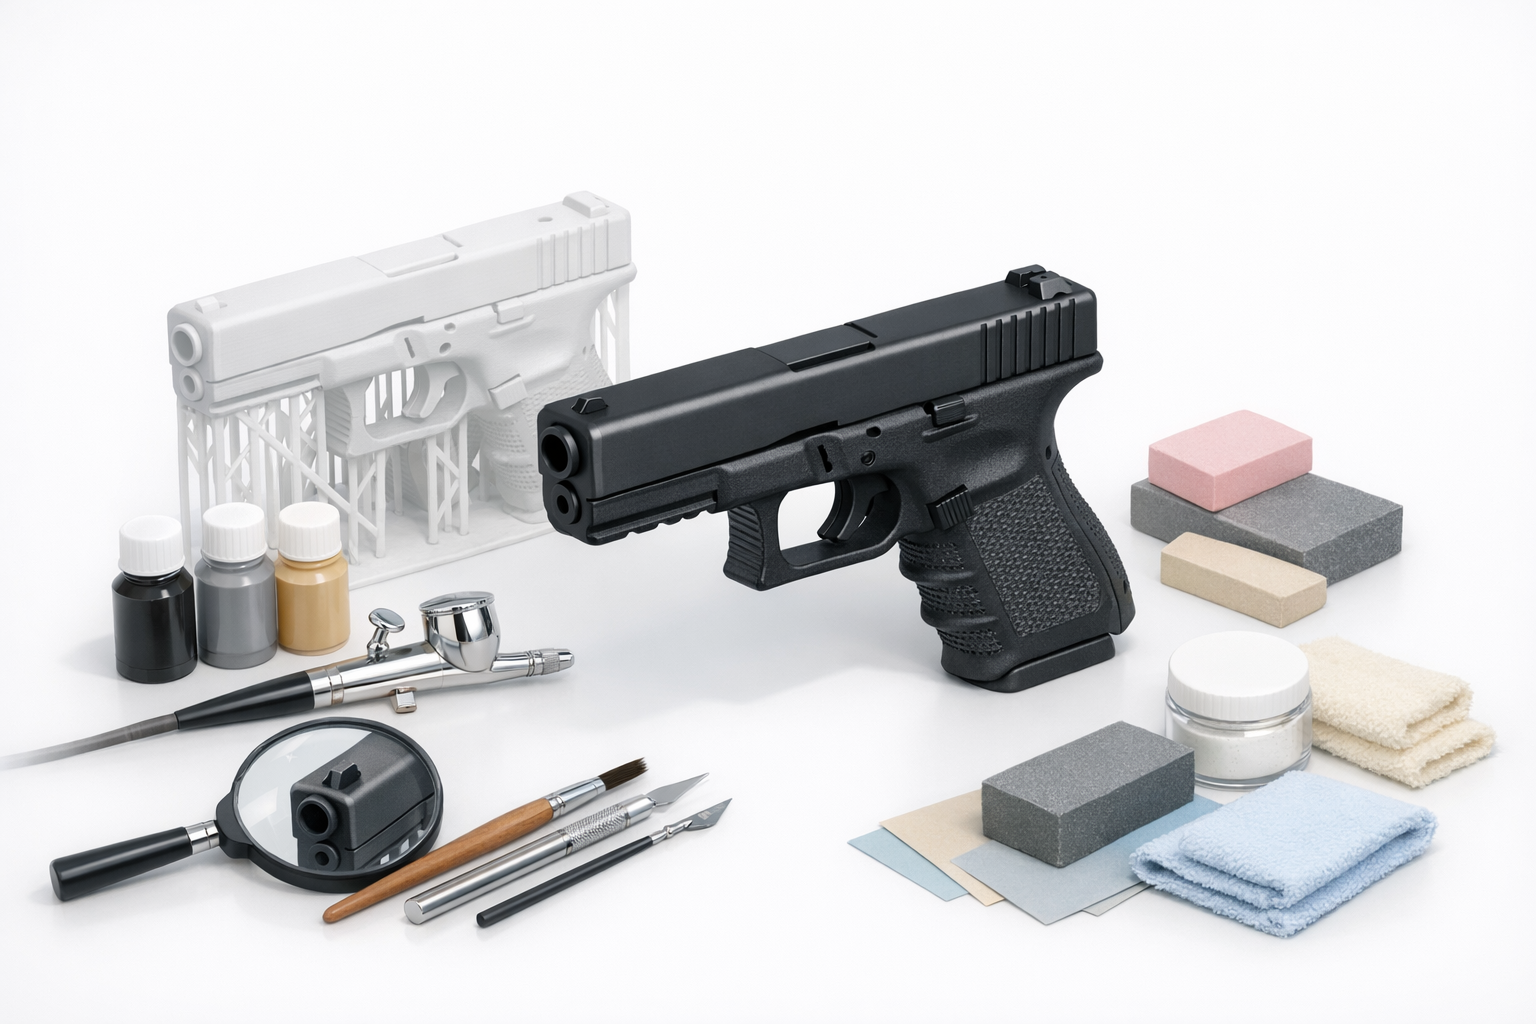
Texturing, Detailing, and Finishing Touches
Applying Realistic Textures
While not always needed for 3D printing, I sometimes apply textures for renders or visualization. Using Tripo’s texturing tools, I can quickly generate PBR materials or bake details into normal maps. For physical prints, I focus on modeling details (engravings, logos) directly into the mesh.
Tips:
- Model key details physically if they need to show up on prints.
- Use textures for digital presentation only.
Final Checks Before Printing
Before hitting print, I run a final checklist: verifying scale, checking for non-manifold geometry, and simulating the print in slicing software. I often export test sections to check fit and finish before committing to a full print.
Pre-print checklist:
- Confirm scale matches intended use.
- Run mesh analysis in slicer.
- Test-print critical sections if possible.
Comparing AI-Powered and Traditional 3D Workflows

Speed and Quality Differences
AI-powered modeling tools like Tripo have cut my base modeling time from hours to minutes. The quality is often suitable for props and visualization right out of the box, but I still need to refine and optimize manually for print. Traditional workflows offer more granular control but are slower and more labor-intensive.
When to Use Each Approach
I use AI tools for rapid prototyping, ideation, or when deadlines are tight. For projects demanding absolute precision or custom engineering (e.g., functional assemblies), I rely more on traditional modeling for full control.
Decision matrix:
- Use AI tools for speed and iteration.
- Use traditional methods for precision and unique requirements.
Lessons Learned and Expert Tips
Common Pitfalls to Avoid
- Neglecting legal research can lead to serious consequences.
- Relying solely on AI output without manual checks results in print failures.
- Over-detailing at the mesh stage can overload slicers and printers.
My Recommendations for Success
- Always start with clear references and a defined purpose.
- Use AI tools to accelerate, not replace, your modeling skills.
- Prioritize mesh cleanup and printability before focusing on textures.
- Test small sections before committing to a whole print.
Final thought:
A streamlined workflow, legal awareness, and attention to detail are the keys to successful 3D printed Glock models—whether for display, simulation, or creative projects.