How to Make 3D Printable Models With AI (Step-by-Step)
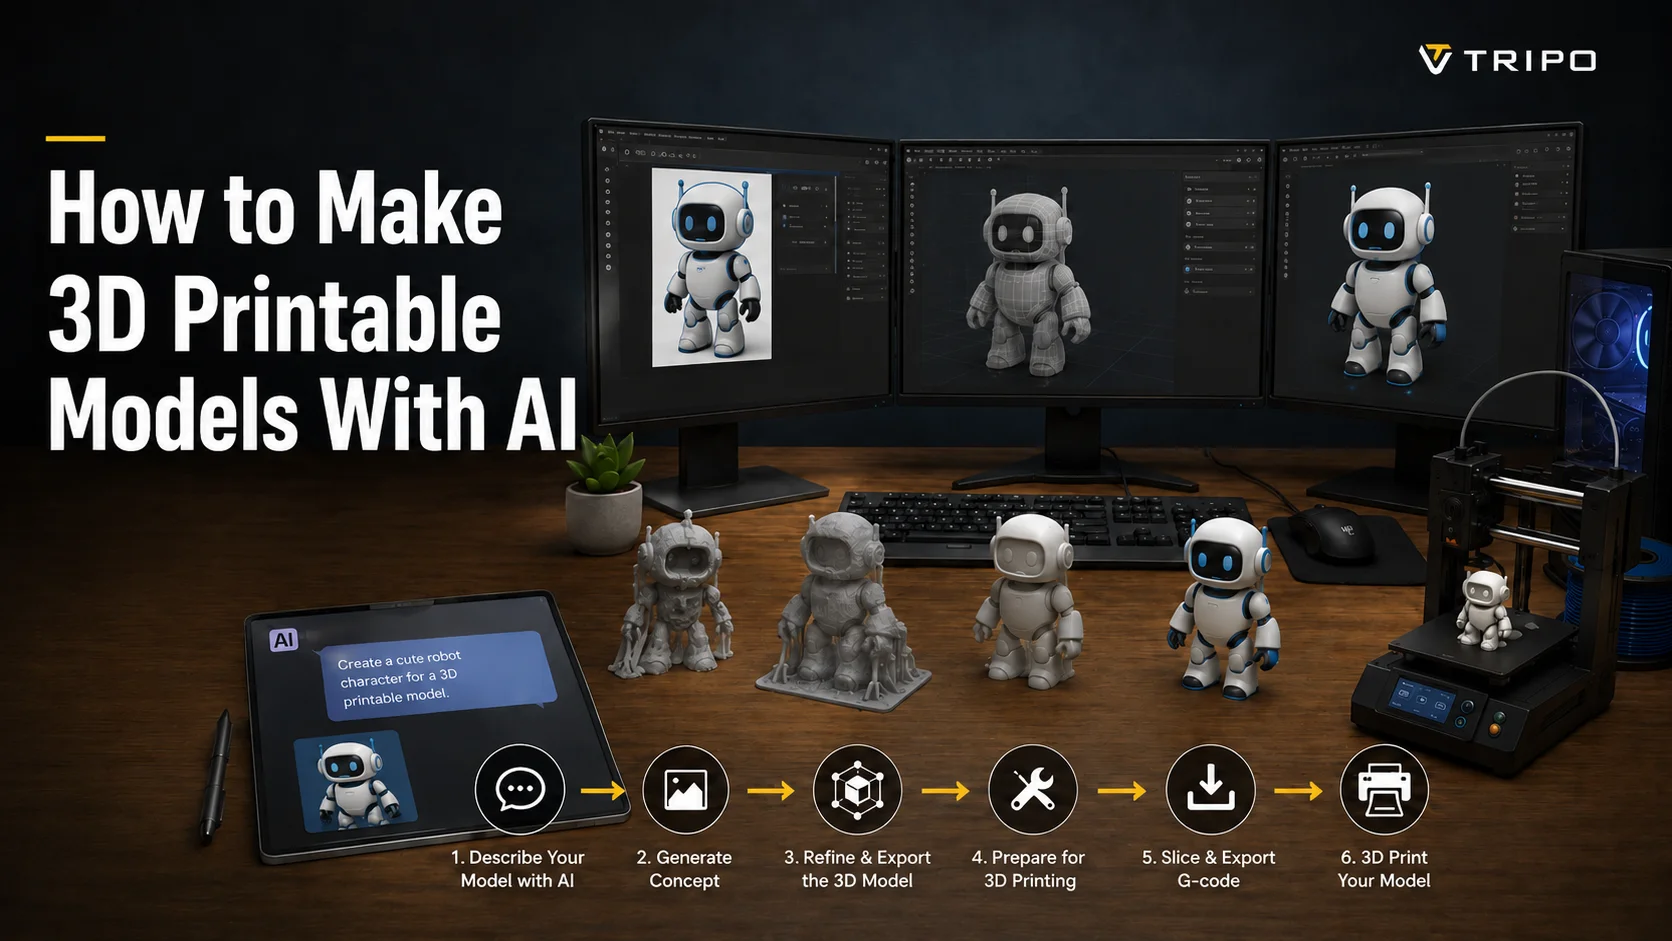
To make a 3D printable model with AI: pick an AI 3D generator, give it a text prompt or a clear image, generate the mesh, then repair it (close holes, flatten the base, remove floating bits) so it's watertight. Export it as STL or 3MF, open it in a slicer, and print. This guide walks through every step.
TL;DR
- Two starting points: text-to-3D (describe it) or image-to-3D (upload a photo/sketch).
- AI builds the mesh in seconds—but raw output usually isn't print-ready.
- The step most tutorials skip: repair the mesh (close holes, flatten the base, remove floaters) so it's watertight.
- Export STL (geometry only) or 3MF (color/multi-material); set units to mm.
- Always slice a test print—AI topology can hide thin walls and tolerance issues.
Can AI Really Make 3D Printable Models? (Yes — Here's How)
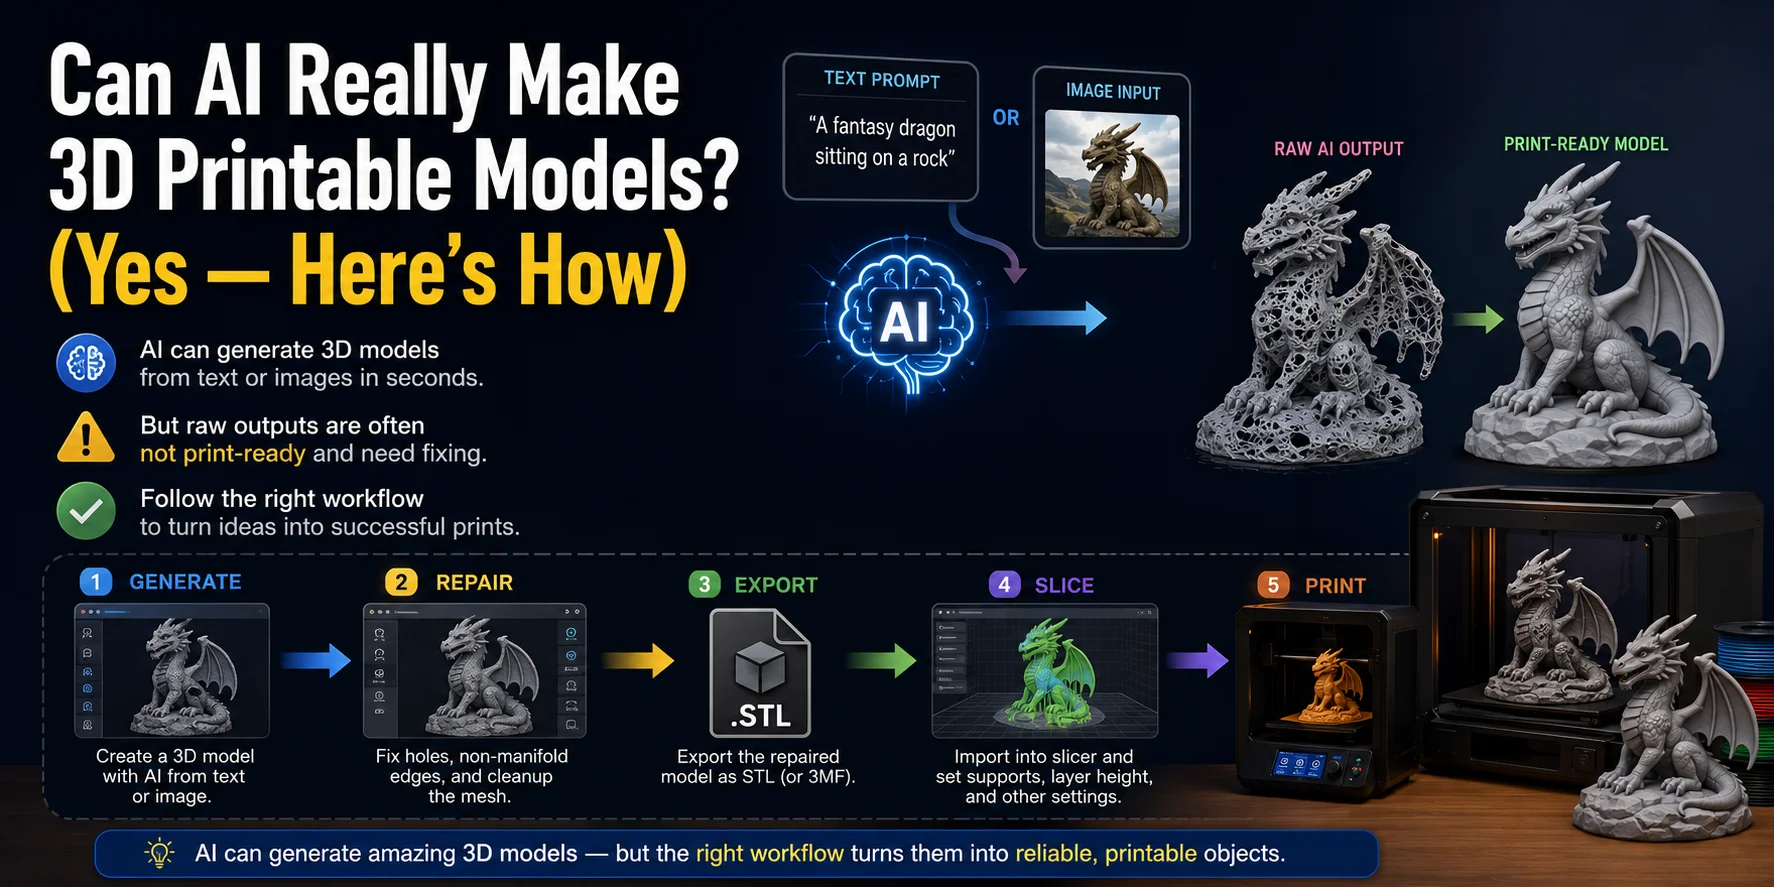
AI can generate a 3D mesh from a text prompt or image in seconds, with no CAD experience required. But there's an important reality check: raw AI output usually isn't immediately print-ready. The process has four steps—generate → repair → export → slice & print—and skipping the repair step is the most common reason AI-generated models fail to print correctly.
Here's the full chain:
- Generate — describe your model in text or upload a reference image
- Repair — close holes, remove floating geometry, verify the mesh is watertight
- Export — save as STL or 3MF with units set to millimeters
- Slice & print — open in a slicer, set supports and scale, then print
The sections below walk through each step in detail.
Step 1 — Choose Your AI 3D Tool and Input
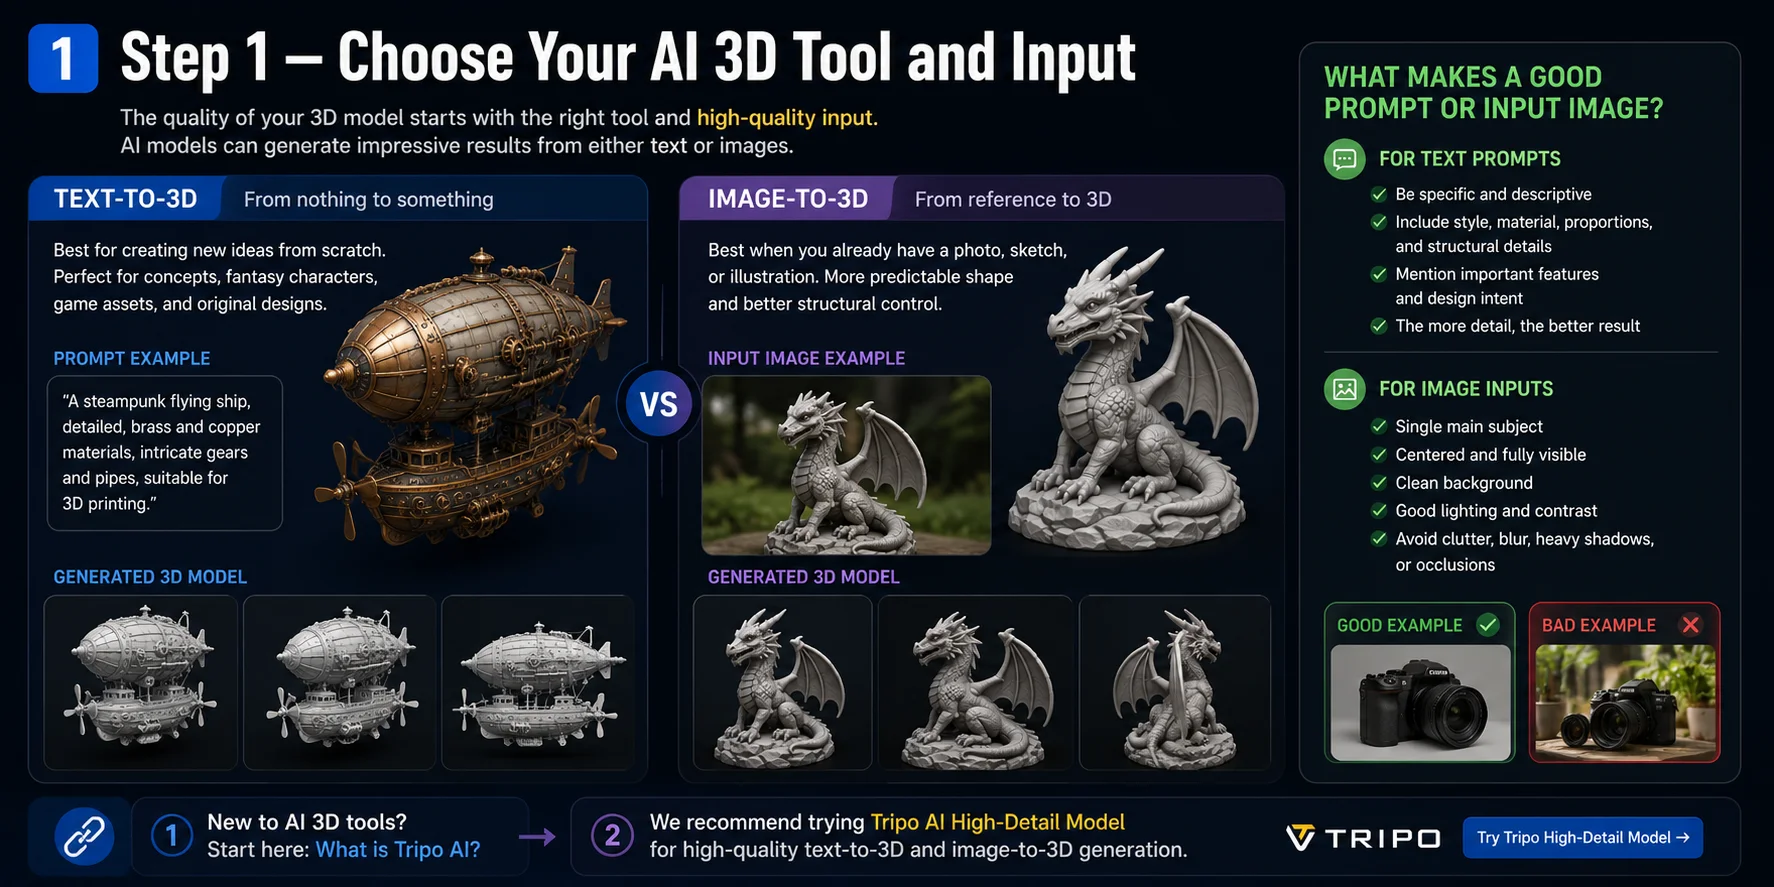
Text-to-3D vs image-to-3D — which to start with
Text-to-3D is the better starting point when you're creating a concept from scratch and don't have a reference image. Describe the object using clear language: specify style, material, structure, and scale. It's the fastest path from an idea to a mesh.
Image-to-3D gives you more control over shape and proportions because the AI uses visual information from your photo or sketch. It works especially well for objects that already exist—a toy, a figurine, a product—or when you have a sketch with a specific silhouette you want to preserve.
What makes a good prompt or input image
For text prompts: be specific about shape, style, and structure. Avoid vague descriptions. Mention whether the object is symmetrical, how many parts it has, and what material feel you're going for.
For input images: use a single subject, centered in the frame, against a clean background, with even lighting and high contrast. Avoid clutter, motion blur, and reflective surfaces.
Step 2 — Generate the 3D Model
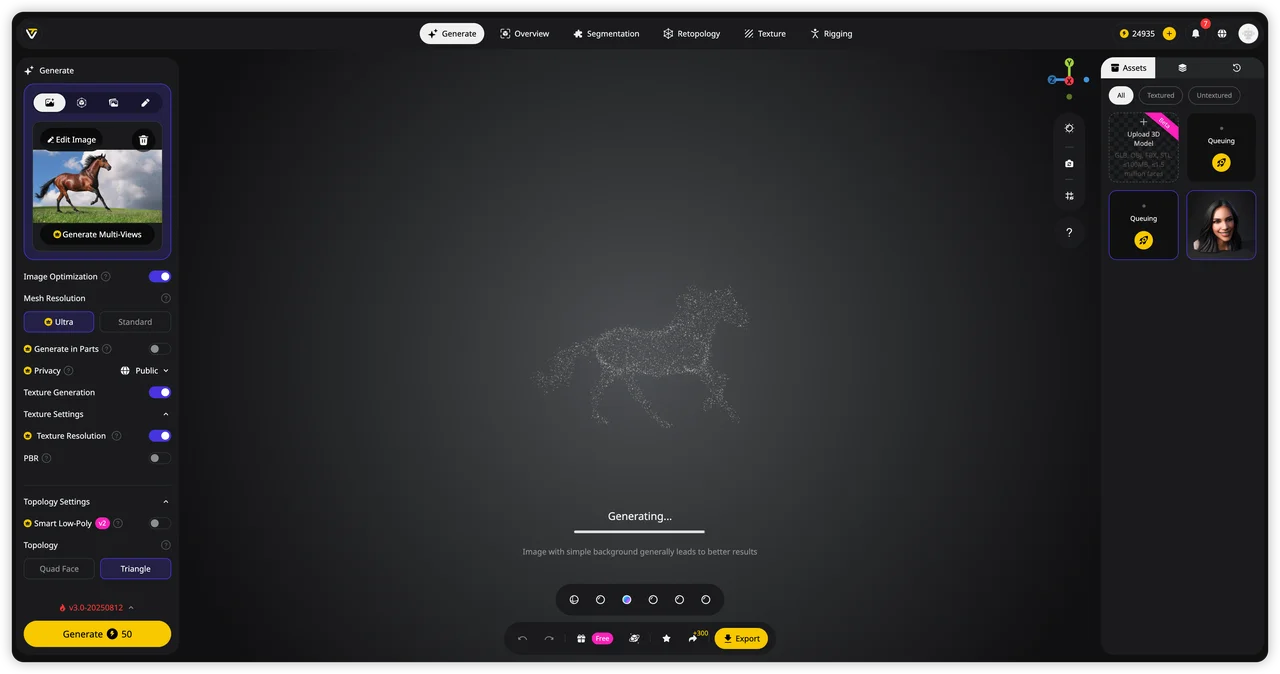
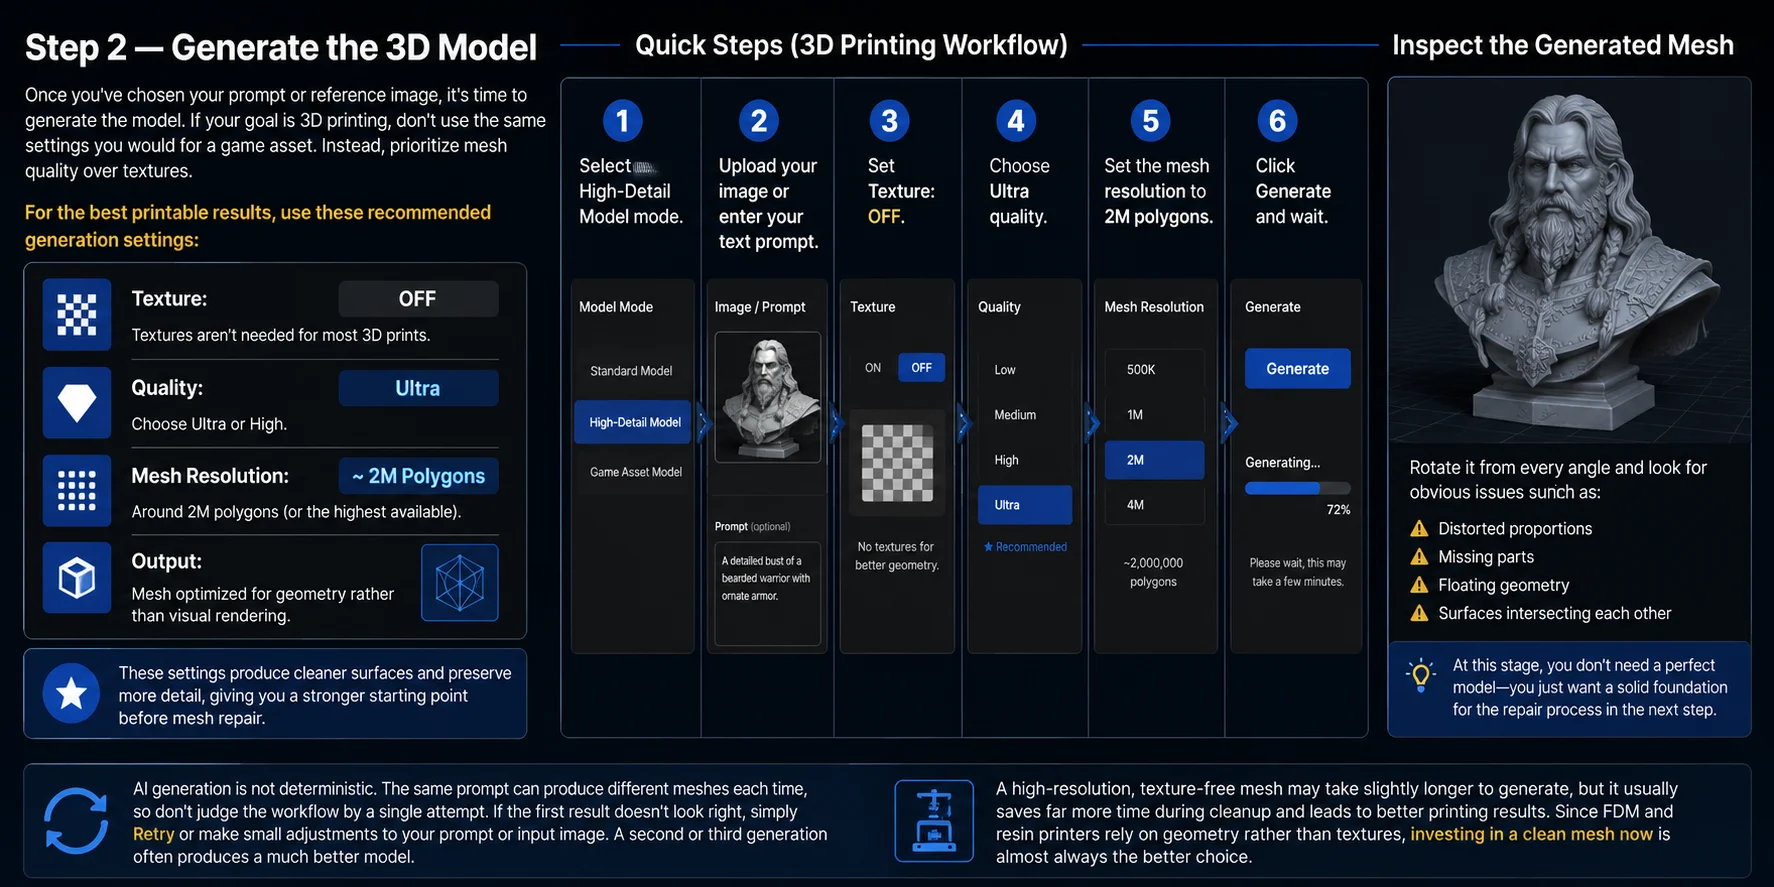
For 3D printing, generation settings matter. Configure the generator for maximum fidelity:
- Select the highest polygon count available (Tripo supports up to 2 million polygons with High-Detail Model, officially suitable for 3D printing)
- Turn texture OFF — 3D printing doesn't use color textures, so generating them wastes processing time
- Use the latest model version for the best geometry quality
AI generation has natural randomness. If the first result has obvious flaws—missing parts, incorrect proportions, or twisted geometry—hit Retry. Small changes to the prompt or input image can produce significantly better results.
After generation, do a quick visual inspection before moving to repair:
- Does the silhouette match your intent?
- Are proportions correct?
- Are there any obvious holes or intersecting faces?
Step 3 — Repair the Mesh (Make It Watertight)
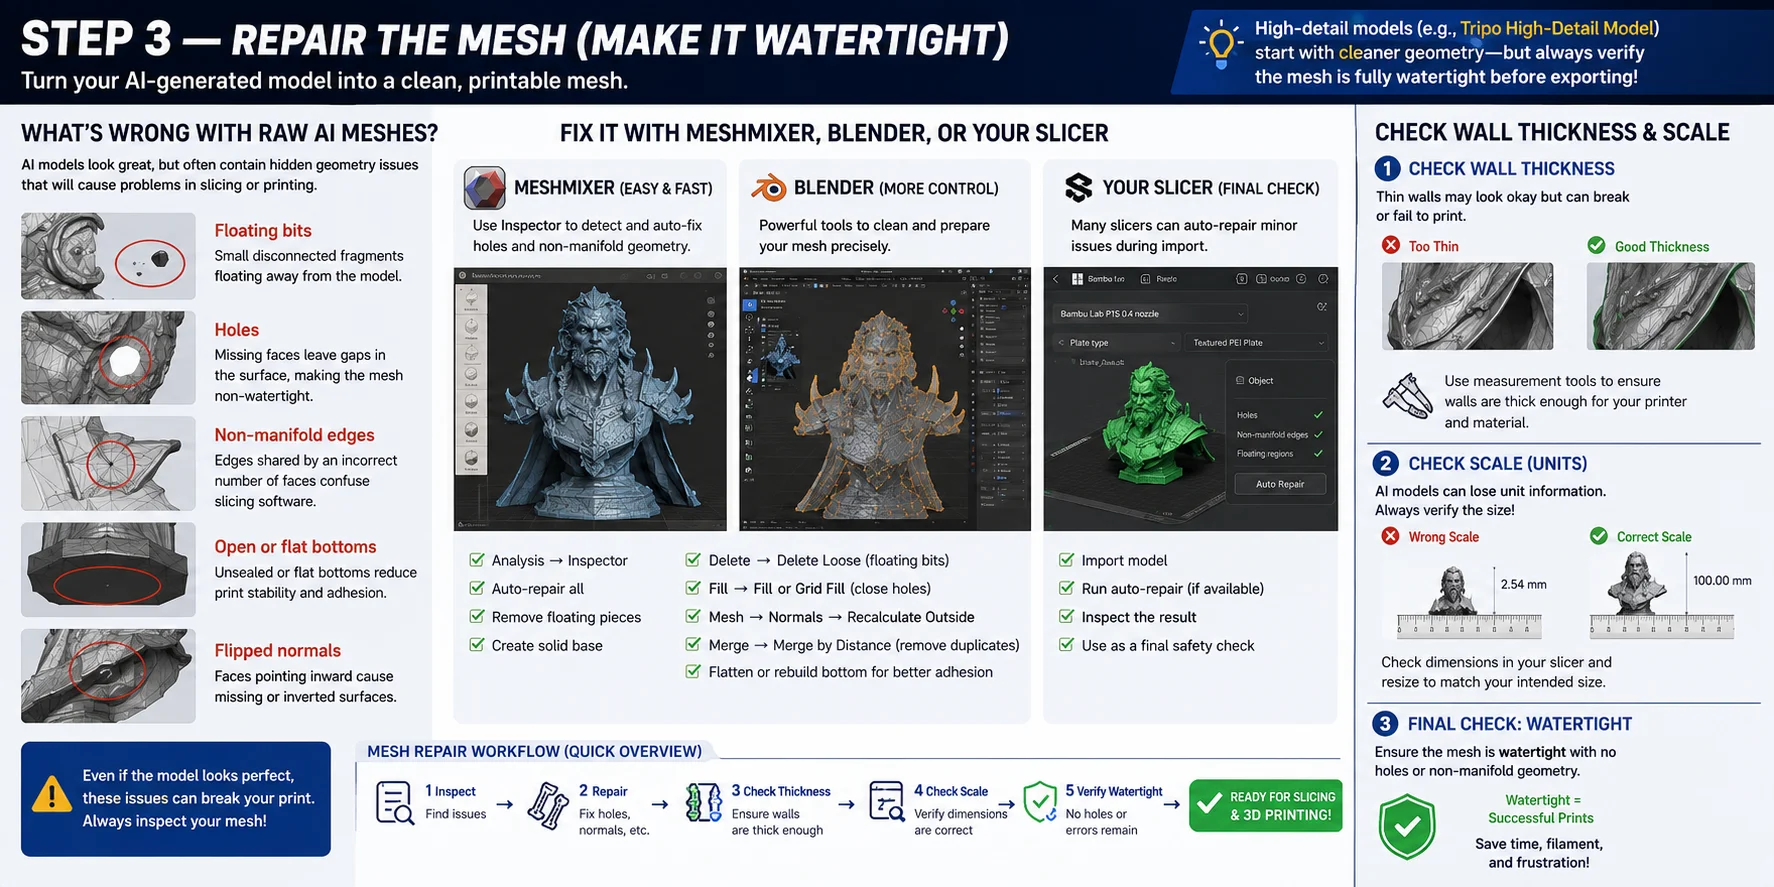
This is the step most tutorials skip, and it's the reason most AI prints fail. Raw AI meshes commonly have floating bits (small disconnected geometry islands), holes (open boundaries where the surface isn't closed), non-manifold edges (geometry that breaks watertight rules), flat bottoms that are missing (the AI guesses at unseen areas), and thin walls that slicers ignore.
What's wrong with raw AI meshes
- Floating bits — disconnected geometry fragments that print as blobs
- Holes — open boundaries that prevent proper slicing
- Non-manifold edges — invalid topology that confuses slicers
- No flat base — models that rock or tip during printing
- Excessive triangle count — millions of micro-triangles that slow down slicers
Fix it
Meshmixer (free): Import the model → Analysis → Inspector to find holes and non-manifold edges → Auto Repair All for automatic fixes.
Blender (free): Edit Mode → Select All by Trait → Non Manifold to find problem areas → Mesh → Clean Up → Fill Holes → Recalculate Normals (Shift+N). Use Mesh → Clean Up → Merge by Distance to fix duplicate vertices.
Slicer built-in repair: Bambu Studio and Cura both include auto-repair functions that can fix simple issues on import.
Check wall thickness & scale
After repair, verify that:
- Walls are at least 1.2 mm thick for FDM printing (thinner walls often print poorly or not at all)
- The model dimensions are in millimeters, not centimeters or inches
- Scale is correct — a 10 mm model and a 10 cm model look the same in the viewport but print very differently
Step 4 — Export the Right File Format (STL vs OBJ vs 3MF)
Choosing the correct export format avoids compatibility problems with your slicer and printer.
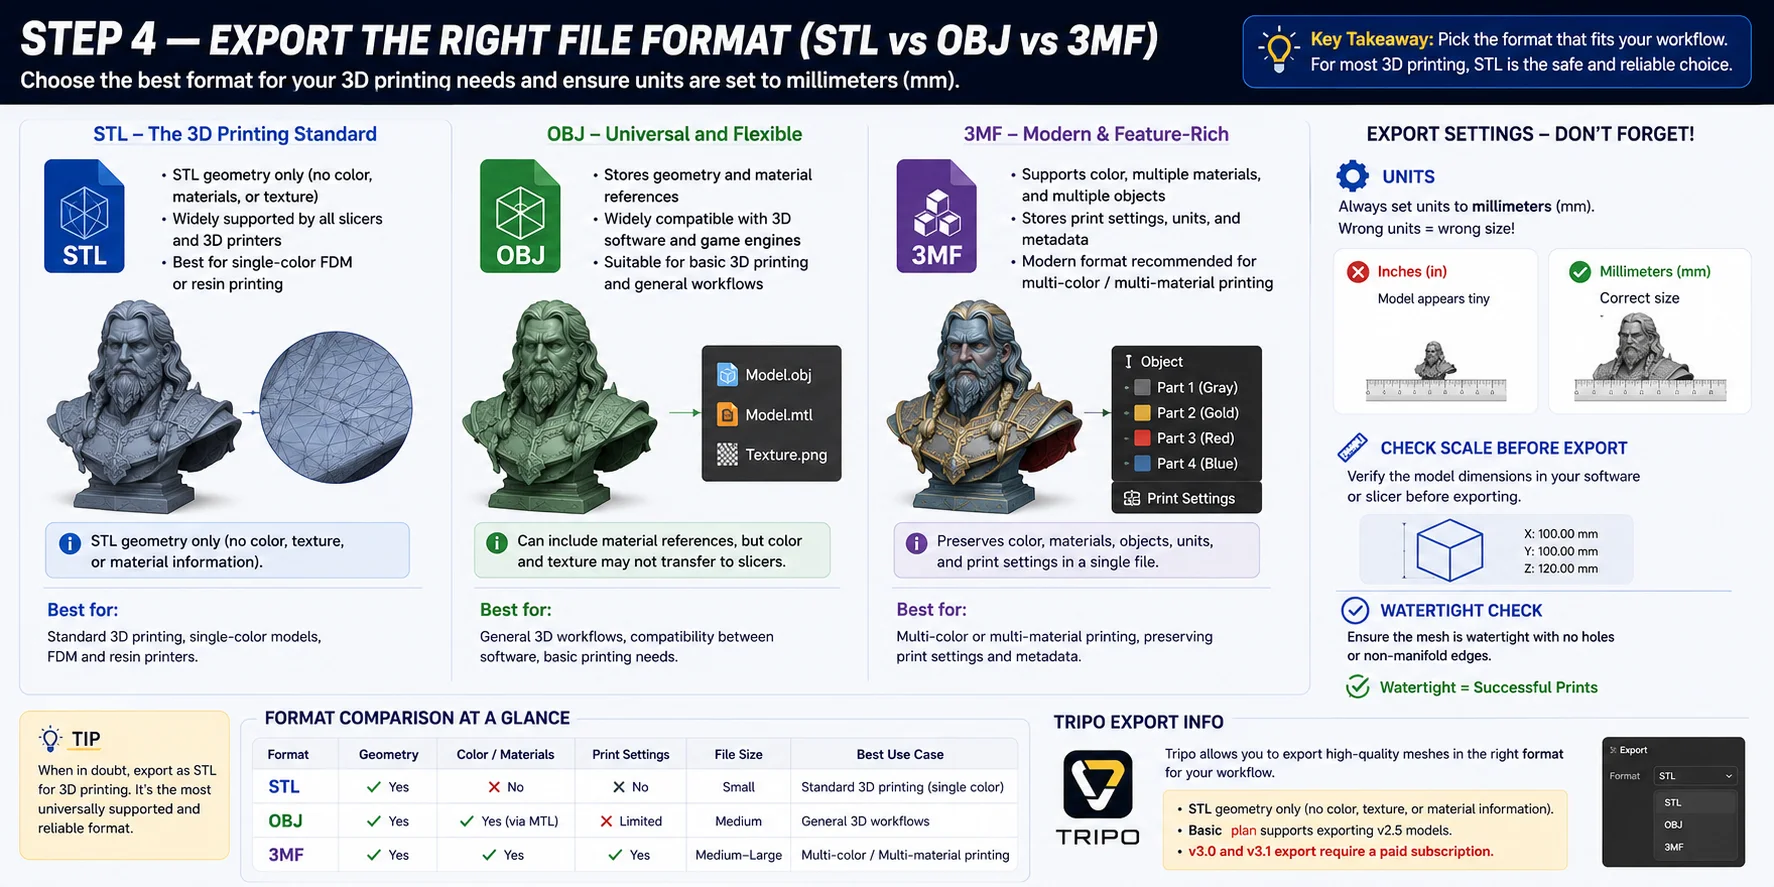
STL is the standard format for 3D printing. It stores geometry only—no colors, textures, or materials. Almost every slicer and 3D printer supports STL. Use it when you only need the shape and maximum compatibility is important.
OBJ is a universal format that works for basic 3D printing. It's widely supported in 3D editing software and can carry basic color information, but it's less common in modern slicers than STL or 3MF.
3MF is the modern 3D printing format. It supports colors, multiple materials, units, and other print metadata. Use it when you want to preserve color or need multi-material print setups, or when using Bambu Studio (which handles 3MF natively).
Always set units to millimeters (mm) before exporting. Most slicers assume millimeter units—exporting in centimeters or inches creates models that are 10× or 25× too large.
Tripo export formats: STL exports geometry only. 3MF preserves color and multi-material settings. OBJ provides universal compatibility. Note that v3.0/3.1 model exports require a paid subscription; Basic plan exports are limited to v2.5 models.
Step 5 — Slice and Print
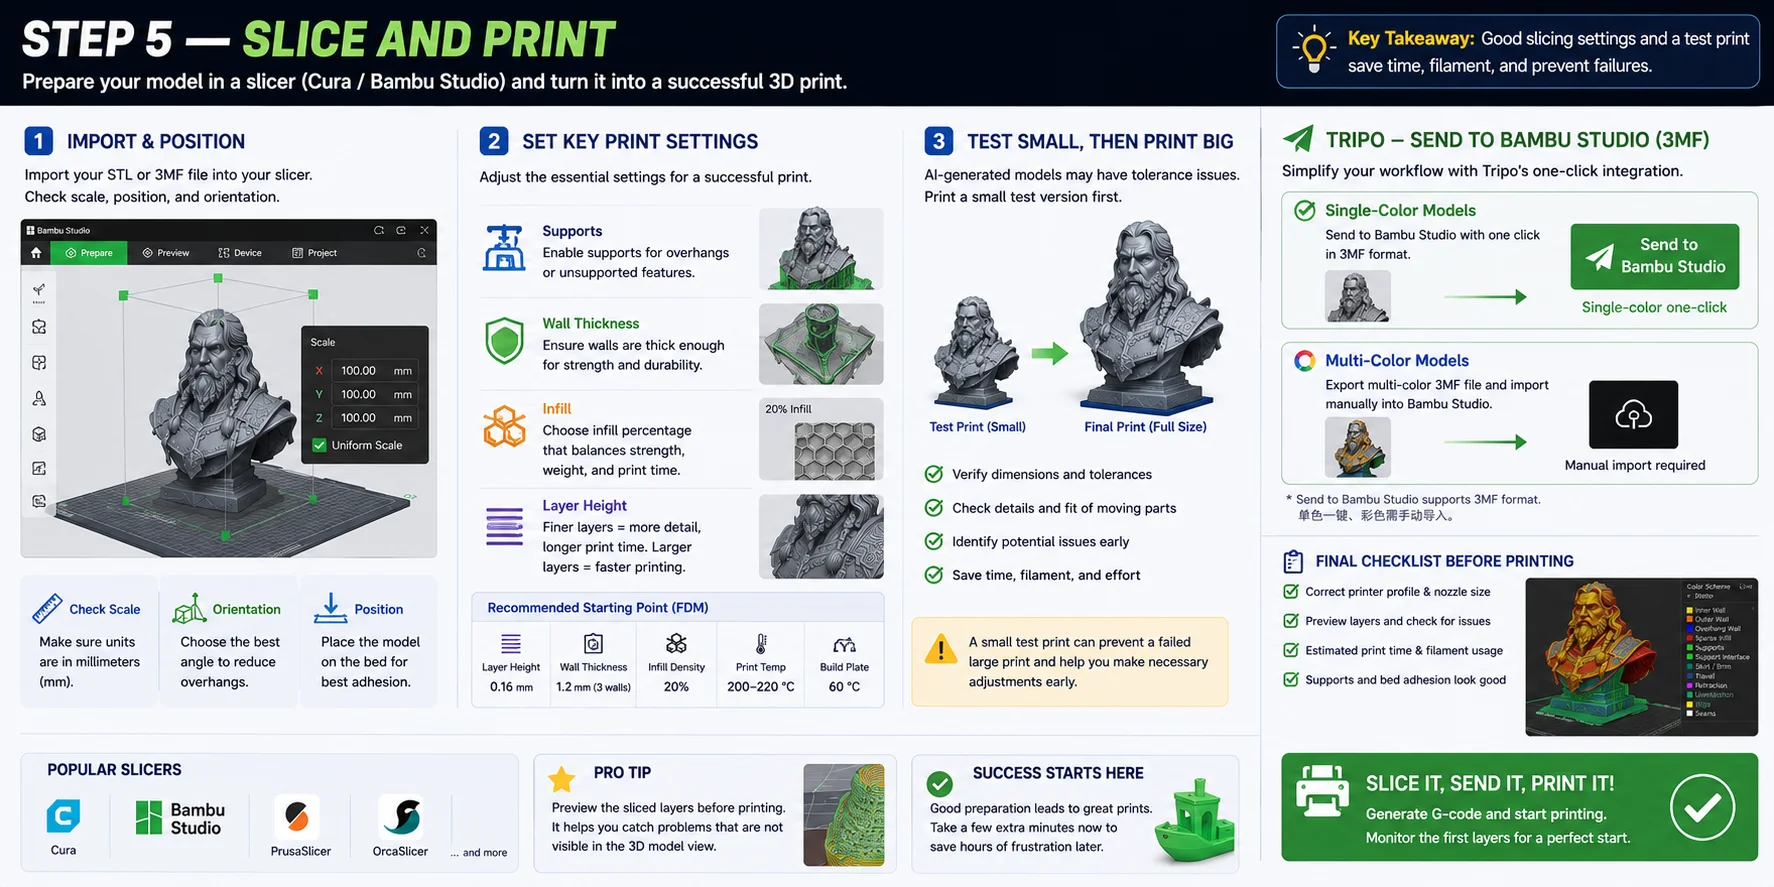
Import your exported file into a slicer. Popular choices include Bambu Studio and Cura.
In the slicer:
- Scale — confirm the model is the right size in millimeters
- Orient — rotate the model so the flattest, most stable face is on the build plate
- Supports — enable supports for overhangs greater than 45°
- Wall thickness — set to 2–3 perimeters (1.2–2 mm) for printable strength
- Infill — 15–20% for decorative models, 30–50% for functional parts
Tripo-generated models can be sent directly to Bambu Studio with one click in 3MF format. One-click export works for single-color models; multi-color models require manual import using Export Multi-Color Printable File.
Always print a test first. AI topology can hide thin walls and tight tolerances that aren't obvious in the slicer preview. A small test print at 50% scale takes 20 minutes and saves you from a failed full-size print.
Is AI 3D Topology Good Enough to Print?
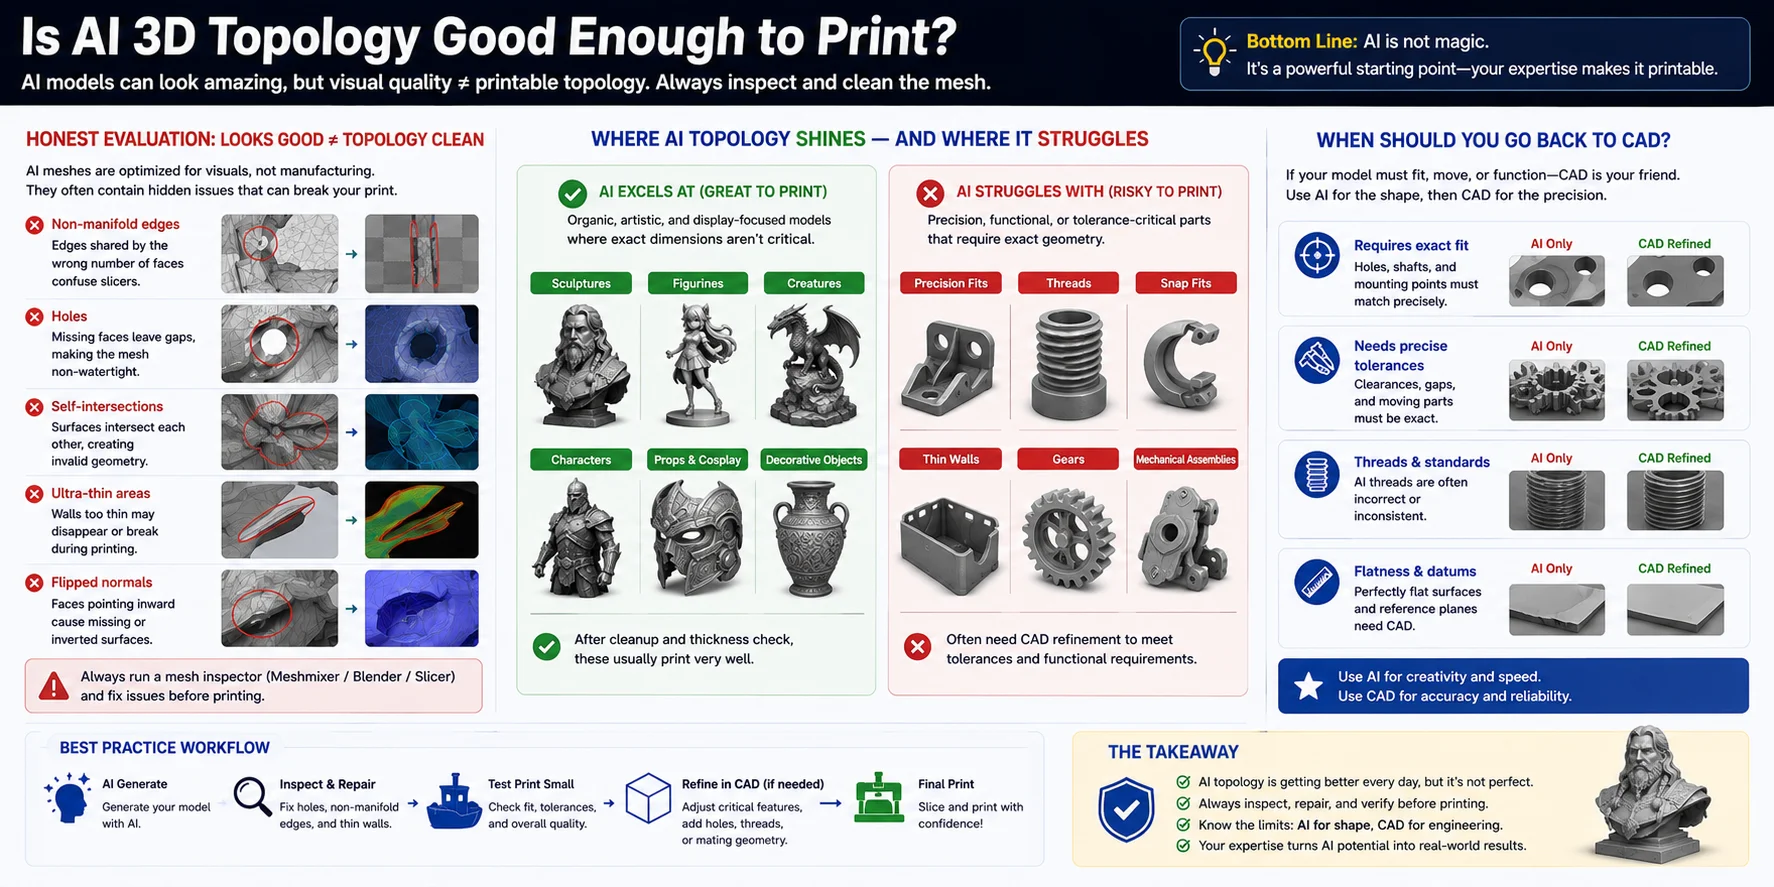
The honest answer: it depends on the model type.
AI topology works well for:
- Decorative sculptures and figurines
- Characters and organic forms
- Toys and collectibles
- Props and display models
- Low-tolerance objects where approximate geometry is fine
AI topology struggles with:
- Precision-fit mechanical parts (gears, brackets, enclosures)
- Threaded connections (bolts, nuts, threaded inserts)
- Very thin features (under 1 mm)
- Objects with tight dimensional tolerances
The topology from AI generators is typically triangle-heavy and irregular. This is fine for printing decorative models but creates problems for objects that need to snap together, thread into other parts, or meet engineering tolerances. For those applications, CAD modeling in Fusion 360 or a similar tool is still the right choice.
The practical takeaway: Use AI generation for organic and artistic models, and use CAD for anything that needs to fit, thread, or meet dimensional specs.
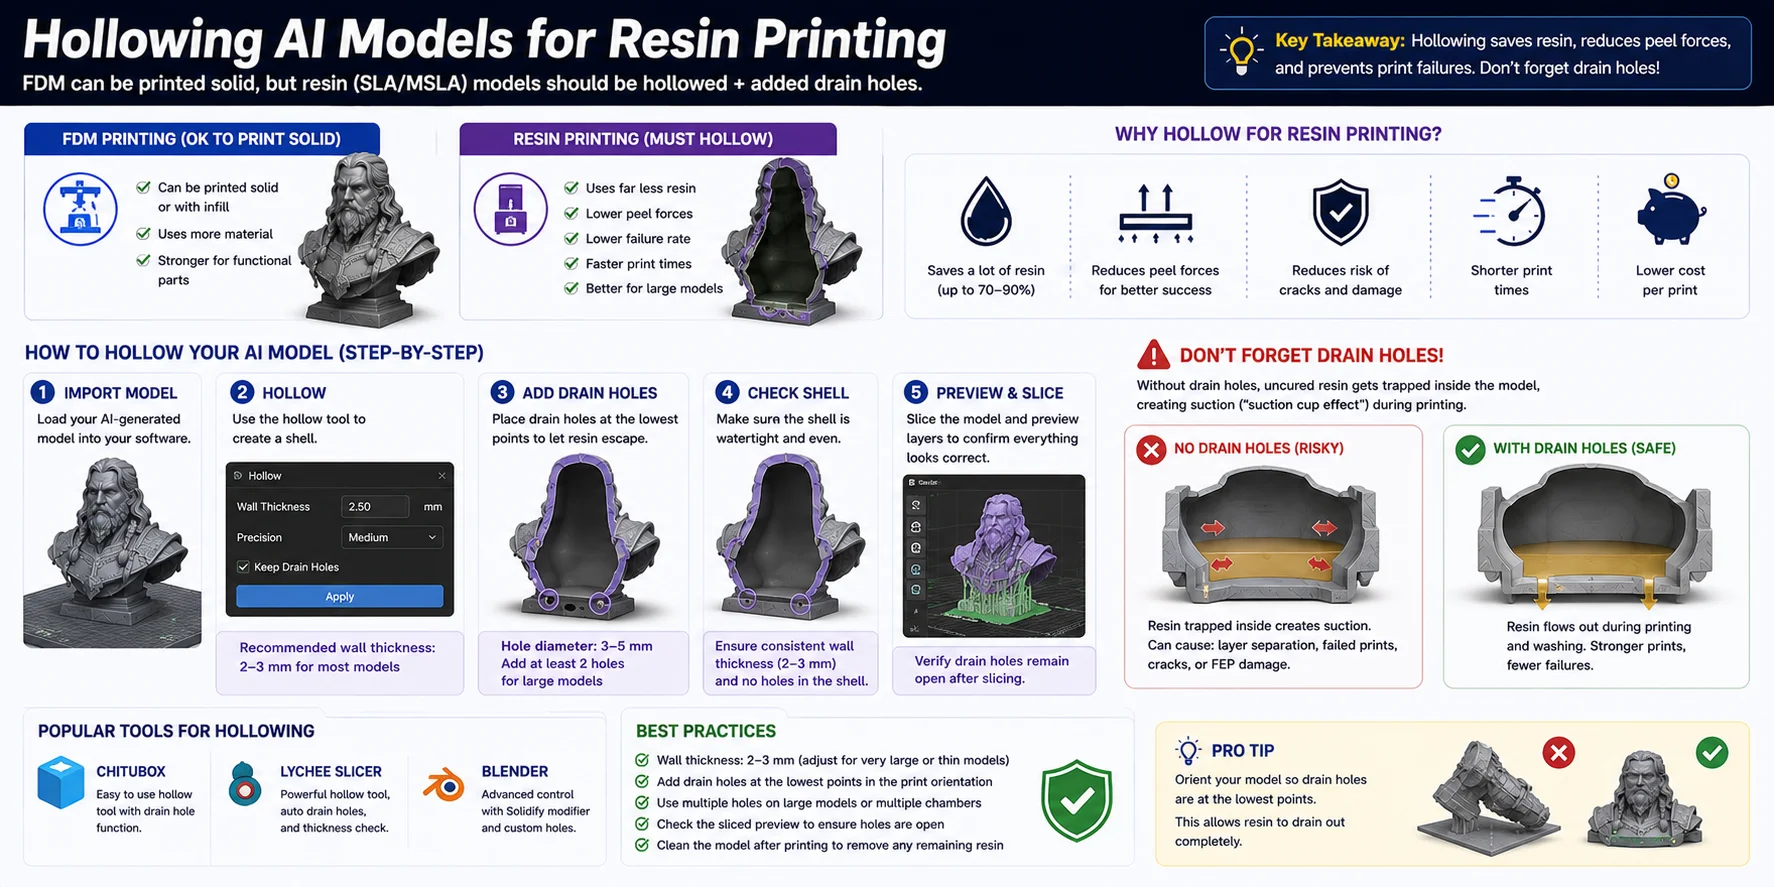
Hollowing AI Models for Resin Printing
FDM printers can print models solid without problems. Resin (SLA/MSLA) printing is different—printing large solid resin models wastes expensive resin, risks print failure, and significantly increases print time.
For resin printing, hollow out your model before slicing:
- Target wall thickness: 2–3 mm (thinner walls can crack; thicker walls waste resin)
- Add drain holes: at least 2 mm diameter, placed at the lowest point of the hollow cavity. Without drain holes, liquid resin is trapped inside and creates a suction effect that pulls prints off the build plate or causes cracking during post-cure
Tools for hollowing:
- Chitubox (slicer with built-in hollowing and drain hole placement)
- Lychee Slicer (similar built-in tools, popular for resin printing)
- Blender (manual hollowing using the Solidify modifier, then Boolean subtraction)
After hollowing, run the mesh through a repair check again—hollowing operations sometimes introduce new non-manifold geometry.
Frequently Asked Questions
Can AI generate 3D printable models?
Yes, AI tools like Tripo can generate 3D printable models from text prompts or images in seconds. The generated mesh typically needs a repair step to close holes and make it watertight before it can be sliced and printed reliably. After repair, you export as STL or 3MF and open the file in your slicer.
How do I make my own 3D model with AI?
To make a 3D model with AI, go to an AI 3D generator like Tripo AI Studio, enter a text description or upload a reference image, adjust settings for high detail with textures off (for printing), then generate. Download the mesh, repair it in Meshmixer or Blender to close holes and remove floating geometry, export as STL or 3MF, and open in your slicer to prepare for printing.
Can ChatGPT make 3D models for 3D printing?
No, ChatGPT cannot generate 3D models directly. ChatGPT is a text-based AI that can help you write better prompts for AI 3D generators, explain repair steps, or troubleshoot print settings, but it doesn't output 3D geometry. For actual 3D model generation, use a dedicated tool like Tripo or Meshy.
What's the best file format for AI 3D printing — STL or OBJ?
STL is the best choice for most 3D printing workflows because it's universally supported by slicers and printers and stores clean geometry-only data. Use 3MF when you need to preserve colors, multi-material settings, or print metadata. OBJ works as a fallback for basic printing but is less commonly used in modern print workflows.
Are AI-generated 3D models good enough to print?
AI-generated models print well for decorative, organic, and artistic objects—figurines, characters, sculptures, and props. They are not reliable for precision-fit mechanical parts, threads, or components with tight tolerances, where CAD modeling is still the better approach. After the repair step, most decorative AI models produce clean prints.
Can I make printable AI models for free?
Yes—many AI 3D generators offer a free tier with limited generations. Tripo offers free generations to get started. For repair and slicing, Meshmixer, Blender, Cura, and Bambu Studio are all free. Export limitations (such as file format or model version) may require a paid subscription for some tools.
Conclusion
AI takes you from idea to printable model in minutes—generate it, repair the mesh, export STL or 3MF, and slice. The repair step is what most tutorials skip, but it's what separates a model that prints cleanly from one that fails on the build plate. Your next print is one prompt away.