AI 생성 3D 에셋을 Babylon.js 및 Three.js로 가져오는 방법
상상해 보세요: AI 3D 모델 생성기 기술을 사용하여 몇 초 만에 멋진 3D 모델을 만들었지만, 이제 이 모델을 웹에서 어떻게 구현할지 막막하게 생각하고 있습니다. 인터랙티브 제품 쇼케이스를 구축하든, 웹 기반 게임을 만들든, 몰입형 AR 경험을 개발하든, AI로 생성된 걸작을 인기 있는 웹 프레임워크로 가져오는 것이 로켓 과학처럼 느껴져서는 안 됩니다.
바로 오늘, 이 문제를 두 가지 접근 방식으로 해결할 것입니다. 먼저 몇 분 안에 모델을 웹에 구현할 수 있는 흥미로운 AI 기반 단축키를 소개한 다음, 완전한 제어를 원하는 분들을 위해 전통적인 코딩 방법으로 깊이 파고들 것입니다. 이미 2백만 명 이상의 크리에이터가 Tripo AI를 사용하여 8~10초 만에 전문적인 3D 모델을 생성하고 있는 만큼, AI로 생성된 3D 에셋을 Babylon.js와 Three.js로 가져오는 가장 빠른 방법을 살펴보겠습니다.
빠른 AI 단축키: Cursor AI를 사용하여 3D 모델 가져오기
여기서 중요한 점은 더 이상 수백 줄의 코드를 작성할 필요가 없다는 것입니다. Cursor AI와 같은 AI 기반 개발 도구는 AI 생성 3D 모델과 같은 작업을 포함하여 전체 통합 설정을 몇 분 안에 생성할 수 있습니다. 이 방법은 디자이너, 마케터 및 깊은 JavaScript 지식 없이도 빠르게 프로토타이핑하고 싶은 모든 사람에게 적합합니다.
AI 단축키 방법을 선택해야 하는 이유
- 매우 빠름: 몇 시간의 코딩을 5분 설정으로 전환
- 초보자 친화적: 코딩 경험이 없어도 문제없음
- 오류 없음: AI가 로더 구성과 같은 복잡한 부분을 처리
- 즉각적인 테스트: AI 생성 3D 모델의 웹 통합을 즉시 확인
단계별 가이드: Cursor AI 방법
1. Tripo AI 모델 내보내기
Tripo Studio 또는 Tripo AI 플랫폼을 사용하는 경우:
- 텍스트 또는 이미지로 모델 생성
- 내보내기 버튼 클릭
- GLB 형식 선택 (웹에 권장)
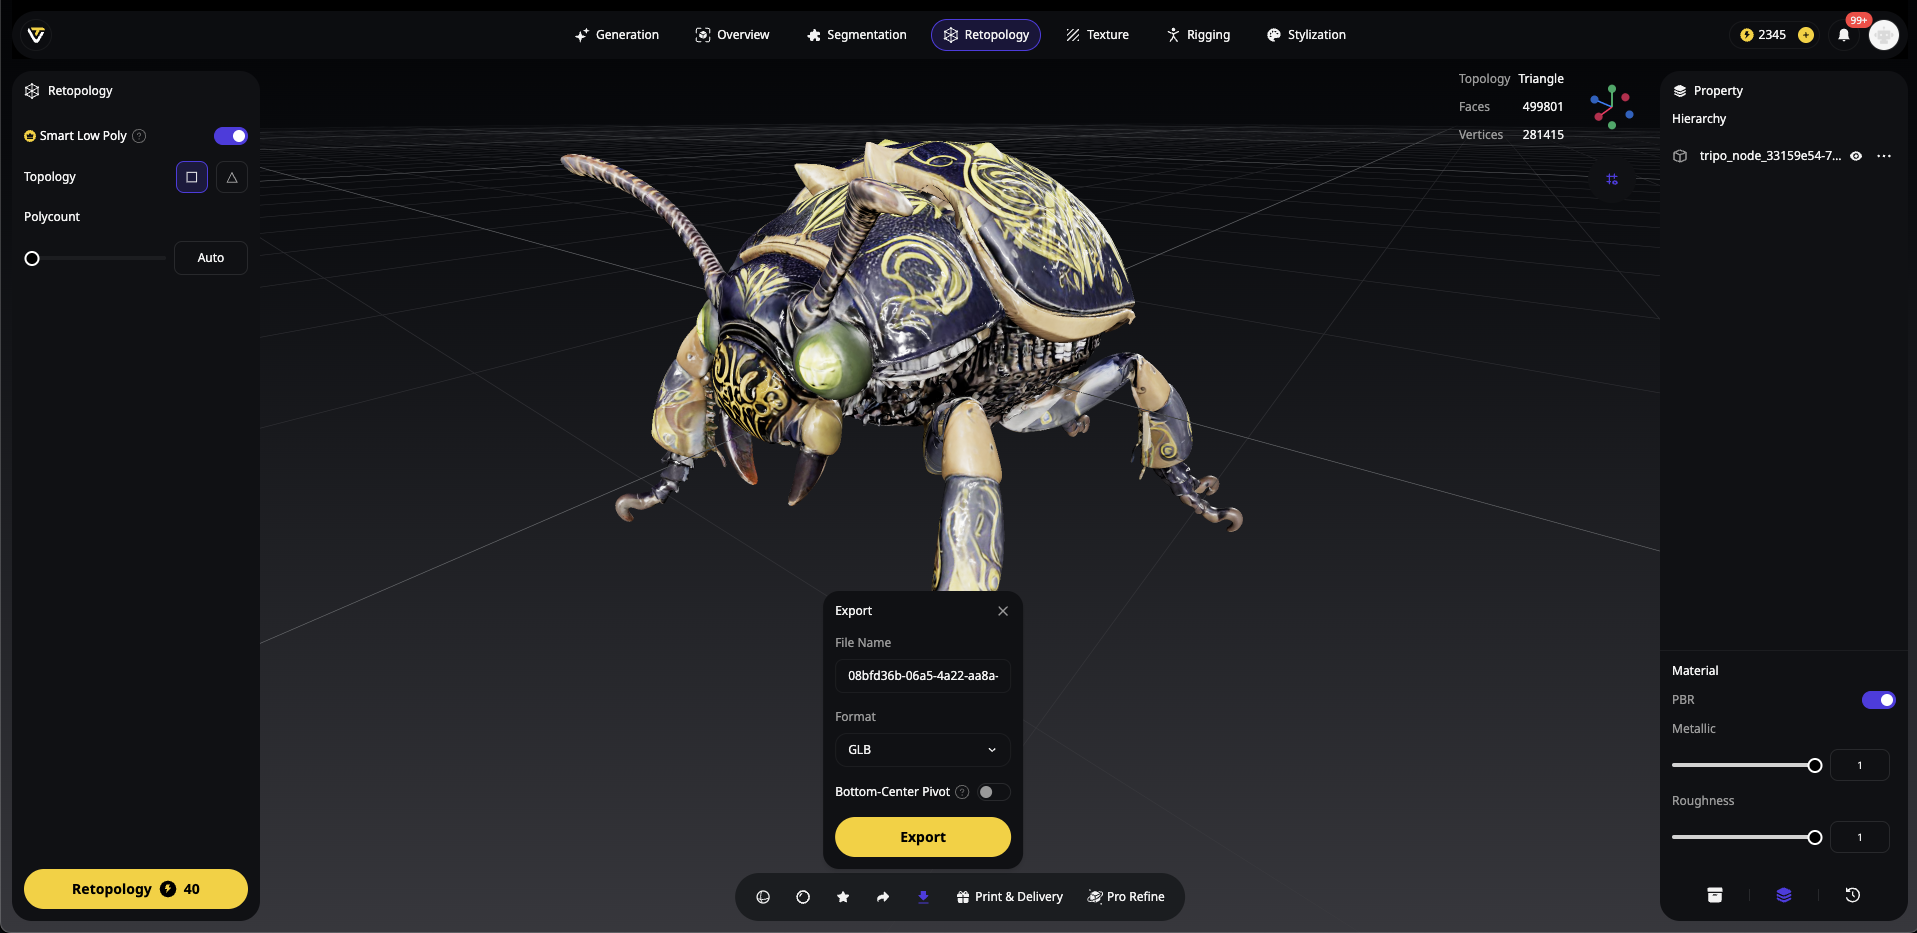
대체 형식: OBJ, FBX, STL 또는 USDZ
새 프로젝트 폴더를 만들고 GLB 모델을 models 하위 폴더에 배치합니다:
my-3d-project/
├── models/
│   └── your-tripo-model.glb
└── (현재 비어 있음)
2단계: Cursor AI를 열고 프롬프트 생성
Cursor AI를 실행하고 프로젝트 폴더를 엽니다. 이 강력한 프롬프트를 사용하여 모든 것을 생성합니다:
'./models/your-tripo-model.glb'에 있는 GLB 3D 모델을 표시하는 완전한 웹 애플리케이션을 생성합니다.

요구 사항:
1. Babylon.js와 Three.js 예제를 별도의 HTML 파일로 설정합니다.
2. CDN을 통해 필요한 모든 종속성을 포함합니다.
3. 적절한 조명, 카메라 컨트롤 및 반응형 캔버스를 추가합니다.
4. 사용자 상호 작용을 위한 OrbitControls를 구현합니다.
5. 로딩 진행률 표시기를 추가합니다.
6. 두 예제에 대한 링크가 있는 index.html을 생성합니다.
7. 모델 로드 실패에 대한 오류 처리를 포함합니다.
8. 각 섹션을 설명하는 주석을 추가합니다.
9. 로컬 테스트를 위해 'python -m http.server'로 작동하도록 합니다.

모델은 중앙에 배치되고, 적절하게 조명되며, 마우스 컨트롤로 회전할 수 있어야 합니다.
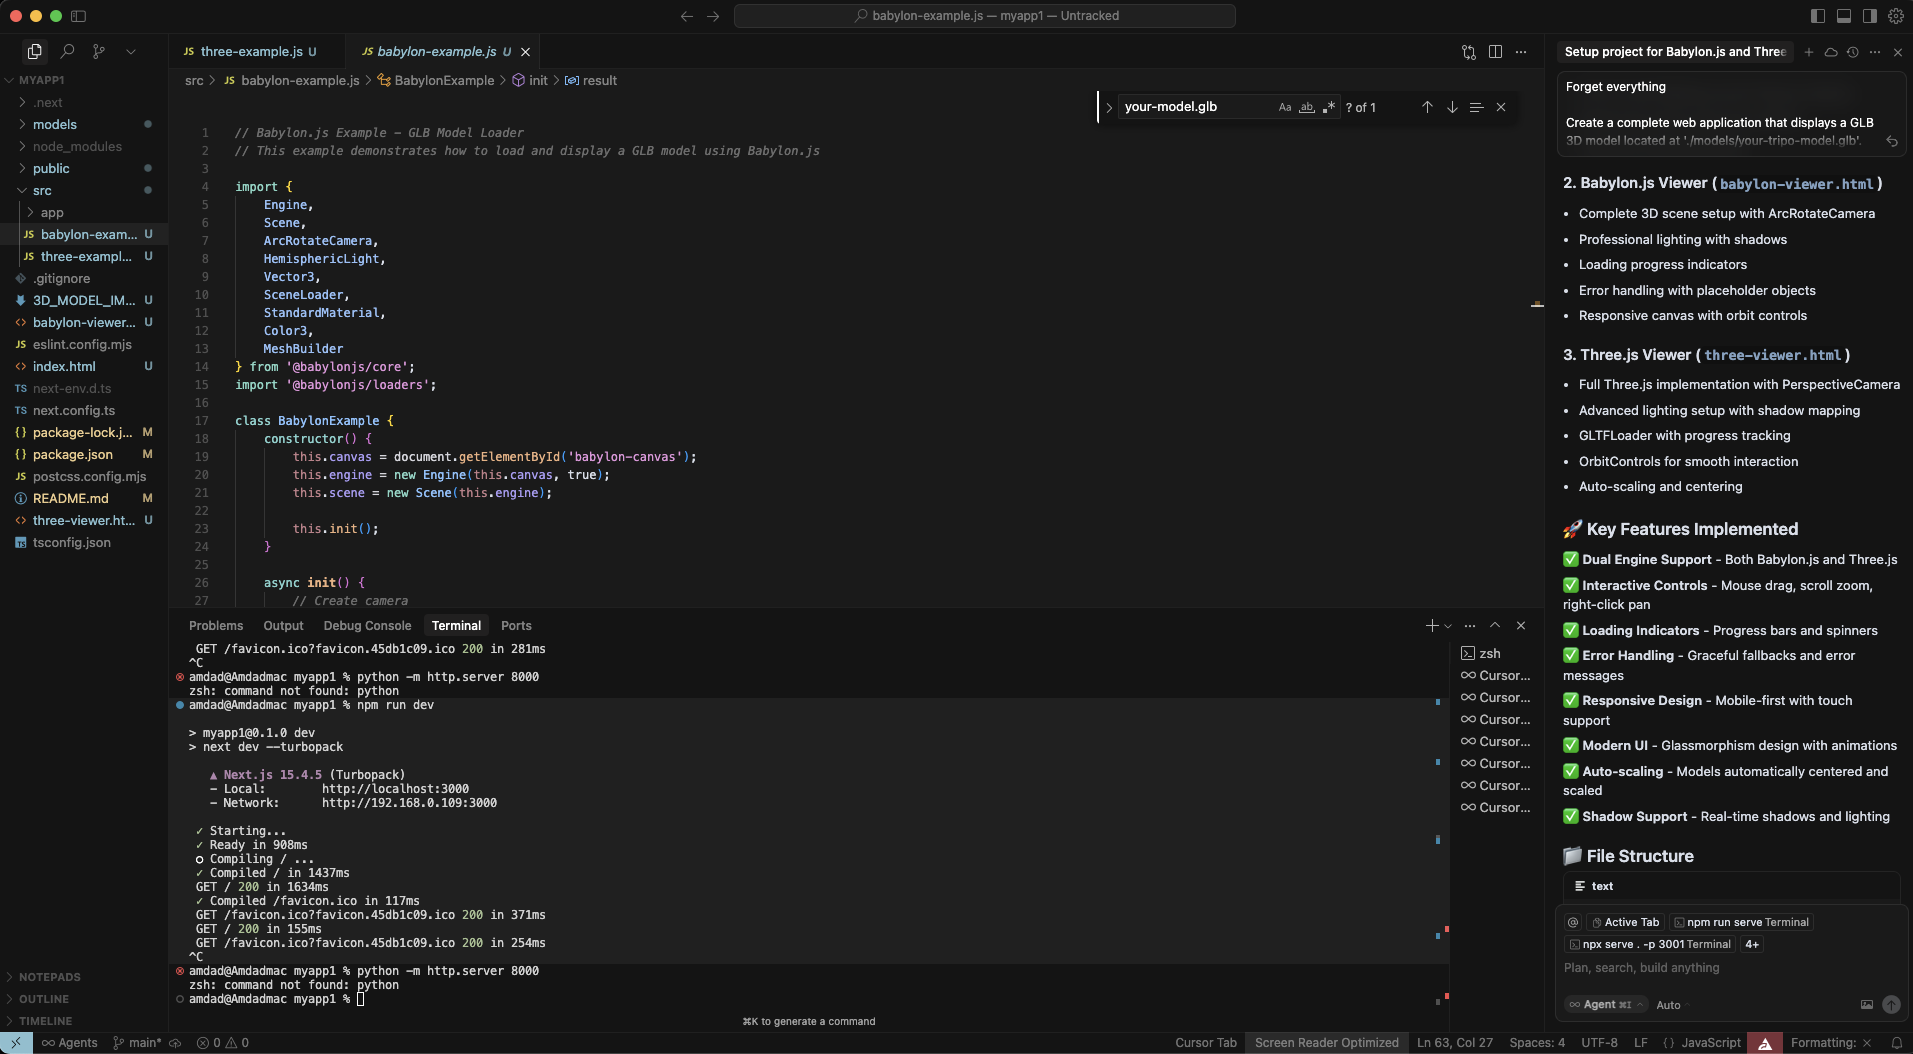
3단계: AI 생성 코드 적용
Cursor AI가 여러 파일을 생성할 것입니다. 변경 사항을 검토하고 수락합니다:
index.html - 두 가지 옵션이 있는 랜딩 페이지
babylon-example.html - Babylon.js 구현
three-example.html - Three.js 구현
잠재적으로 지침이 포함된 README.md
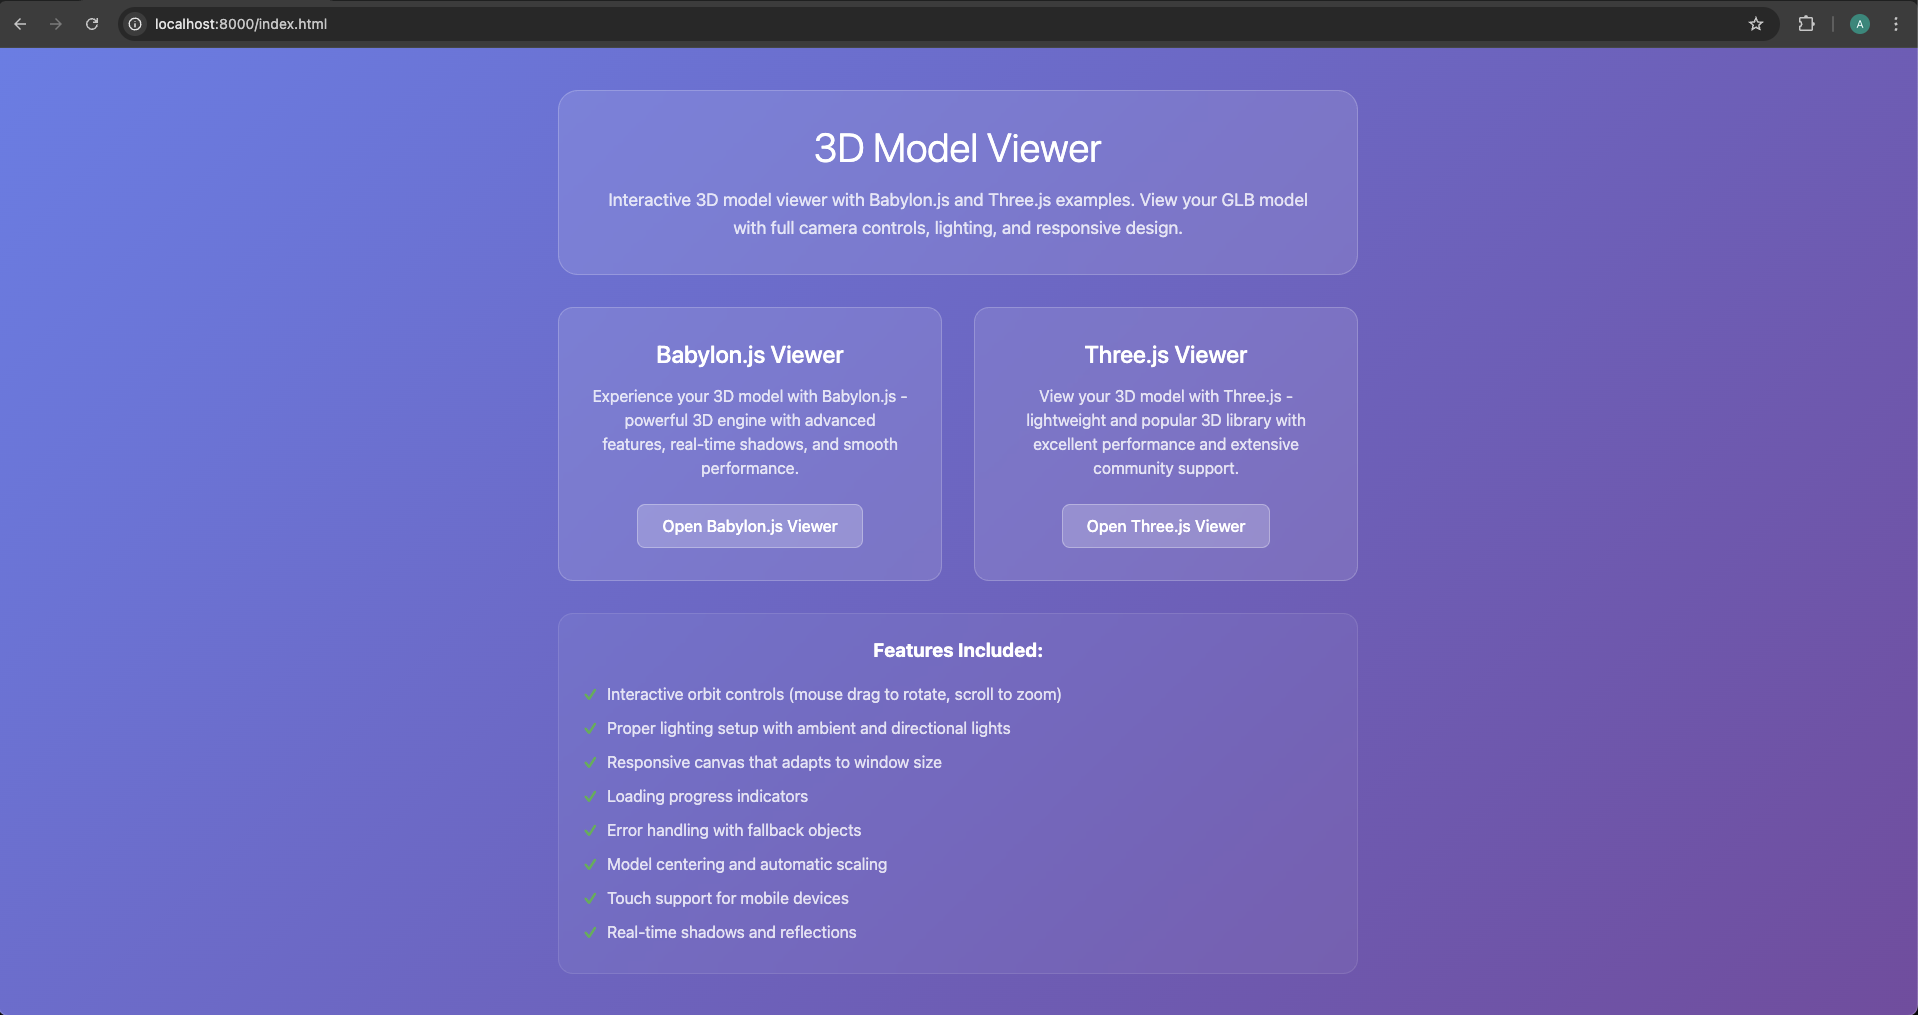
4단계: 통합 테스트
프로젝트 폴더에서 터미널을 열고 다음을 실행합니다:
python -m http.server 8000
# 또는 Node.js를 선호하는 경우:
npx http-server
http://localhost:8000으로 이동하여 예제를 클릭하여 모델을 확인합니다!

5단계: AI 지원을 통한 사용자 정의
수정이 필요하세요? Cursor AI에 간단히 요청하세요:
"Three.js 예제에 스카이박스 배경을 추가해 줘"
"Babylon.js에서 모델이 자동으로 회전하도록 만들어 줘"
"두 예제에 그림자 효과를 추가해 줘"
"퍼센티지 로딩 화면을 구현해 줘"
Cursor AI의 실제 출력 예시
Cursor가 Three.js 구현을 위해 생성할 수 있는 내용은 다음과 같습니다:
_// Three.js 예제 - GLB 모델 로더_
_// 이 예제는 Three.js를 사용하여 GLB 모델을 로드하고 표시하는 방법을 보여줍니다._

import * as THREE from 'three';
import { GLTFLoader } from 'three/examples/jsm/loaders/GLTFLoader.js';
import { OrbitControls } from 'three/examples/jsm/controls/OrbitControls.js';

class ThreeExample {
    constructor() {
        this.container = document.getElementById('three-container');
        this.scene = new THREE.Scene();
        this.camera = new THREE.PerspectiveCamera(
            75,
            window.innerWidth / window.innerHeight,
            0.1,
            1000
        );

        this.renderer = new THREE.WebGLRenderer({ antialias: true });
        this.renderer.setSize(window.innerWidth, window.innerHeight);
        this.renderer.setClearColor(0x000000);
        this.renderer.shadowMap.enabled = true;
        this.renderer.shadowMap.type = THREE.PCFSoftShadowMap;

        this.container.appendChild(this.renderer.domElement);

        this.init();
    }

    **init**() {
        _// 카메라 설정_
        this.camera.position.set(5, 5, 5);
        this.camera.lookAt(0, 0, 0);

        _// 조명 설정_
        const ambientLight = new THREE.AmbientLight(0x404040, 0.6);
        this.scene.add(ambientLight);

        const directionalLight = new THREE.DirectionalLight(0xffffff, 0.8);
        directionalLight.position.set(10, 10, 5);
        directionalLight.castShadow = true;
        directionalLight.shadow.mapSize.width = 2048;
        directionalLight.shadow.mapSize.height = 2048;
        this.scene.add(directionalLight);

        _// OrbitControls 추가_
        this.controls = new OrbitControls(this.camera, this.renderer.domElement);
        this.controls.enableDamping = true;
        this.controls.dampingFactor = 0.05;
        this.controls.screenSpacePanning = false;
        this.controls.minDistance = 1;
        this.controls.maxDistance = 50;

        _// GLB 모델 로드_
        this.loadModel();

        _// 창 크기 조정 처리_
        window.addEventListener('resize', () => {
            this.camera.aspect = window.innerWidth / window.innerHeight;
            this.camera.updateProjectionMatrix();
            this.renderer.setSize(window.innerWidth, window.innerHeight);
        });

        _// 애니메이션 루프 시작_
        this.animate();
    }

    **loadModel**() {
        const loader = new GLTFLoader();

        console.log('GLB 모델 로드 중...');
        loader.load(
            'models/your-model1.glb',
            (_gltf_) => {
                console.log('모델 로드 성공:', _gltf_);

                _// 모델을 장면에 추가_
                this.scene.add(_gltf_.scene);

                _// 모델 중앙 정렬_
                this.centerModel(_gltf_.scene);

                _// 참조를 위한 바닥면 추가_
                this.createGround();

                _// 모든 메시의 그림자 활성화_
                _gltf_.scene.traverse((_child_) => {
                    if (_child_.isMesh) {
                        _child_.castShadow = true;
                        _child_.receiveShadow = true;
                    }
                });

            },
            (_progress_) => {
                console.log('로딩 진행률:', (_progress_.loaded / _progress_.total * 100) + '%');
            },
            (_error_) => {
                console.error('모델 로드 오류:', _error_);
                this.createPlaceholderCube();
            }
        );
    }

    **centerModel**(_model_) {
        _// 모델을 중앙에 배치하기 위해 바운딩 박스 계산_
        const box = new THREE.Box3().setFromObject(_model_);
        const center = box.getCenter(new THREE.Vector3());
        const size = box.getSize(new THREE.Vector3());

        _// 모델 중앙 정렬_
        _model_.position.sub(center);

        _// 필요한 경우 모델을 합리적인 크기로 조정_
        const maxDim = Math.max(size.x, size.y, size.z);
        if (maxDim > 10) {
            const scale = 5 / maxDim;
            _model_.scale.setScalar(scale);
        }
    }

    **createGround**() {
        _// 참조를 위한 바닥면 생성_
        const groundGeometry = new THREE.PlaneGeometry(20, 20);
        const groundMaterial = new THREE.MeshLambertMaterial({
            color: 0x333333,
            transparent: true,
            opacity: 0.8
        });
        const ground = new THREE.Mesh(groundGeometry, groundMaterial);
        ground.rotation.x = -Math.PI / 2;
        ground.position.y = -2;
        ground.receiveShadow = true;
        this.scene.add(ground);
    }

    **createPlaceholderCube**() {
        _// 모델 로드 실패 시 플레이스홀더 큐브 생성_
        const geometry = new THREE.BoxGeometry(2, 2, 2);
        const material = new THREE.MeshLambertMaterial({ color: 0x8080ff });
        const cube = new THREE.Mesh(geometry, material);
        cube.castShadow = true;
        this.scene.add(cube);
    }

    **animate**() {
        requestAnimationFrame(() => this.animate());

        _// 컨트롤 업데이트_
        this.controls.update();

        _// 장면 렌더링_
        this.renderer.render(this.scene, this.camera);
    }
}

_// DOM 로드 시 초기화_
document.addEventListener('DOMContentLoaded', () => {
    new ThreeExample();
});

export default ThreeExample;
방법 비교: AI 단축키 vs 전통적인 코딩
전통적인 방법: 수동 구현
AI 단축키는 빠른 시작에 매우 유용하지만, 전문 개발자는 종종 완전한 제어를 필요로 합니다. Babylon.js 3D 모델 가져오기와 Three.js 3D 모델 로드를 위한 전통적인 접근 방식을 살펴보겠습니다.
Babylon.js: 완전한 수동 설정
1단계: 프로젝트 구조
수동으로 프로젝트를 생성합니다:
mkdir babylon-3d-project
cd babylon-3d-project
npm init -y
npm install --save babylonjs babylonjs-loaders
2단계: HTML 기초
<!DOCTYPE html><html><head><title>Babylon.js - Tripo AI 모델</title><style>
        html, body {
            overflow: hidden;
            width: 100%;
            height: 100%;
            margin: 0;
            padding: 0;
        }
        #renderCanvas {
            width: 100%;
            height: 100%;
            touch-action: none;
        }
    </style></head><body><canvas id="renderCanvas"></canvas><script src="https://cdn.babylonjs.com/babylon.js"></script><script src="https://cdn.babylonjs.com/loaders/babylonjs.loaders.min.js"></script><script src="app.js"></script></body></html>
3단계: JavaScript 구현
// app.jsconst canvas = document.getElementById("renderCanvas");
const engine = new BABYLON.Engine(canvas, true, {
    preserveDrawingBuffer: true,
    stencil: true,
    disableWebGL2Support: false
});

const createScene = async () => {
    const scene = new BABYLON.Scene(engine);
    scene.clearColor = new BABYLON.Color4(0.9, 0.9, 0.9, 1);

    // 더 나은 위치 설정을 위한 카메라const camera = new BABYLON.ArcRotateCamera(
        "camera",
        BABYLON.Tools.ConvertDegreesToRadians(45),
        BABYLON.Tools.ConvertDegreesToRadians(60),
        10,
        BABYLON.Vector3.Zero(),
        scene
    );
    camera.attachControl(canvas, true);
    camera.wheelPrecision = 50;
    camera.minZ = 0.1;

    // 향상된 조명 설정const hemiLight = new BABYLON.HemisphericLight(
        "hemiLight",
        new BABYLON.Vector3(0, 1, 0),
        scene
    );
    hemiLight.intensity = 0.5;

    const dirLight = new BABYLON.DirectionalLight(
        "dirLight",
        new BABYLON.Vector3(-1, -2, -1),
        scene
    );
    dirLight.position = new BABYLON.Vector3(20, 40, 20);
    dirLight.intensity = 0.5;
    dirLight.shadowEnabled = true;

    // 그림자 생성기const shadowGenerator = new BABYLON.ShadowGenerator(1024, dirLight);
    shadowGenerator.useBlurExponentialShadowMap = true;

    // 그림자를 위한 바닥const ground = BABYLON.MeshBuilder.CreateGround(
        "ground",
        { width: 20, height: 20 },
        scene
    );
    ground.receiveShadows = true;

    // 오류 처리가 포함된 AI 생성 3D 에셋 가져오기try {
        const result = await BABYLON.SceneLoader.ImportMeshAsync(
            "",
            "./models/",
            "your-tripo-model.glb",
            scene
        );

        // 가져온 메시 처리
        result.meshes.forEach(mesh => {
            shadowGenerator.addShadowCaster(mesh);
            if (mesh.material) {
                mesh.material.backFaceCulling = false;
            }
        });

        // 모델 중앙 정렬 및 스케일 조정const rootMesh = result.meshes[0];
        const bounds = rootMesh.getHierarchyBoundingVectors();
        const center = bounds.max.add(bounds.min).scale(0.5);
        rootMesh.position = center.negate();

        // 카메라 자동 맞춤
        camera.setTarget(BABYLON.Vector3.Zero());
        camera.radius = bounds.max.subtract(bounds.min).length() * 1.5;

    } catch (error) {
        console.error("모델 로드 실패:", error);
        // 오류 표시기 생성const errorText = new BABYLON.GUI.TextBlock();
        errorText.text = "3D 모델 로드 실패";
        errorText.color = "red";
        errorText.fontSize = 24;
    }

    return scene;
};

// 초기화 및 실행createScene().then(scene => {
    engine.runRenderLoop(() => {
        scene.render();
    });

    // 모바일 최적화
    engine.setHardwareScalingLevel(1 / window.devicePixelRatio);
});

// 반응형 처리window.addEventListener("resize", () => {
    engine.resize();
});

// 성능 최적화
scene.registerBeforeRender(() => {
    // 여기에 프레임당 업데이트 추가
});
Three.js: 전문적인 구현
Three.js 3D 모델 로드를 위한 완전한 수동 접근 방식은 다음과 같습니다:
import * as THREE from 'three';
import { GLTFLoader } from 'three/examples/jsm/loaders/GLTFLoader.js';
import { OrbitControls } from 'three/examples/jsm/controls/OrbitControls.js';
import { DRACOLoader } from 'three/examples/jsm/loaders/DRACOLoader.js';

class ThreeJSApp {
    constructor() {
        this.scene = new THREE.Scene();
        this.camera = null;
        this.renderer = null;
        this.controls = null;
        this.model = null;
        this.mixer = null;
        this.clock = new THREE.Clock();

        this.init();
        this.loadModel();
        this.animate();
    }

    init() {
        // 장면 설정this.scene.background = new THREE.Color(0xf0f0f0);
        this.scene.fog = new THREE.Fog(0xf0f0f0, 10, 50);

        // 카메라this.camera = new THREE.PerspectiveCamera(
            50,
            window.innerWidth / window.innerHeight,
            0.1,
            1000
        );
        this.camera.position.set(5, 5, 5);

        // 최적화된 렌더러this.renderer = new THREE.WebGLRenderer({
            antialias: true,
            powerPreference: "high-performance"
        });
        this.renderer.setPixelRatio(Math.min(window.devicePixelRatio, 2));
        this.renderer.setSize(window.innerWidth, window.innerHeight);
        this.renderer.shadowMap.enabled = true;
        this.renderer.shadowMap.type = THREE.PCFSoftShadowMap;
        this.renderer.outputEncoding = THREE.sRGBEncoding;
        this.renderer.toneMapping = THREE.ACESFilmicToneMapping;
        document.body.appendChild(this.renderer.domElement);

        // 조명const ambient = new THREE.AmbientLight(0xffffff, 0.4);
        this.scene.add(ambient);

        const directional = new THREE.DirectionalLight(0xffffff, 0.6);
        directional.position.set(5, 10, 5);
        directional.castShadow = true;
        directional.shadow.camera.near = 0.1;
        directional.shadow.camera.far = 50;
        directional.shadow.camera.left = -10;
        directional.shadow.camera.right = 10;
        directional.shadow.camera.top = 10;
        directional.shadow.camera.bottom = -10;
        directional.shadow.mapSize.width = 2048;
        directional.shadow.mapSize.height = 2048;
        this.scene.add(directional);

        // 바닥const groundGeometry = new THREE.PlaneGeometry(50, 50);
        const groundMaterial = new THREE.MeshStandardMaterial({
            color: 0xcccccc,
            roughness: 0.8,
            metalness: 0.2
        });
        const ground = new THREE.Mesh(groundGeometry, groundMaterial);
        ground.rotation.x = -Math.PI / 2;
        ground.receiveShadow = true;
        this.scene.add(ground);

        // 컨트롤this.controls = new OrbitControls(this.camera, this.renderer.domElement);
        this.controls.enableDamping = true;
        this.controls.dampingFactor = 0.05;
        this.controls.screenSpacePanning = false;
        this.controls.minDistance = 1;
        this.controls.maxDistance = 50;
        this.controls.maxPolarAngle = Math.PI / 2;

        // 이벤트 리스너window.addEventListener('resize', this.onWindowResize.bind(this));
    }

    loadModel() {
        // 진행률 추적을 위한 로딩 매니저const manager = new THREE.LoadingManager();

        manager.onStart = (url, itemsLoaded, itemsTotal) => {
            console.log(`로딩 시작: ${url}`);
            this.showLoader(true);
        };

        manager.onProgress = (url, itemsLoaded, itemsTotal) => {
            const progress = (itemsLoaded / itemsTotal) * 100;
            this.updateLoader(progress);
        };

        manager.onLoad = () => {
            console.log('로딩 완료!');
            this.showLoader(false);
        };

        manager.onError = (url) => {
            console.error(`로딩 오류: ${url}`);
            this.showError('3D 모델 로드 실패');
        };

        // 압축된 지오메트리용 DRACO 로더 (선택 사항이지만 권장)const dracoLoader = new DRACOLoader(manager);
        dracoLoader.setDecoderPath('https://www.gstatic.com/draco/v1/decoders/');

        // GLTF 로더const loader = new GLTFLoader(manager);
        loader.setDRACOLoader(dracoLoader);

        // 모델 로드
        loader.load(
            './models/your-tripo-model.glb',
            (gltf) => {
                this.model = gltf.scene;

                // 모델 중앙 정렬 및 스케일 조정const box = new THREE.Box3().setFromObject(this.model);
                const center = box.getCenter(new THREE.Vector3());
                const size = box.getSize(new THREE.Vector3());

                // 모델 중앙 정렬this.model.position.sub(center);

                // 보기에 맞게 스케일 조정const maxDim = Math.max(size.x, size.y, size.z);
                const scale = 5 / maxDim;
                this.model.scale.multiplyScalar(scale);

                // 그림자 활성화this.model.traverse((child) => {
                    if (child.isMesh) {
                        child.castShadow = true;
                        child.receiveShadow = true;

                        // AI 생성 모델을 위해 양면 재질 확인if (child.material) {
                            child.material.side = THREE.DoubleSide;
                        }
                    }
                });

                // 장면에 추가this.scene.add(this.model);

                // 애니메이션 처리 (존재하는 경우)if (gltf.animations && gltf.animations.length > 0) {
                    this.mixer = new THREE.AnimationMixer(this.model);

                    // 모든 애니메이션 재생
                    gltf.animations.forEach((clip) => {
                        const action = this.mixer.clipAction(clip);
                        action.play();
                    });
                }

                // 모델에 맞게 카메라 조정this.fitCameraToObject(this.model);
            }
        );
    }

    fitCameraToObject(object) {
        const box = new THREE.Box3().setFromObject(object);
        const size = box.getSize(new THREE.Vector3());
        const center = box.getCenter(new THREE.Vector3());

        const maxDim = Math.max(size.x, size.y, size.z);
        const fov = this.camera.fov * (Math.PI / 180);
        const cameraZ = Math.abs(maxDim / 2 / Math.tan(fov / 2));

        this.camera.position.set(cameraZ, cameraZ, cameraZ);
        this.controls.target = center;
        this.controls.update();
    }

    animate() {
        requestAnimationFrame(this.animate.bind(this));

        const delta = this.clock.getDelta();

        // 애니메이션 업데이트if (this.mixer) {
            this.mixer.update(delta);
        }

        // 컨트롤 업데이트this.controls.update();

        // 렌더링this.renderer.render(this.scene, this.camera);
    }

    onWindowResize() {
        this.camera.aspect = window.innerWidth / window.innerHeight;
        this.camera.updateProjectionMatrix();
        this.renderer.setSize(window.innerWidth, window.innerHeight);
    }

    showLoader(show) {
        let loader = document.getElementById('loader');
        if (!loader && show) {
            loader = document.createElement('div');
            loader.id = 'loader';
            loader.style.cssText = `
                position: fixed;
                top: 50%;
                left: 50%;
                transform: translate(-50%, -50%);
                background: rgba(0,0,0,0.8);
                color: white;
                padding: 20px;
                border-radius: 10px;
                font-family: Arial, sans-serif;
                z-index: 1000;
            `;
            document.body.appendChild(loader);
        }
        if (loader) {
            loader.style.display = show ? 'block' : 'none';
        }
    }

    updateLoader(progress) {
        const loader = document.getElementById('loader');
        if (loader) {
            loader.textContent = `로딩 중: ${Math.round(progress)}%`;
        }
    }

    showError(message) {
        const loader = document.getElementById('loader');
        if (loader) {
            loader.textContent = message;
            loader.style.background = 'rgba(255,0,0,0.8)';
        }
    }
}

// 앱 초기화const app = new ThreeJSApp();
웹 성능을 위한 AI 생성 모델 최적화
AI 단축키를 사용하든 수동 방법을 사용하든, AI 생성 3D 모델의 웹 성능을 최적화하는 것은 매우 중요합니다. 원활한 경험을 보장하는 방법은 다음과 같습니다:
- glTF를 이용한 형식 최적화
glTF 모델 가져오기 형식은 웹 3D의 표준입니다. 최적화 방법과 이유는 다음과 같습니다:
// 로딩 중 텍스처 최적화
loader.load('./models/your-model.glb', (gltf) => {
    gltf.scene.traverse((child) => {
        if (child.isMesh && child.material) {
            // 텍스처 최적화if (child.material.map) {
                child.material.map.minFilter = THREE.LinearMipmapLinearFilter;
                child.material.map.anisotropy = renderer.capabilities.getMaxAnisotropy();
            }

            // 반복되는 메시에 GPU 인스턴싱 활성화if (child.geometry) {
                child.geometry.computeBoundingSphere();
                child.frustumCulled = true;
            }
        }
    });
});
- LOD(Level of Detail) 시스템
다양한 기기에서 더 나은 성능을 위해 LOD를 구현합니다:
class LODManager {
    constructor(scene, camera) {
        this.scene = scene;
        this.camera = camera;
        this.lodGroups = new Map();
    }

    addLODModel(name, levels) {
        const lod = new THREE.LOD();

        levels.forEach(({ url, distance }) => {
            const loader = new GLTFLoader();
            loader.load(url, (gltf) => {
                lod.addLevel(gltf.scene, distance);
            });
        });

        this.scene.add(lod);
        this.lodGroups.set(name, lod);
        return lod;
    }

    update() {
        this.lodGroups.forEach(lod => {
            lod.update(this.camera);
        });
    }
}

// 사용법const lodManager = new LODManager(scene, camera);
lodManager.addLODModel('tripoModel', [
    { url: './models/high-detail.glb', distance: 0 },
    { url: './models/medium-detail.glb', distance: 10 },
    { url: './models/low-detail.glb', distance: 20 }
]);
- 텍스처 압축
품질 손실 없이 텍스처 크기를 줄입니다:
// GPU에 업로드하기 전에 텍스처 압축function compressTexture(texture) {
    const canvas = document.createElement('canvas');
    const ctx = canvas.getContext('2d');

    // 2의 제곱수로 크기 조정const size = Math.pow(2, Math.floor(Math.log2(Math.max(texture.image.width, texture.image.height))));
    canvas.width = size;
    canvas.height = size;

    ctx.drawImage(texture.image, 0, 0, size, size);

    // 압축된 텍스처 생성const compressedTexture = new THREE.CanvasTexture(canvas);
    compressedTexture.minFilter = THREE.LinearMipmapLinearFilter;
    compressedTexture.generateMipmaps = true;

    return compressedTexture;
}
- 성능 모니터링
FPS를 추적하고 그에 따라 최적화합니다:
class PerformanceMonitor {
    constructor() {
        this.fps = 0;
        this.frameCount = 0;
        this.lastTime = performance.now();

        this.createDisplay();
    }

    createDisplay() {
        this.display = document.createElement('div');
        this.display.style.cssText = `
            position: fixed;
            top: 10px;
            left: 10px;
            background: rgba(0,0,0,0.7);
            color: #00ff00;
            padding: 10px;
            font-family: monospace;
            font-size: 14px;
            z-index: 1000;
        `;
        document.body.appendChild(this.display);
    }

    update() {
        this.frameCount++;
        const currentTime = performance.now();

        if (currentTime >= this.lastTime + 1000) {
            this.fps = Math.round((this.frameCount * 1000) / (currentTime - this.lastTime));
            this.frameCount = 0;
            this.lastTime = currentTime;

            this.display.textContent = `FPS: ${this.fps}`;

            // FPS에 따라 품질 자동 조정if (this.fps < 30) {
                this.reduceQuality();
            } else if (this.fps > 55) {
                this.increaseQuality();
            }
        }
    }

    reduceQuality() {
        // 품질 감소 로직 구현console.log('성능 향상을 위해 품질 감소');
    }

    increaseQuality() {
        // 품질 증가 로직 구현console.log('품질 증가');
    }
}
프로덕션 배포를 위한 모범 사례
- 에셋 파이프라인 자동화
웹용 3D 모델을 자동으로 최적화하는 빌드 프로세스를 생성합니다:
// package.json{"scripts": {"optimize-models": "gltf-pipeline -i ./models/raw/*.glb -o ./models/optimized/ -d","build": "npm run optimize-models && webpack"}}
- CDN 배포
전 세계적인 성능을 위해 CDN에서 모델을 제공합니다:
const MODEL_CDN = 'https://your-cdn.com/models/';

function loadModelFromCDN(modelName) {
    return new Promise((resolve, reject) => {
        const loader = new GLTFLoader();
        loader.load(
            `${MODEL_CDN}${modelName}`,
            resolve,
            (progress) => console.log('로딩 중:', progress.loaded / progress.total * 100 + '%'),
            reject
        );
    });
}
- 점진적 로딩 전략
사용자 상호 작용을 기반으로 모델을 로드합니다:
class ProgressiveLoader {
    constructor() {
        this.loadQueue = [];
        this.isLoading = false;
        this.loadedModels = new Map();
    }

    addToQueue(priority, modelInfo) {
        this.loadQueue.push({ priority, ...modelInfo });
        this.loadQueue.sort((a, b) => b.priority - a.priority);
        this.processQueue();
    }

    async processQueue() {
        if (this.isLoading || this.loadQueue.length === 0) return;

        this.isLoading = true;
        const { url, name, onLoad } = this.loadQueue.shift();

        try {
            const loader = new GLTFLoader();
            const gltf = await loader.loadAsync(url);

            this.loadedModels.set(name, gltf.scene);
            if (onLoad) onLoad(gltf.scene);

        } catch (error) {
            console.error(`${name} 로드 실패:`, error);
        }

        this.isLoading = false;
        this.processQueue();
    }

    preloadCritical(models) {
        models.forEach(model => {
            this.addToQueue(10, model);
        });
    }

    loadOnDemand(modelInfo) {
        if (this.loadedModels.has(modelInfo.name)) {
            return Promise.resolve(this.loadedModels.get(modelInfo.name));
        }

        return new Promise((resolve) => {
            this.addToQueue(5, {
                ...modelInfo,
                onLoad: resolve
            });
        });
    }
}

// 사용 예시const loader = new ProgressiveLoader();

// 중요한 모델 미리 로드
loader.preloadCritical([
    { name: 'hero-model', url: './models/hero.glb' },
    { name: 'environment', url: './models/environment.glb' }
]);

// 사용자 상호 작용 시 로드document.getElementById('load-extra').addEventListener('click', async () => {
    const model = await loader.loadOnDemand({
        name: 'extra-model',
        url: './models/extra.glb'
    });
    scene.add(model);
});
- 메모리 관리
메모리 누수를 방지하기 위해 사용하지 않는 에셋을 적절히 해제합니다:
class ResourceManager {
    constructor() {
        this.resources = new Map();
    }

    addResource(name, resource) {
        this.resources.set(name, resource);
    }

    disposeResource(name) {
        const resource = this.resources.get(name);
        if (!resource) return;

        resource.traverse((child) => {
            if (child.geometry) {
                child.geometry.dispose();
            }

            if (child.material) {
                if (Array.isArray(child.material)) {
                    child.material.forEach(mat => this.disposeMaterial(mat));
                } else {
                    this.disposeMaterial(child.material);
                }
            }
        });

        this.resources.delete(name);
    }

    disposeMaterial(material) {
        // 텍스처 해제
        ['map', 'normalMap', 'roughnessMap', 'metalnessMap', 'aoMap'].forEach(prop => {
            if (material[prop]) {
                material[prop].dispose();
            }
        });

        material.dispose();
    }

    disposeAll() {
        this.resources.forEach((resource, name) => {
            this.disposeResource(name);
        });
    }
}
일반적인 문제 및 해결책
문제 해결 가이드
기기별 최적화
class DeviceOptimizer {
    constructor(renderer) {
        this.renderer = renderer;
        this.isMobile = /Android|webOS|iPhone|iPad|iPod/i.test(navigator.userAgent);
        this.gpu = this.detectGPU();

        this.applyOptimizations();
    }

    detectGPU() {
        const canvas = document.createElement('canvas');
        const gl = canvas.getContext('webgl') || canvas.getContext('experimental-webgl');
        const debugInfo = gl.getExtension('WEBGL_debug_renderer_info');

        if (debugInfo) {
            return gl.getParameter(debugInfo.UNMASKED_RENDERER_WEBGL);
        }
        return 'unknown';
    }

    applyOptimizations() {
        if (this.isMobile) {
            // 모바일 최적화this.renderer.setPixelRatio(Math.min(window.devicePixelRatio, 2));
            this.renderer.shadowMap.enabled = false;

            // 텍스처 크기 축소THREE.DefaultLoadingManager.onLoad = () => {
                this.renderer.capabilities.maxTextureSize = 2048;
            };
        } else {
            // 데스크톱 최적화this.renderer.setPixelRatio(window.devicePixelRatio);
            this.renderer.shadowMap.type = THREE.PCFSoftShadowMap;
        }

        // GPU별 설정if (this.gpu.includes('Intel')) {
            console.log('Intel GPU 감지, 보수적인 설정 적용');
            this.renderer.capabilities.precision = 'mediump';
        }
    }

    getRecommendedModelQuality() {
        if (this.isMobile) return 'low';
        if (this.gpu.includes('Intel')) return 'medium';
        return 'high';
    }
}

// 사용법const optimizer = new DeviceOptimizer(renderer);
const quality = optimizer.getRecommendedModelQuality();
최신 프레임워크와의 통합
React 통합 예시
// TripoModelViewer.jsximport React, { useEffect, useRef } from 'react';
import * as THREE from 'three';
import { GLTFLoader } from 'three/examples/jsm/loaders/GLTFLoader';
import { OrbitControls } from 'three/examples/jsm/controls/OrbitControls';

const TripoModelViewer = ({ modelUrl, width = '100%', height = '500px' }) => {
    const mountRef = useRef(null);
    const sceneRef = useRef(null);

    useEffect(() => {
        const mount = mountRef.current;

        // 장면 설정const scene = new THREE.Scene();
        scene.background = new THREE.Color(0xf0f0f0);

        // 카메라const camera = new THREE.PerspectiveCamera(
            50,
            mount.clientWidth / mount.clientHeight,
            0.1,
            1000
        );
        camera.position.set(5, 5, 5);

        // 렌더러const renderer = new THREE.WebGLRenderer({ antialias: true });
        renderer.setSize(mount.clientWidth, mount.clientHeight);
        mount.appendChild(renderer.domElement);

        // 조명const ambientLight = new THREE.AmbientLight(0xffffff, 0.6);
        scene.add(ambientLight);

        const directionalLight = new THREE.DirectionalLight(0xffffff, 0.8);
        directionalLight.position.set(5, 10, 5);
        scene.add(directionalLight);

        // 컨트롤const controls = new OrbitControls(camera, renderer.domElement);
        controls.enableDamping = true;

        // 모델 로드const loader = new GLTFLoader();
        loader.load(modelUrl, (gltf) => {
            scene.add(gltf.scene);

            // 자동 중앙 정렬 및 스케일 조정const box = new THREE.Box3().setFromObject(gltf.scene);
            const center = box.getCenter(new THREE.Vector3());
            gltf.scene.position.sub(center);
        });

        // 애니메이션 루프const animate = () => {
            requestAnimationFrame(animate);
            controls.update();
            renderer.render(scene, camera);
        };
        animate();

        // 크기 조정 처리const handleResize = () => {
            camera.aspect = mount.clientWidth / mount.clientHeight;
            camera.updateProjectionMatrix();
            renderer.setSize(mount.clientWidth, mount.clientHeight);
        };
        window.addEventListener('resize', handleResize);

        // 장면 참조 저장
        sceneRef.current = { scene, camera, renderer, controls };

        // 정리return () => {
            window.removeEventListener('resize', handleResize);
            mount.removeChild(renderer.domElement);
            renderer.dispose();
        };
    }, [modelUrl]);

    return <div ref={mountRef} style={{ width, height }} />;
};

export default TripoModelViewer;

// React 앱에서의 사용 예시function App() {
    return (
        <div>
            <h1>내 Tripo AI 모델</h1>
            <TripoModelViewer modelUrl="./models/my-model.glb" />
        </div>
    );
}
Vue.js 통합
// TripoModelViewer.vue
<template>
  <div ref="container" :style="{ width: width, height: height }"></div>
</template>

<script>
import * as THREE from 'three';
import { GLTFLoader } from 'three/examples/jsm/loaders/GLTFLoader';
import { OrbitControls } from 'three/examples/jsm/controls/OrbitControls';

export default {
  name: 'TripoModelViewer',
  props: {
    modelUrl: String,
    width: { type: String, default: '100%' },
    height: { type: String, default: '500px' }
  },
  mounted() {
    this.initThree();
    this.loadModel();
  },
  methods: {
    initThree() {
      // React 예시와 유사한 Three.js 설정
      this.scene = new THREE.Scene();
      // ... 나머지 초기화
    },
    loadModel() {
      const loader = new GLTFLoader();
      loader.load(this.modelUrl, (gltf) => {
        this.scene.add(gltf.scene);
      });
    }
  },
  beforeDestroy() {
    // Three.js 리소스 정리
    if (this.renderer) {
      this.renderer.dispose();
    }
  }
};
</script>
성능 벤치마킹
AI 생성 3D 모델의 웹 성능을 추적하고 최적화합니다:
class PerformanceBenchmark {
    constructor() {
        this.metrics = {
            loadTime: 0,
            frameRate: [],
            memoryUsage: [],
            drawCalls: 0
        };
    }

    startLoadTimer() {
        this.loadStart = performance.now();
    }

    endLoadTimer() {
        this.metrics.loadTime = performance.now() - this.loadStart;
        console.log(`모델 로드에 ${this.metrics.loadTime.toFixed(2)}ms 소요`);
    }

    measureFrame(renderer) {
        // 프레임 속도this.metrics.frameRate.push(renderer.info.render.frame);

        // 메모리 사용량if (performance.memory) {
            this.metrics.memoryUsage.push({
                used: performance.memory.usedJSHeapSize / 1048576,
                total: performance.memory.totalJSHeapSize / 1048576
            });
        }

        // 드로우 콜this.metrics.drawCalls = renderer.info.render.calls;
    }

    getReport() {
        const avgFrameRate = this.metrics.frameRate.reduce((a, b) => a + b, 0) / this.metrics.frameRate.length;
        const avgMemory = this.metrics.memoryUsage.reduce((a, b) => a + b.used, 0) / this.metrics.memoryUsage.length;

        return {
            loadTime: `${this.metrics.loadTime.toFixed(2)}ms`,
            avgFrameRate: avgFrameRate.toFixed(2),
            avgMemoryMB: avgMemory.toFixed(2),
            drawCalls: this.metrics.drawCalls
        };
    }
}
결론: 3D 웹 개발의 미래
AI 생성 3D 에셋을 웹 프레임워크로 가져오는 두 가지 강력한 접근 방식을 다루었습니다. Cursor AI를 사용한 AI 지원 단축키는 3D 웹 개발을 민주화하여 깊은 코딩 지식 없이도 크리에이터가 접근할 수 있도록 합니다. 한편, 전통적인 수동 접근 방식은 전문 개발자가 복잡한 애플리케이션에 필요한 세밀한 제어를 제공합니다.
Tripo AI의 즉각적인 AI 3D 모델 생성기 기능과 최신 웹 프레임워크의 결합은 전례 없는 기회를 창출합니다:
- 빠른 프로토타이핑: 아이디어에서 인터랙티브 3D까지 몇 주가 아닌 몇 분 안에 구현
- 비용 효율성: 모든 프로젝트에 값비싼 3D 아티스트가 필요 없음
- 확장성: 수천 개의 고유 모델 생성 및 배포
- 접근성: 누구나 전문적인 3D 웹 경험을 생성 가능
3D 제품 뷰가 있는 전자상거래 사이트를 구축하든, 웹 기반 게임을 개발하든, 교육 플랫폼을 만들든, Tripo AI에서 웹 배포에 이르는 워크플로는 그 어느 때보다 원활해졌습니다. Algorithm 2.5가 8-10초 만에 멋진 모델을 생성하고, 우리가 다룬 가져오기 방법들을 통해 몇 년 전만 해도 불가능했던 경험을 만들 수 있는 역량을 갖추게 될 것입니다.
AI 기반 3D 콘텐츠로 웹 프로젝트를 혁신할 준비가 되셨나요? 이미 2백만 명 이상의 크리에이터가 Tripo AI를 사용하고 있습니다. 첫 번째 모델을 무료로 생성하고 몇 분 안에 브라우저에서 생생하게 구현되는 것을 확인하세요. 웹 3D의 미래는 복잡한 워크플로에 관한 것이 아니라, 아이디어를 즉시 현실로 만드는 것입니다.
오늘 바로 제작을 시작하고, Tripo AI가 전 세계 개발자와 디자이너에게 선호되는 이유를 알아보세요. 다음 획기적인 3D 웹 경험은 몇 번의 클릭만으로 가능합니다!