Two-Week Solo Game-Demo Sprint: How AI Tools + Unreal Handle the Whole Pipeline

Intro
AI has super-charged indie game dev. Over the last two weeks I paired Unreal Engine 5 with a stack of AI tools to crank out a playable on-rails light-gun prototype—solo. From brainstorming and concept art to code, SFX and music, AI handled heavy lifting so I could stay in the zone and keep the ideas flowing instead of drowning in busywork.

There's a quick-cut video of the build process below; the full walk-through sits at the end of the post.
AI Toolkit
- Planning: ChatGPT + Gemini for ideas and the initial design doc
- Art: DeepSeek + Midjourney for concepts and style guides
- Programming: ChatGPT as a live Blueprint coach
- Audio: generative music + sound-effect models
- Voice-over: TTS for runtime dialog
- AI 3D Modeling: Tripo
Bottom line: AI touched every stage, turning a typical multi-person project into a one-man sprint.
Project Setup
Why This Game?
I asked myself the basics up front: What's the core loop? Why is it fresh? Where will it ship?
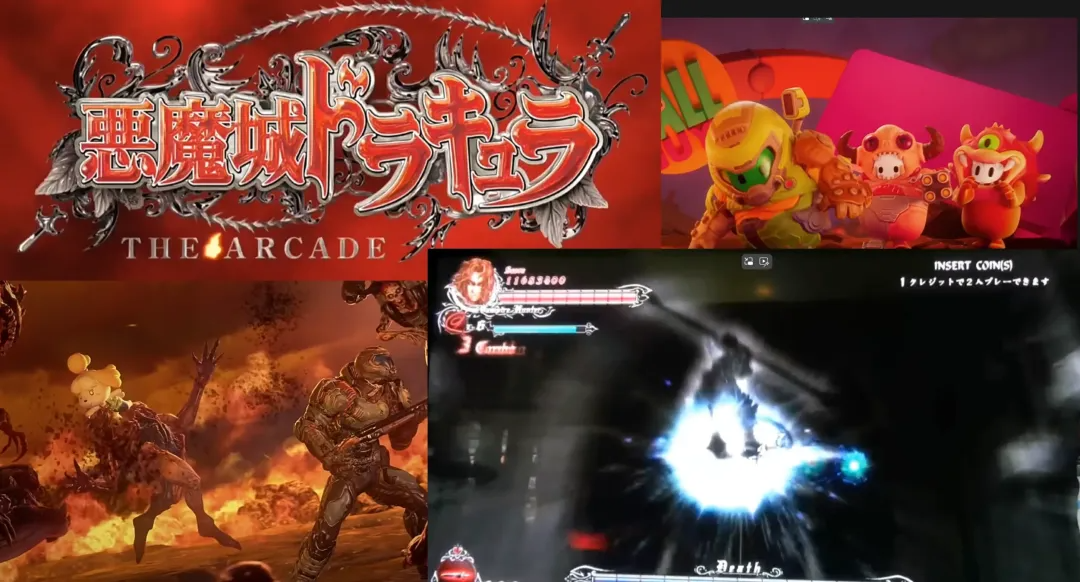
Inspiration came from those goofy "DOOM x Animal Crossing" mashup videos, the Fall Guys / DOOM crossover, plus the arcade Castlevania rail shooter. The mash-ups sparked an idea: mix on-rails shooting with melee. Players ride a preset path, blast distant enemies with a light gun, then whip out a laser sword to slash or parry anything that gets too close. It's a combo you rarely see in classic rail shooters and perfect for a two-week scope.
Time Budget
After the concept clicked, I tossed the outline into Gemini and let it spit back a day-by-day schedule. Was it perfect? Nope. But it gave me a solid baseline and saved hours of calendar shuffling. I kept a living to-do list in Tencent Docs and tuned it nightly.
Goal One: Week 1 = stand-up a tiny MVP level that proves the gun-plus-saber loop.
Design Doc Highlights
Core Loop
- Cute cyber-punk world
- Player glides along rails
- Shoot far targets, slash or parry close threats
- Rack up combos, survive to the boss
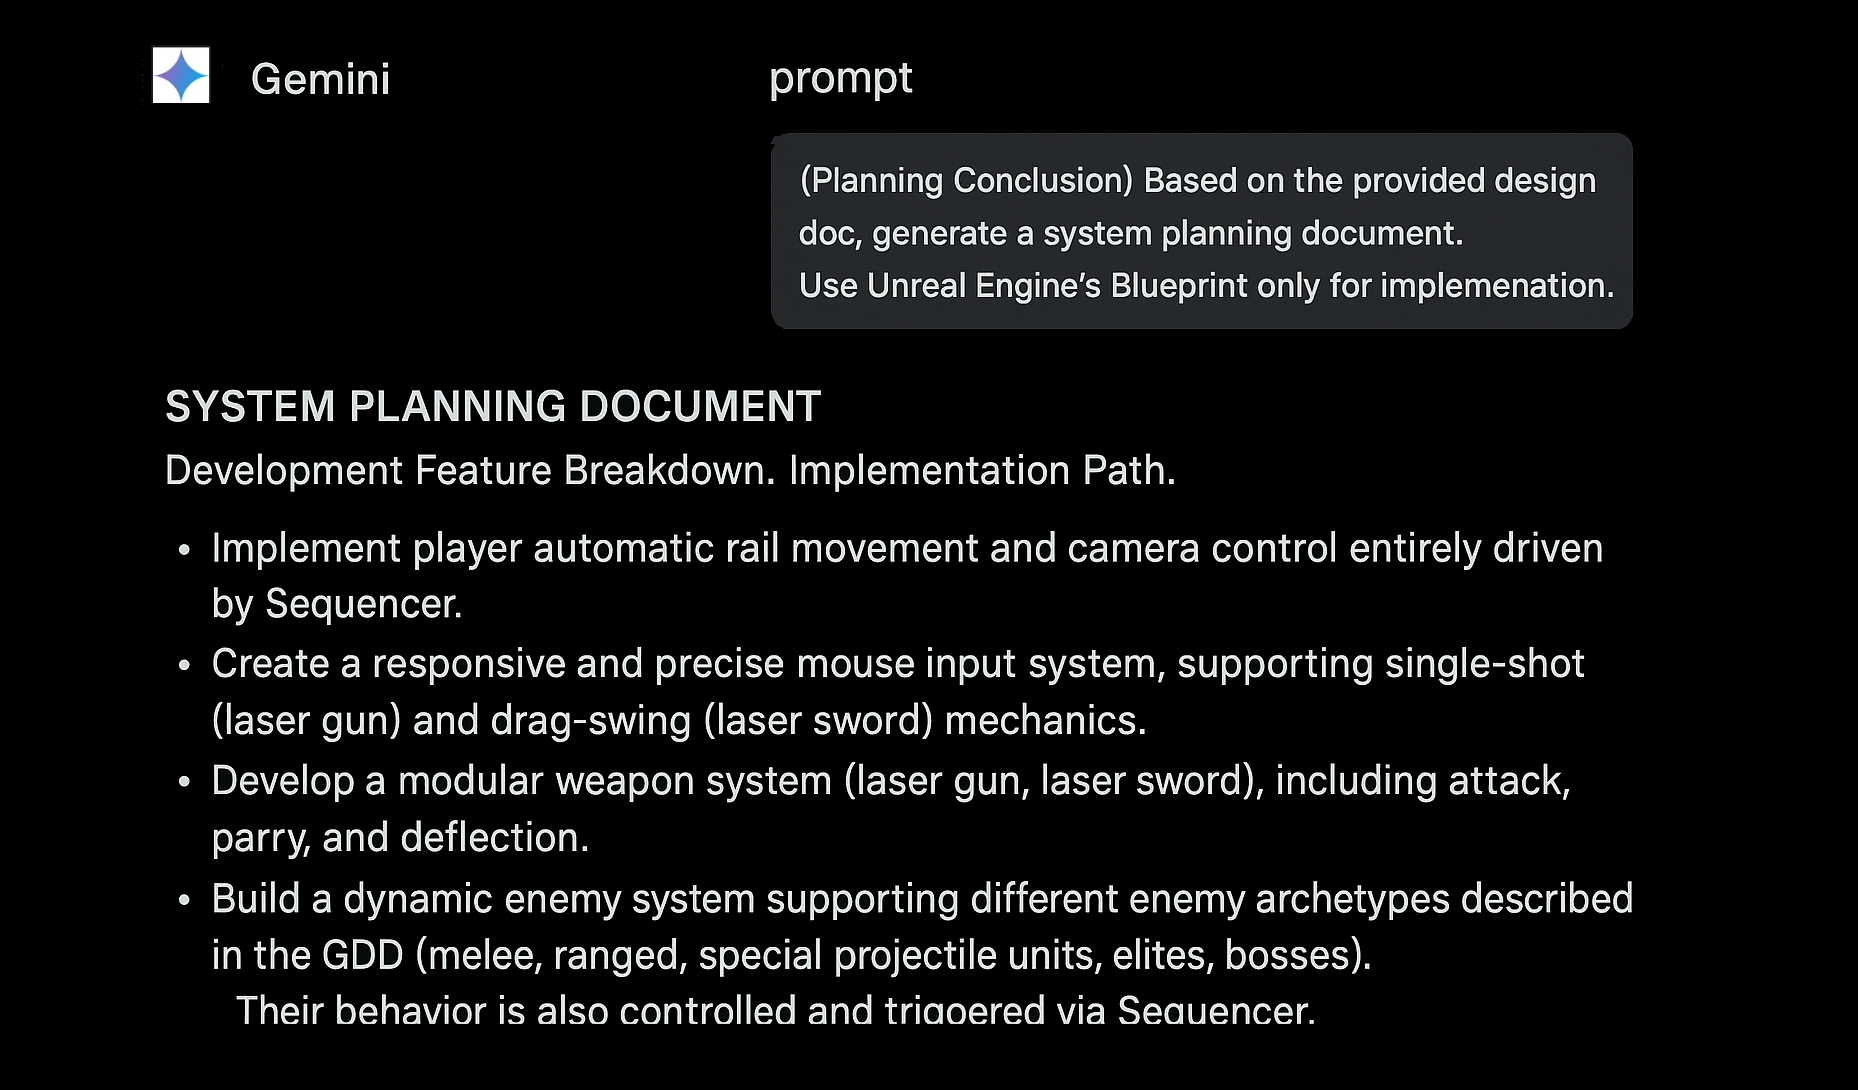
System Breakdown
- Rails & Cameras: Sequencer drives movement and cuts, "roller-coaster" style
- Input / Combat: Click to shoot, click-drag to swing the saber
- Weapons: Modular gun + saber, each with its own cooldown and hit logic
- Enemies: Expandable archetypes (melee, flyers, bullet-hell, elites, boss) tied to Sequencer events
Gemini's first pass landed in a few hours instead of days and gave me a clear checklist to attack.
Core Gameplay Loop
- The player rides along a fixed rail.
- Enemies spawn along the track according to a script.
- Use the light-gun to clear distant and airborne threats.
- When foes close in or fire parry-able projectiles, swap to the laser sword to slash or perfect-parry shots back.
- Read the situation and switch rapidly between shooting and slashing to handle mixed enemy groups.
- Keep the action going, racking up score and combo multipliers until the stage ends or a boss appears.
Every level follows this arc: light skirmishes kick things off, difficulty ramps up, and it all climaxes in a boss fight for a tight, high-energy finish.
MVP Feasibility Check & Scope Control
Before I wrote a single line of code, I tossed the core feature list into ChatGPT for a sanity check. The AI came back with an MVP plan that boiled everything down to one short level—just enough to prove that rail-shooting plus melee actually feels good.
That lines up with the "iterate fast" mindset: nail the tiniest slice first, then expand. I use a back-of-the-napkin rule: if you can prototype a mechanic in a day, a full game around it will run about a year; two days of prototyping means closer to two years of production, and so on. In other words, keep the test build small enough to finish in a few days, so the whole demo can wrap up in two weeks.
Bottom line: Week 1's mission was a stripped-down level that locks in the core shoot-slash loop.
Art & Audio
To lock in the game's musical vibe fast, I flipped the usual order—music first, visuals later. I turned to Suno AI, a powerhouse generative-music tool that writes and sings full tracks from any lyrics and style prompts you feed it.
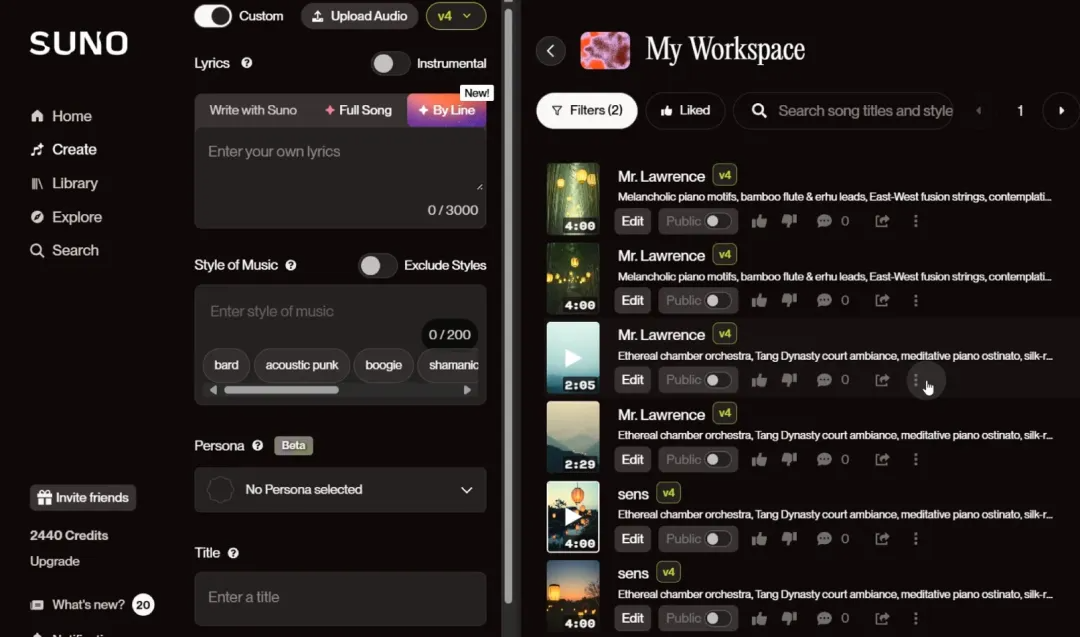
One cool trick: Suno lets you drop "meta tags" right into the lyrics, wrapped in brackets—things like Intro, Male Voice, Interlude, Female Voice, Guitar Solo. Those tags steer the song's structure, vocals, instrumentation, and genre (pop, electronic, whatever) for instant fine-tuning. The full tag catalog lives on Suno's site.
Here's how I used it:
- I asked DeepSeek to spit out a short set of lyrics.
- In the prompt I tagged the style as "Electronic" and "Solo vocal."
- Suno kicked back several humming rough-cuts—full verse/chorus layouts in different flavors.
Prompt: Imagine you're a songwriter. In the style of Kendrick Lamar's "Not Like Us," write a track called "Cute Bomber." Please provide:
- The full lyrics.
- The backing-track details, expressed as Suno AI keywords (genre, mood, instruments, meta-tags, etc.).
After a quick A/B test, I grabbed the punchiest electronic segment as a placeholder theme. The track still needs a human pass for mixing and polish, but Suno AI let me nail the musical direction in record time.
World & Visual Style
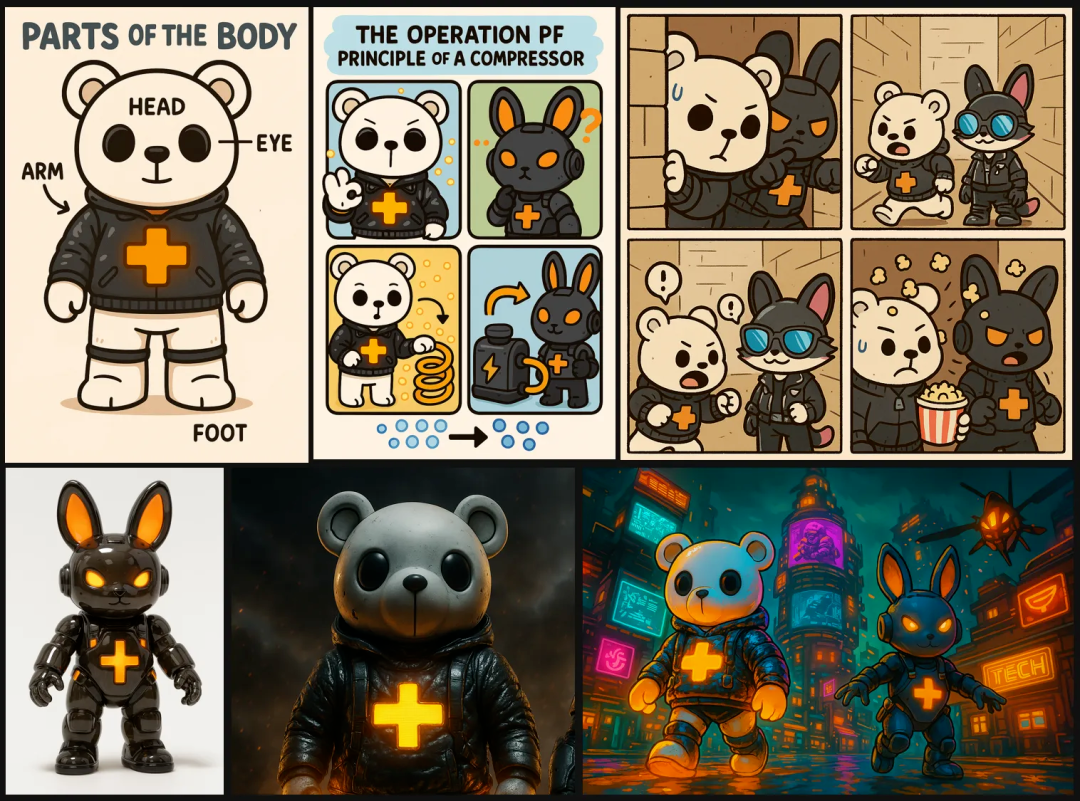
I'm going for a mash-up of sci-fi flash and Saturday-morning cute. Picture chibi-size future soldiers battling a hellspawn invasion in a neon-soaked cyber-city—adorable on the surface, but still packed with high-octane edge.
Style touchstones: the bubbly animal shapes and bright palettes of Fall Guys, fused with hard-glow cyberpunk signage and circuitry. Blend those ingredients and you get a candy-colored battlefield that's equal parts charming and electric.
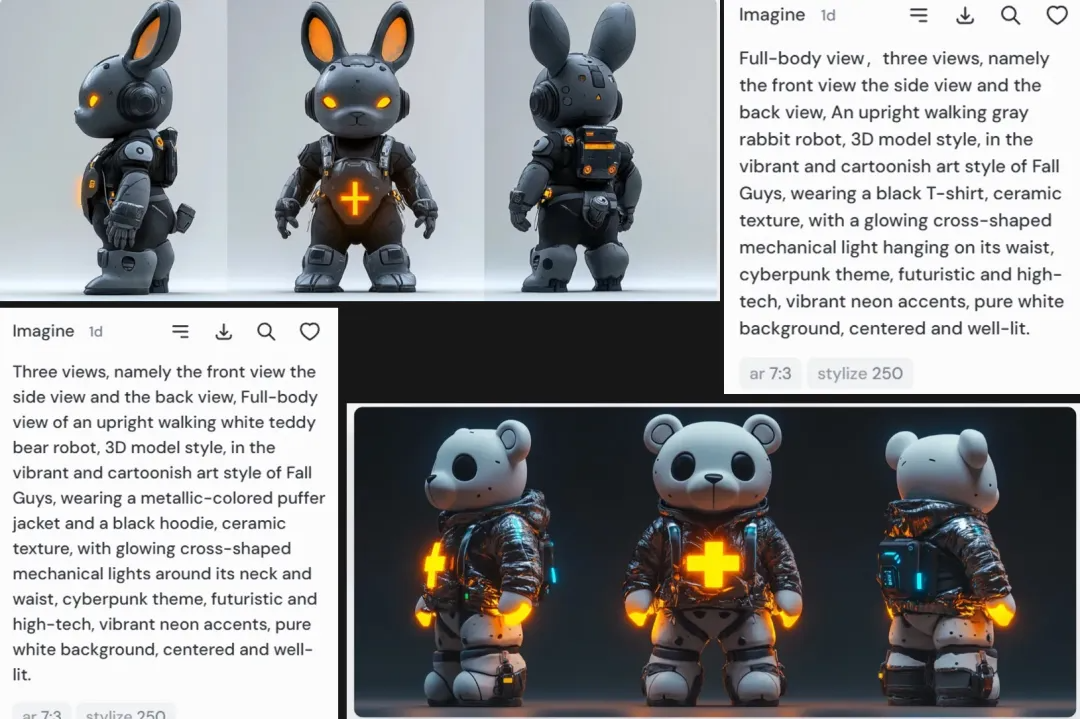
Concept Art
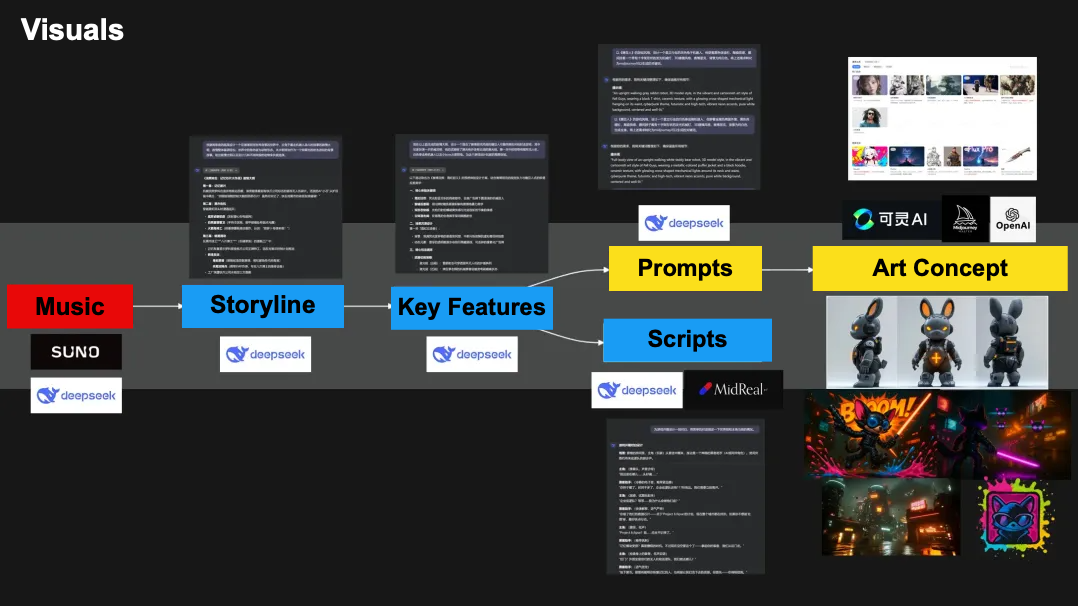
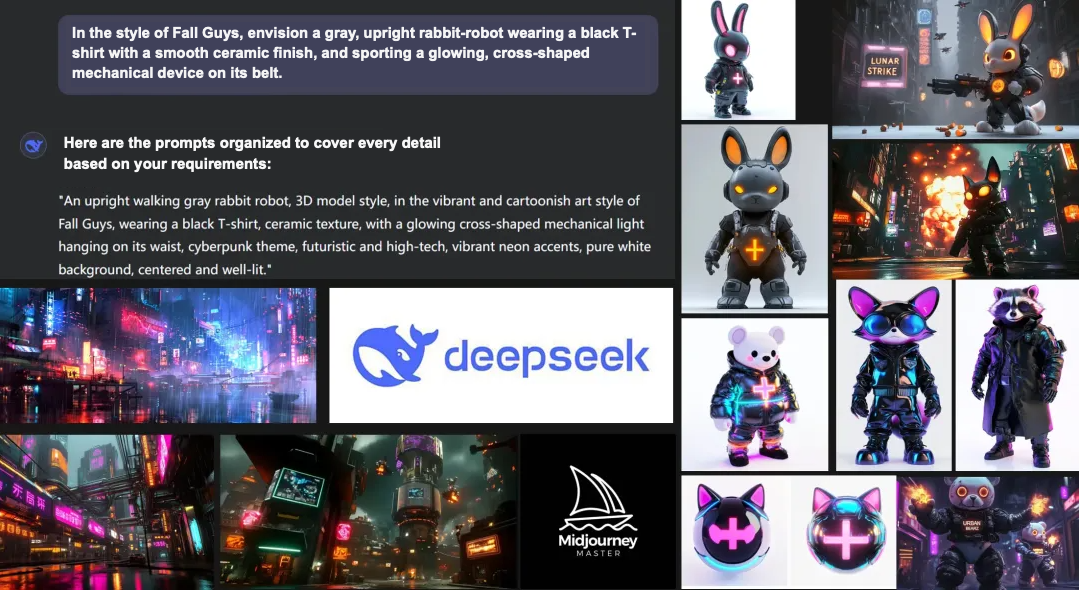
For concept art, I leaned on DeepSeek plus Midjourney:
- DeepSeek prompts: I fed it my vision ("Fall Guys roundness meets cyber-mech details") and it spun up richly detailed Midjourney prompts.
- Midjourney output: Dropped those prompts in and got back spot-on character sheets. By adding "three views, front, side, back" to each prompt, Midjourney delivered full turnarounds in one go—perfect for keeping design details consistent when we move to 3D modeling.
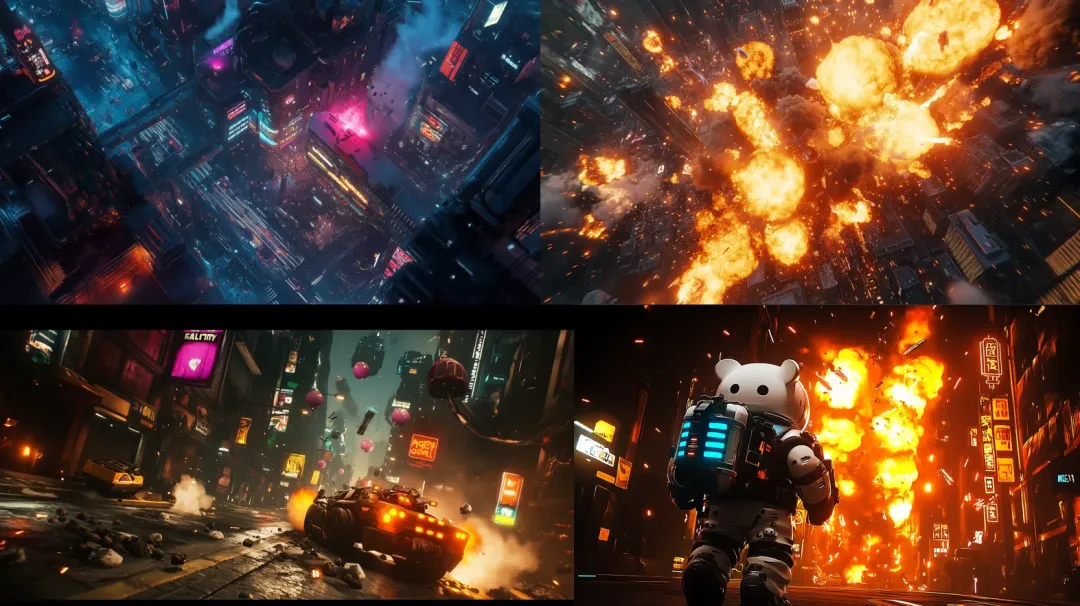
Teaser Cinematic
Static concept art was just the start—I also put together a proof-of-concept opening cinematic. The whole thing came together with a relay of AI tools:
- Script & Storyboard
- DeepSeek drafted the scene script, laying out the setting, beats, and key shots.
- I piped that text into Midjourney, which spat out a sequence of illustrations that doubled as storyboard panels.
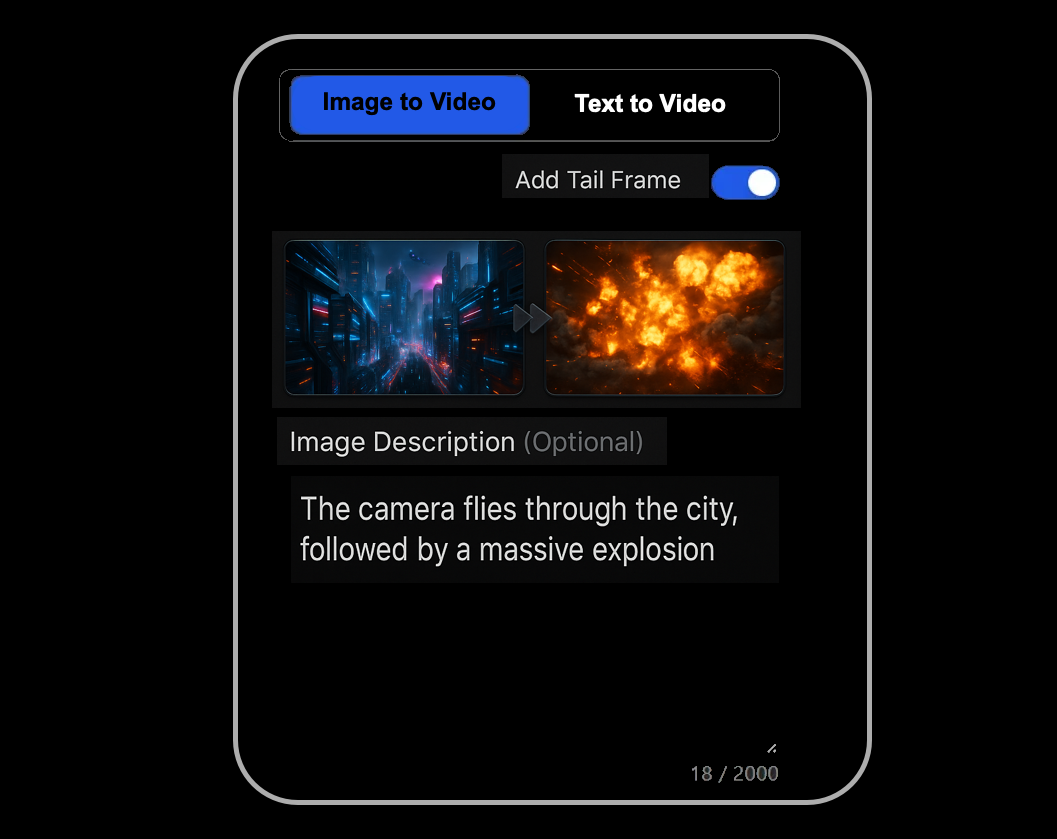
- Video Generation
- Those frames went frame-by-frame into Kling—a Chinese AI video tool that handles both image-to-video and text-to-video.
- Using prompt cues for camera moves and transitions, Kling turned the stills into smooth, connected animation clips. (At the time it outperformed options like OpenAI Sora for my needs.)
- Sound Design
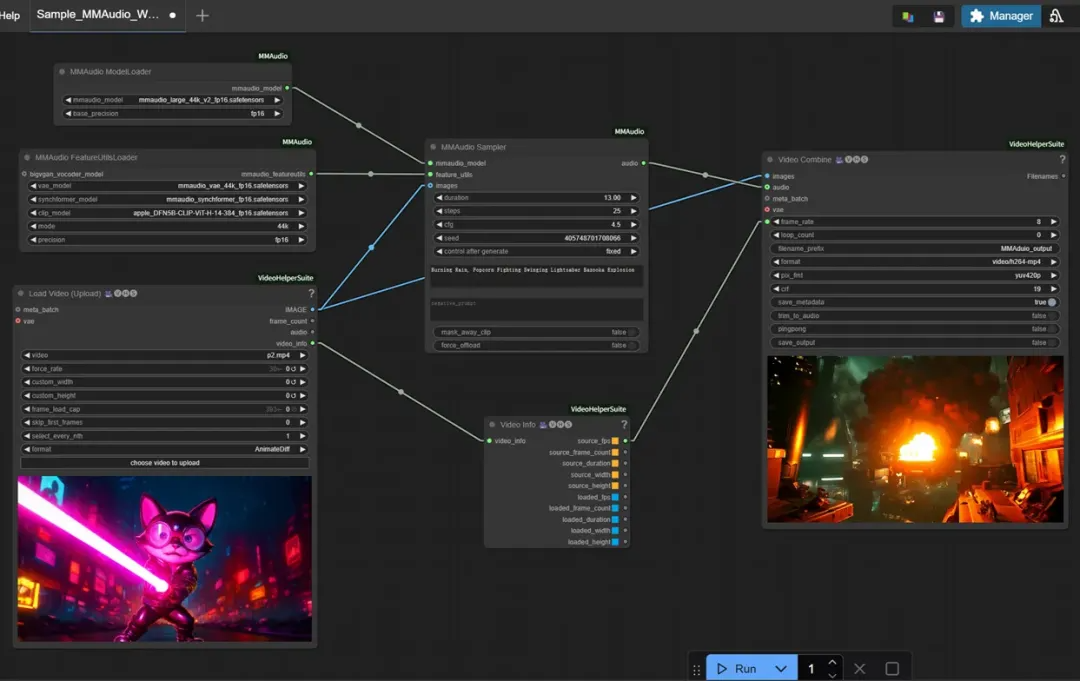
- With silent clips in hand, I fired up a local ComfyUI workflow running the MMAudio model.
- Feed it the footage plus a prompt like "futuristic city street under attack," and it generates layered ambience—sirens, mech hums, energy-weapon charge-ups. (Tip: generate ~10-second chunks; MMAudio loves a GPU with 16 GB VRAM or more.)
- Final Mix
- I dropped Suno's draft theme, Kling's video, and MMAudio's SFX into my editor, synced everything up, and did a quick mix.
A few AI hand-offs later, the concept trailer was done—locking down the game's audio-visual vibe with a fraction of the usual effort.
Tech Prep
Version Control
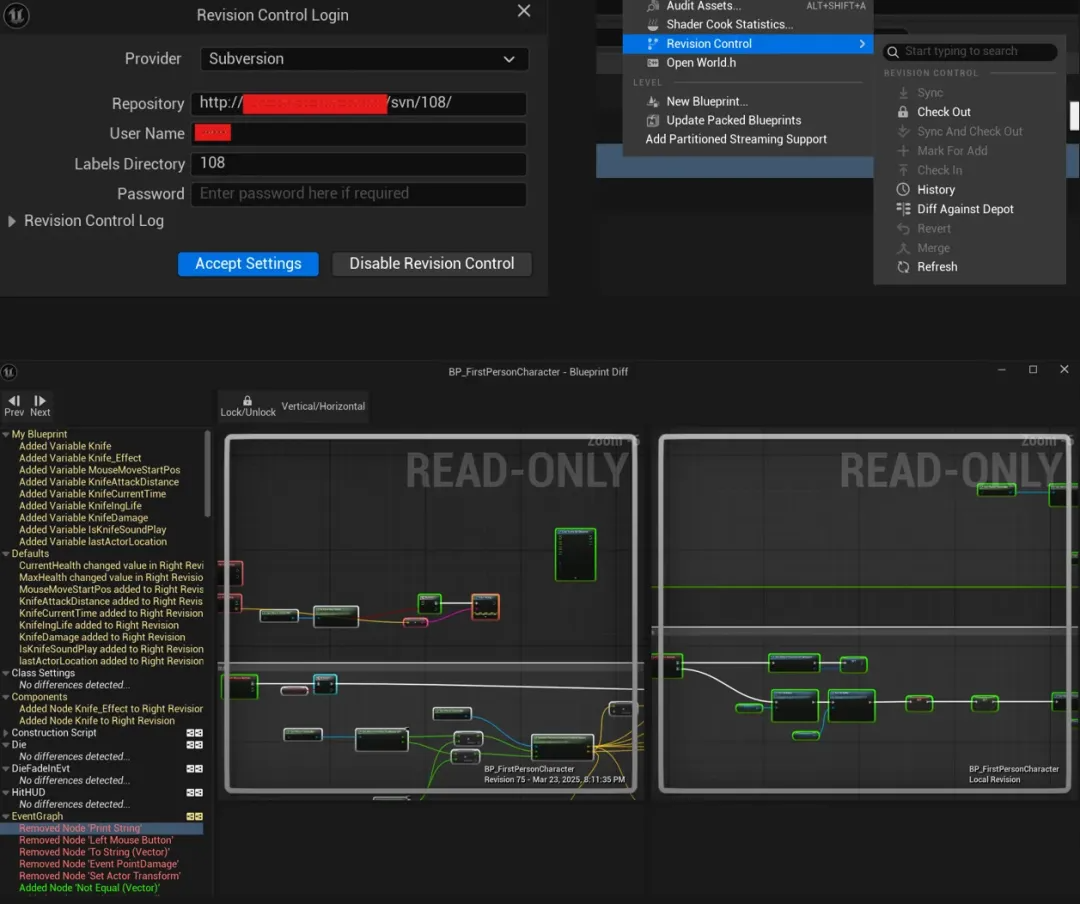
Even as a solo dev, I spun up an SVN repo on my home NAS—just a Docker container and done. Unreal Engine plays nicely with SVN, the setup is painless, and it handles the fat binary files that come with game projects.
With proper version control in place, I can branch at will, drop checkpoints, and experiment without fear. Rollbacks and diffs are instant, which matters even more when you're living in Blueprints—UE5's editor has built-in diff support. Solid source control is the safety net that makes rapid iteration possible.
Sequencer as Gameplay Spine
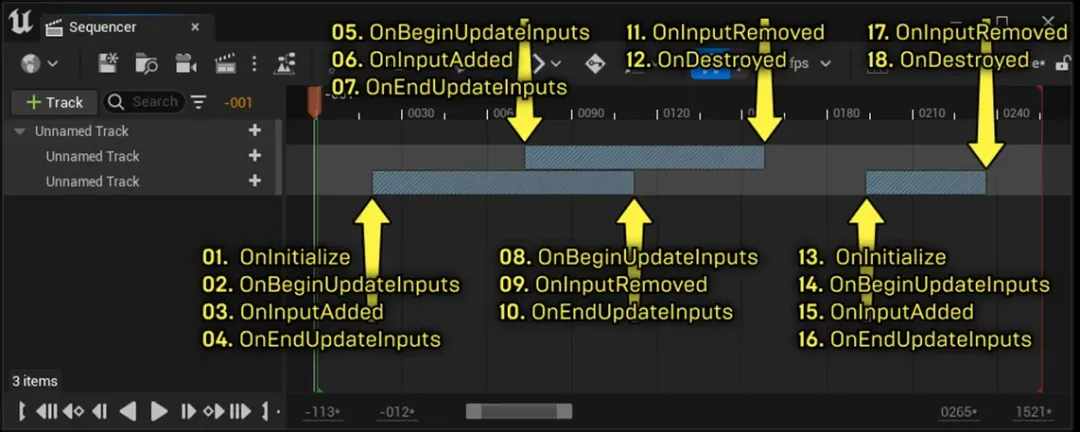
Because this is a rail shooter, UE5's Sequencer sits at the heart of everything. I dug into its event-trigger system and confirmed it's good for more than cutscenes—it can run moment-to-moment gameplay with frame-perfect timing, which is exactly what a rhythm-heavy shooter needs.
The timeline owns the player's rail path and every camera cut. Keyframes inside a Level Sequence asset lock in position and rotation, so the view glides along a preset route and transitions cleanly between angles—no extra code required.
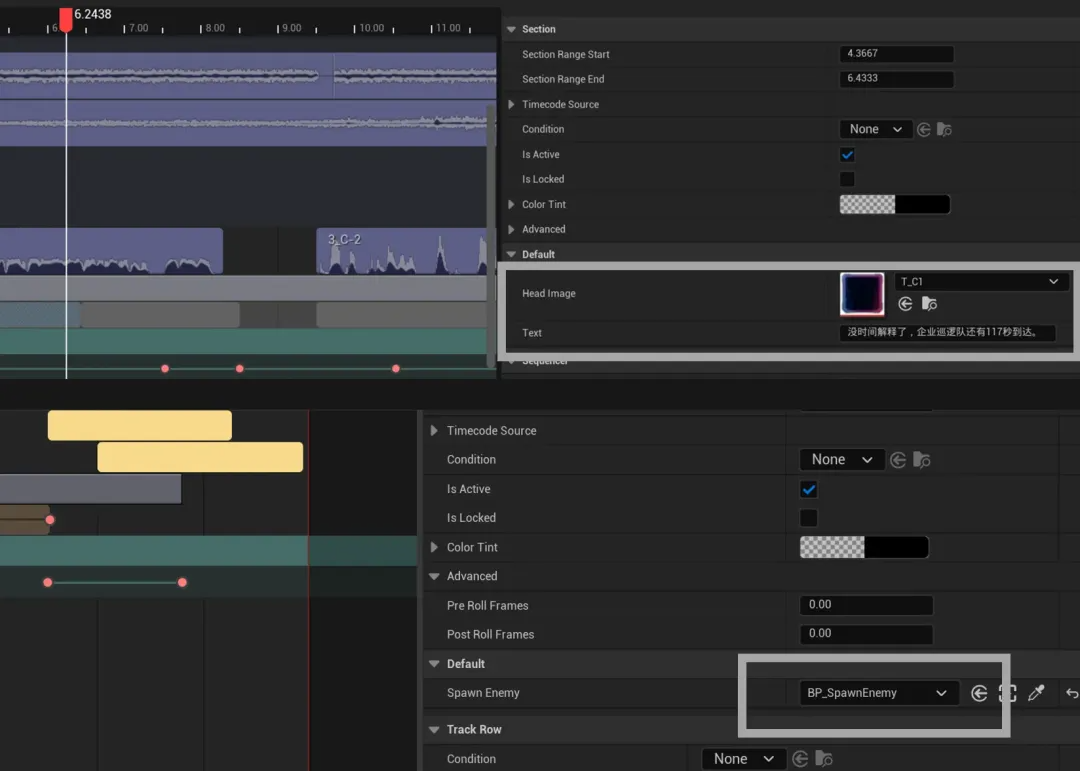
I also need Sequencer to fire gameplay beats—spawning enemies, kicking off animations, whatever. The solution: custom event tracks. Drop an "EnemySpawn" or "MonsterAttack" marker on the timeline, bind it to a custom event in the level Blueprint, and when playback hits that frame the game logic fires automatically. It turns level scripting into a visual, easily tweakable flow chart.
MVP Check
I ran another feasibility check—mixing my own experience with ChatGPT's advice—and locked in the tech approach. ChatGPT's top tip was: build the smallest possible loop first to prove the shoot-and-slash combo. Our MVP: one short level with rail movement, a handful of enemies, and a boss fight.
In UE5, I whipped up that prototype fast. Sequencer drove the first-person rail, timeline events spawned enemies that swooped in, and the player shot them down. Once the loop played smoothly, I had real data on pacing, difficulty, and fun—so I could confidently tackle full development.
Coding in Blueprints
Rail Controller
Player Controller & Rail Movement
The player isn't free-roaming—instead, they're "locked" to a preset rail. I made a Character subclass but handed off all movement to Sequencer. In a Level Sequence asset, keyframes drive the Pawn's Location and Rotation over time. Binding that Sequence to the player automatically moves and turns them along the path. I also hooked up multiple cameras to the same timeline so the view cuts smoothly without extra code.
Combat System
Input is simple: left-click to shoot, hold-and-drag to swing the laser sword.
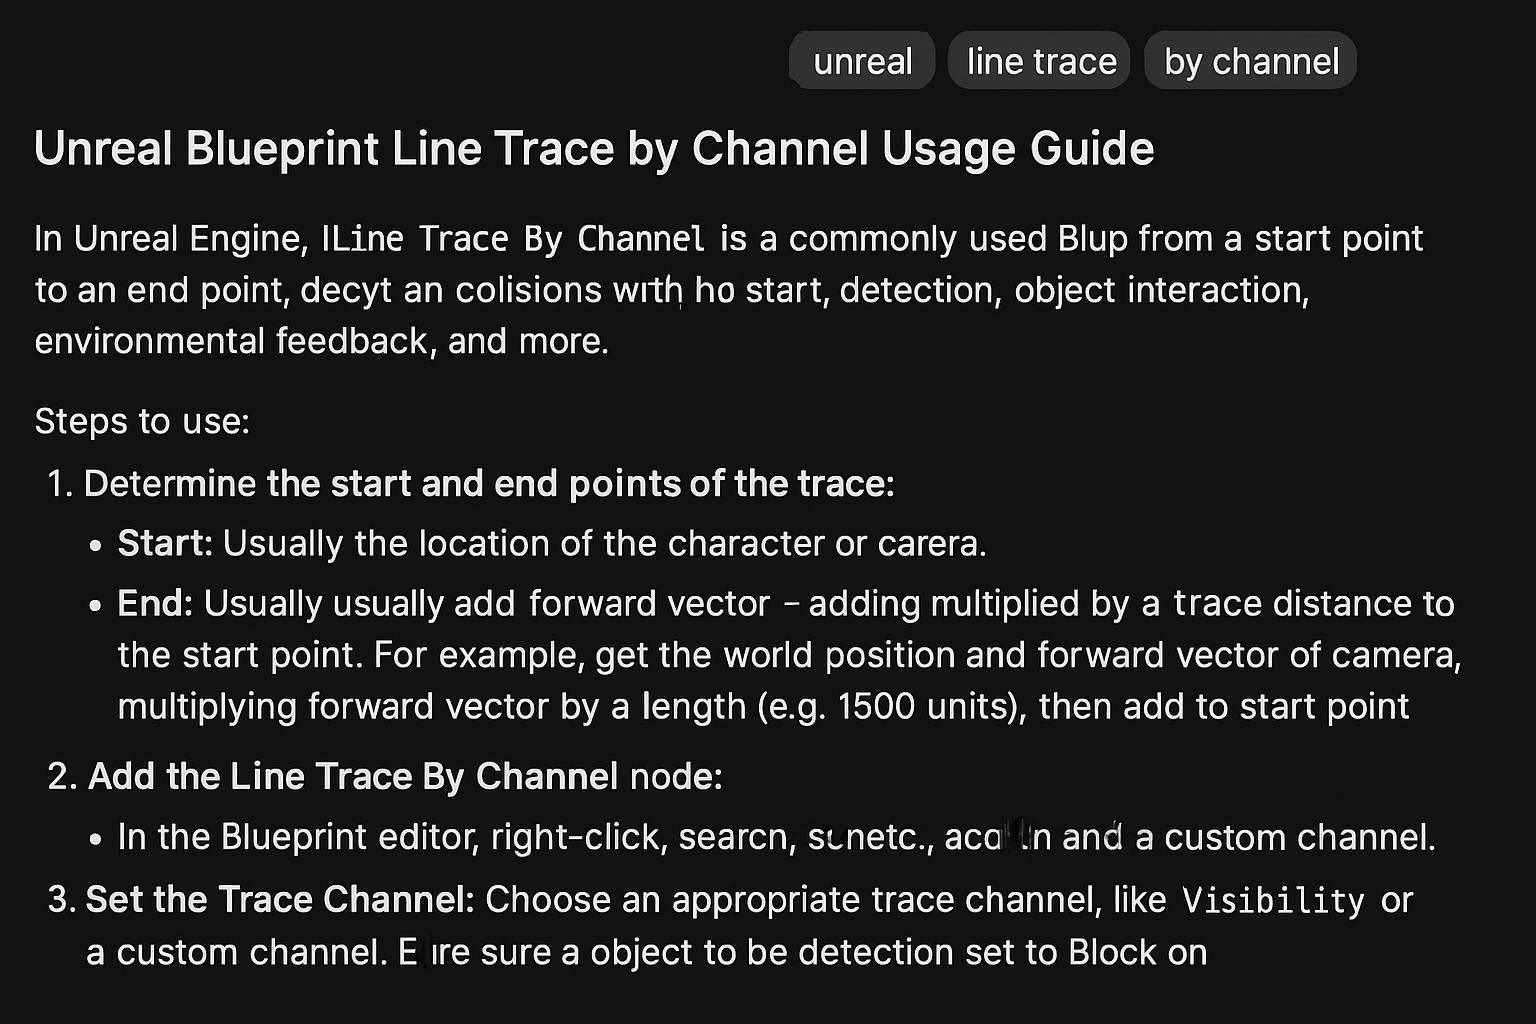
- Shooting uses a line-trace from the camera's center toward the crosshair; hits call the enemy's damage logic.
- Melee watches the drag motion, converts it into a screen-space slash arc, and checks for enemies inside that arc to trigger hits or parries.
Weapons live in two Blueprint components—one for the gun (trace, VFX, damage) and one for the sword (arc detection, slash VFX, block/parry).
Enemies & Level Logic
I built four enemy classes: melee grunts, flyers, ranged flyers, and a boss. The first three run on AIControllers with Behavior Trees—once you spawn them, the tree handles movement and attack decisions. The boss's phases and special attacks are driven directly by Sequencer events for tight timing.
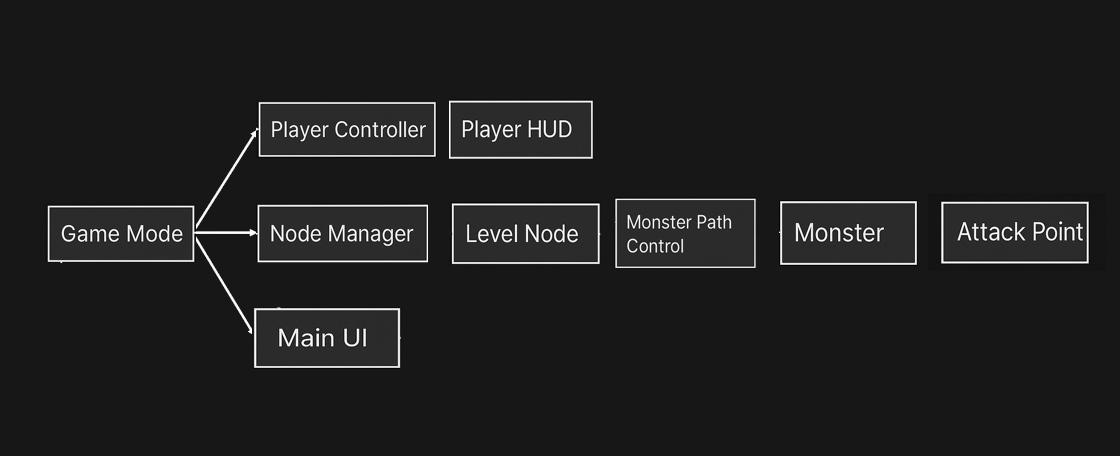
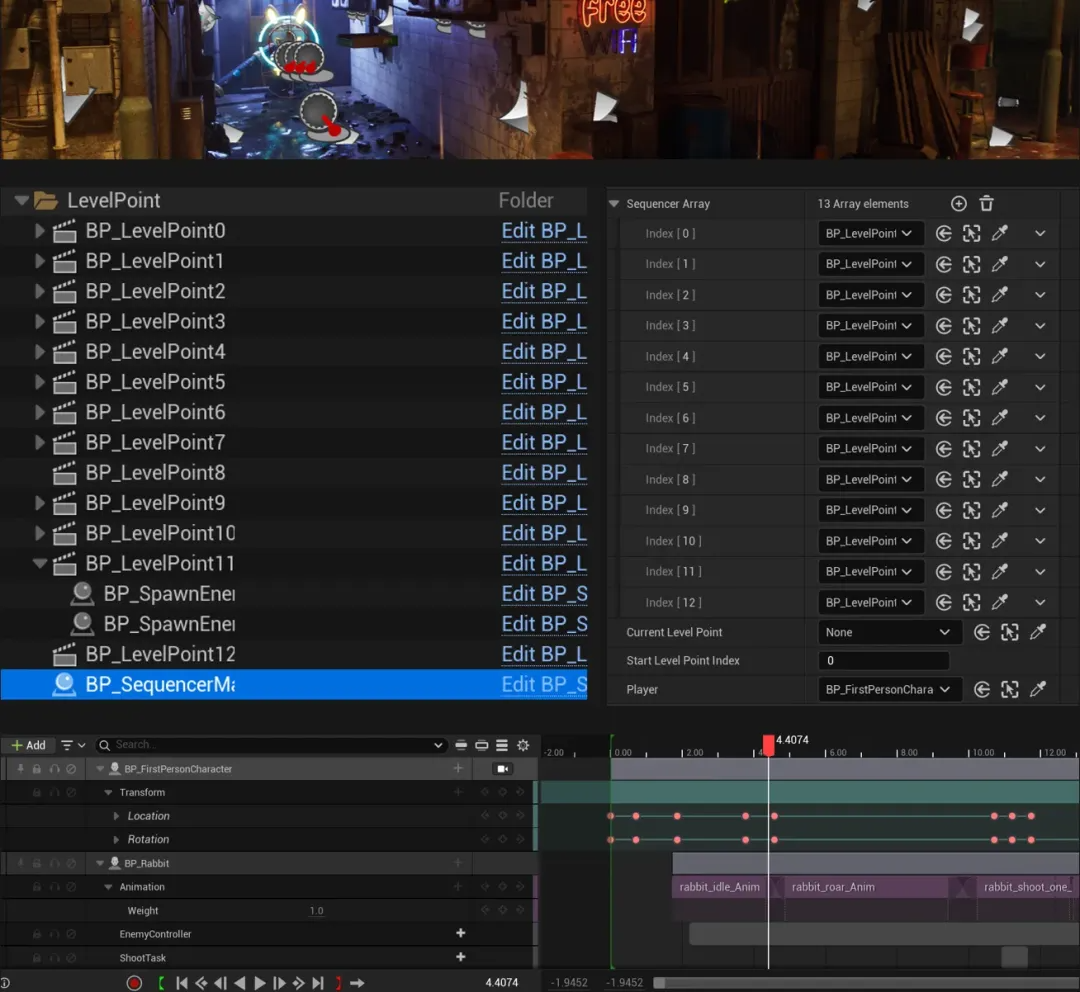
To sequence the whole level, I created a LevelPoint actor (subclassing LevelSequenceActor). You place multiple LevelPoints along the rail; each has its own Sequence asset for spawning enemies, playing lines, camera shakes, etc. A LevelPoint defines its "next" node (or branches based on conditions). When the player reaches a LevelPoint, its Sequence plays; once its win condition is met (all enemies down or time's up), the system jumps to the next LevelPoint's Sequence. I even added custom tracks to Sequencer so it can check game state and decide when to advance—making the entire flow a modular, visual "node + timeline" storyboard.
AI-Assisted Blueprint Scripting
ChatGPT was my go-to whenever a Blueprint question popped up ("How do I spawn enemies from a Sequencer event?" "How to convert mouse drag into a melee hit?"). It delivered step-by-step answers, pointed to docs or forum posts, and even sketched out pseudo–Blueprint nodes.
For instance, when I asked how to tweak a material at runtime, it told me to use a "Create Dynamic Material Instance" node and reminded me to store the reference. A few clicks later, my laser-sword swings lit up enemies exactly as planned.
Having an AI "tech consultant" on call cut through roadblocks and boosted both speed and confidence. Its advice sometimes needed a tweak or two, but overall it handled countless little details so I could keep building.
Assets
UI
UI needed to match the game's cute cyberpunk look. I used GPT-4o to generate flat, in-game art assets in a "Splatoon"–style—feeding it clear prompts (reference images, colors, layout notes, text descriptions) and iterating until I got a set of neon-graffiti UI pieces (e.g. pipeline-style health/energy bars, splashy score panels).

GPT-4o's image-generation (released March 2025) proved powerful but imperfect:
- Pros: low learning curve, fast and flexible; supports text-to-image, image-to-image, multi-image consistency; great for icons, style transfers, presentation art.
- Cons: chat length caps can truncate context; fine detail often drifts (not ideal for precise mockups); resolution limits require manual stitching for turnarounds; prompt complexity still has edge cases (though reference images help).
Overall, the GPT-4o is a game-changer—ideas now outpace technical hurdles, and a new, AI-driven workflow for 2D UI design is emerging.
SFX
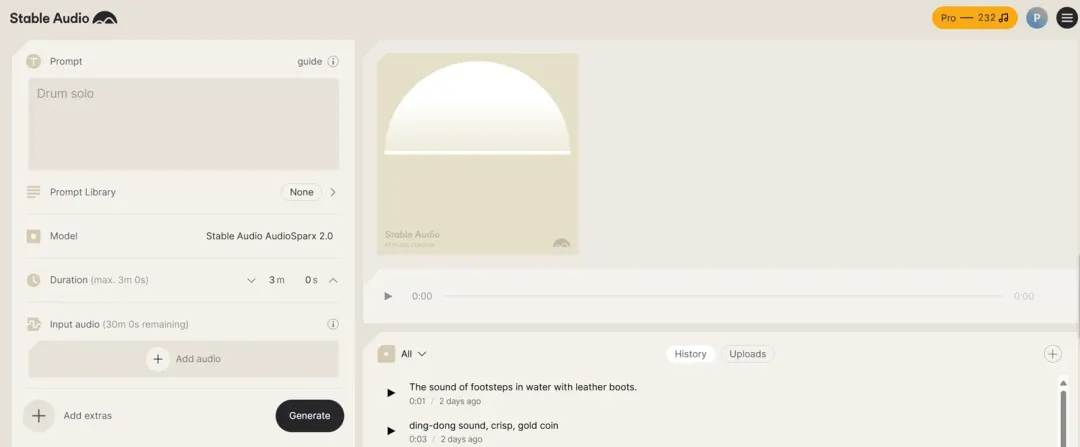
- Sound Effects: I used Stable Audio's generation platform to whip up gunshots, explosions, monster roars, and more from simple prompts like "mechanical machinery winding down" or "laser sword slicing through air." Running it locally sped up iteration.
- Background Music: For the prototype, I slotted in the electronic theme from Suno AI as a placeholder.
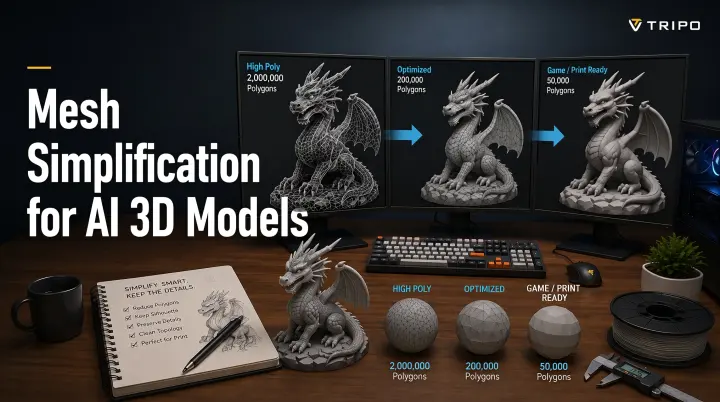
3D Models
- Generate: Midjourney three-view ➜ Tripo 2.5 to auto-mesh and retopo
- I fed the Midjourney three-view turnarounds into Tripo 2.5, which auto-retopologizes and converts 2D art into a basic 3D mesh with textures in minutes. The topology is solid and the silhouette matches the concept. Its auto-rigging isn't perfect—bone sizes and orientations need tweaking—but it slashed modeling and UV time.
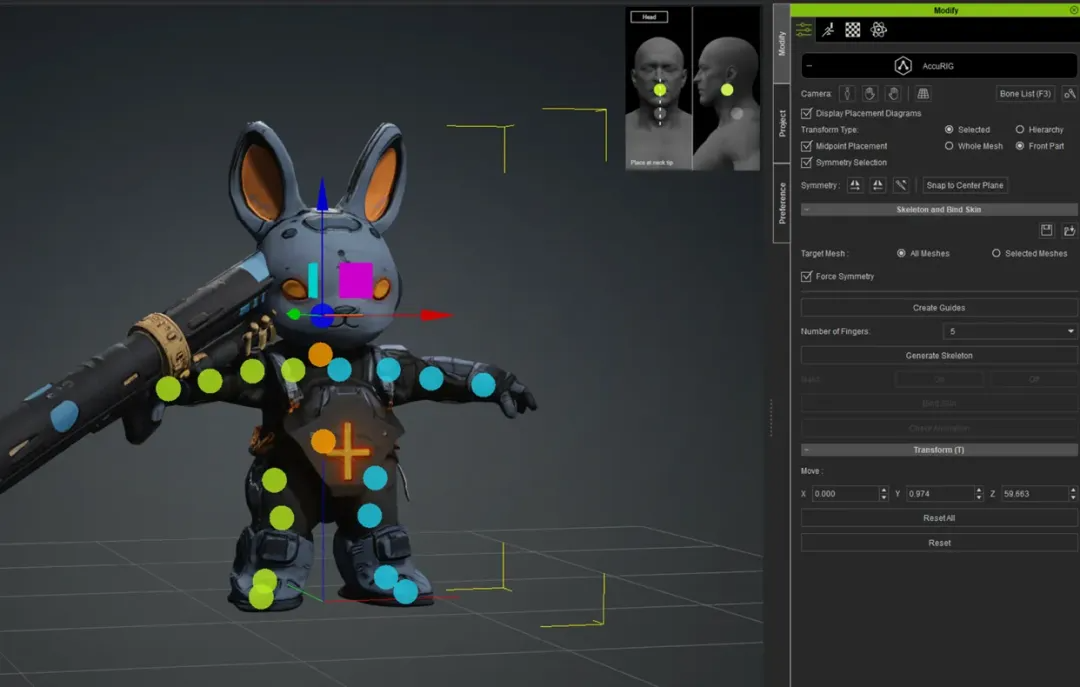
- Rig: Character Creator's AccuRIG one-click skeleton
- Next, I imported the mesh into Character Creator and ran its AccuRIG tool to instantly generate a skeleton and skin weights.
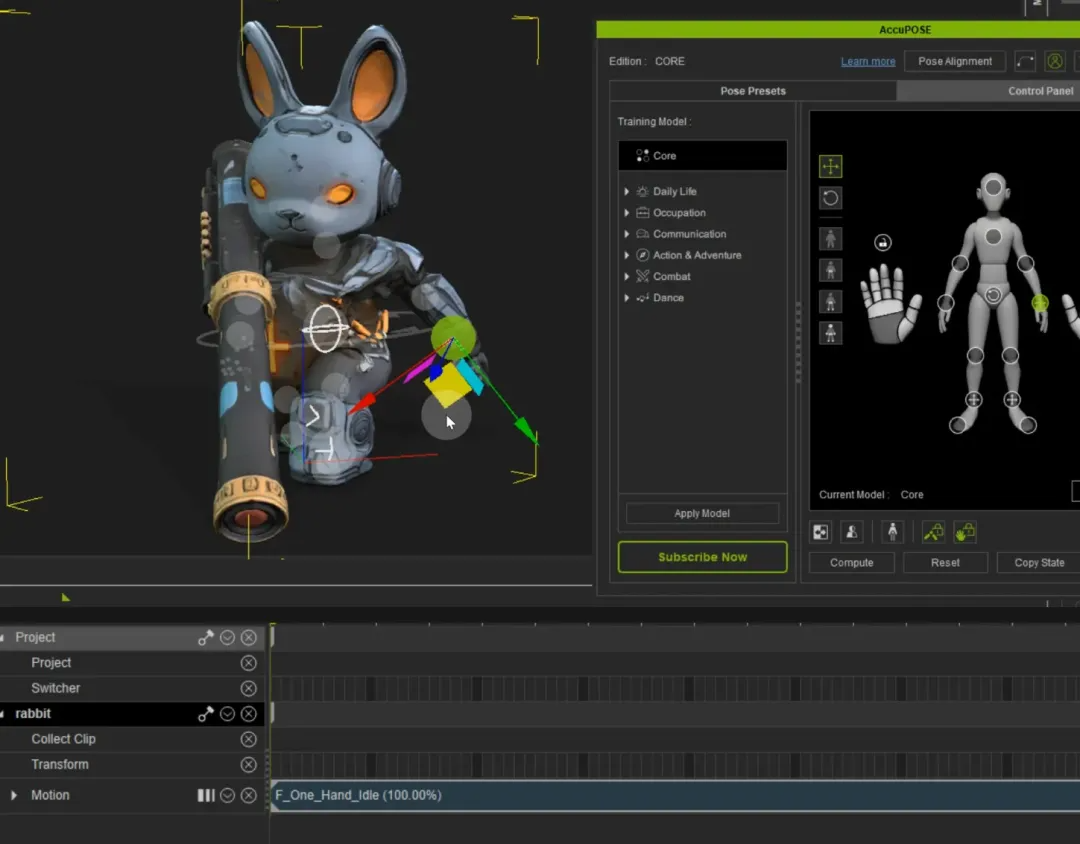
- Animate: iClone 8 for motion-library retarget; AI pose assist is gold
- For animation, I used iClone 8: its motion library, mocap retargeting, and AI-pose assist let me apply run, shoot, slash, and hit reactions in minutes instead of hand-keying. I exported the clips as FBX and brought them into Unreal.
- Import: FBX back into UE5
Thanks to this AI pipeline—concept → 3D mesh → rig → animation—a process that normally takes weeks was done in days.
Level Design
AI Assistant
I had Gemini study the arcade Castlevania flow and spit out a node-based level roadmap. Its breakdown—intro → mobs → mid-boss → more mobs → final boss—nailed the feel, even specifying enemy types and counts at each stage. I then tweaked that script to fit my own design and finalized the level plan.
Level Design and LevelPoint System
I used the LevelPoint system to assemble the level by dropping event nodes along the player's rail. Each LevelPoint ties to its own Level Sequence in Sequencer, where you choreograph everything—enemy spawns, camera shakes, dialogue, etc.
For example:
- At LevelPoint1, its Sequence plays a mini-climax—waves of enemies, a camera jolt, a voice line. When the player hits that point, the Sequence fires and the fight kicks off.
- Once those foes are down, the rail carries you to LevelPoint2, whose Sequence might roll a cutscene and a small boss encounter.
- This repeats up to the final boss and level wrap-up.
The "node + timeline" method turns level design into a visual edit: to tweak pacing or add a beat, just insert, remove, or adjust event markers in Sequencer.
Dynamic Dialog
I built an on-the-fly dialog system instead of using fixed VO scripts. At each story node, AI crafts a fresh line and then we TTS it.
Here's how it works:
- Integrate AIITK plugin• Installed Unreal's AIITK (AI Integration ToolKit) to expose GPT calls in Blueprints.
- Define API & prompt templates• Hook up the OpenAI GPT-4 endpoint.• Create prompt templates for different contexts (normal combat, boss battles, etc.).
- Generate text at runtime• When the player hits a LevelPoint, Blueprint calls AIITK with the appropriate prompt.• GPT-4 returns JSON with Chinese subtitles and an English version for voice.
- Synthesize speech• Blueprint sends the English line to OpenAI's TTS API and receives a WAV.• Blueprint then plays the audio while displaying the Chinese subtitle.
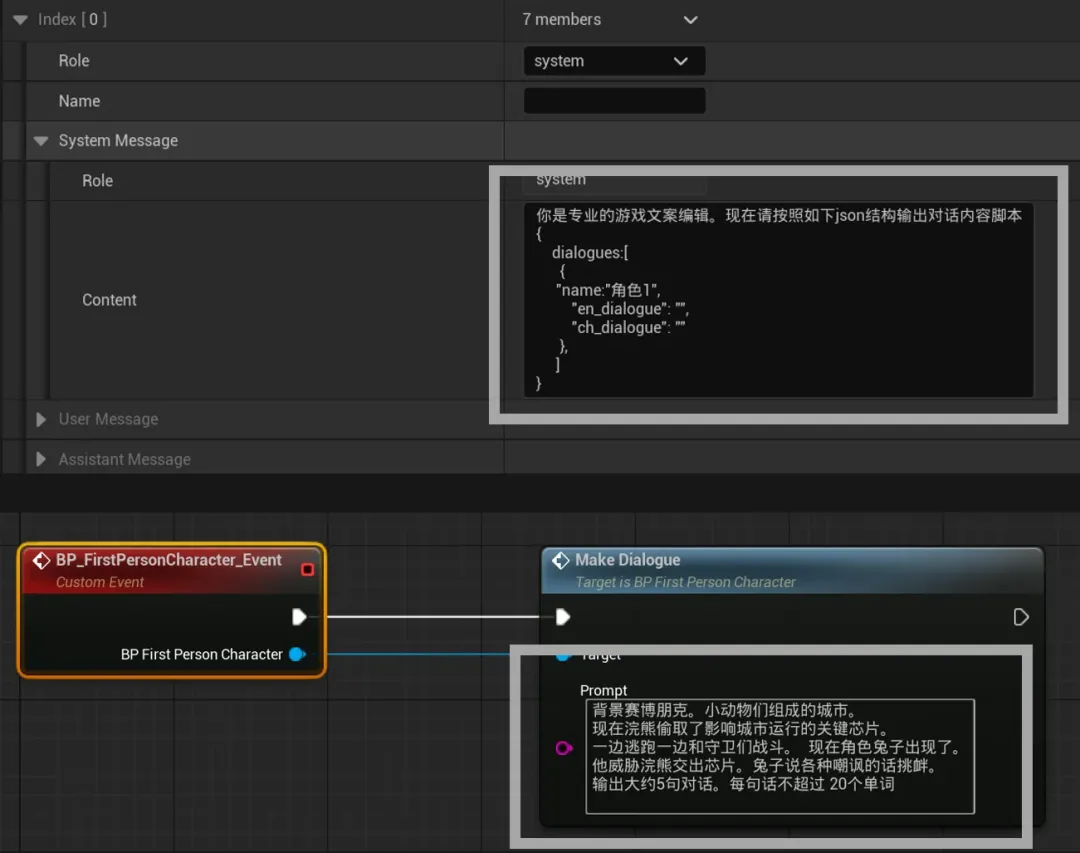
Dialogue Generation Flow
- Lines: At each LevelPoint, AIITK calls GPT with the prompt and context, returning Chinese dialogue plus an English version in JSON.
- Voice synthesis: Parse the JSON, grab the English line, send it to the TTS API, and get back a WAV.
- Play & display: Unreal's audio component plays the WAV while the UI shows the Chinese subtitle.

All of that happens in seconds, so every play-through hears fresh lines without any hand-written script or recorded VO.
Challenges & Tweaks
- Prompts matter: Be precise, keep lines short, split multi-line chat into separate calls.
- Stay consistent: AI can wander off-model. Reinforce setting and character details in your prompts.
- Don't stall the game: Run AI calls during load screens or cutscenes so players never wait.
Takeaways
- AI's upside: In 14 days, AI let me go from zero to a working demo—handling art, code, audio, and more—so I stayed in creative flow instead of busywork. Directing AI is the new secret weapon.
- AI's limits: AI still needs human oversight. Docs, art, code, and dialogue all required tweaks. Good prompt-crafting is half the battle.
Full Prototype Workflow
- Original author: 正义之伙伴
- Contact: yangskin@163.com
Translated and republished with permission.