Learn how to create AI-driven 3D games in 2 hours or less—no programming needed.
The overall process of the code snippet (which can be used as a prompt to generate code):
1. Player Movement Logic and UI Generation
GameLogicrepersents the core management component of the game. It receives all in-game events and distributes them to the appropriate subsystems, effectively reducing code coupling.- When the player approaches a frame that containes a BoxCollider, its attached
Transpondercomponent automaticlly detects the interaction and passes the player approaching event to theGameLogiccomponent. In response,UIFactoryinstantiates a UI panel for user input. - This UI panel includes the InputDialog component, which listens for the player's keyboard input. When the player presses Enter for the first time, the input box is activated and captures keyboard focus. After the player finishes typing and presses Enter again, the input is sumbitted as an event to the
GameLogic. - When the player moves away from the frame contaning the BoxCollider, the UI panel is immediately destroyed.
2. Model Generation and Skeleton Mapping (Provided by TripoSDK)
- After the GameLogic component receives the prompt input from the player, it passes the prompt to the
TripoClientcomponent (Note: a Vaild TripoAPIKey must be provided beforehand) - The TripoClient calls the TripoAPI compoent to send the prompt to the Tripo Server. During this process,
TripoAPIassembles the request , sends it and begins polling the server at regular intervals to check for updates. Once sucessesful, the player receives a TakID for the generated model from the Tripo Server. This TaskID is then used to request skeleton generation. - After the Rigging process is completed,
TripoAPIreturns the model's download URL toTripoClient. TripoClientthen loads and parses the GLB-format model via the glTFfast plugin. - Next, the
RuntimeHumanoidAvatarBuildercomponent is mounted onto the model. This component maps the GLB model's skeleton to Unity's Humanoid Avatar system, enabling animation retargeting. - Finally,
TripoClientinstantiates the model in the scene. At this point, developers can use existing humanoid animation resources to drive the newly generated model.
3. Transfers of Control
The GameLogiccompoent listens for the player's keyboard input to dynamically switch control between the player and the generated model. Specifically, it adjusts camera priority and reassigns theThirdPersonControllercontrol target.- When the player presses the F key, control is transferred from the player character to the model, allowing the player to operate it. Press F Key again returns control back to the player.
- Depending on the generated model, its size may vary; ranging from extremely large to extremely small - enabling unique gameplay interactions and allowing the player to passthrough different obstacles.
- Additionally, the model's appearance can be swapped easily, effectively supporting a low-cost character customization and skin system within the game.
Overall code logic:
Main GameObject
Specific implementation steps:
Unity Version: 2022.3.55
Source code and scenes Path: Assets-LowPoly Environment Pack - Demo - Demo1
1. Project Setup and Resources Import:
- Create a New Project
- Open Unity, and click New Project.
- Select the URP (Universal Render Pipeline)template.
- Name the project TripoRuntimeTutorial, and click create.
- Import Required Resource Pac
Please open your browser and go to the Unity Asset Store. Search and download the following free packages (also available in the provided project files):
Add to My Resources, and in subsequent pop-ups, click "Open in Unity" and download.
After downloading each package, go to Unity > Assets which is on the top of the Unity Menu > Import Package > Custom Package , and import them one by one. Click Import on each prompt.
- Convert Materials to URP
Some imported materials may appear pink(indicating shader issue). To convert:
- Filter or select all pink weird looking models in the scene.
- Then navigate to Editor > Rendering > Materials, and convert them to UPR-compatible materials.
- Install glTFast Dependency(forLoading GLB models)
Option 1: Install via Git (requires a local Git environment)
- Go to Window > Package Manager, click the + sign button > Add package from Git URL.
- Enter the URL: https://github.com/atteneder/glTFast.git, then click Add, and wait for the glTFast plugin to be imported.
Option 2: Download from Tripo official website, which includes the glTFast plugin as well.
- Visit Tripo's homepage and go to the Resources section.
- Download the Unity Plugin, which already includes the glTFast dependency.
- Follow the tutorial video included in the package for installation instructions.
- Open the Demo scene
- In the Unity project window, navigate to: Assets > LowPoly Environment Pack > Demo > Demo1
- Double-click Demo1 to open it.
To set up your custom environment:
- Drag assets like tanks, rocks, or trees from Assets > ithappy folder into the scene.
- You can now move the player freely within the environment.
- Add Player-Related prefab
Navigate to: Assets > StarterAsset > ThirdPersonController > Prefabs
Drag the following three prefabs into the Hierarchy panel:
- MainCamera
- PlayerFollowCamera
- PlayerArmature
- Set camera Parameters
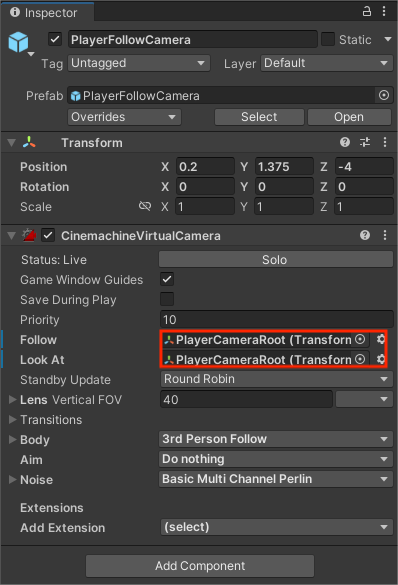
- Select PlayerFollowCamera in the scene,
- In the property panel (Inspector), locate the CinemachineVirtualCamera component.
- Set both Follow and Look At to PlayerCameraRoot (Note: can be found under PlayerArmature's child components).
The above setup uses the third-person controller script provided by Unity. At this point, click the Play button in the Unity toolbar, you can use the WASD keys to control the character's movement. The character and the camera should now move and adjust it accordingly!
Displaying the Prompt Panel on Player Proximity
When the player approaches a specific object, a UI input panel should appear. When the player moves away, the panel should disappear.
- Creation of Trigger Area
- In the Assets > ithappy > Military FREE > Perfab directory, select a model (e.g., a tank).
- Right - click the model and choose Create Empty Child, then rename it to Trigger.
- Select the Trigger object, go to the Inspector, click Add Component, and add a Box Collider.
- Check the Is Trigger option.
- Click Edit Collider, and adjust its handles in the Scene view to scale the collider to twice the size of the model, covering its surrounding area.
- Create the Trigger Event Script
- In the Project panel, right-click in the Assets folder > Create > C# Script, name it
Transponder, and open the script with Cursor. - This script should detect when a player enters or exits the collider, a message is send to our GameLogic component. Select the model in Cursor and enter our reference prompt:
Please generate a Unity C# script named Transponder that triggers OnPlayerEnter when a GameObject with tag "player" enters the collider, and OnplayerExit when the player exits.
- Save the script and drag the Transponder component onto the Trigger object in the scene.
- Game Logic Management
Right-click in the scene > Create Empty, rename it GameLogicManager (Serves as the logic container).
- Under GameLogicManager, create another empty child and name it GameManager.
- Create a new script named
GameManager, which will handle the core logic for the scene.
We quote the Transponder component and then listen for events when players enter or exit. The reference prompt words are as follows:
Please generate a Unity C# script named GameManager that listens to.
- OnPlayerEnter and OnPlayerExit events from a Transponder instance.
- On OnPlayerEnter, instantiate a UI prompt prefab using the UIFactory script.
- On OnPlayerExit, destroy this UI prefab.
After saving the script, drag the GameManager script onto the GameManager object and drag the Tranponder component into the Tranponder field. This completes the listening for player entry and exit events.
- Create UI Panel Prefab
In the Hierarchy, right-click > UI > Panel, to create a new panel.
- Add 2 compoents in children under the panel:
- Text (to display prompt Instrucitons)
- InputField (to receive player input)
- Adjust layout and positioning using the Game view as a preview.
- Once finished, drag the entire Panel object into the Assets Folder to create a prefab.
- Name it InputDialogPrefab.
Note: If you are using TextMeshPro,make sure to assign a Chinese-compatible font, such as NotoSansSC SDF, to avoid square-shaped characters in the text.
- Create the
InputDialogScript: Handle Input Logic
- Create a Unity C# script called InputDialog.
Reference Promot:
- Please generate a Unity C# Script named InputDialog to manage a TMP-based UI dialog box.
- It should contain a TMP_Text for the prompt and a TMP-InputField for input.
- On first Enter key press: activate the input box and disable the player's movement controller (e.g.,
ThirdPersonController) - On second Enter key press: submit the input, re-enable movement, and destroy the dialog box.
- Maintain input focus until valid input is entered.
Mount the InputDialog component to the InputDialogPrefab. Drag the corresponding Text and InputField objects into their respective fields on the component (Dependencies).
- Create the UIFactory script: Instantiate UI panel
Create a new C# script named UIFactory
Reference Promot:
- Please generate a Unity C# Script named UIFactory that follows the factory pattern to instantiate UI dialog boxes.
- Given a UI prefab, a position, and a rotation, instantiate the prefab at the given transform and return its InputDialog component.
This component acts as an intermediary to decouple UI creation logic from game event handling.
- Associated Component Dependencies
Double-check whether all component dependencies are properly assigned.
- The PlayerArmature object in the scene should have the Tag set to "Player".
In GameManager object, assign:
- The Transponder field with the Trigger object's Transponder script.
- The UIFactory field with thw
UIFactorycomponent on GameLogicManager object.
Testing: Click Play in Unity.
- Approach the object with the trigger - the input panel should appear.
- When you walk away, the panel should automatically disappear.
Note: Our source file has a fixed position for where the panel is generated. Modify this value according to the Transform properties of the Trigger you selected. Alternatively, you can set the Canvas > RenderMode of the UI prefab to ScreenSpace - Overlay, so that the UI will be rendered in screen space data and will not enter world space.
Submit the prompt to TripoAPI
At this stage, we are not yet able to submit prompts to the Tripo server in real-time. However, the necessary code for prompt submission, network requests, model generation, skeleton rigging, mapping, adapter, and animation retargeting is ready in place. These scripts will be fully integrated into the Tripo for Unity plugin in future updates. (Note: Please make sure a UIEvent system exists in your scene before proceeding; otherwise, the UI will not respond!)
- Import Tripo Plugin Script
In the Unity Project panel (usually on the left,), locate the source files TripoClient.cs, TripoAPI.cs, and RuntimeHumanoidAvatarBuilder.cs from you download folder.
- Drag them into the Assets/Scripts folder.
Here's what each script does:
TripoClient.cs and TripoAPI.csprompt submission and network communication with the Tripo server. RuntimeHumanoidAvatarBuilder.csthe model's skeleton to Unity's humanoid rig using the GLTFast plugin.
TripoClient.cs and TripoAPI.cs represent lite versions of the Tripo For Unity plugin but with rigging functionality. We will continue to update and streamline this process in future releases.
- Create Tripo Client compoent
- Create an empty compoents in child under GameLogicManager and name it TripoClient.
- Drag
TripoClient.csandTripoAPI.csonto this new object to attach the scripts. - In the Inspector, locate the API Key field in TripoClient component. Paste your Tripo API key (you can register an account on the official Tripo website and receive 600 free points monthly).
- Prompt Input & Callback Logic
Since we have upgraded the player input system, we need to update the prompt transmission logic in GameManager. By default, the GameManager script should already be listening to OnPlayerEnter and OnPlayerExit events. If you are working with AI-generated code or chaining logic across multiple components, It's helpful to paste previously generated code as context.
The script that we provided has already defined the callback function when GameManager issues an instance call to UIFactory. Definitely, there are other solutions, but in this case, the prompt that can be use to complete this part of the logic can be seen as the following.
Updated Behavior: In GameManager script
- When OnPlayerEnter is triggered , the
UIFactoryinstantiate an input dialog (InputDialog prefab). - When OnPlayerExit is triggered, the input dialog is destroyed.
Once the player finishes entering a prompt, it will passed to the TripoClient script with , with a call example of tripoClient.TextToModel(prompt, pos);. Modify the associated scripts.
Modify GameManager.cs:
- Open GameManager.cs. script
- Find the OnPromptConfirmed method (this handles prompt input confirmation)
- Complete the internal code, and make sure the tripoClient field is correctly assigned in the GameManager component.
- Create a Model Container
- In the scene hierarchy, create an empty compoments in children and name it ModelContainer
- Use it as the parent node for all dynamically generated models.
Test your Setup
- Hit the Play byutton in Uinty.
- Enter a prompt in the panel.
- You should see the prompt successfully uploaded to the Tripo server.
- The generation progress will appear in the Unity Console and also the "Input/Progress" field of the Tripo API Component.
Now you are ready to generate your own AI model in Unity. Enjoy building!
Animation Retargeting
Once the model has been generated, the next step is to map existing animation resources to your model's skeleton. Ensure the RuntimeHumanoidAvatarBuilder script has been added to your project. This script handles the mapping from the humanoid GLB skeleton to Unity's Avatar, and the TripoClient script will automatically mount it to the generated model.
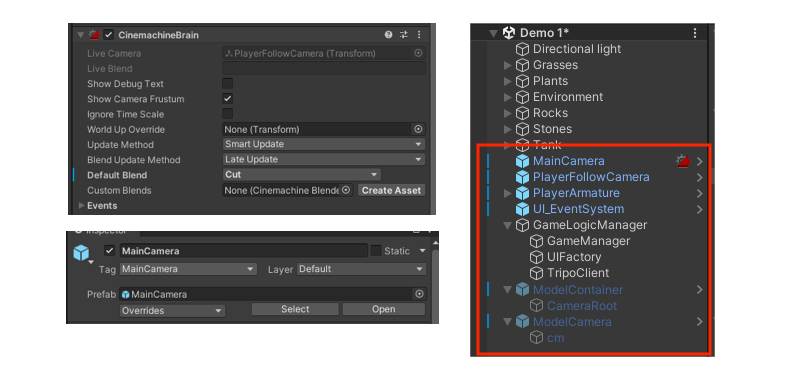
Let's first organize the structure and dependencies of the project. Before the game stares, except for environmental objects, the custom GameObjects should be in the following state. Expand each script component and ensure all fields are correctly assigned. If you encounter any issues, compare them with the source files to check for incorrect component assignment.
Otherwise, in our demo, the model is a combat mech, so its Transform > Scale property is enlarged tenfold. This also applies to its Controller-related properties.
- Add model control component
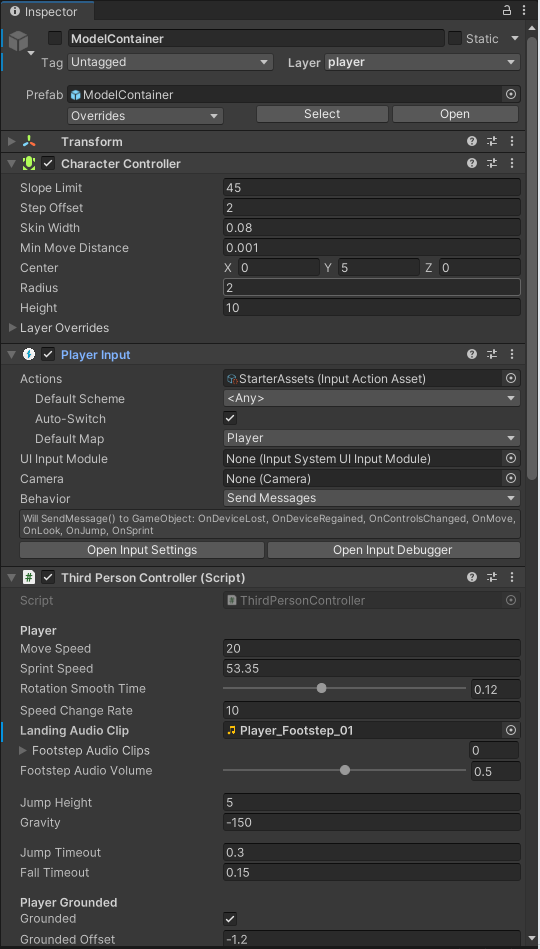
Select the ModelContainer compoment and sequentially add the following components (all provided by the Starter Assets package):
- Character Controller
- Player Input
- Third Person Controller
In the Third Person Controller component, set the Camera field to the MainCamera in the scene.
- Set the Camera for Model Movement
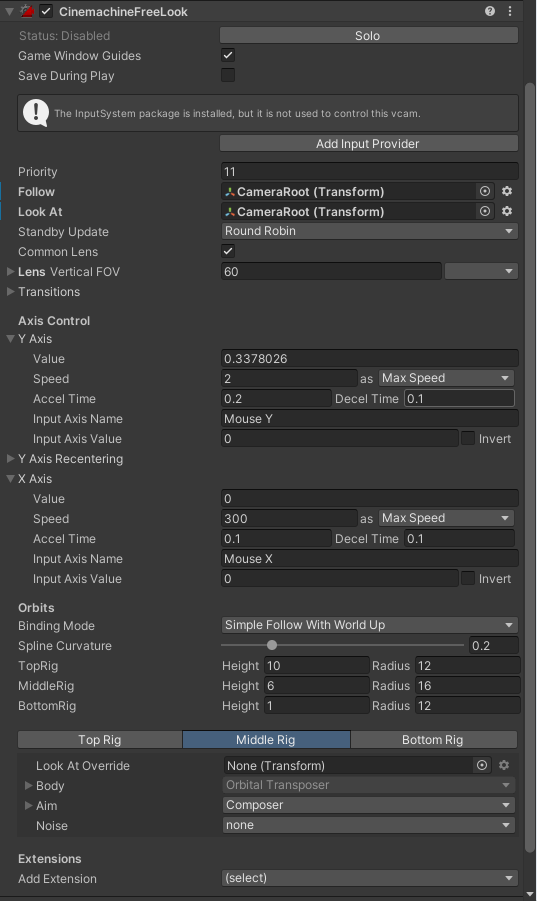
Create an empty compoents in children, name it ModelCamera, and add a CinemachineFreeLook component to it (you need to import the Cinemachine plugin, which is included in the Starter Assets package).
Then create a compoents in children under ModelContainer, name it CameraRoot, and adjust its Y-coordinate to 5 (waist height of the model). Assign both the Follow and LookAt fields of ModelCamera to CameraRoot. Now the camera will follow the model's movement.
- Enable Character Movement:
At this point, the transformer should play its idle animation but cannot be controlled yet.
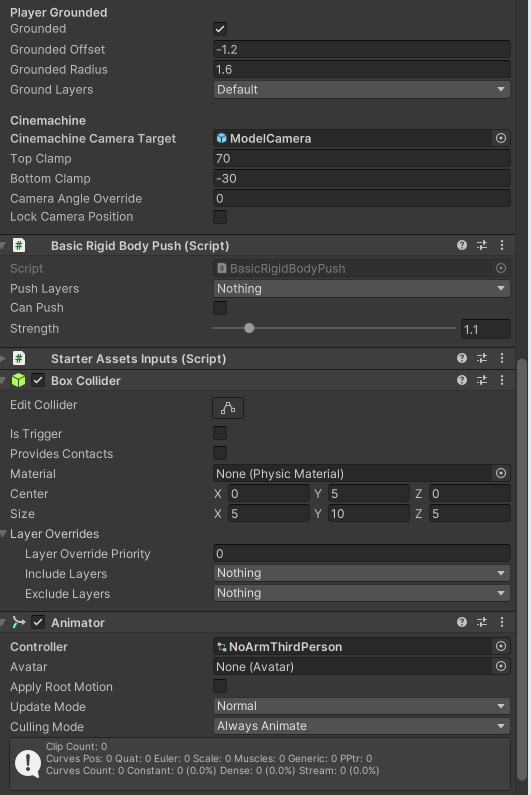
Those components: CharacterController, PlayerInput, ThirdPersonController, BasicRigidBody, and StarterAssetsInputs, are provided by Unity's StarterAssets and handle player input. The Animator component controls the animation, and the Avatar generated by the RuntimeHumanoidAvatarBuilder will be automatically also assigned to the Animator's Avatar field.
To Test:
- Disable the PlayerArmature component and its camera.
- Drag a Tripo-generated GLB model(with rigging) into the scene as a compoment in children of ModelContainer.
- Add the RuntimeHumanoidAvatarBuilder component to the new model.
Now during runtime, the transformer can be controlled. Then the final step is to implement logic for control switching.
- Implement Control Switching
Update the following logic in the Update function of your GameLogic script:
- isLoad indicates whether the model has been generated. If false, skip the process.
- isInModel indicates whether the player is currently controlling the transformer or the player.
When entering the transfomer:
- Disable the player and the player's camera.
- Cinemachine plugin will automatically switch the camera view to our newly created ModelCamera.
- Resetting the ModelContainer to make movement logic effective on the transformer.
When exiting the transformer:
- Keeo the transformer in place.
- Show the player character at the transformer's current position.
- At the same time, switch control and camera back to the player.
Once the above logic is complete, pressing the F key allows the player to enter and control the transformer. Pressing the F key again switches control back to the player, while the transfomer remain in place, but the player reappears excatlly at the transfomer's location.
Final Touches
At this point, the demo is functionally complete. If you want to polish the experience, you can:
- Show a UI Prompt (e..g., "Press F to control the model") when the player approaches the transfomer
- Support selecting one of multiple transformers when several are generated.
Congratulations!
Thank you for your hard work! You have now completed the entire demo. You can freely generate and control the transfomer models using your own ideas and assets.
Need Help?
If you encounter any difficulties or have feedback for TripoGame, please feel free to contact us at our official email! tripogame@vastai3d.com. We'd love to hear from you!
Tips:
- This tutorial is designed to demonstrate how the Tripo API can be used in real-time gameplay. The game design itself is for reference only. Hoping to proactively address potential issues that developers may encounter.
- Currently, the demo only supports generating humanoid models due to rigging requirements. If animation appears abnormally due to the unstable AL-generated skeleton weights, use the Avatar Mask to block problematic body parts animation. For example, the source file already disables hand animation in the NoArmPerson Controller.
- For faster generation, you can use the TripoV2/TripoV1Turbo. Simply replace the model_version number "v2.5-20250123" in the TripoAPI script with
- v2.0-20240919
- Turbo-v1.0-20250506 .
- FBX and GLB models have different orientations, which may lead to dependency issues when importing. If you need to import FBX, use plugins such asTriLib to load the model and handle adaptations accordingly.
